photography - tutorial
TRANSCRIPT
[PANDUAN ASAS FOTOGRAFI] TUTORIAL
T U T O R I A L S B A S I C P H O T O G R A P H Y Page 1
Tahniah kerana anda berminat dan telah pun memiliki ebook inisecara percuma.
Saya menghasilkan kompilasi tutorial Ebook ini bertujuan
untuk berkongsi dengan anda atau sesiapa sahaja yangmeminati dunia fotografi, Dan saya yakin bahawa anda juga
seperti saya yang bermula menyelongkar dunia fotografi inidengan ilmu yang cetek dan asas.
Tutorial yang saya kumpulkan di sini adalah hasil penulisan
fotografer freelance potrait & event (singapura & manila).Saya mengikuti tutorial yang dihasilkan oleh beliau sejak
saya memulakan hobi dalam fotografi dan sehinggalah
melibatkan diri sebagai seorang fotografer perkahwinan.
Kompilasi ini memudahkan anda mengenal secara asas tentangkamera digital slr dan dunia fotografi.
Anda boleh dapatkan ebook dalam bahasa Malaysia yang
dijual di internet, tetapi anda perlu mengeluarkanperbelanjaan untuk mendapatkannya.
Perhatian, tidak dibenarkan sama sekali ebook ini diniagakan.
Wan ahmad azarimy
Ilham Persona Photographywww.ilhampersona.com

[PANDUAN ASAS FOTOGRAFI] TUTORIAL
T U T O R I A L S B A S I C P H O T O G R A P H Y Page 2
Lesson 1 - PAGE 3PHOTOGRAPHY EXPOSURE EXPLAINED
Lesson 2 - PAGE 21ANALYZING EXPOSURE WITH HISTOGRAM
Lesson 3 - PAGE 35EXPOSURE METERING (WHAT OUR CAMERASEES)
Lesson 4 - PAGE 45EXPOSURE COMPOSITION(PART ONE)
Lesson 5 - PAGE 52EXPOSURE COMPOSITION (PART TWO)
Lesson 6 - PAGE 57COMMON EXPOSURE PROBLEMS ANDSOLUTIONS
Lesson 7 - PAGE 66WHITE BALANCE AND COLOR CAST
Lesson 8 PAGE 76CHOSING A DIGITAL SLR CAMERA(PART I)
Lesson 9 - PAGE 80CHOSING A DIGITAL SLR CAMERA- RESOLUTION -(PART II)
Lesson 10 - PAGE 84SITUATIONAL ACCESSORIES
Lesson 11 - PAGE 89BASIC ESSENTIAL CAMERA ACCESSORIES
Lesson 12 - PAGE 96CHOSING A DIGITAL SLR CAMERA - AUTOFOCUS - (PART III)
Lesson 13 - PAGE 105CHOSING A DIGITAL SLR CAMERA- SENSOR SIZE -(PART IV)
Lesson 14 - PAGE 112CHOSING A DIGITAL SLR CAMERA(SUMMARY)
Lesson 15 - PAGE 115UTILIZING EXPOSURE CONTROL
Lesson 16 - PAGE 132UNDERSTANDING CAMERA LENSES(PART I)
Lesson 17 - PAGE 141UNDERSTANDING CAMERA LENSES- IMAGE CHARACTERISTICS -(PART II)
Lesson 18 - PAGE 159BASICS OF LIGHTING
Lesson 19 - PAGE 172BASIC DIGITAL DARKROOM WORKFLOW
Lesson 20 - PAGE 177DIGITAL WORKFLOW IMAGE ACQUISITION
Lesson 21 - PAGE 180DIGITAL WORKFLOW
(BASIC GLOBAL ADJUSMENTS)
Lesson 22 - PAGE 196CLASSIC LIGHTING STYLES
Lesson 23 - PAGE 207BASIC POTRAIT LIGHTING
Lesson 24 - PAGE 213BASICS OF COMPOSITION
Lesson 25 - PAGE 228HOW TO TAKE BETTER PICTURE
[PANDUAN ASAS FOTOGRAFI] TUTORIAL
T U T O R I A L S B A S I C P H O T O G R A P H Y Page 3
Lesson 1
PHOTOGRAPHY EXPOSUREEXPLAINED
What is Photography?
Photography is derived from the Greek term of phos graphis or “painting with light”. From thesimplest pocket camera to the most modern digital SLR cameras in the market today, all camerasfunction as an image capturing device by harnessing different spectrum of light to create animage.
While different people have different reasons for starting photography, photographyfundamentals remain constant and apply to all subject matter and intentions.
The challenge of photography lies in trying to attempt to reproduce reality on a static, two-dimensional surface from an active, three-dimensional world. To be able to convey emotions,relive memories, and stimulate imagination on screen or a piece of paper is an art by itself.
Armed with the knowledge of photography fundamentals will allow anyone to have a betterchance of translating their vision into a photographic reality the way it was intended by the artist.
Content of this tutorial:
How is an image captured? Shutter speed Aperture size Depth of Field ISO sensitivity ISO Noise So what settings should I use?
How is an image captured?
In the most basic form, a camera functions like our eye. Light enters our eye and the eye rendersan image through our optic nerves that transmits the different color information for our brain todecode and registers as an image.
[PANDUAN ASAS FOTOGRAFI] TUTORIAL
T U T O R I A L S B A S I C P H O T O G R A P H Y Page 4
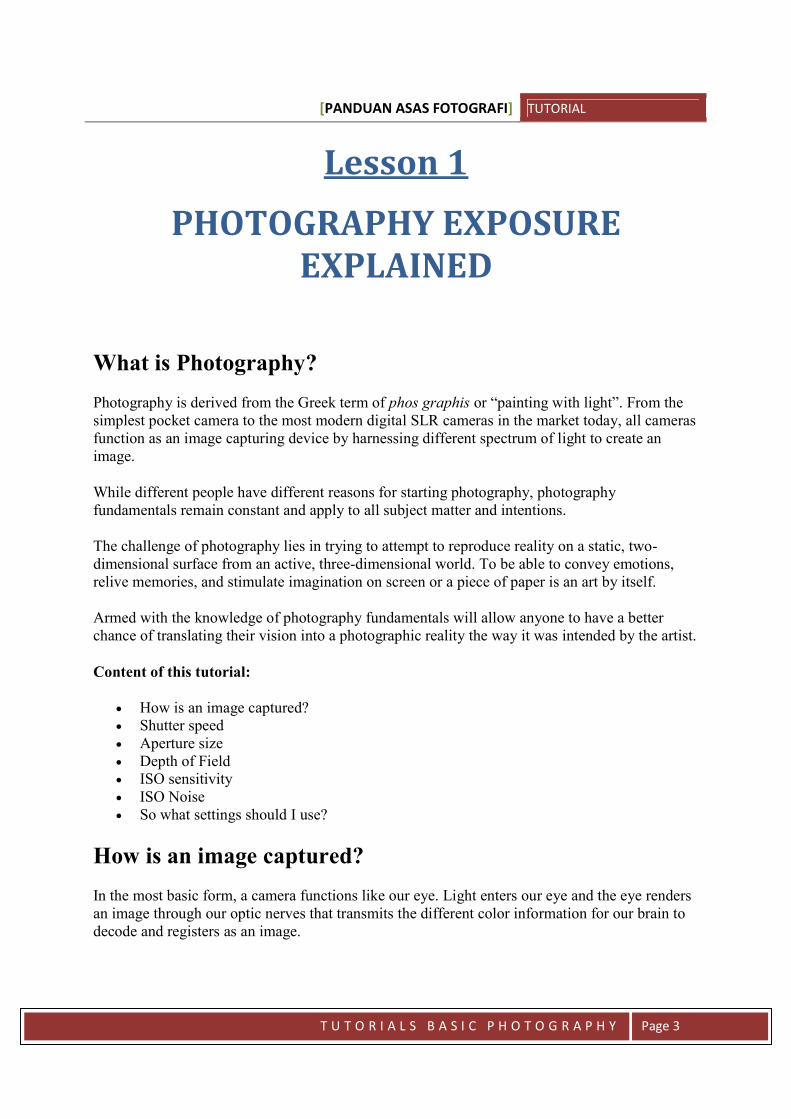
In a digital SLR, the basic image capture follows the following sequence. Light enters throughthe lens which controls the amount of light through the aperture blades, then the light hits theshutter, then the subsequent light is recorded by the camera’s sensor (refer to Fig. 1).
Fig 1: Basic Digital Image Capture Sequence
Different types of cameras may have various lens, sensor, and processor variances, but they allfunction on the same basic premise.
In most cases, the end user has little control over how the camera processes and develops theimage within the camera, but the photographer can control how the light is being harnessedbefore the image is registered in the camera.
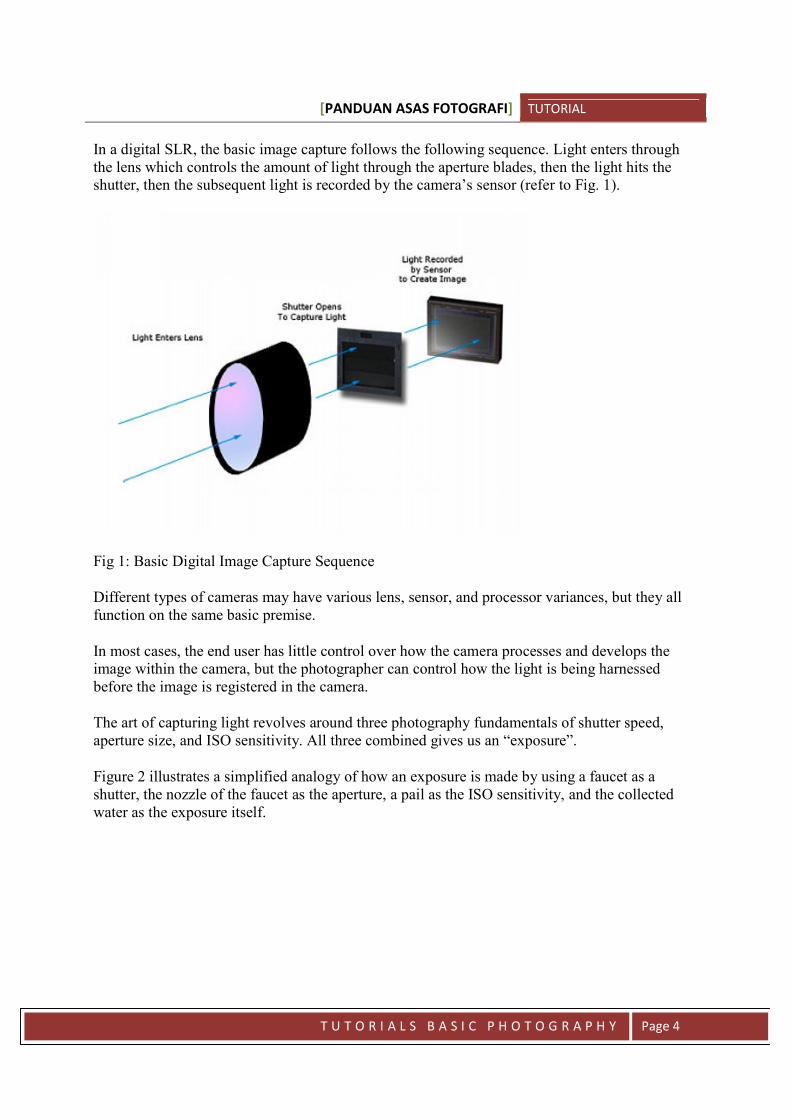
The art of capturing light revolves around three photography fundamentals of shutter speed,aperture size, and ISO sensitivity. All three combined gives us an “exposure”.
Figure 2 illustrates a simplified analogy of how an exposure is made by using a faucet as ashutter, the nozzle of the faucet as the aperture, a pail as the ISO sensitivity, and the collectedwater as the exposure itself.
[PANDUAN ASAS FOTOGRAFI] TUTORIAL
T U T O R I A L S B A S I C P H O T O G R A P H Y Page 5
Fig 2: Bucket analogy
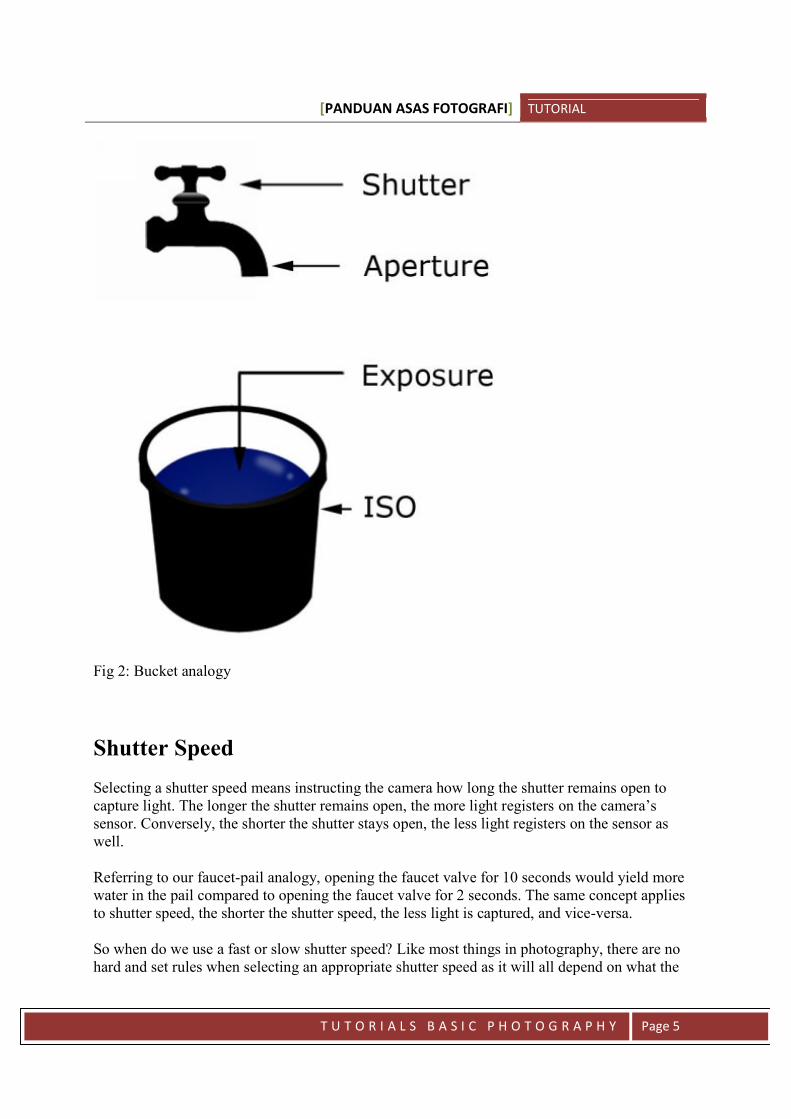
Shutter Speed
Selecting a shutter speed means instructing the camera how long the shutter remains open tocapture light. The longer the shutter remains open, the more light registers on the camera’ssensor. Conversely, the shorter the shutter stays open, the less light registers on the sensor aswell.
Referring to our faucet-pail analogy, opening the faucet valve for 10 seconds would yield morewater in the pail compared to opening the faucet valve for 2 seconds. The same concept appliesto shutter speed, the shorter the shutter speed, the less light is captured, and vice-versa.
So when do we use a fast or slow shutter speed? Like most things in photography, there are nohard and set rules when selecting an appropriate shutter speed as it will all depend on what the
[PANDUAN ASAS FOTOGRAFI] TUTORIAL
T U T O R I A L S B A S I C P H O T O G R A P H Y Page 6
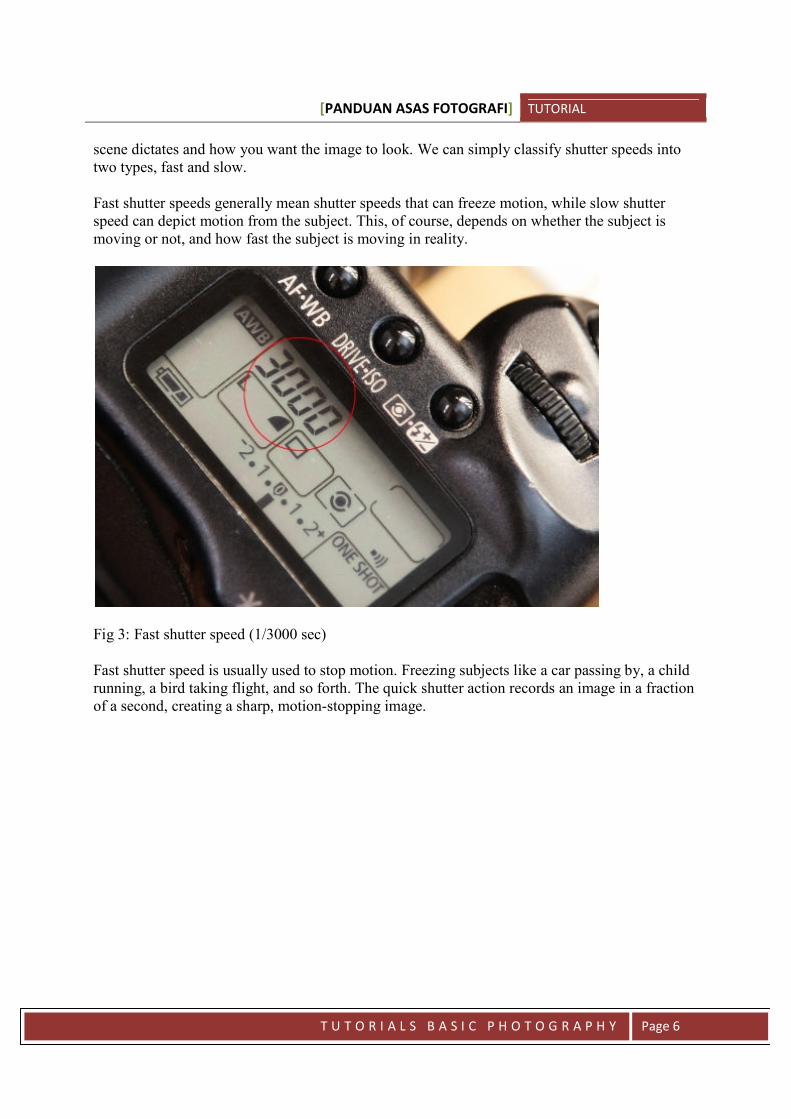
scene dictates and how you want the image to look. We can simply classify shutter speeds intotwo types, fast and slow.
Fast shutter speeds generally mean shutter speeds that can freeze motion, while slow shutterspeed can depict motion from the subject. This, of course, depends on whether the subject ismoving or not, and how fast the subject is moving in reality.
Fig 3: Fast shutter speed (1/3000 sec)
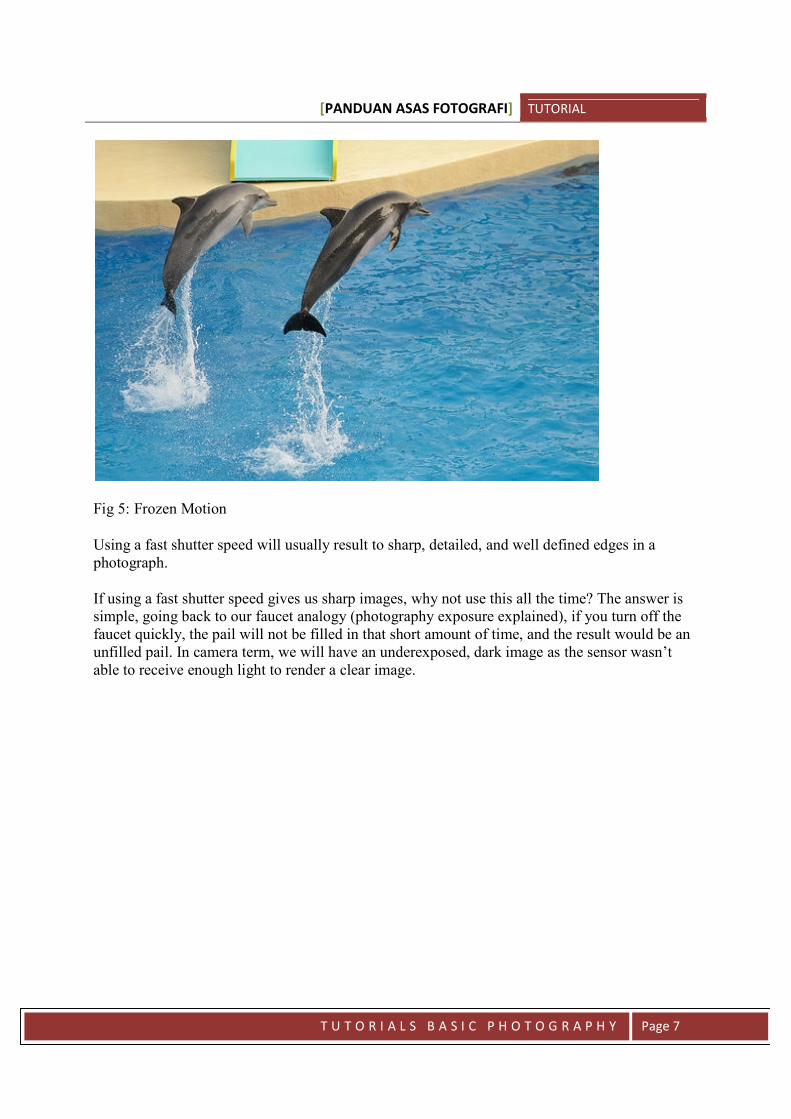
Fast shutter speed is usually used to stop motion. Freezing subjects like a car passing by, a childrunning, a bird taking flight, and so forth. The quick shutter action records an image in a fractionof a second, creating a sharp, motion-stopping image.
[PANDUAN ASAS FOTOGRAFI] TUTORIAL
T U T O R I A L S B A S I C P H O T O G R A P H Y Page 7
Fig 5: Frozen Motion
Using a fast shutter speed will usually result to sharp, detailed, and well defined edges in aphotograph.
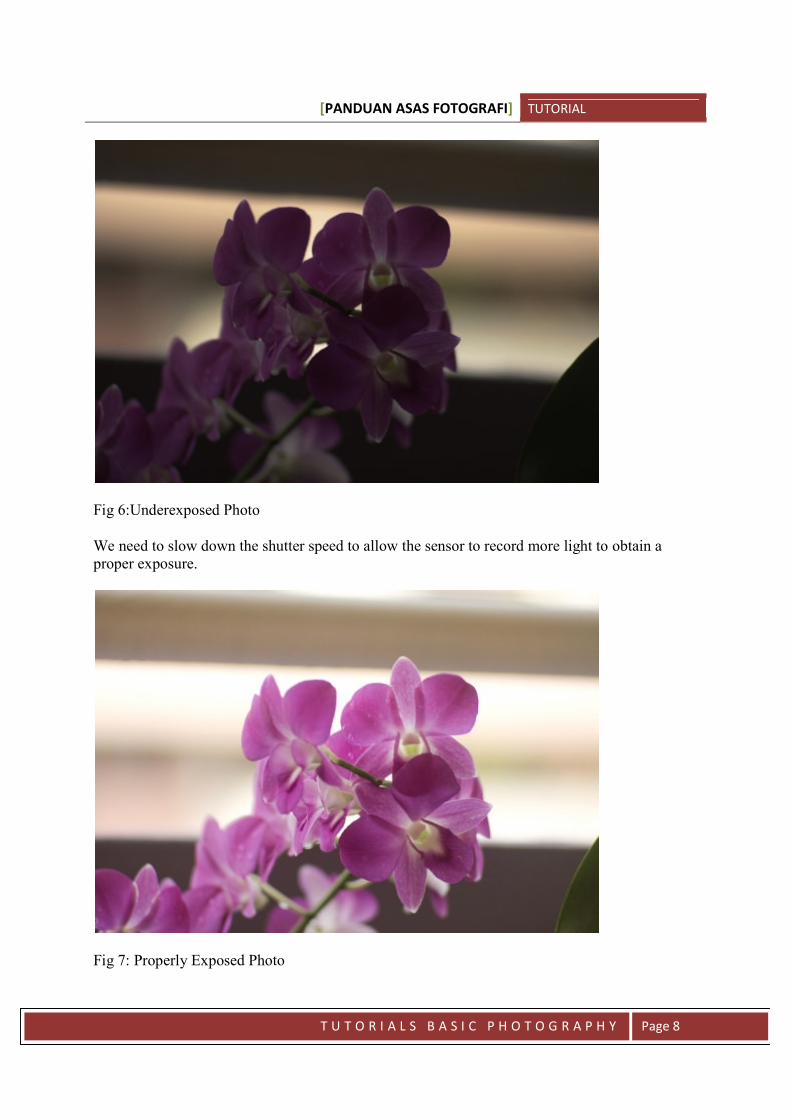
If using a fast shutter speed gives us sharp images, why not use this all the time? The answer issimple, going back to our faucet analogy (photography exposure explained), if you turn off thefaucet quickly, the pail will not be filled in that short amount of time, and the result would be anunfilled pail. In camera term, we will have an underexposed, dark image as the sensor wasn’table to receive enough light to render a clear image.
[PANDUAN ASAS FOTOGRAFI] TUTORIAL
T U T O R I A L S B A S I C P H O T O G R A P H Y Page 8
Fig 6:Underexposed Photo
We need to slow down the shutter speed to allow the sensor to record more light to obtain aproper exposure.
Fig 7: Properly Exposed Photo
[PANDUAN ASAS FOTOGRAFI] TUTORIAL
T U T O R I A L S B A S I C P H O T O G R A P H Y Page 9
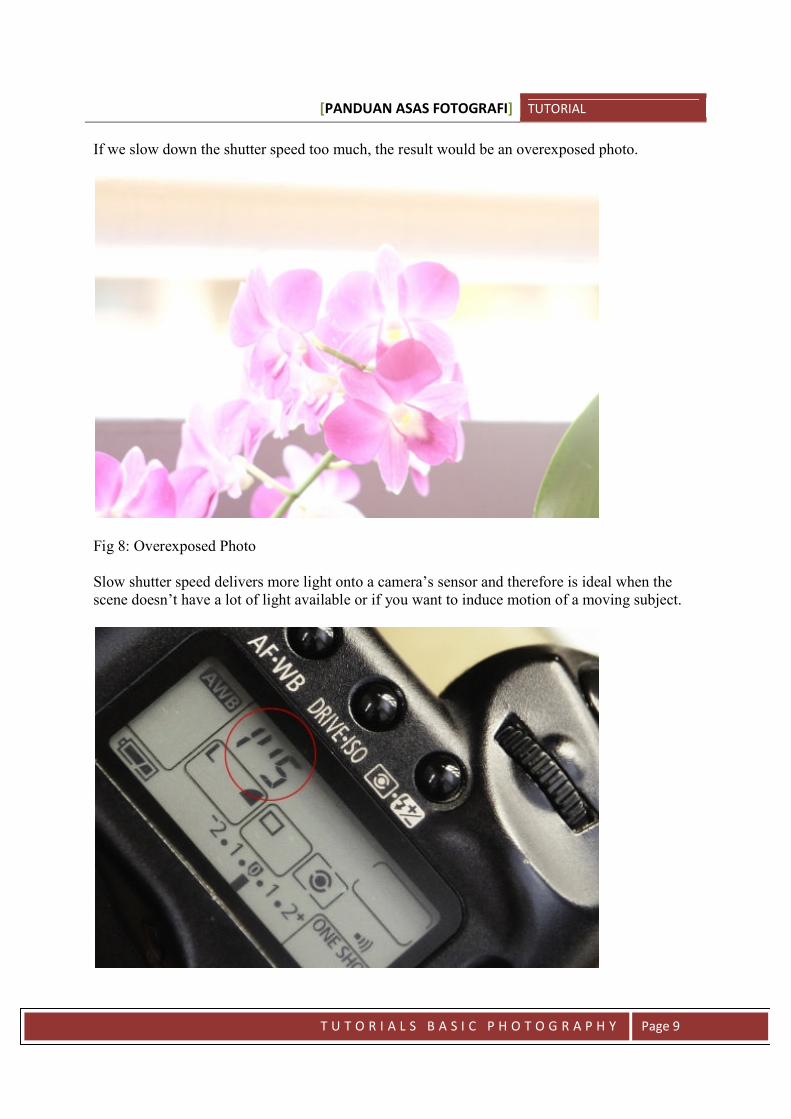
If we slow down the shutter speed too much, the result would be an overexposed photo.
Fig 8: Overexposed Photo
Slow shutter speed delivers more light onto a camera’s sensor and therefore is ideal when thescene doesn’t have a lot of light available or if you want to induce motion of a moving subject.
[PANDUAN ASAS FOTOGRAFI] TUTORIAL
T U T O R I A L S B A S I C P H O T O G R A P H Y Page 10
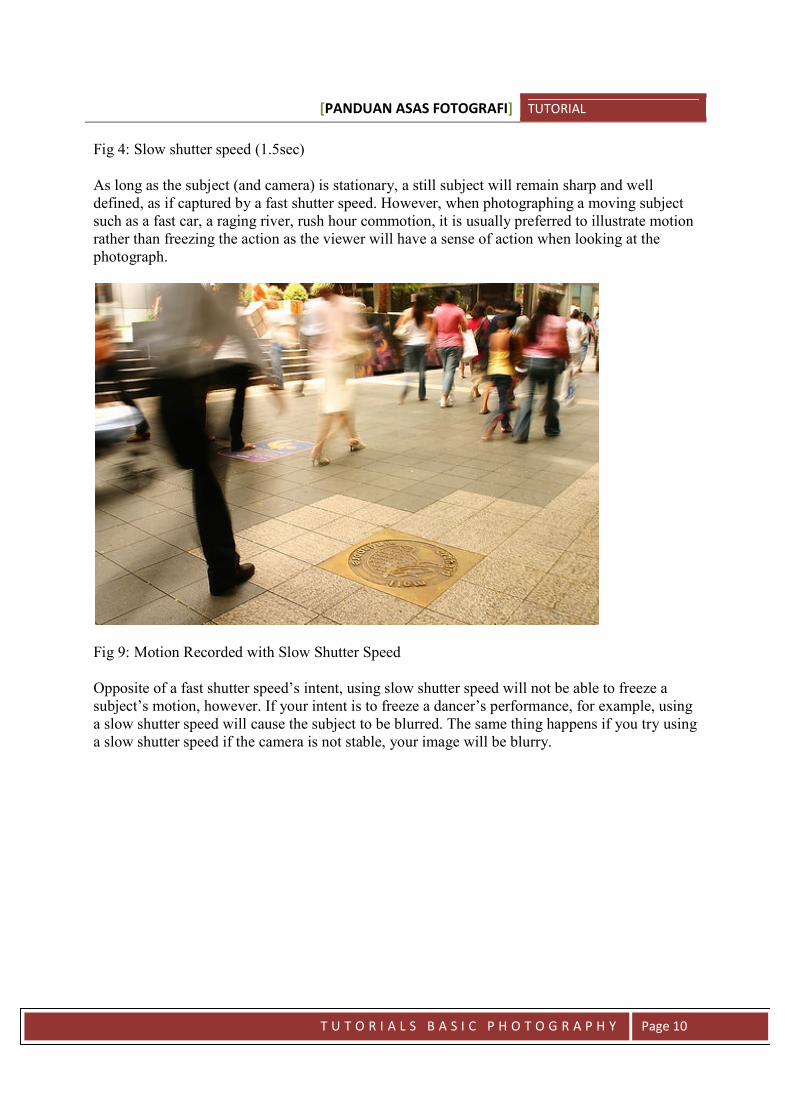
Fig 4: Slow shutter speed (1.5sec)
As long as the subject (and camera) is stationary, a still subject will remain sharp and welldefined, as if captured by a fast shutter speed. However, when photographing a moving subjectsuch as a fast car, a raging river, rush hour commotion, it is usually preferred to illustrate motionrather than freezing the action as the viewer will have a sense of action when looking at thephotograph.
Fig 9: Motion Recorded with Slow Shutter Speed
Opposite of a fast shutter speed’s intent, using slow shutter speed will not be able to freeze asubject’s motion, however. If your intent is to freeze a dancer’s performance, for example, usinga slow shutter speed will cause the subject to be blurred. The same thing happens if you try usinga slow shutter speed if the camera is not stable, your image will be blurry.

[PANDUAN ASAS FOTOGRAFI] TUTORIAL
T U T O R I A L S B A S I C P H O T O G R A P H Y Page 11
Fig 10: Image Blur Due to Camera Shake
To summarize, a fast shutter speed freezes motion while a slow shutter speed allows motion tobe recorded as a blur.
In order to find out how fast or slow our shutter speed has to be, we have to understand howaperture works as well.
Aperture size
The aperture size dictates how large the opening of the lens’ aperture blades can open to inrelation to the focal length of the lens. The larger the aperture opening, the more light passesthrough the lens, and the smaller the aperture size, the less light passes through the lens.

[PANDUAN ASAS FOTOGRAFI] TUTORIAL
T U T O R I A L S B A S I C P H O T O G R A P H Y Page 12
Fig 11: Aperture Set at F/11
Fig 12: Aperture Blades "Stopped Down" to a Small Diameter
[PANDUAN ASAS FOTOGRAFI] TUTORIAL
T U T O R I A L S B A S I C P H O T O G R A P H Y Page 13
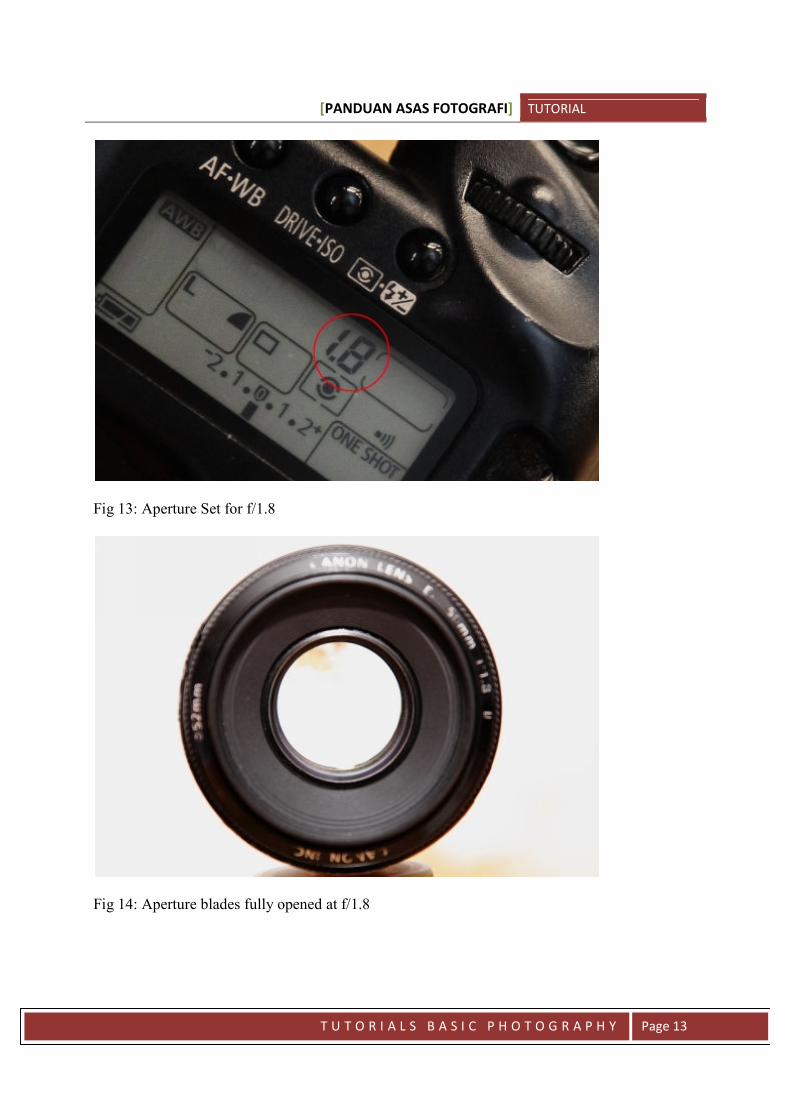
Fig 13: Aperture Set for f/1.8
Fig 14: Aperture blades fully opened at f/1.8
[PANDUAN ASAS FOTOGRAFI] TUTORIAL
T U T O R I A L S B A S I C P H O T O G R A P H Y Page 14
Returning to our faucet analogy, we’ve determined that the shutter speed is the amount of timethe faucet valve is left open. We can alter the flow of water by introducing the aperture size intothe equation. The aperture is represented by the diameter of the faucet nozzle.
If the faucet’s spout diameter is enlarged, more water will flow through the faucet and the pailwill be filled up at a faster rate. Conversely, the smaller the diameter of the faucet’s spout thelonger it takes for the pail to be filled with water. That’s exactly how aperture settings work, ifthe shutter speed is constant, altering the aperture size will increase or decrease the amount oflight for the exposure.
Depth of Field
In addition to controlling the amount of light, changing the aperture also alters the depth of fieldof an image. To put it simply, depth of field (DOF) means the area of acceptable sharpness.Within an image there are areas of the image that are sharp and areas that fall out of focus,adjusting the DOF will allow you to choose how much (or how little) areas to be kept in focus inyour image.
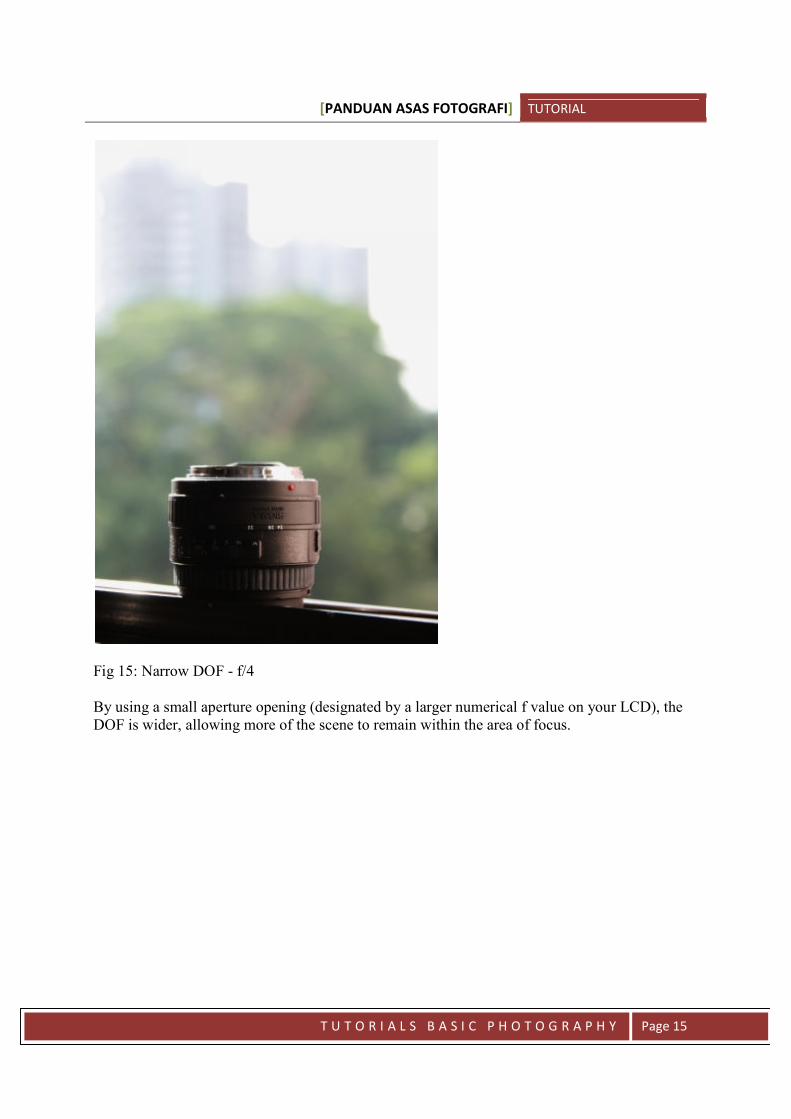
By using a large aperture opening (usually designated by a low f/ number on your LCD), theDOF is narrower. This is also called selective focus as only partial areas of your image will be infocus. Any areas in front and behind the DOF will not be sharp and will be blurry.
[PANDUAN ASAS FOTOGRAFI] TUTORIAL
T U T O R I A L S B A S I C P H O T O G R A P H Y Page 15
Fig 15: Narrow DOF - f/4
By using a small aperture opening (designated by a larger numerical f value on your LCD), theDOF is wider, allowing more of the scene to remain within the area of focus.
[PANDUAN ASAS FOTOGRAFI] TUTORIAL
T U T O R I A L S B A S I C P H O T O G R A P H Y Page 16
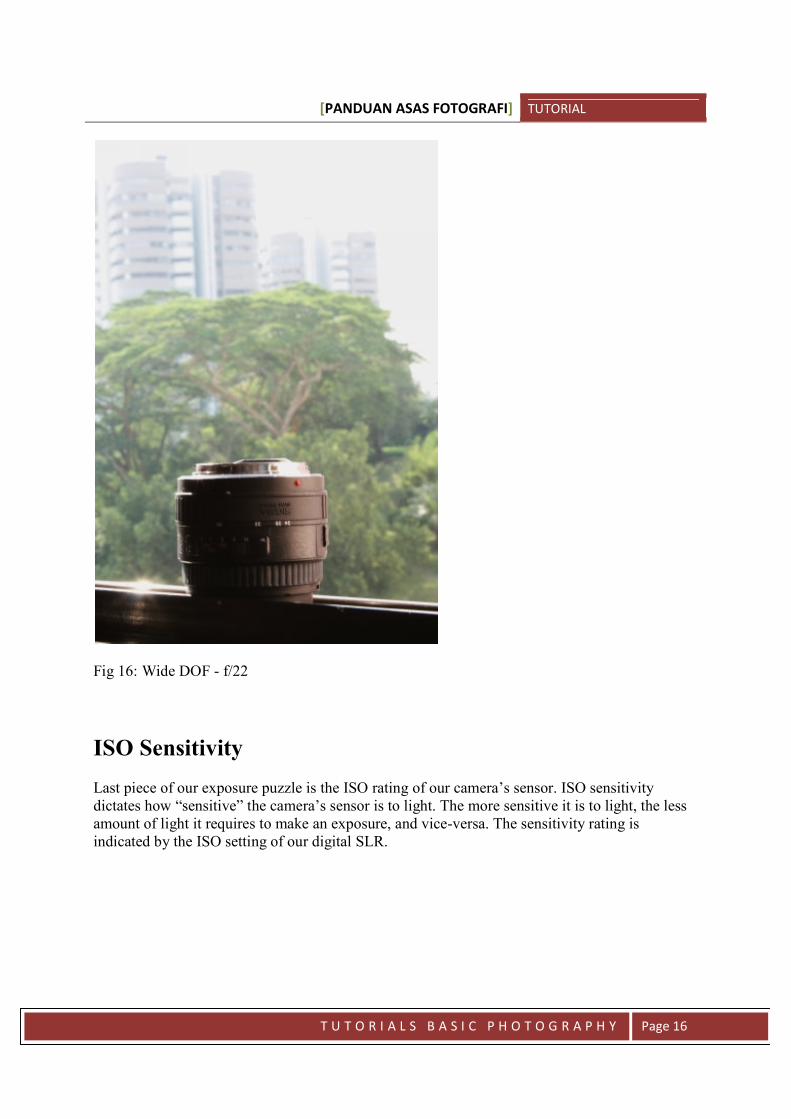
Fig 16: Wide DOF - f/22
ISO Sensitivity
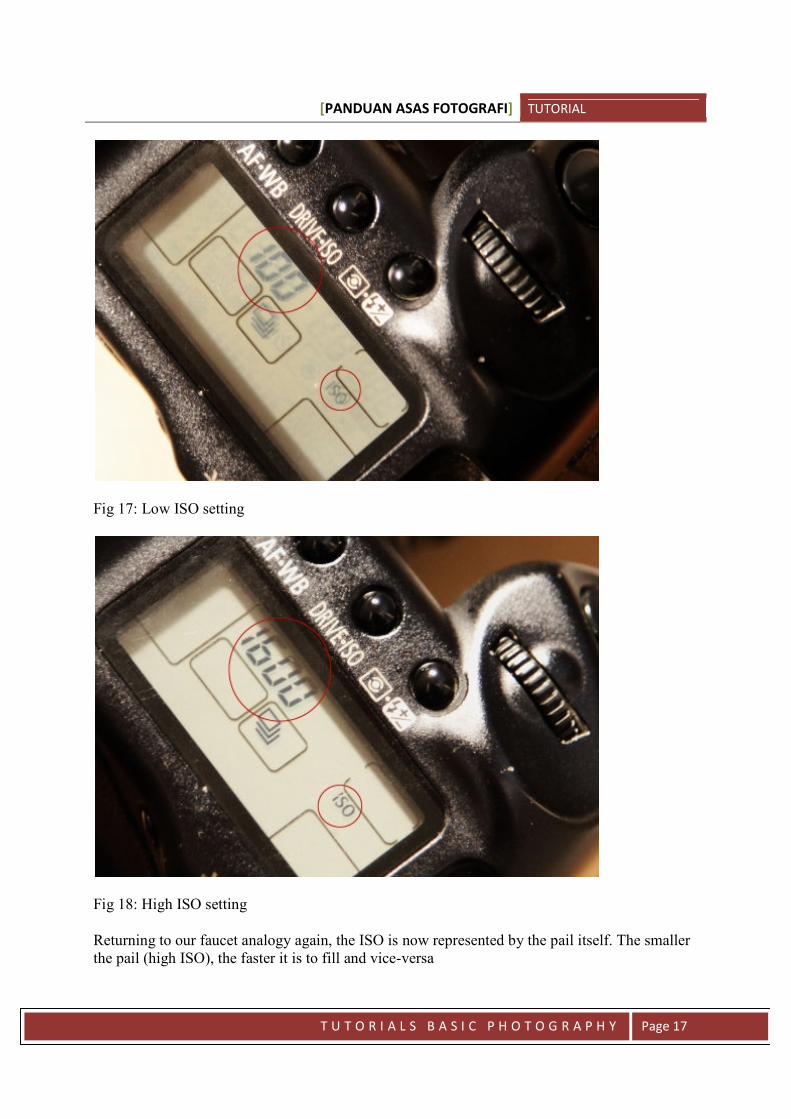
Last piece of our exposure puzzle is the ISO rating of our camera’s sensor. ISO sensitivitydictates how “sensitive” the camera’s sensor is to light. The more sensitive it is to light, the lessamount of light it requires to make an exposure, and vice-versa. The sensitivity rating isindicated by the ISO setting of our digital SLR.
[PANDUAN ASAS FOTOGRAFI] TUTORIAL
T U T O R I A L S B A S I C P H O T O G R A P H Y Page 17
Fig 17: Low ISO setting
Fig 18: High ISO setting
Returning to our faucet analogy again, the ISO is now represented by the pail itself. The smallerthe pail (high ISO), the faster it is to fill and vice-versa
[PANDUAN ASAS FOTOGRAFI] TUTORIAL
T U T O R I A L S B A S I C P H O T O G R A P H Y Page 18
If our shutter speed (faucet valve’s opening) and our aperture (diameter of the faucet) areconstant, the size of the pail will alter our final outcome.
Let’s say we have a 5 gallon pail that takes 5 seconds to fill up, without altering the shutter speedand aperture values (valve opening and faucet size) increasing our ISO (smaller pail size) willnow require less than 5 seconds to fill up. On the other hand, decreasing our ISO (larger pailsize) will now require more than 5 seconds to fill-up.
It would seem that using higher ISO would be more ideal as it would entail shorter exposuretimes to create an image. Increasing ISO sensitivity, however, has a drawback, as the sensitivityincreases, so will digital noise and image quality deterioration.
ISO Noise
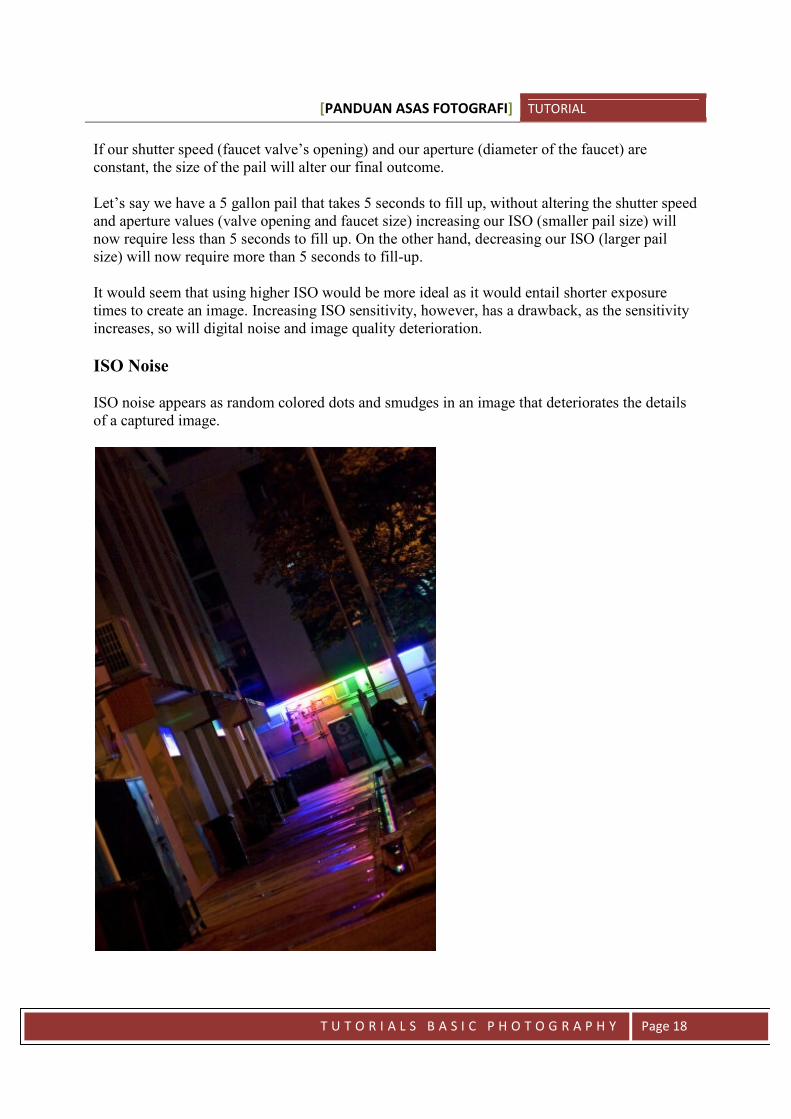
ISO noise appears as random colored dots and smudges in an image that deteriorates the detailsof a captured image.
[PANDUAN ASAS FOTOGRAFI] TUTORIAL
T U T O R I A L S B A S I C P H O T O G R A P H Y Page 19
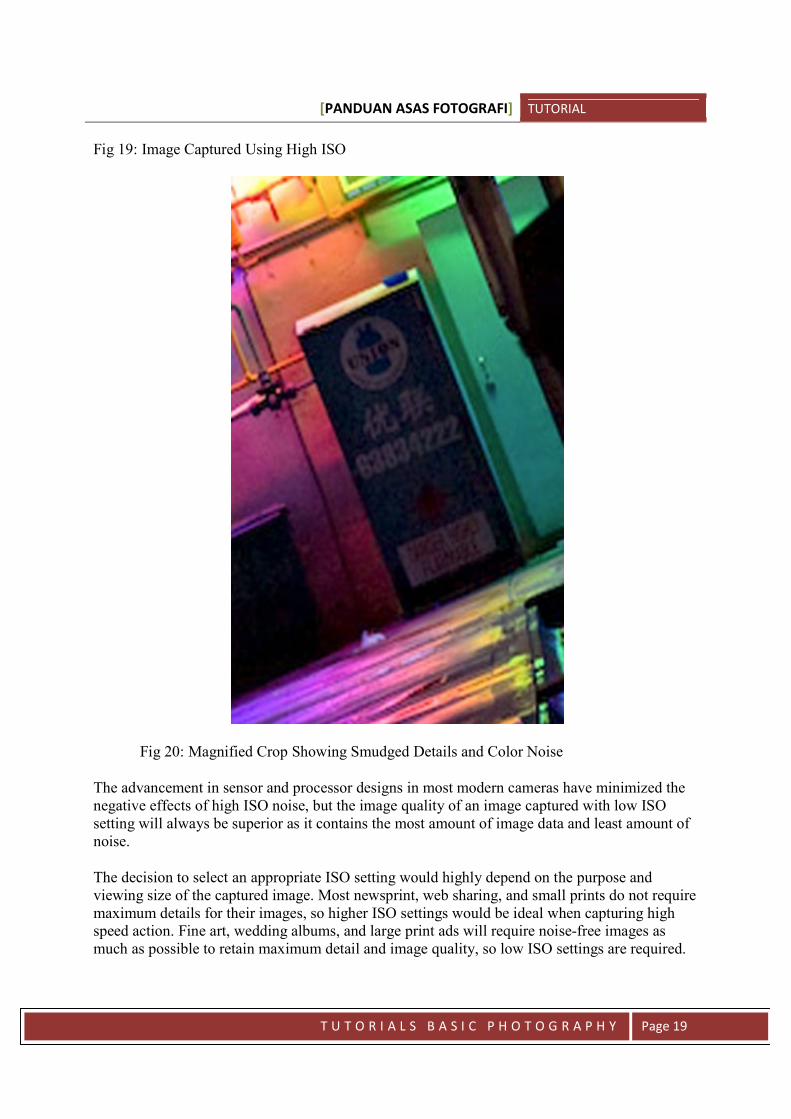
Fig 19: Image Captured Using High ISO
Fig 20: Magnified Crop Showing Smudged Details and Color Noise
The advancement in sensor and processor designs in most modern cameras have minimized thenegative effects of high ISO noise, but the image quality of an image captured with low ISOsetting will always be superior as it contains the most amount of image data and least amount ofnoise.
The decision to select an appropriate ISO setting would highly depend on the purpose andviewing size of the captured image. Most newsprint, web sharing, and small prints do not requiremaximum details for their images, so higher ISO settings would be ideal when capturing highspeed action. Fine art, wedding albums, and large print ads will require noise-free images asmuch as possible to retain maximum detail and image quality, so low ISO settings are required.
[PANDUAN ASAS FOTOGRAFI] TUTORIAL
T U T O R I A L S B A S I C P H O T O G R A P H Y Page 20
So What Settings Should I Use?
As a photographer, experience will allow you to maximize the combination of these threesettings (shutter speed, aperture size, and ISO) based on your desired and required output.
To better understand how each setting affects and image, it would be best to practice as much asyou can with repeatable subjects such as items and scenes you can find in your home orneighborhood.
Understanding how shutter speed, aperture size, and ISO change the final image with the samesubject will undoubtedly fast-track your understanding to proper exposure.
We will learn how different combination of shutter speed, aperture size, and ISO settings affect aphotograph in our next article. Stay tuned!
[PANDUAN ASAS FOTOGRAFI] TUTORIAL
T U T O R I A L S B A S I C P H O T O G R A P H Y Page 21
Lesson 2
ANALYZING EXPOSURE WITHHISTOGRAM
Now that we have a better understanding about exposure and how to expose a photograph usingdifferent mixtures of shutter speed, aperture size, and ISO setting, we need to learn how toanalyze our exposure to ensure we’ve captured the correct amount of data in different areas ofour photograph. The most intuitive way to achieve this while shooting would be to check ourcamera’s LCD screen as it provides instantaneous feedback of the photo we’ve just taken.
Unfortunately, almost all LCD screens are not accurate in displaying the correct brightness,color, and detail of our captured image, partly because of the small size of the screen relative tothe image size and the viewing angle of the LCD itself. When we transfer our captured imagesinto our computers, the image we see on our monitors may be erroneous as well if our monitorsare not carefully calibrated by a special monitor calibrating device.
So what can use to obtain consistent and accurate feedback of our images?
The answer is the histogram, which is available in our camera display and most image processingsoftware that is packaged with our cameras.
If you’re wondering how to activate the histogram for your particular camera, please refer to the“reviewing images” (or equivalent) section of your users manual.
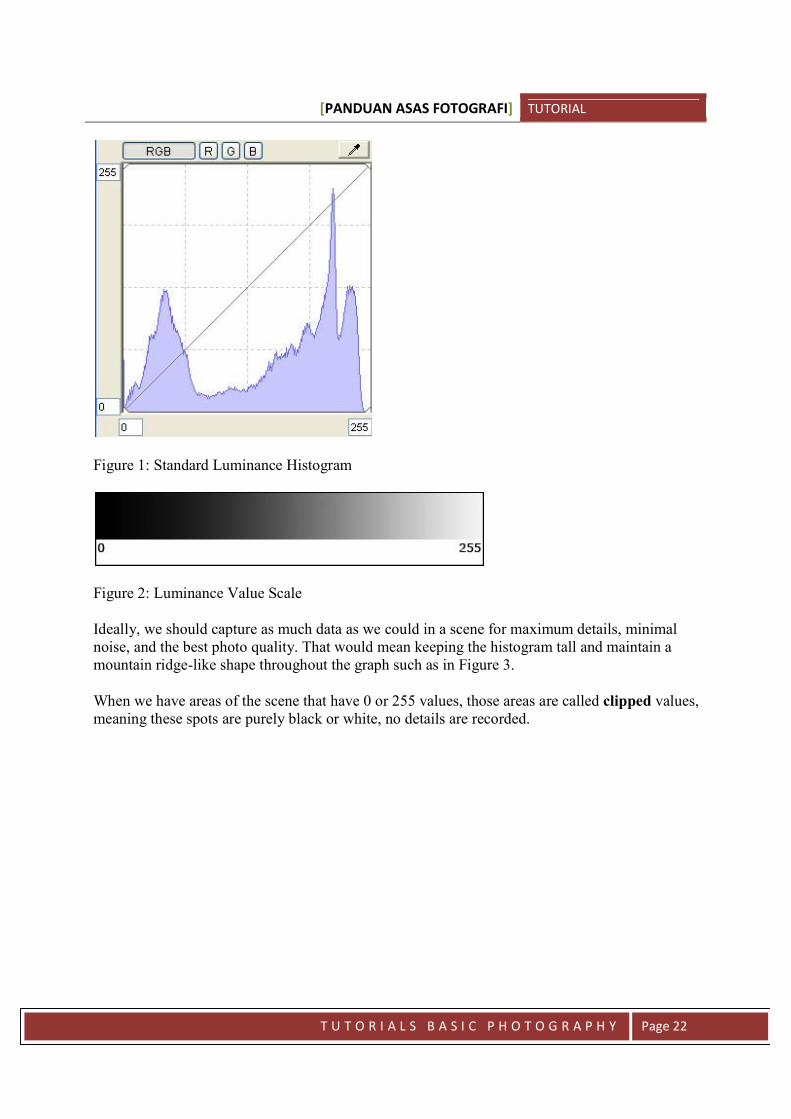
A histogram is a graphical representation of luminance values in our image from the darkest tothe brightest part of the captured image. Numerically, we’ll see that the graph is represented by afixed scale of 0 to 255 in both horizontal and vertical axis.
A luminance histogram shows the tones of our image between the darkest and brightest areas ofthe scene regardless of color.
The horizontal row represents the tonal values of your image, with 0 (left-most) being pureblack, and 255 (right-most) being pure white. Everything in between will be the shades otherthan pure black and white. The vertical line represents how much data is captured in thatparticular tonal range. In Figure 1, for example, we can see that there are “peaks” in the first andfourth column of our graph, while there are minimal pure black (leftmost) and pure white data(rightmost) in the graph.
[PANDUAN ASAS FOTOGRAFI] TUTORIAL
T U T O R I A L S B A S I C P H O T O G R A P H Y Page 22
Figure 1: Standard Luminance Histogram
Figure 2: Luminance Value Scale
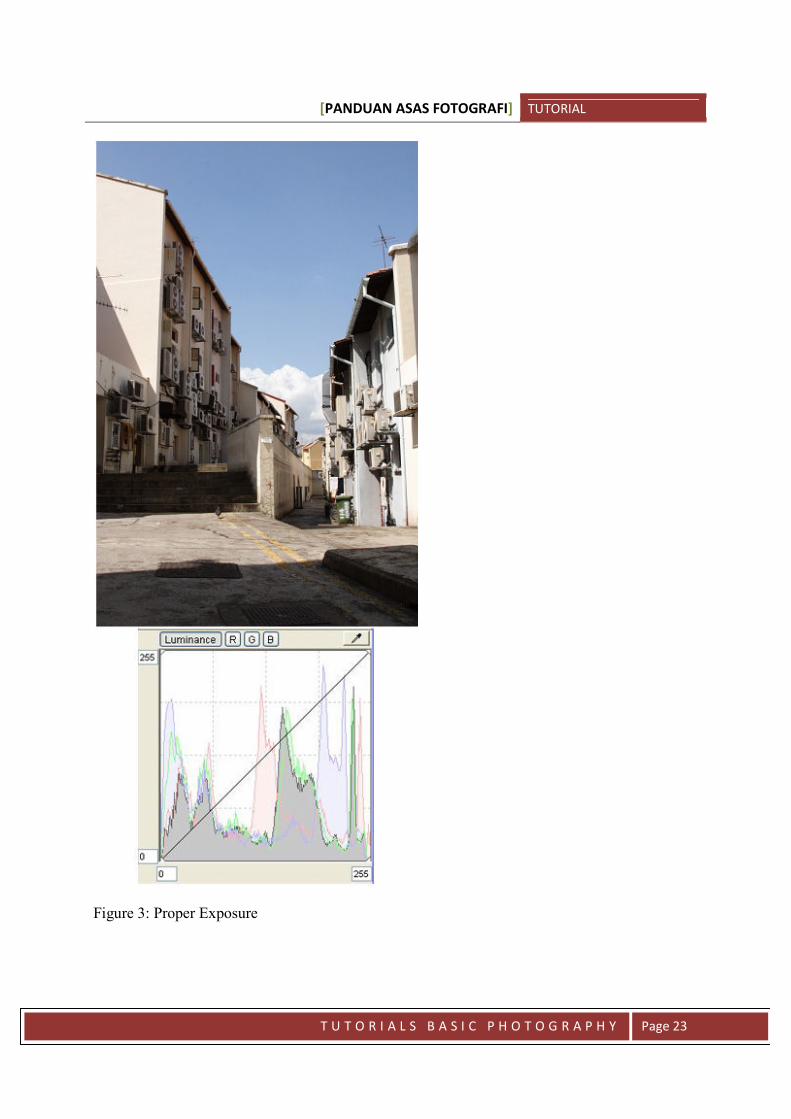
Ideally, we should capture as much data as we could in a scene for maximum details, minimalnoise, and the best photo quality. That would mean keeping the histogram tall and maintain amountain ridge-like shape throughout the graph such as in Figure 3.
When we have areas of the scene that have 0 or 255 values, those areas are called clipped values,meaning these spots are purely black or white, no details are recorded.
[PANDUAN ASAS FOTOGRAFI] TUTORIAL
T U T O R I A L S B A S I C P H O T O G R A P H Y Page 23
Figure 3: Proper Exposure

[PANDUAN ASAS FOTOGRAFI] TUTORIAL
T U T O R I A L S B A S I C P H O T O G R A P H Y Page 24
We can see that the histogram (gray area) has a lot of peaks in between 0 and 225 on thehorizontal scale, while having minimum peaks near 0 and 255. Examining the image shows a lotof details from shadows to bright highlights throughout the scene.
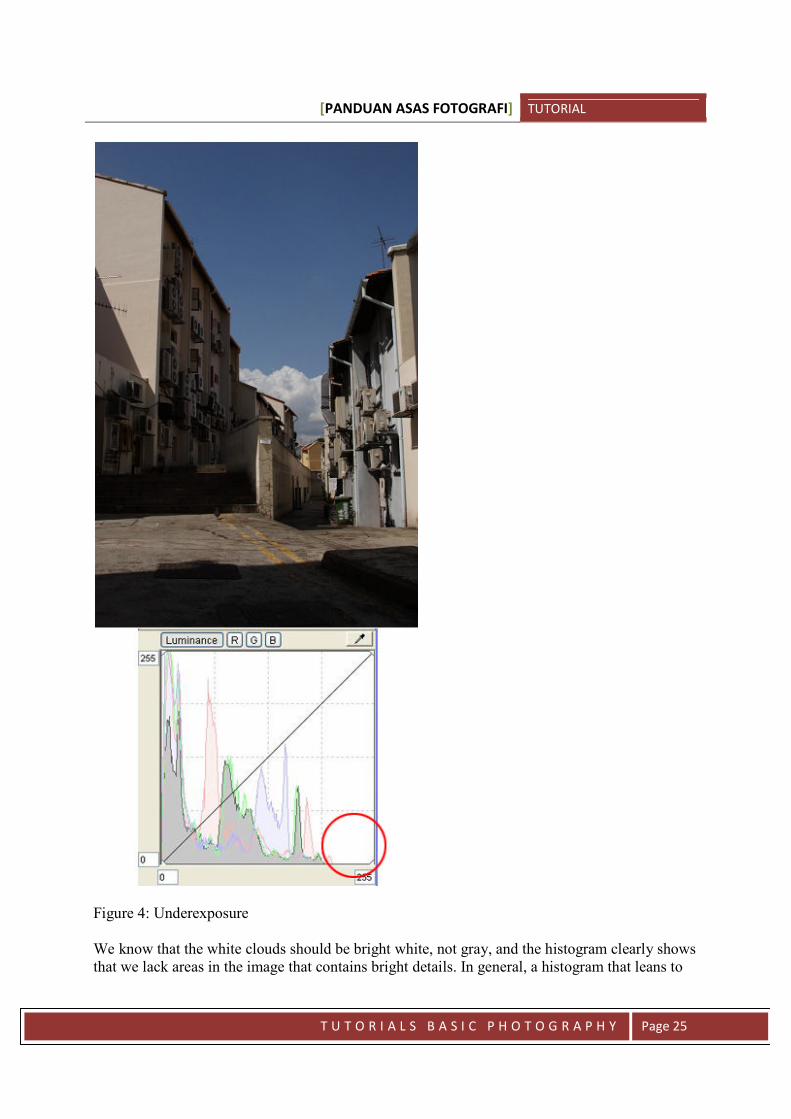
Figure 4 illustrates an underexposed photo. On its own, the image may appear properly exposedthrough our camera’s LCD or our computer’s LCD, especially if the screen has a high brightnesssetting. However, if we look at the histogram, we can clearly see that there’s a big gap on theright of the graph, showing that there are little to no bright scenes in the image.
[PANDUAN ASAS FOTOGRAFI] TUTORIAL
T U T O R I A L S B A S I C P H O T O G R A P H Y Page 25
Figure 4: Underexposure
We know that the white clouds should be bright white, not gray, and the histogram clearly showsthat we lack areas in the image that contains bright details. In general, a histogram that leans to
[PANDUAN ASAS FOTOGRAFI] TUTORIAL
T U T O R I A L S B A S I C P H O T O G R A P H Y Page 26
the left without information at the right side of the graph means that the photograph isunderexposed.
We also notice that the peaks near the left of the graph are a lot higher than Figure 2, the graphshows that the photo contains a lot more dark shadows than our previous image. Looking at ourimage, we can see that the staircase on the left, and the awnings on the upper right are lacking indetails.
Figure 5 shows an overexposed image. While it’s clearly visible that the photograph is toobright, our camera and computer LCD can make the image appear “normal” if the brightnesssettings are set low. That’s why the histogram is a more accurate tool to gauge our exposure.

[PANDUAN ASAS FOTOGRAFI] TUTORIAL
T U T O R I A L S B A S I C P H O T O G R A P H Y Page 27
Figure 5: Overexposure

[PANDUAN ASAS FOTOGRAFI] TUTORIAL
T U T O R I A L S B A S I C P H O T O G R A P H Y Page 28
Note how our graph now leans towards the right, with the peaks concentrating near the 255values while leaving a gap near the 0 values. The graph tells us that the image lacks pure blacksin the scene and much of the data captured are near-white.
We can examine the photograph and see that the clouds in the middle of Figure 3 and 4 are nolonger present and all the textures on the walls of the buildings are pure white as well. There areno details recorded in those 255-value areas, just pure white, those areas where the clouds aresupposed to be are now “clipped”.
Here’s another example of a properly-exposed image of an island.
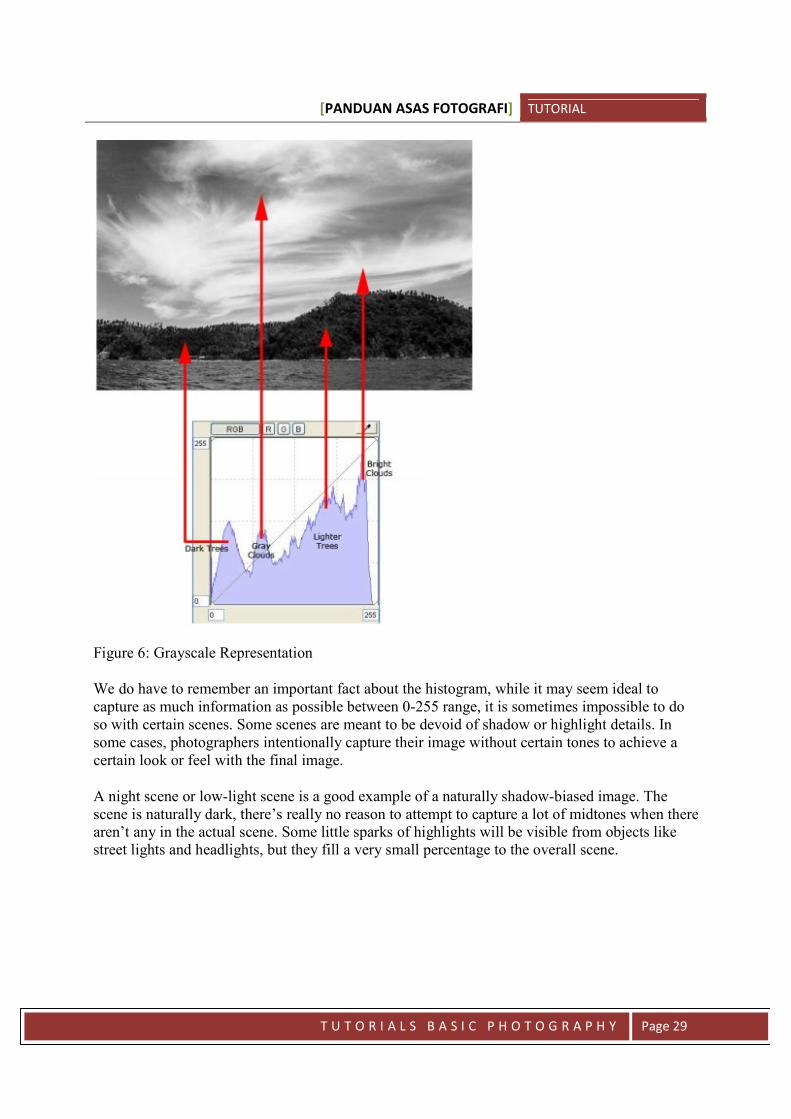
The term “tones” may be a little confusing at first, especially when we look at a colorful image.It’s hard to see where certain colors fall within our histogram graph with the exception of pureblacks and pure whites. However, if we look at the scene in grayscale, using and understandingthe histogram becomes easier.
Figure 4: Island Sample
[PANDUAN ASAS FOTOGRAFI] TUTORIAL
T U T O R I A L S B A S I C P H O T O G R A P H Y Page 29
Figure 6: Grayscale Representation
We do have to remember an important fact about the histogram, while it may seem ideal tocapture as much information as possible between 0-255 range, it is sometimes impossible to doso with certain scenes. Some scenes are meant to be devoid of shadow or highlight details. Insome cases, photographers intentionally capture their image without certain tones to achieve acertain look or feel with the final image.
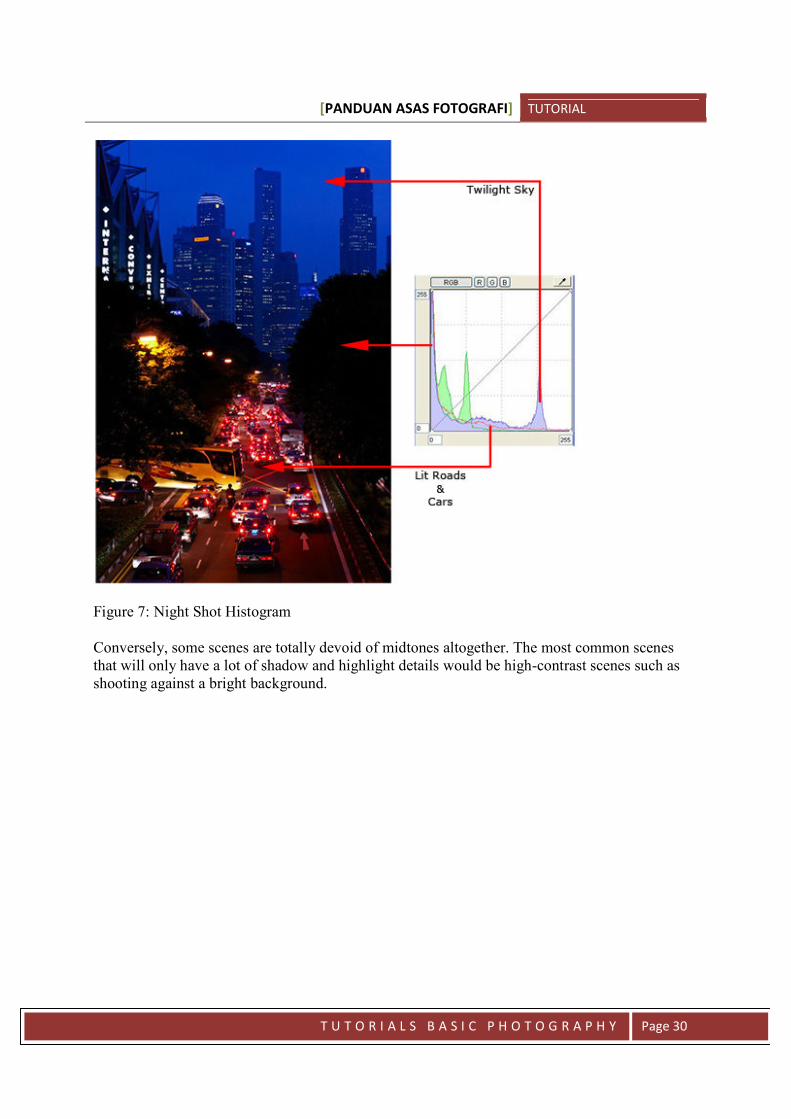
A night scene or low-light scene is a good example of a naturally shadow-biased image. Thescene is naturally dark, there’s really no reason to attempt to capture a lot of midtones when therearen’t any in the actual scene. Some little sparks of highlights will be visible from objects likestreet lights and headlights, but they fill a very small percentage to the overall scene.
[PANDUAN ASAS FOTOGRAFI] TUTORIAL
T U T O R I A L S B A S I C P H O T O G R A P H Y Page 30
Figure 7: Night Shot Histogram
Conversely, some scenes are totally devoid of midtones altogether. The most common scenesthat will only have a lot of shadow and highlight details would be high-contrast scenes such asshooting against a bright background.
[PANDUAN ASAS FOTOGRAFI] TUTORIAL
T U T O R I A L S B A S I C P H O T O G R A P H Y Page 31
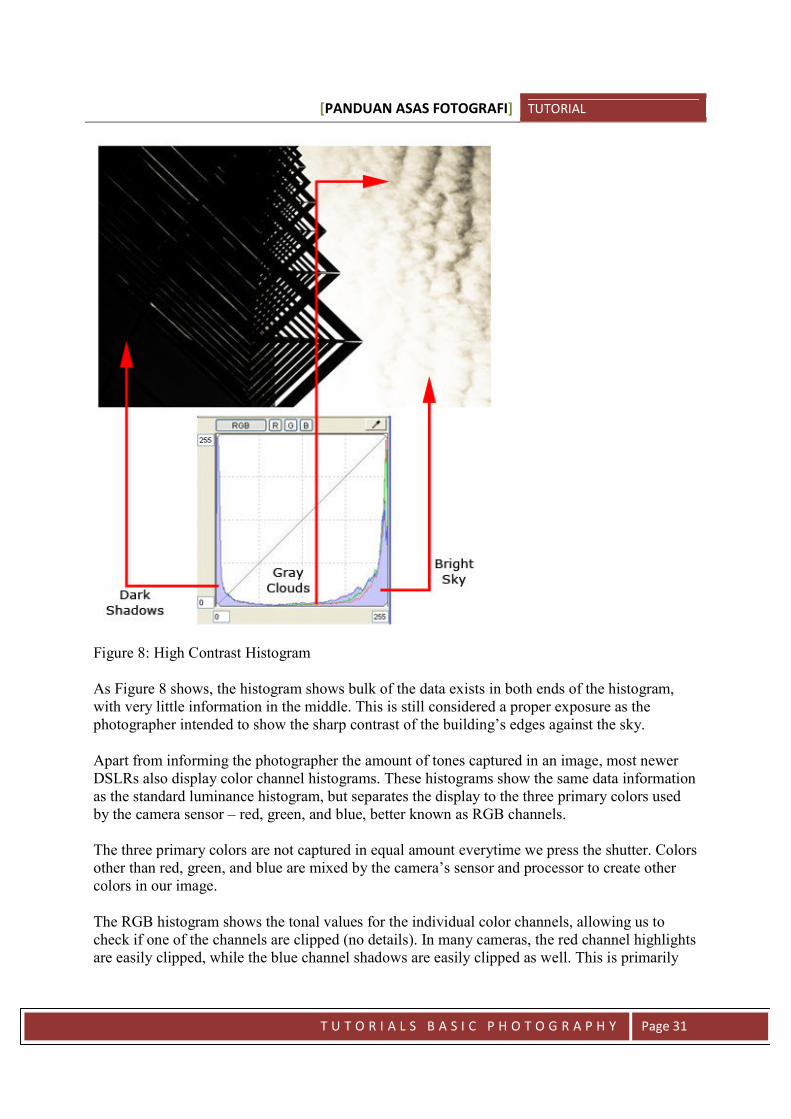
Figure 8: High Contrast Histogram
As Figure 8 shows, the histogram shows bulk of the data exists in both ends of the histogram,with very little information in the middle. This is still considered a proper exposure as thephotographer intended to show the sharp contrast of the building’s edges against the sky.
Apart from informing the photographer the amount of tones captured in an image, most newerDSLRs also display color channel histograms. These histograms show the same data informationas the standard luminance histogram, but separates the display to the three primary colors usedby the camera sensor – red, green, and blue, better known as RGB channels.
The three primary colors are not captured in equal amount everytime we press the shutter. Colorsother than red, green, and blue are mixed by the camera’s sensor and processor to create othercolors in our image.
The RGB histogram shows the tonal values for the individual color channels, allowing us tocheck if one of the channels are clipped (no details). In many cameras, the red channel highlightsare easily clipped, while the blue channel shadows are easily clipped as well. This is primarily
[PANDUAN ASAS FOTOGRAFI] TUTORIAL
T U T O R I A L S B A S I C P H O T O G R A P H Y Page 32
due to sensor design limitation where reds are generally easier to capture by the sensor comparedto green and blue colors.
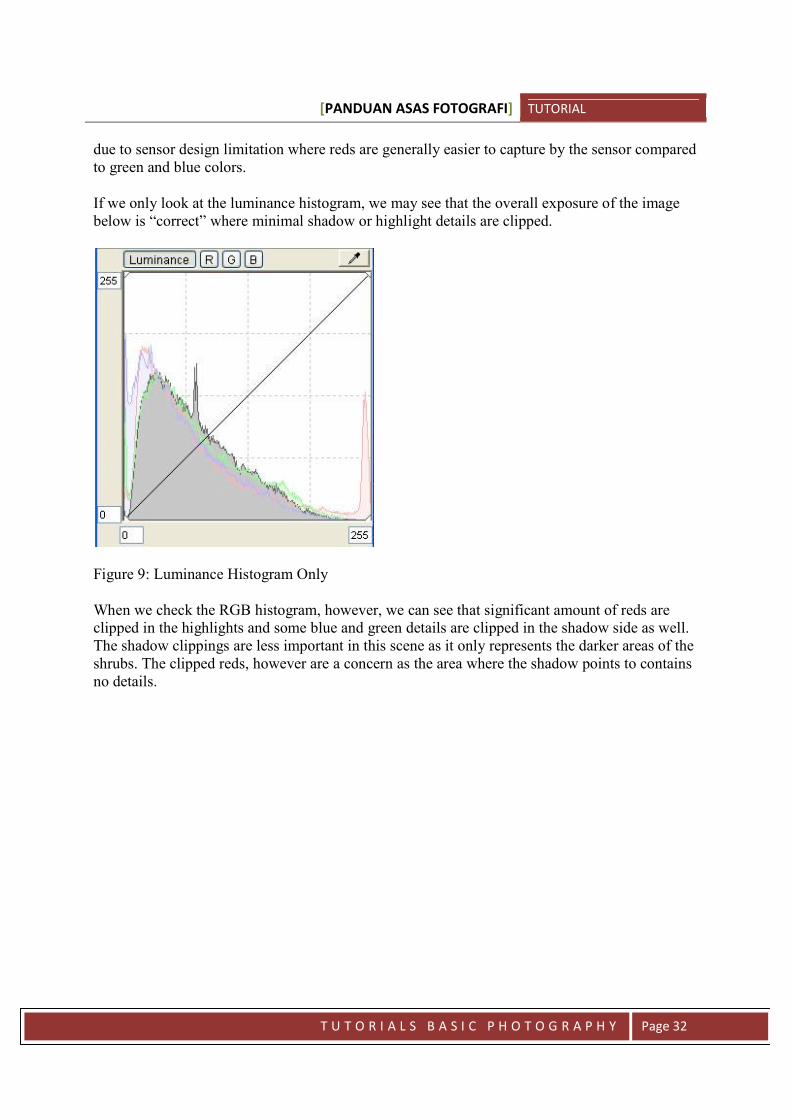
If we only look at the luminance histogram, we may see that the overall exposure of the imagebelow is “correct” where minimal shadow or highlight details are clipped.
Figure 9: Luminance Histogram Only
When we check the RGB histogram, however, we can see that significant amount of reds areclipped in the highlights and some blue and green details are clipped in the shadow side as well.The shadow clippings are less important in this scene as it only represents the darker areas of theshrubs. The clipped reds, however are a concern as the area where the shadow points to containsno details.
[PANDUAN ASAS FOTOGRAFI] TUTORIAL
T U T O R I A L S B A S I C P H O T O G R A P H Y Page 33
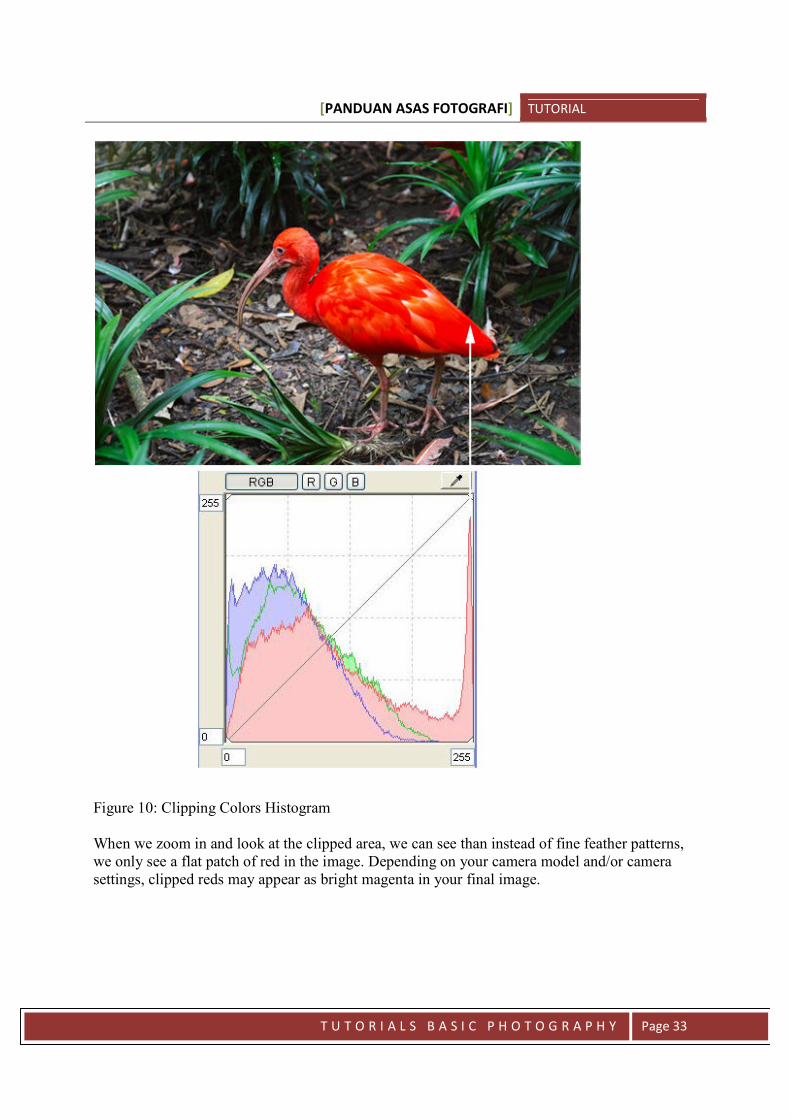
Figure 10: Clipping Colors Histogram
When we zoom in and look at the clipped area, we can see than instead of fine feather patterns,we only see a flat patch of red in the image. Depending on your camera model and/or camerasettings, clipped reds may appear as bright magenta in your final image.
[PANDUAN ASAS FOTOGRAFI] TUTORIAL
T U T O R I A L S B A S I C P H O T O G R A P H Y Page 34
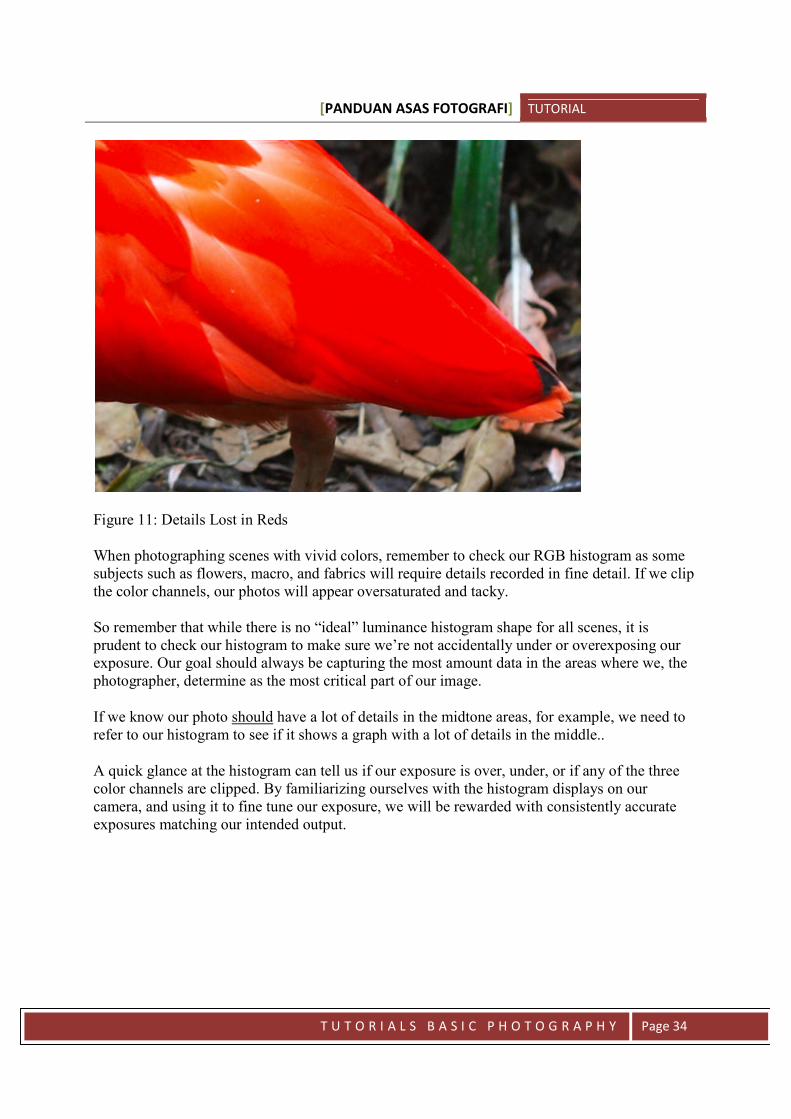
Figure 11: Details Lost in Reds
When photographing scenes with vivid colors, remember to check our RGB histogram as somesubjects such as flowers, macro, and fabrics will require details recorded in fine detail. If we clipthe color channels, our photos will appear oversaturated and tacky.
So remember that while there is no “ideal” luminance histogram shape for all scenes, it isprudent to check our histogram to make sure we’re not accidentally under or overexposing ourexposure. Our goal should always be capturing the most amount data in the areas where we, thephotographer, determine as the most critical part of our image.
If we know our photo should have a lot of details in the midtone areas, for example, we need torefer to our histogram to see if it shows a graph with a lot of details in the middle..
A quick glance at the histogram can tell us if our exposure is over, under, or if any of the threecolor channels are clipped. By familiarizing ourselves with the histogram displays on ourcamera, and using it to fine tune our exposure, we will be rewarded with consistently accurateexposures matching our intended output.
[PANDUAN ASAS FOTOGRAFI] TUTORIAL
T U T O R I A L S B A S I C P H O T O G R A P H Y Page 35
Lesson 3
EXPOSURE METERING
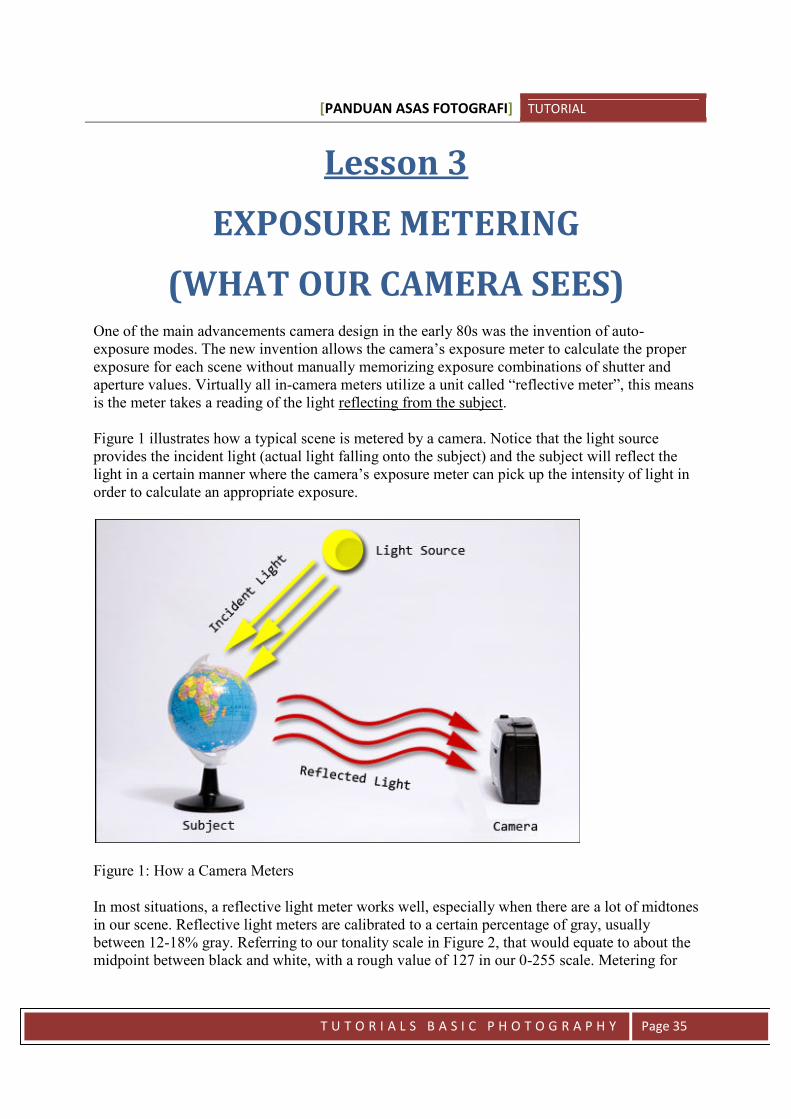
(WHAT OUR CAMERA SEES)One of the main advancements camera design in the early 80s was the invention of auto-exposure modes. The new invention allows the camera’s exposure meter to calculate the properexposure for each scene without manually memorizing exposure combinations of shutter andaperture values. Virtually all in-camera meters utilize a unit called “reflective meter”, this meansis the meter takes a reading of the light reflecting from the subject.
Figure 1 illustrates how a typical scene is metered by a camera. Notice that the light sourceprovides the incident light (actual light falling onto the subject) and the subject will reflect thelight in a certain manner where the camera’s exposure meter can pick up the intensity of light inorder to calculate an appropriate exposure.
Figure 1: How a Camera Meters
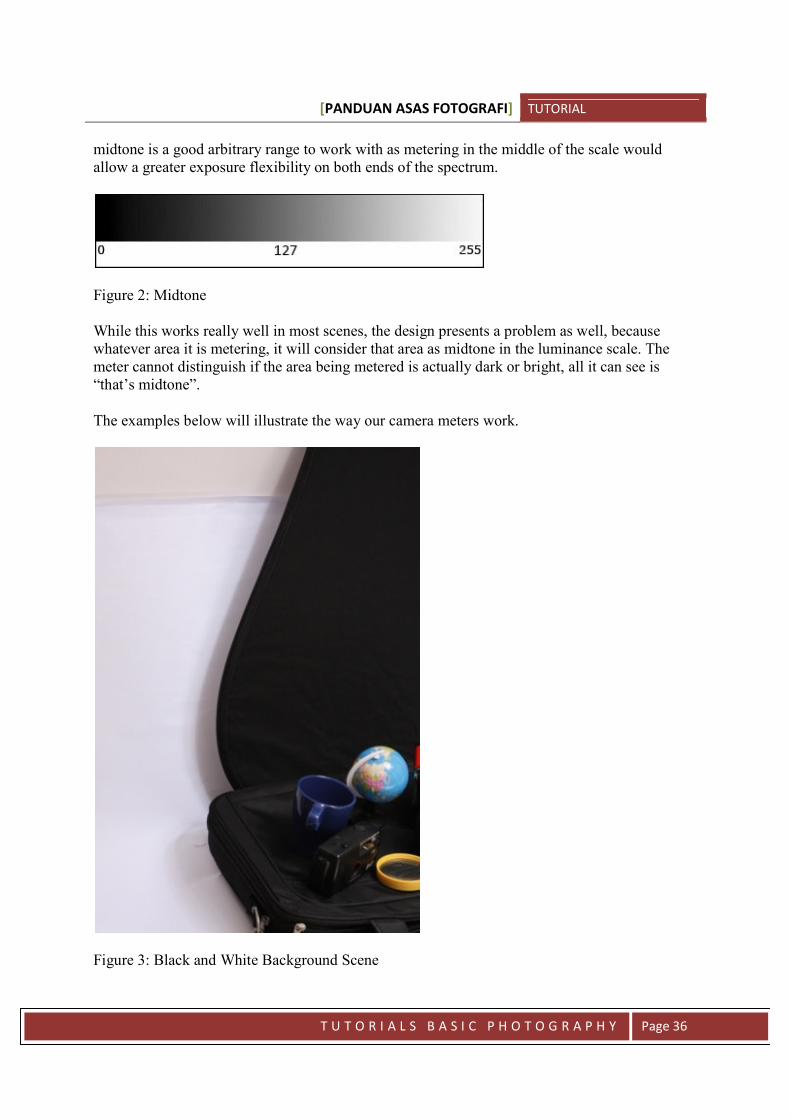
In most situations, a reflective light meter works well, especially when there are a lot of midtonesin our scene. Reflective light meters are calibrated to a certain percentage of gray, usuallybetween 12-18% gray. Referring to our tonality scale in Figure 2, that would equate to about themidpoint between black and white, with a rough value of 127 in our 0-255 scale. Metering for
[PANDUAN ASAS FOTOGRAFI] TUTORIAL
T U T O R I A L S B A S I C P H O T O G R A P H Y Page 36
midtone is a good arbitrary range to work with as metering in the middle of the scale wouldallow a greater exposure flexibility on both ends of the spectrum.
Figure 2: Midtone
While this works really well in most scenes, the design presents a problem as well, becausewhatever area it is metering, it will consider that area as midtone in the luminance scale. Themeter cannot distinguish if the area being metered is actually dark or bright, all it can see is“that’s midtone”.
The examples below will illustrate the way our camera meters work.
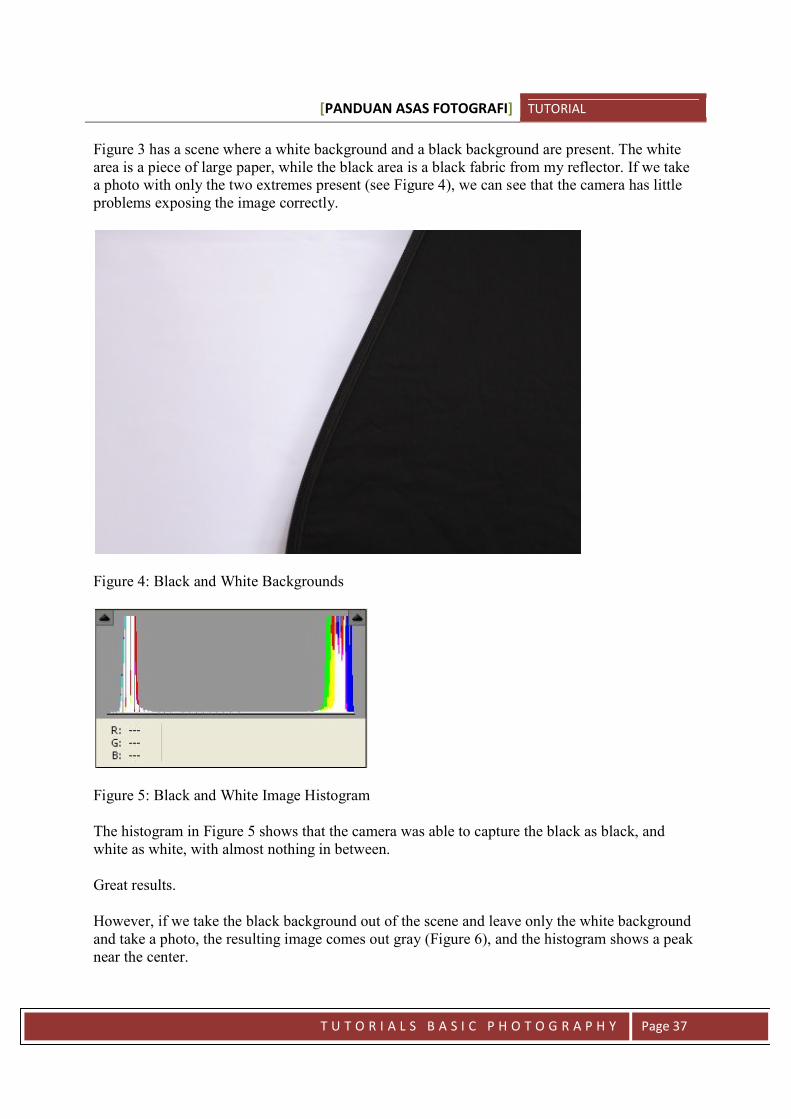
Figure 3: Black and White Background Scene
[PANDUAN ASAS FOTOGRAFI] TUTORIAL
T U T O R I A L S B A S I C P H O T O G R A P H Y Page 37
Figure 3 has a scene where a white background and a black background are present. The whitearea is a piece of large paper, while the black area is a black fabric from my reflector. If we takea photo with only the two extremes present (see Figure 4), we can see that the camera has littleproblems exposing the image correctly.
Figure 4: Black and White Backgrounds
Figure 5: Black and White Image Histogram
The histogram in Figure 5 shows that the camera was able to capture the black as black, andwhite as white, with almost nothing in between.
Great results.
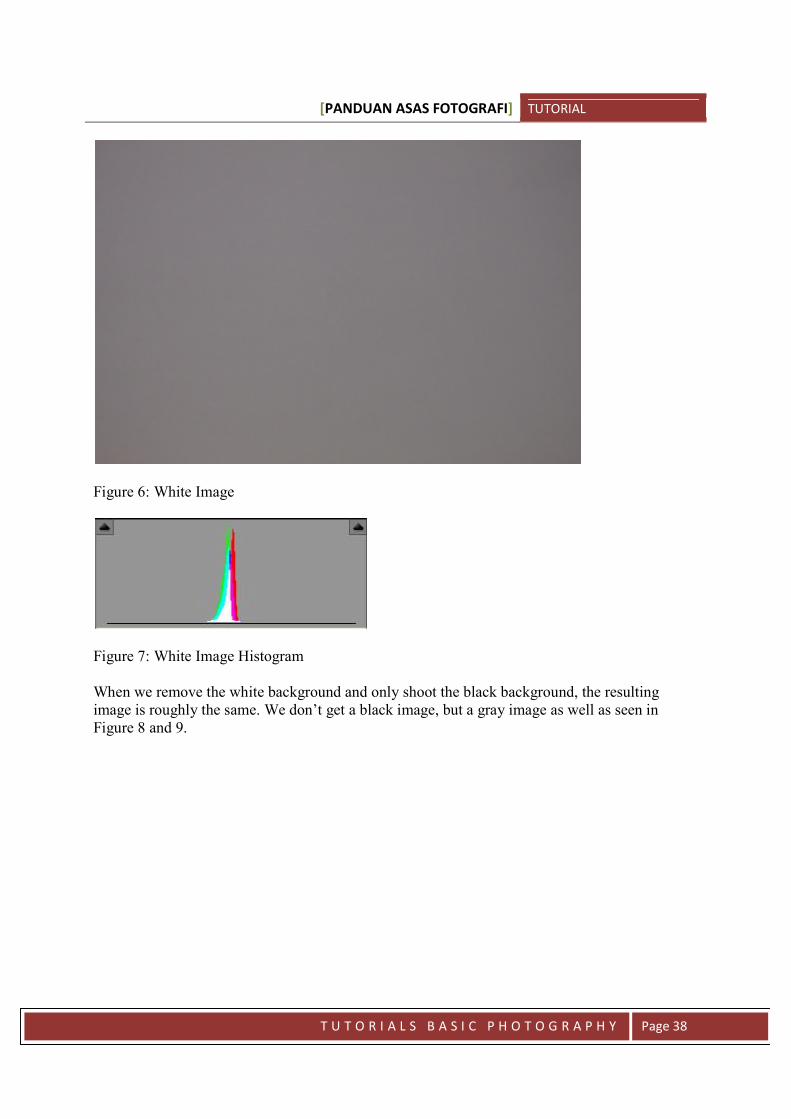
However, if we take the black background out of the scene and leave only the white backgroundand take a photo, the resulting image comes out gray (Figure 6), and the histogram shows a peaknear the center.
[PANDUAN ASAS FOTOGRAFI] TUTORIAL
T U T O R I A L S B A S I C P H O T O G R A P H Y Page 38
Figure 6: White Image
Figure 7: White Image Histogram
When we remove the white background and only shoot the black background, the resultingimage is roughly the same. We don’t get a black image, but a gray image as well as seen inFigure 8 and 9.
[PANDUAN ASAS FOTOGRAFI] TUTORIAL
T U T O R I A L S B A S I C P H O T O G R A P H Y Page 39
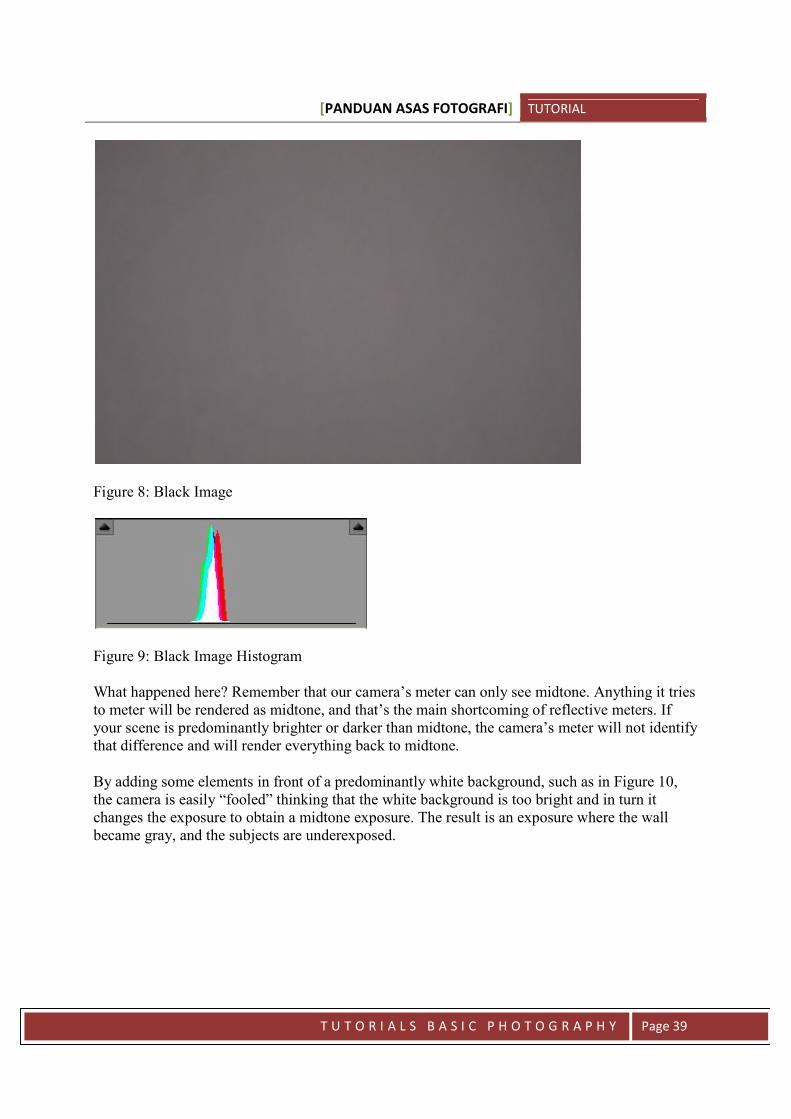
Figure 8: Black Image
Figure 9: Black Image Histogram
What happened here? Remember that our camera’s meter can only see midtone. Anything it triesto meter will be rendered as midtone, and that’s the main shortcoming of reflective meters. Ifyour scene is predominantly brighter or darker than midtone, the camera’s meter will not identifythat difference and will render everything back to midtone.
By adding some elements in front of a predominantly white background, such as in Figure 10,the camera is easily “fooled” thinking that the white background is too bright and in turn itchanges the exposure to obtain a midtone exposure. The result is an exposure where the wallbecame gray, and the subjects are underexposed.

[PANDUAN ASAS FOTOGRAFI] TUTORIAL
T U T O R I A L S B A S I C P H O T O G R A P H Y Page 40
Figure 10: Scene On White Background
Figure 11: Histogram of Figure 10
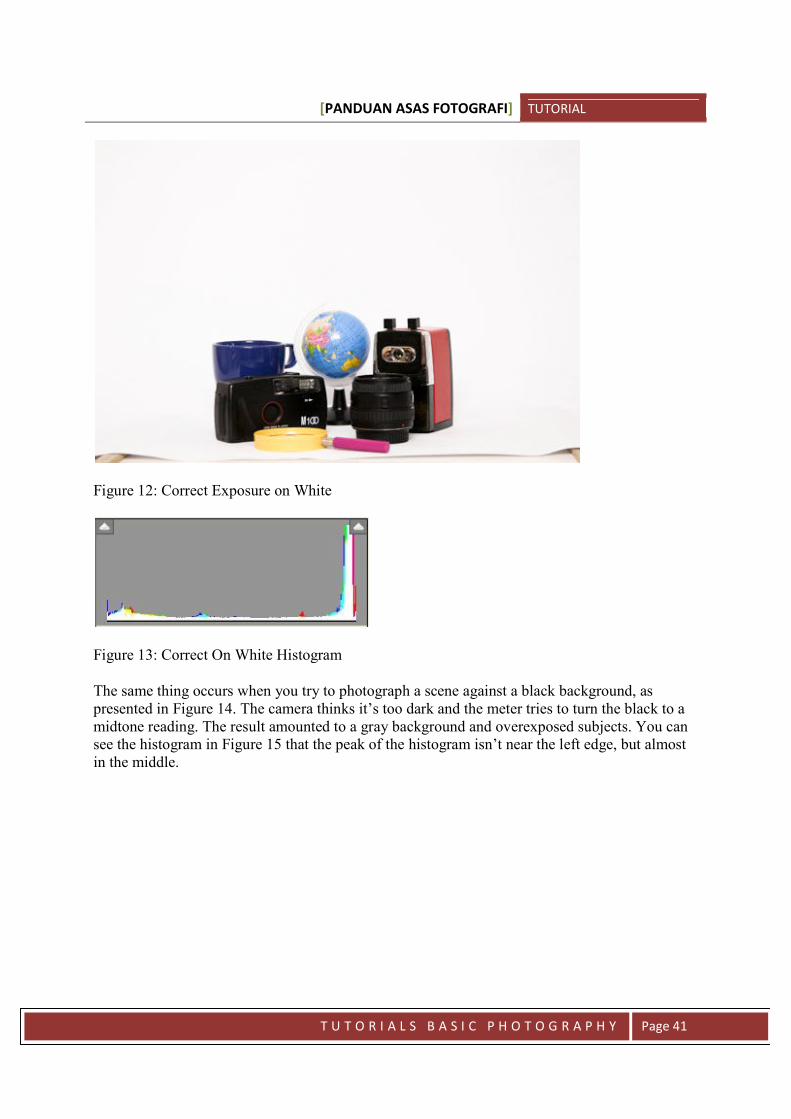
Figure 12 and 13 shows the correct exposure with the large white area peaking near the rightedges of our histogram.
[PANDUAN ASAS FOTOGRAFI] TUTORIAL
T U T O R I A L S B A S I C P H O T O G R A P H Y Page 41
Figure 12: Correct Exposure on White
Figure 13: Correct On White Histogram
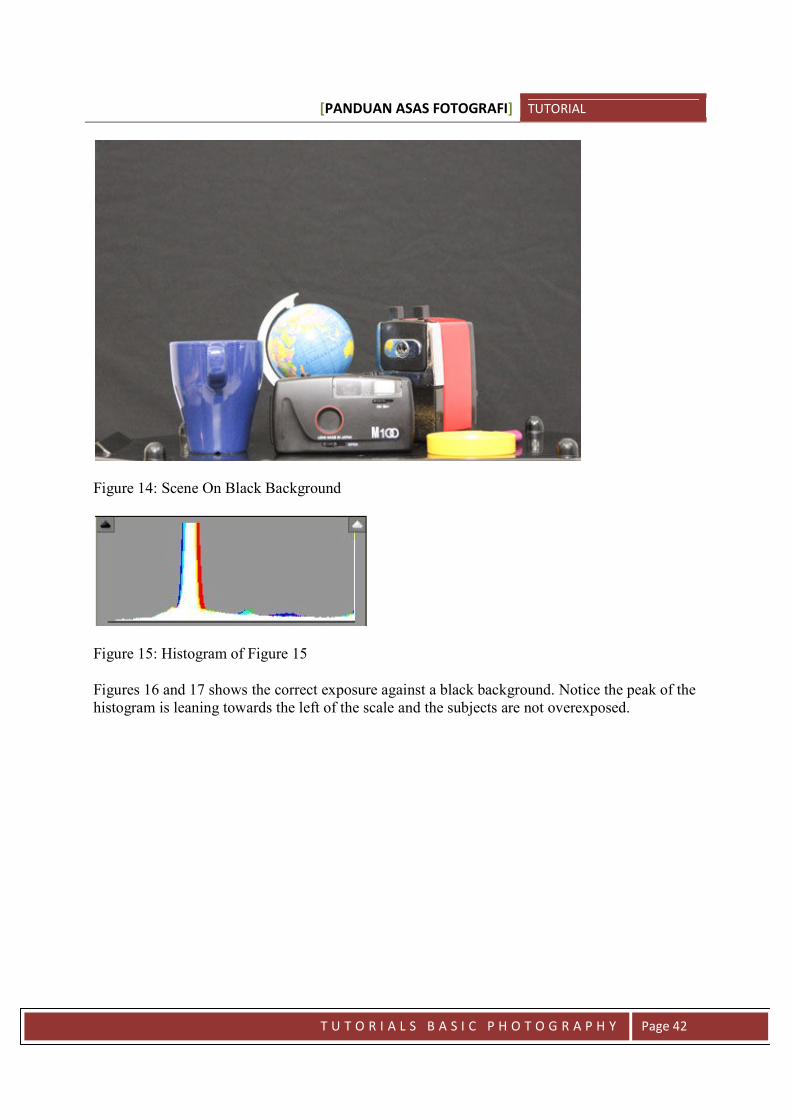
The same thing occurs when you try to photograph a scene against a black background, aspresented in Figure 14. The camera thinks it’s too dark and the meter tries to turn the black to amidtone reading. The result amounted to a gray background and overexposed subjects. You cansee the histogram in Figure 15 that the peak of the histogram isn’t near the left edge, but almostin the middle.
[PANDUAN ASAS FOTOGRAFI] TUTORIAL
T U T O R I A L S B A S I C P H O T O G R A P H Y Page 42
Figure 14: Scene On Black Background
Figure 15: Histogram of Figure 15
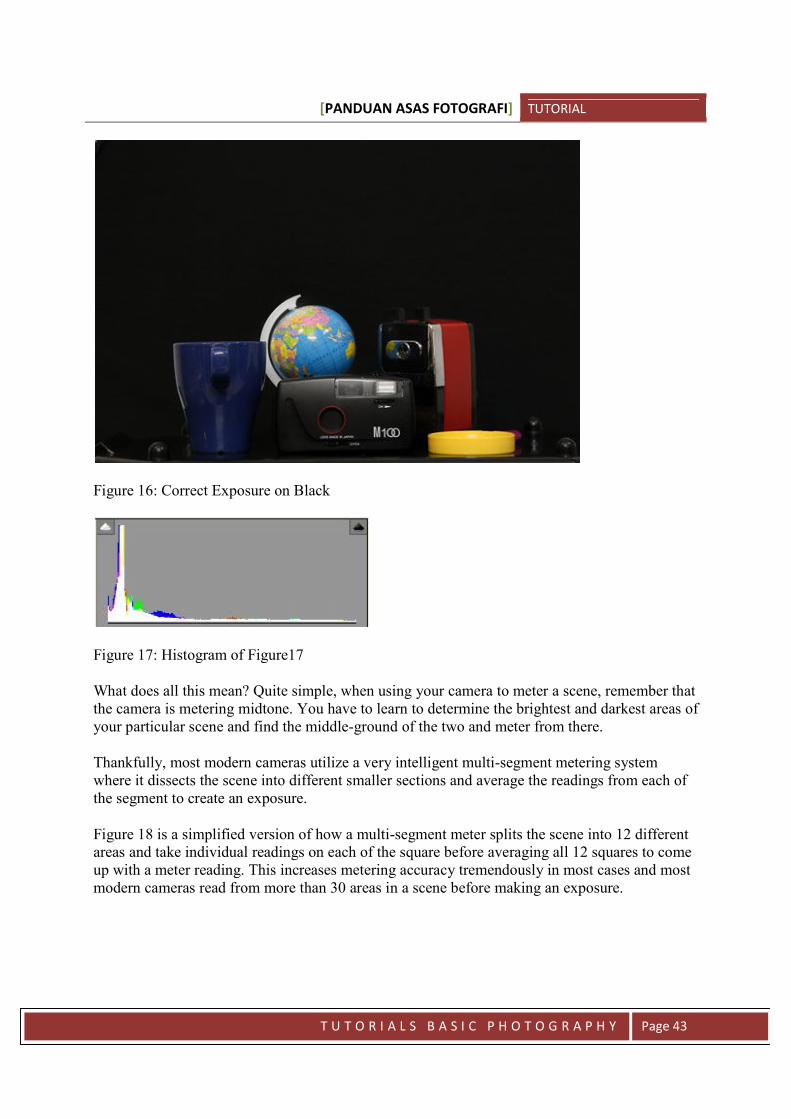
Figures 16 and 17 shows the correct exposure against a black background. Notice the peak of thehistogram is leaning towards the left of the scale and the subjects are not overexposed.
[PANDUAN ASAS FOTOGRAFI] TUTORIAL
T U T O R I A L S B A S I C P H O T O G R A P H Y Page 43
Figure 16: Correct Exposure on Black
Figure 17: Histogram of Figure17
What does all this mean? Quite simple, when using your camera to meter a scene, remember thatthe camera is metering midtone. You have to learn to determine the brightest and darkest areas ofyour particular scene and find the middle-ground of the two and meter from there.
Thankfully, most modern cameras utilize a very intelligent multi-segment metering systemwhere it dissects the scene into different smaller sections and average the readings from each ofthe segment to create an exposure.
Figure 18 is a simplified version of how a multi-segment meter splits the scene into 12 differentareas and take individual readings on each of the square before averaging all 12 squares to comeup with a meter reading. This increases metering accuracy tremendously in most cases and mostmodern cameras read from more than 30 areas in a scene before making an exposure.
[PANDUAN ASAS FOTOGRAFI] TUTORIAL
T U T O R I A L S B A S I C P H O T O G R A P H Y Page 44
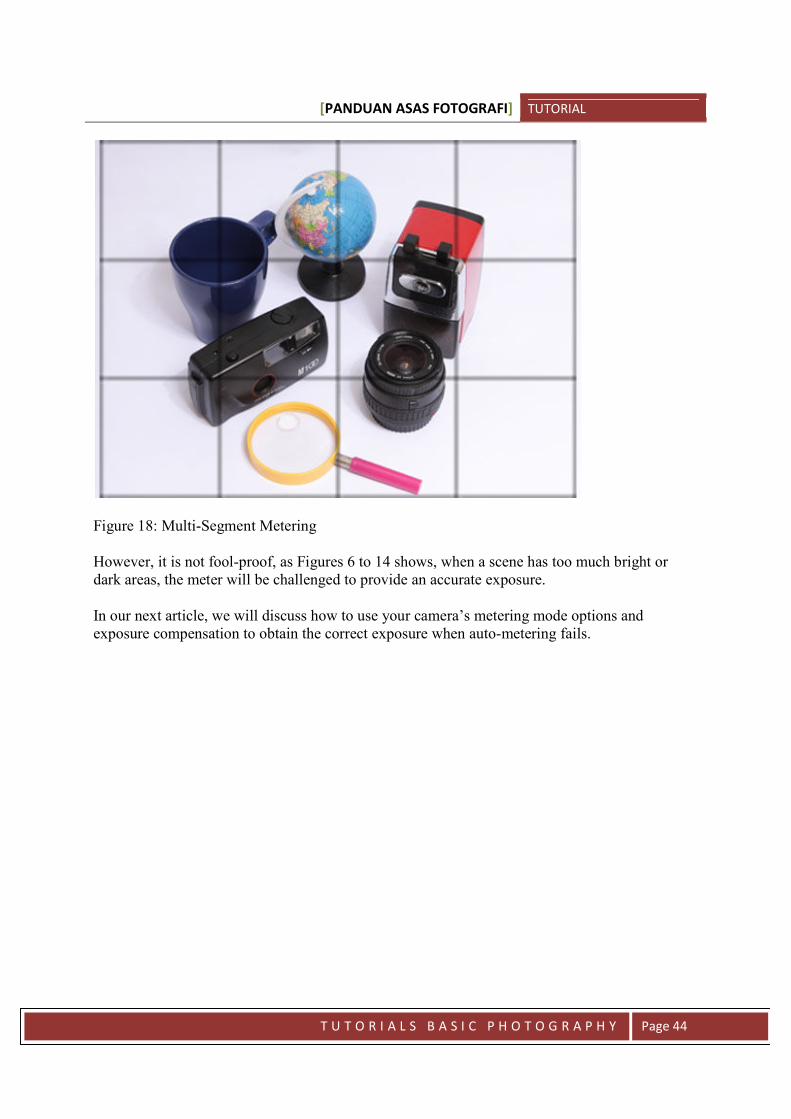
Figure 18: Multi-Segment Metering
However, it is not fool-proof, as Figures 6 to 14 shows, when a scene has too much bright ordark areas, the meter will be challenged to provide an accurate exposure.
In our next article, we will discuss how to use your camera’s metering mode options andexposure compensation to obtain the correct exposure when auto-metering fails.
[PANDUAN ASAS FOTOGRAFI] TUTORIAL
T U T O R I A L S B A S I C P H O T O G R A P H Y Page 45
Lesson 4
EXPOSURE COMPOSITION
(PART ONE)
Be Smarter than the Meter
In our previous lesson, we learned how camera meters calculate the exposure based on thereflected light of the scene being photographed. We learned that while most newer DSLRs aremore than capable of exposing a scene accurately, high contrast scenes that are predominantlybright or dark can fool our camera’s metering sensors causing an image to be under or over-exposed.
In this lesson, we will learn how to compensate for this metering error by helping the cameraidentify a scene that is not midtone and specify whether to darken or lighten to create a properexposure.
Metering Patterns
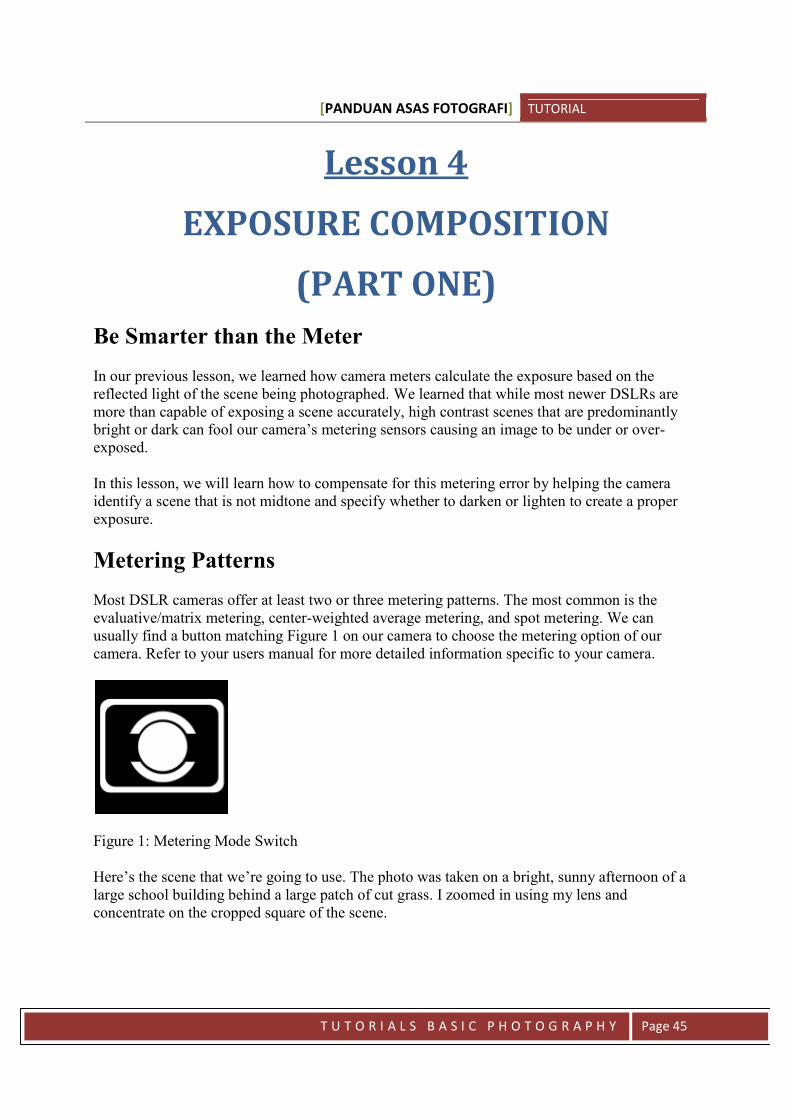
Most DSLR cameras offer at least two or three metering patterns. The most common is theevaluative/matrix metering, center-weighted average metering, and spot metering. We canusually find a button matching Figure 1 on our camera to choose the metering option of ourcamera. Refer to your users manual for more detailed information specific to your camera.
Figure 1: Metering Mode Switch
Here’s the scene that we’re going to use. The photo was taken on a bright, sunny afternoon of alarge school building behind a large patch of cut grass. I zoomed in using my lens andconcentrate on the cropped square of the scene.

[PANDUAN ASAS FOTOGRAFI] TUTORIAL
T U T O R I A L S B A S I C P H O T O G R A P H Y Page 46
Figure 2: Sample Scene
As a whole, the scene is pretty well exposed by the camera. The abundance of midtone grass,cloudy skies, and shadows of the trees and buildings allowed the camera to make an acceptableexposure for all the elements within the frame.
Let’s take a look at the scene inside the red bounding box to show how the camera’s meter maybe fooled by the predominantly bright (white) area. We’ll also discuss how the three differentmetering modes of our cameras behave in such a scene.
Evaluative/Matrix Metering
Evaluative metering usually separates the scene into several different areas and the meter takes areading from each of these “zones” then averaging all the exposures to create a final exposure.Since our scene is predominantly white, the meter underexposes the scene, turning the white wallto light gray.

[PANDUAN ASAS FOTOGRAFI] TUTORIAL
T U T O R I A L S B A S I C P H O T O G R A P H Y Page 47
Figure 3: Evaluative Metering Pattern
The histogram shows the highest peak just off to the right center indicating that the mostabundant tone in the scene is light gray. We know that’s not true based on the correctly exposedscene in Figure 2. The evaluative meter “clipped” some shadows because the whole scene isunderexposed.
Figure 4: Histogram of Evaluative Exposure
Center-weighted Average Metering
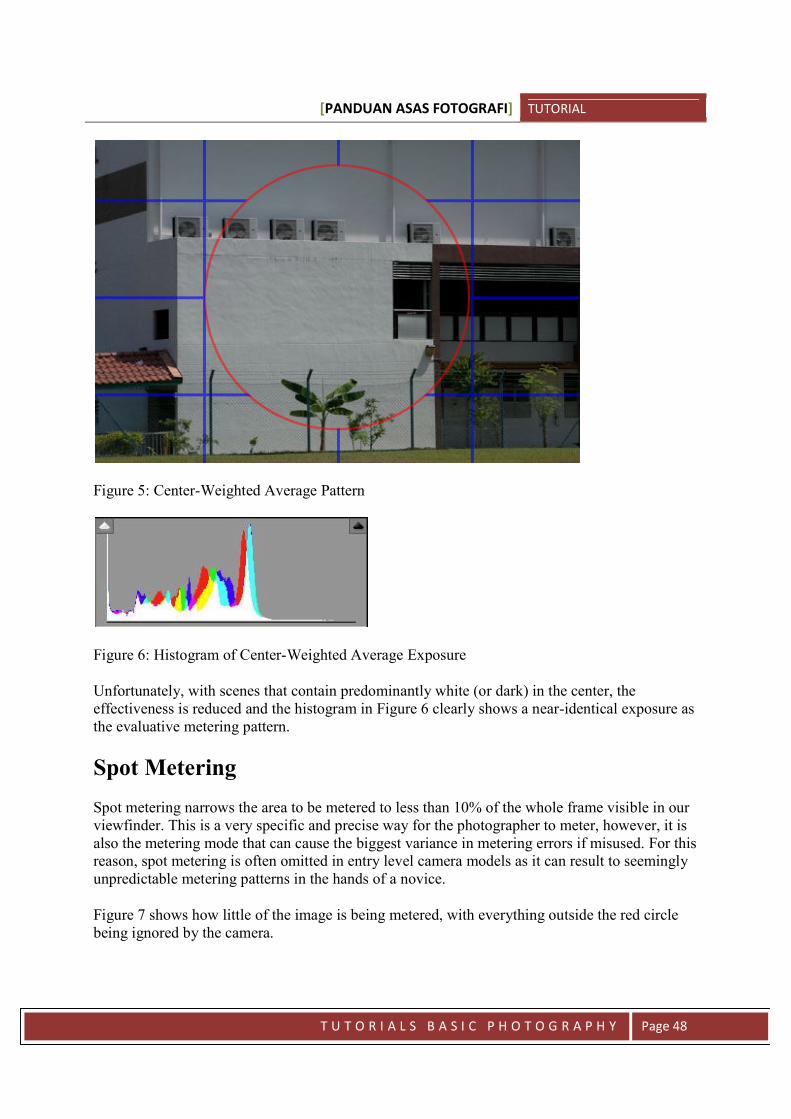
Center-weighted average metering is very similar to evaluative metering with the primarydifference being putting more emphasis on the center of the scene versus the edges when thecamera meters. Different cameras have different metering ratios between the center and edges ofthe scene, but in most cases, it’s about 70% center and 30% edges. This metering mode is prettymuch a de-facto standard when in-camera metering was introduced in the early 70s and is veryreliable as it forces the meter to put more emphasis in the area where there photographer is mostlikely to place the subject in the frame. Figure 5 is a simplified illustration of how center-weighted average metering computes for the exposure of a scene.
[PANDUAN ASAS FOTOGRAFI] TUTORIAL
T U T O R I A L S B A S I C P H O T O G R A P H Y Page 48
Figure 5: Center-Weighted Average Pattern
Figure 6: Histogram of Center-Weighted Average Exposure
Unfortunately, with scenes that contain predominantly white (or dark) in the center, theeffectiveness is reduced and the histogram in Figure 6 clearly shows a near-identical exposure asthe evaluative metering pattern.
Spot Metering
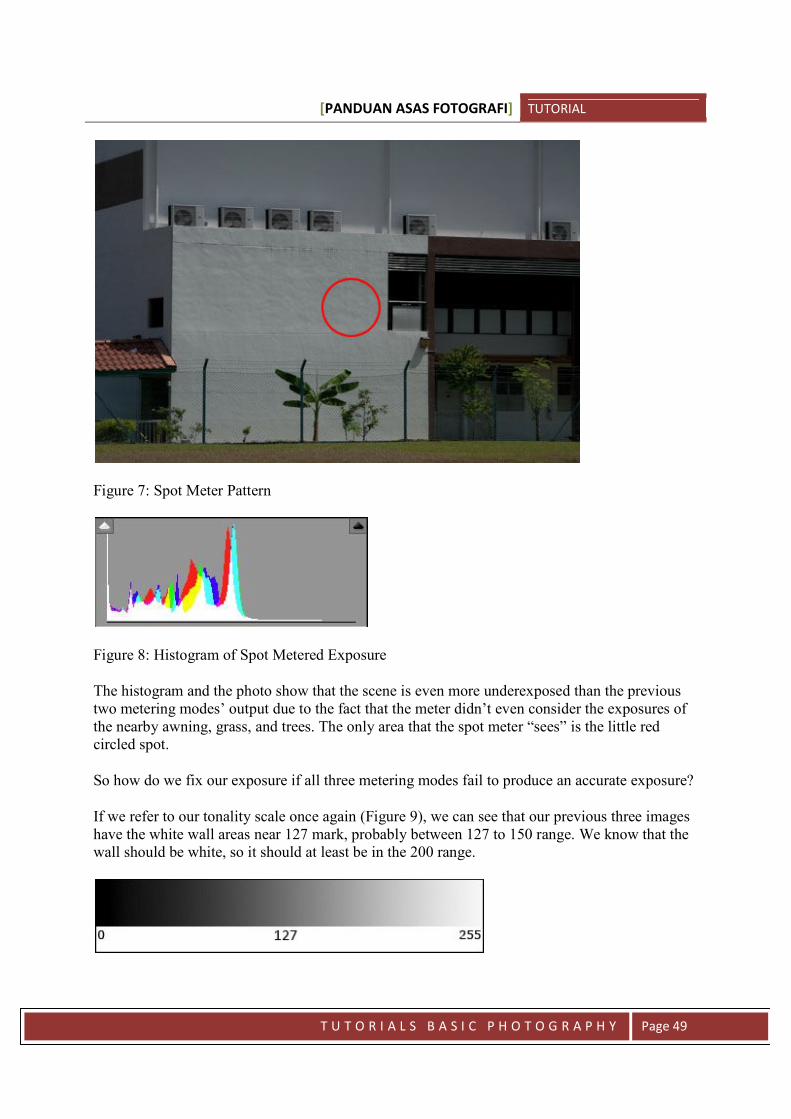
Spot metering narrows the area to be metered to less than 10% of the whole frame visible in ourviewfinder. This is a very specific and precise way for the photographer to meter, however, it isalso the metering mode that can cause the biggest variance in metering errors if misused. For thisreason, spot metering is often omitted in entry level camera models as it can result to seeminglyunpredictable metering patterns in the hands of a novice.
Figure 7 shows how little of the image is being metered, with everything outside the red circlebeing ignored by the camera.
[PANDUAN ASAS FOTOGRAFI] TUTORIAL
T U T O R I A L S B A S I C P H O T O G R A P H Y Page 49
Figure 7: Spot Meter Pattern
Figure 8: Histogram of Spot Metered Exposure
The histogram and the photo show that the scene is even more underexposed than the previoustwo metering modes’ output due to the fact that the meter didn’t even consider the exposures ofthe nearby awning, grass, and trees. The only area that the spot meter “sees” is the little redcircled spot.
So how do we fix our exposure if all three metering modes fail to produce an accurate exposure?
If we refer to our tonality scale once again (Figure 9), we can see that our previous three imageshave the white wall areas near 127 mark, probably between 127 to 150 range. We know that thewall should be white, so it should at least be in the 200 range.
[PANDUAN ASAS FOTOGRAFI] TUTORIAL
T U T O R I A L S B A S I C P H O T O G R A P H Y Page 50
Figure 9: Tonality Scale
We can use our camera’s exposure compensation function to solve this problem.
We need to add exposure to our scenes above so that our gray will turn to white. Check yourusers manual for specific instructions on how to use your camera’s exposure compensation (EC)function.
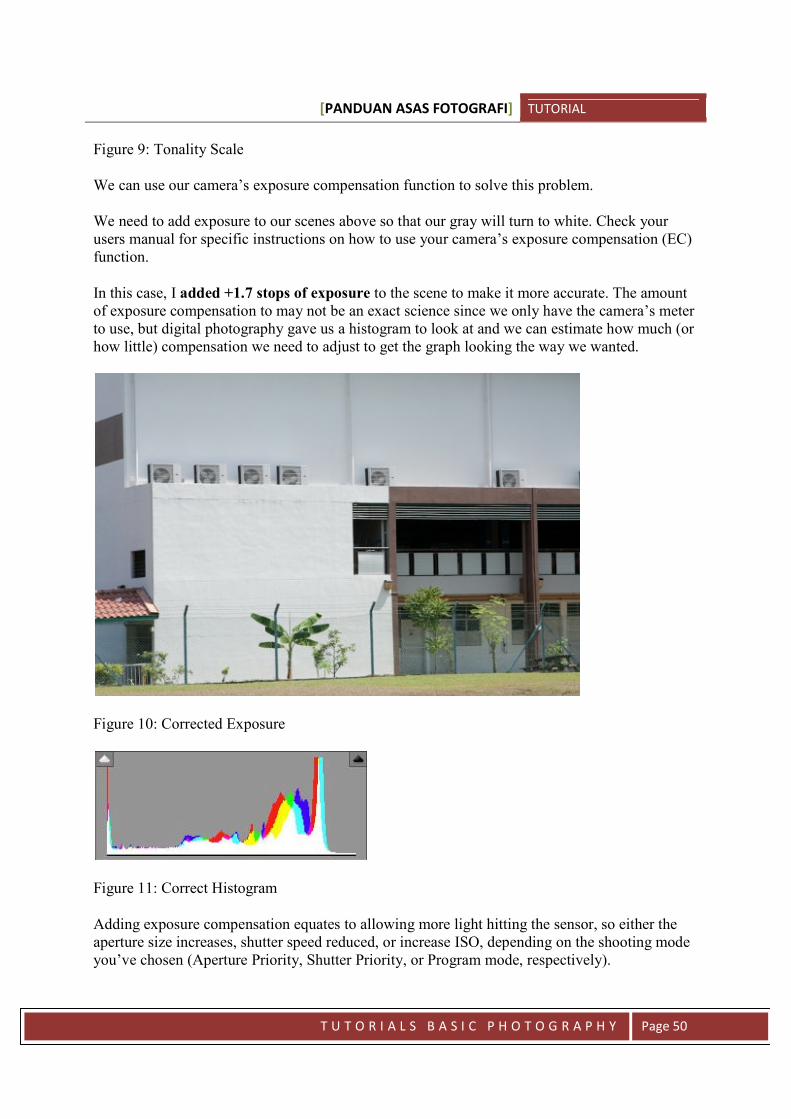
In this case, I added +1.7 stops of exposure to the scene to make it more accurate. The amountof exposure compensation to may not be an exact science since we only have the camera’s meterto use, but digital photography gave us a histogram to look at and we can estimate how much (orhow little) compensation we need to adjust to get the graph looking the way we wanted.
Figure 10: Corrected Exposure
Figure 11: Correct Histogram
Adding exposure compensation equates to allowing more light hitting the sensor, so either theaperture size increases, shutter speed reduced, or increase ISO, depending on the shooting modeyou’ve chosen (Aperture Priority, Shutter Priority, or Program mode, respectively).

[PANDUAN ASAS FOTOGRAFI] TUTORIAL
T U T O R I A L S B A S I C P H O T O G R A P H Y Page 51
Reducing exposure compensation would be the other way around, a reduction of aperture size,faster shutter speed, or lowering ISO, again, depending on the camera’s shooting mode.
So exercise a little care when using the camera’s meter when photographing predominantlybright or dark scenes and study the histogram. If you see that majority of the scene should have aright-biased histogram, add some exposure compensation. On the other hand, if you know thescene is predominantly dark, reduce the exposure compensation accordingly.
Part II of our Exposure Compensation article will discuss how to use auto-exposure lock toaccurately expose a scene.
[PANDUAN ASAS FOTOGRAFI] TUTORIAL
T U T O R I A L S B A S I C P H O T O G R A P H Y Page 52
Lesson 5
EXPOSURE COMPOSITION
(PART TWO)
Exposure Lock
In addition to exposure compensation adjustments, we can also use our camera’s exposure lockfunction to create proper exposures. Unlike the exposure compensation method where we allowthe camera to take a midtone reading then adjust the exposure afterwards, exposure lock allowsthe us, the photographer, to manually seek out an area in the scene which we consider as midtonebefore making an exposure.
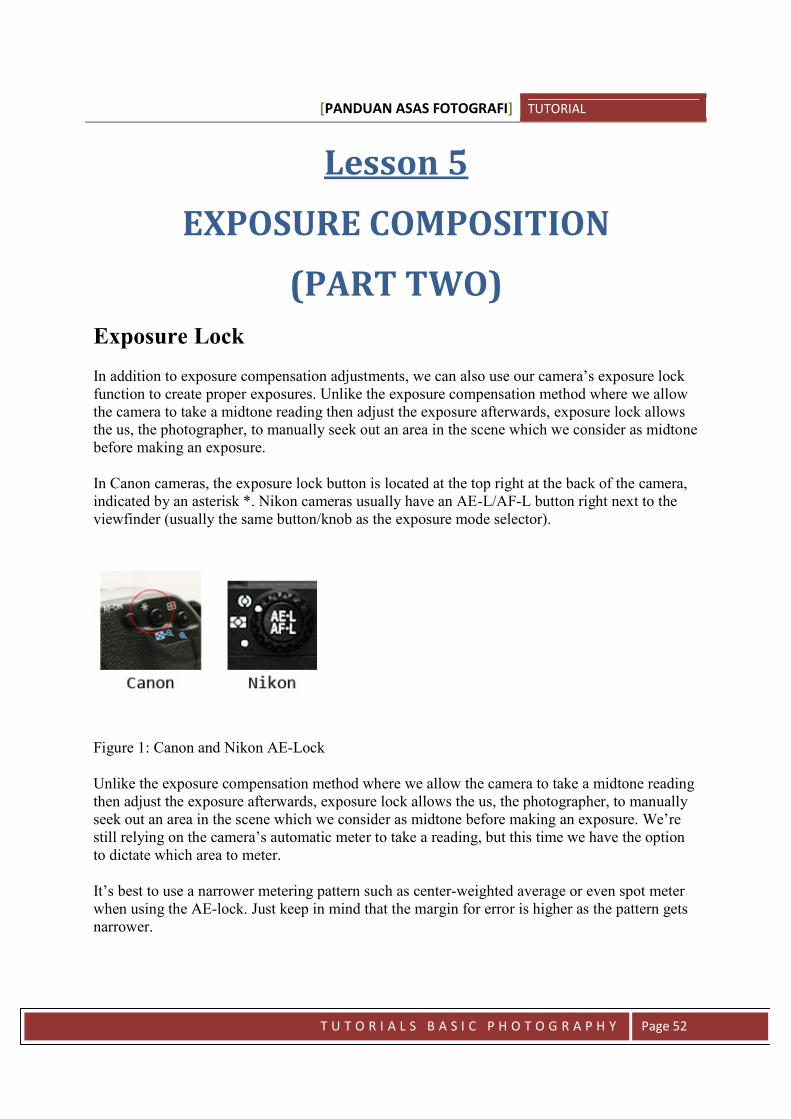
In Canon cameras, the exposure lock button is located at the top right at the back of the camera,indicated by an asterisk *. Nikon cameras usually have an AE-L/AF-L button right next to theviewfinder (usually the same button/knob as the exposure mode selector).
Figure 1: Canon and Nikon AE-Lock
Unlike the exposure compensation method where we allow the camera to take a midtone readingthen adjust the exposure afterwards, exposure lock allows the us, the photographer, to manuallyseek out an area in the scene which we consider as midtone before making an exposure. We’restill relying on the camera’s automatic meter to take a reading, but this time we have the optionto dictate which area to meter.
It’s best to use a narrower metering pattern such as center-weighted average or even spot meterwhen using the AE-lock. Just keep in mind that the margin for error is higher as the pattern getsnarrower.
[PANDUAN ASAS FOTOGRAFI] TUTORIAL
T U T O R I A L S B A S I C P H O T O G R A P H Y Page 53
If your camera doesn’t have a spot metering function, you can zoom in with your lens and pick aspot to AE-lock before zooming out to recompose the scene.
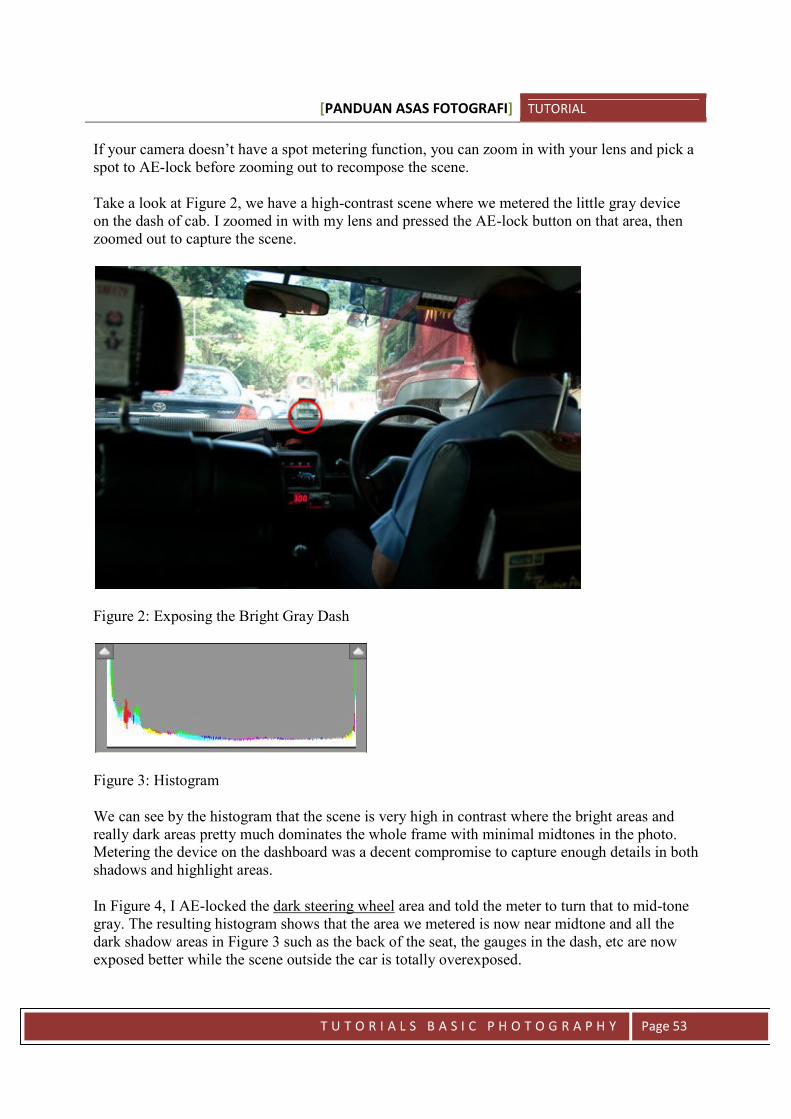
Take a look at Figure 2, we have a high-contrast scene where we metered the little gray deviceon the dash of cab. I zoomed in with my lens and pressed the AE-lock button on that area, thenzoomed out to capture the scene.
Figure 2: Exposing the Bright Gray Dash
Figure 3: Histogram
We can see by the histogram that the scene is very high in contrast where the bright areas andreally dark areas pretty much dominates the whole frame with minimal midtones in the photo.Metering the device on the dashboard was a decent compromise to capture enough details in bothshadows and highlight areas.
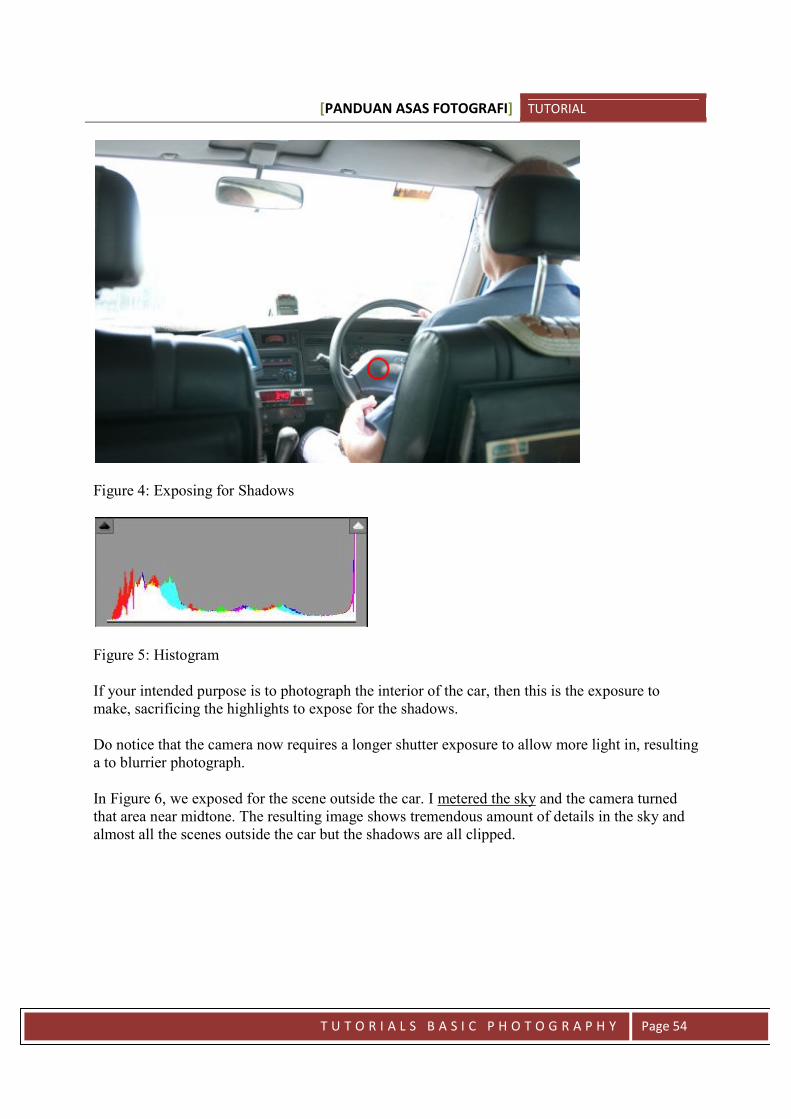
In Figure 4, I AE-locked the dark steering wheel area and told the meter to turn that to mid-tonegray. The resulting histogram shows that the area we metered is now near midtone and all thedark shadow areas in Figure 3 such as the back of the seat, the gauges in the dash, etc are nowexposed better while the scene outside the car is totally overexposed.
[PANDUAN ASAS FOTOGRAFI] TUTORIAL
T U T O R I A L S B A S I C P H O T O G R A P H Y Page 54
Figure 4: Exposing for Shadows
Figure 5: Histogram
If your intended purpose is to photograph the interior of the car, then this is the exposure tomake, sacrificing the highlights to expose for the shadows.
Do notice that the camera now requires a longer shutter exposure to allow more light in, resultinga to blurrier photograph.
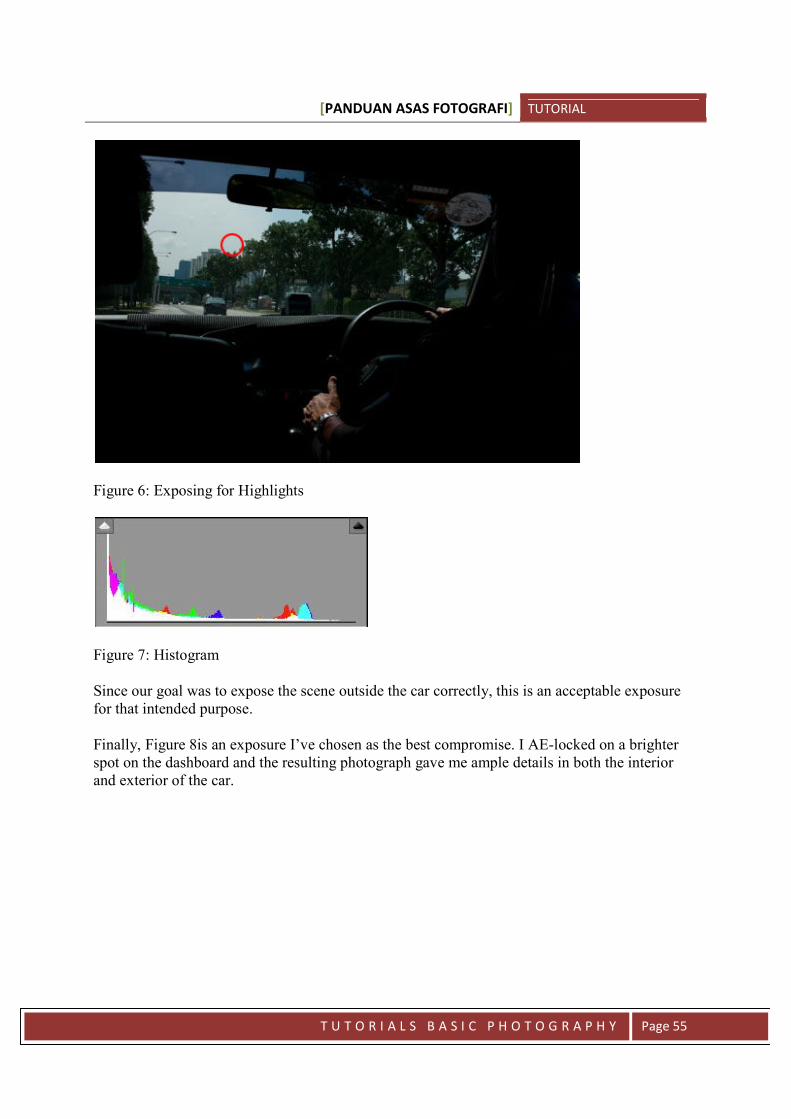
In Figure 6, we exposed for the scene outside the car. I metered the sky and the camera turnedthat area near midtone. The resulting image shows tremendous amount of details in the sky andalmost all the scenes outside the car but the shadows are all clipped.
[PANDUAN ASAS FOTOGRAFI] TUTORIAL
T U T O R I A L S B A S I C P H O T O G R A P H Y Page 55
Figure 6: Exposing for Highlights
Figure 7: Histogram
Since our goal was to expose the scene outside the car correctly, this is an acceptable exposurefor that intended purpose.
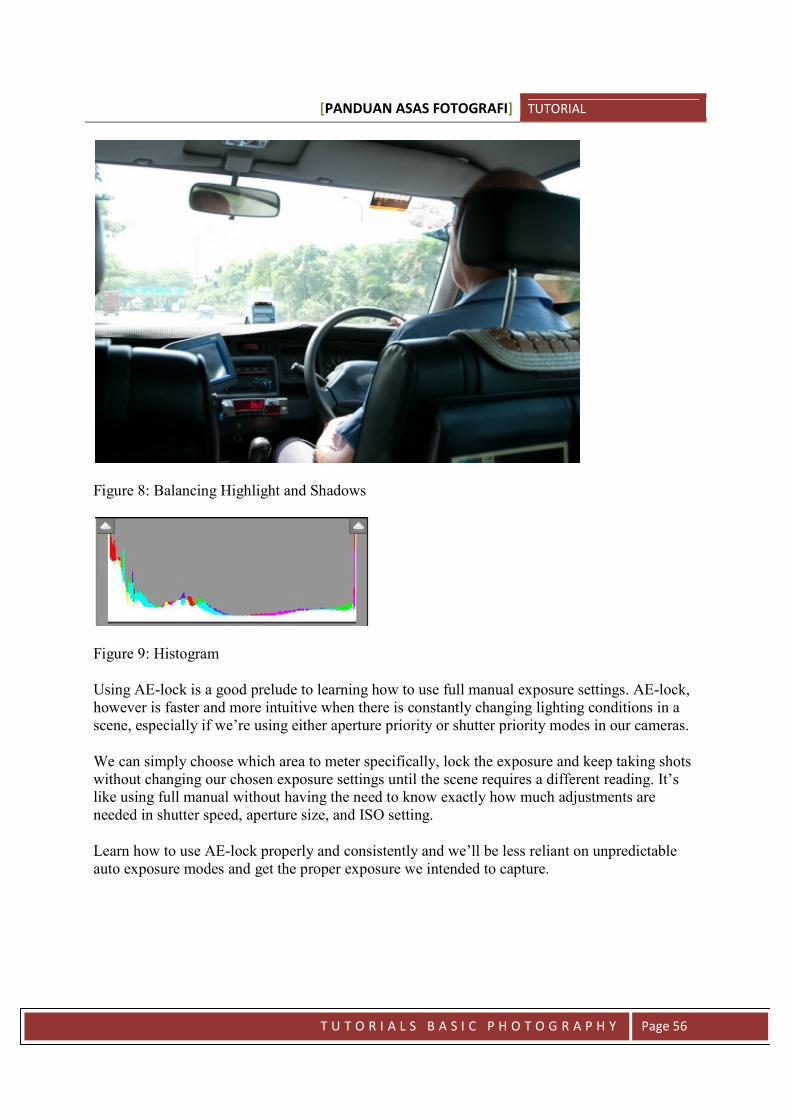
Finally, Figure 8is an exposure I’ve chosen as the best compromise. I AE-locked on a brighterspot on the dashboard and the resulting photograph gave me ample details in both the interiorand exterior of the car.
[PANDUAN ASAS FOTOGRAFI] TUTORIAL
T U T O R I A L S B A S I C P H O T O G R A P H Y Page 56
Figure 8: Balancing Highlight and Shadows
Figure 9: Histogram
Using AE-lock is a good prelude to learning how to use full manual exposure settings. AE-lock,however is faster and more intuitive when there is constantly changing lighting conditions in ascene, especially if we’re using either aperture priority or shutter priority modes in our cameras.
We can simply choose which area to meter specifically, lock the exposure and keep taking shotswithout changing our chosen exposure settings until the scene requires a different reading. It’slike using full manual without having the need to know exactly how much adjustments areneeded in shutter speed, aperture size, and ISO setting.
Learn how to use AE-lock properly and consistently and we’ll be less reliant on unpredictableauto exposure modes and get the proper exposure we intended to capture.
[PANDUAN ASAS FOTOGRAFI] TUTORIAL
T U T O R I A L S B A S I C P H O T O G R A P H Y Page 57
Lesson 6
COMMON EXPOSURE PROBLEMSAND SOLUTIONS
After discussing most of the basics of exposure, let’s take a look on some common exposureerrors that frequent our photographs when we rely on automation too much.
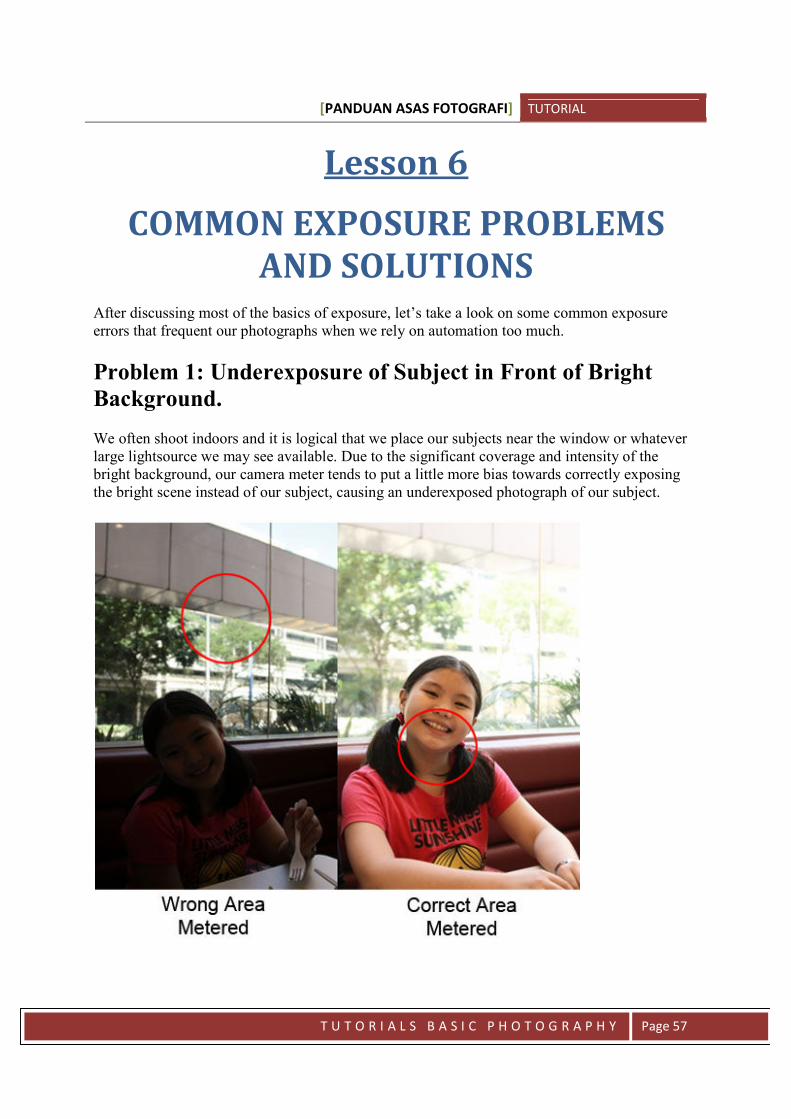
Problem 1: Underexposure of Subject in Front of BrightBackground.
We often shoot indoors and it is logical that we place our subjects near the window or whateverlarge lightsource we may see available. Due to the significant coverage and intensity of thebright background, our camera meter tends to put a little more bias towards correctly exposingthe bright scene instead of our subject, causing an underexposed photograph of our subject.
[PANDUAN ASAS FOTOGRAFI] TUTORIAL
T U T O R I A L S B A S I C P H O T O G R A P H Y Page 58
Figure 1: Incorrect Auto-Exposure Bias
Solutions: By metering the subject only, we can ensure that the subject is correctly exposed andallow the rest of the scene to just complement the subject instead of taking over the subject.
We can choose a smaller metering pattern such as a spot meter, or use auto-exposure lock on theface of the subject instead of just allowing the camera do make the decision.
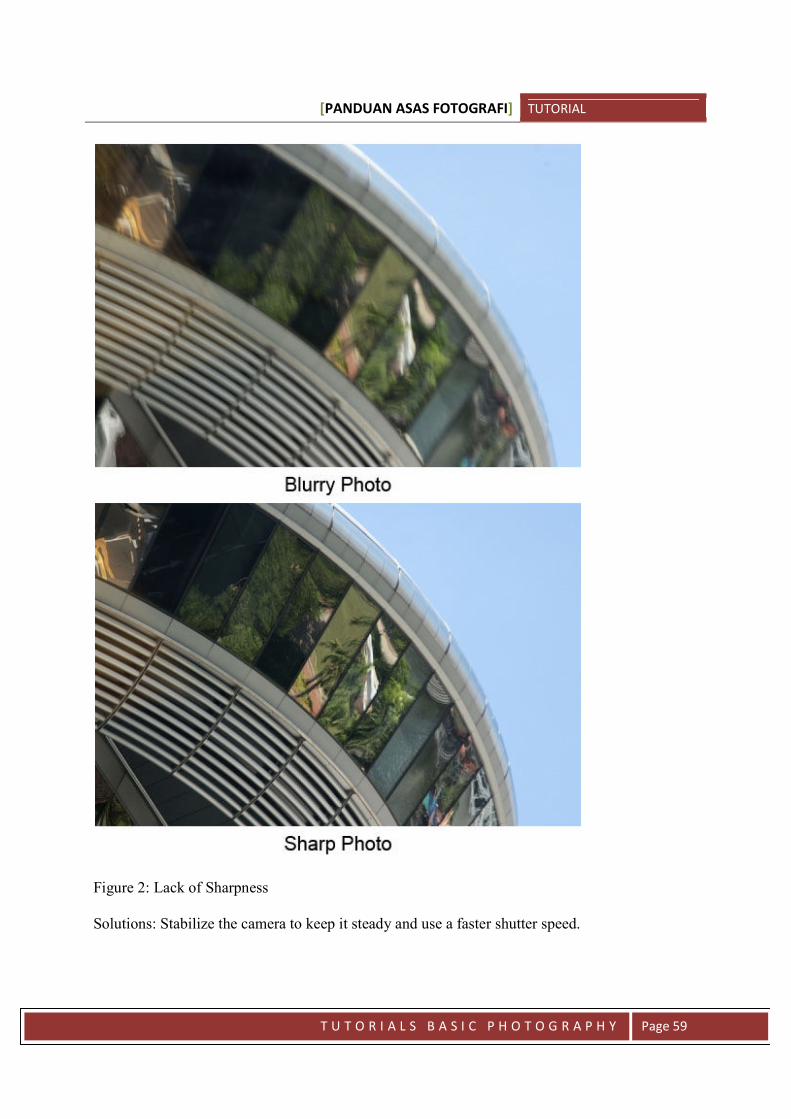
Problem 2: Shaky, Blurry Photograph of a Still Subject.
When we photograph a stationary subject, such as a building, for instance, any blur that we see inthe photograph is caused by us, the photographer, as the structure we’re photographing doesn’tmove.
[PANDUAN ASAS FOTOGRAFI] TUTORIAL
T U T O R I A L S B A S I C P H O T O G R A P H Y Page 59
Figure 2: Lack of Sharpness
Solutions: Stabilize the camera to keep it steady and use a faster shutter speed.

[PANDUAN ASAS FOTOGRAFI] TUTORIAL
T U T O R I A L S B A S I C P H O T O G R A P H Y Page 60
The first photo in Figure 2 used a slow shutter speed due to a small aperture and low ISO settingof the camera, the second photograph used a wider aperture and higher ISO which allow us to geta much sharper image. The camera was also stabilized a little by propping my elbows on thetable while holding the camera, acting as a pseudo tripod.
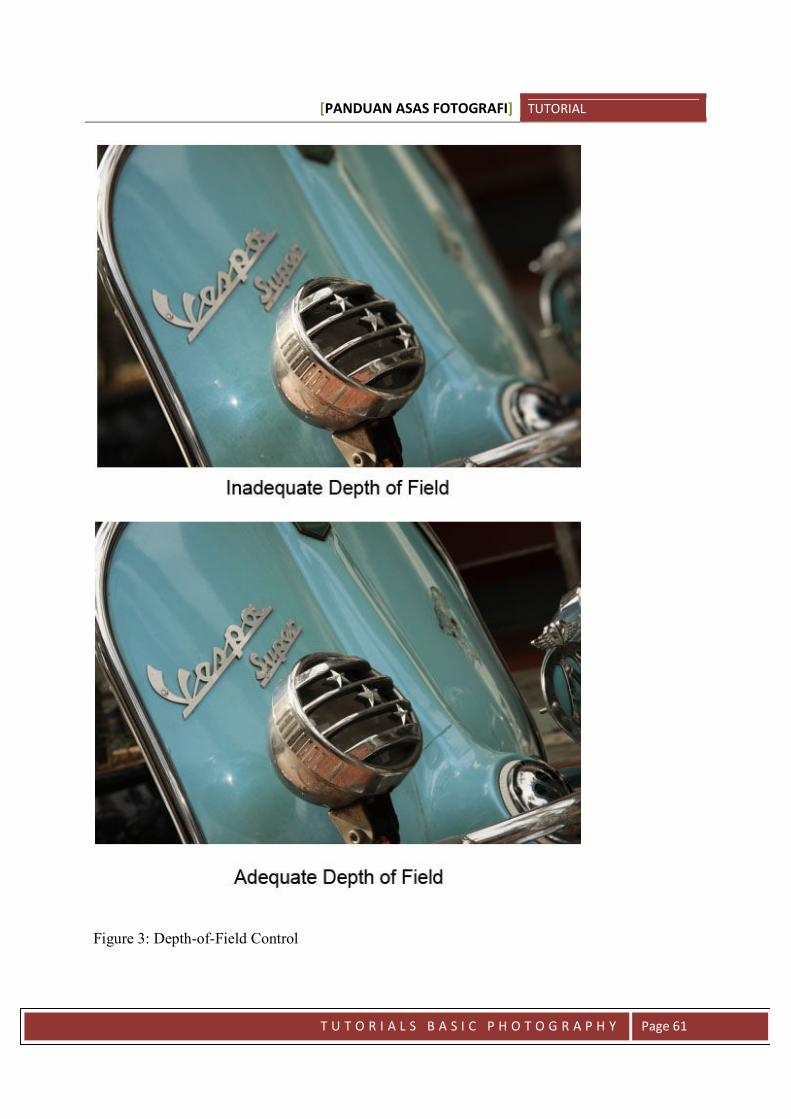
Problem 3: Not Enough Areas of the Subject are Sharp.
The third problem is common when we use longer lenses and/or lenses that allow a wide apertureopening. Many of us get too addicted with wide aperture usage and it often cause ourphotographs to not have adequate depth-of-field (DOF) to keep all the necessary details in focus.
[PANDUAN ASAS FOTOGRAFI] TUTORIAL
T U T O R I A L S B A S I C P H O T O G R A P H Y Page 61
Figure 3: Depth-of-Field Control
[PANDUAN ASAS FOTOGRAFI] TUTORIAL
T U T O R I A L S B A S I C P H O T O G R A P H Y Page 62
Solutions: Use a smaller aperture, use a wider focal length, and/or increase distance betweensubject and lens.
Figure 3 shows the difference between shooting at an aperture of f/4 versus a shot taken withf/16. The second image shows more details and kept all the elements of the classic scooter infocus, while the first image failed to keep even the branding in sharp focus.
As a photographer, we should have a keen eye on making sure how much of the subject needs tobe in focus and not get carried away with selective focusing.
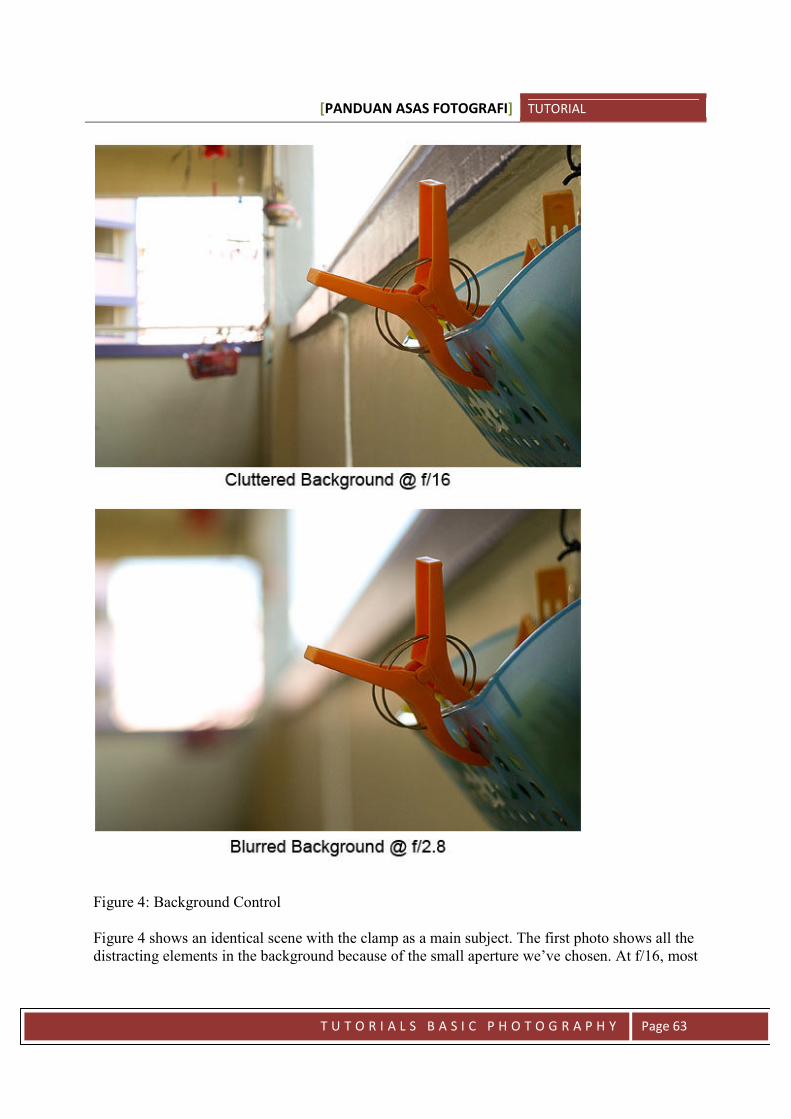
Problem 4: Distracting Background
In an ideal world, every photo we take will have a perfect, complementary background, whetherit’s plain or complex. In reality, the world is a messy place and there may be cases where wecannot avoid moving the camera or our subject around for a less cluttered background.
[PANDUAN ASAS FOTOGRAFI] TUTORIAL
T U T O R I A L S B A S I C P H O T O G R A P H Y Page 63
Figure 4: Background Control
Figure 4 shows an identical scene with the clamp as a main subject. The first photo shows all thedistracting elements in the background because of the small aperture we’ve chosen. At f/16, most
[PANDUAN ASAS FOTOGRAFI] TUTORIAL
T U T O R I A L S B A S I C P H O T O G R A P H Y Page 64
of the background elements remain clear enough to cause the viewer’s eyes to wander around theframe.
The second photo uses a wide aperture of f/2.8. The large aperture reduced the depth-of-fieldconsiderably and we can see that much of the background elements are blurred out. Some of theelements, such as the hanging incense burner cannot even be identified in the second photo.
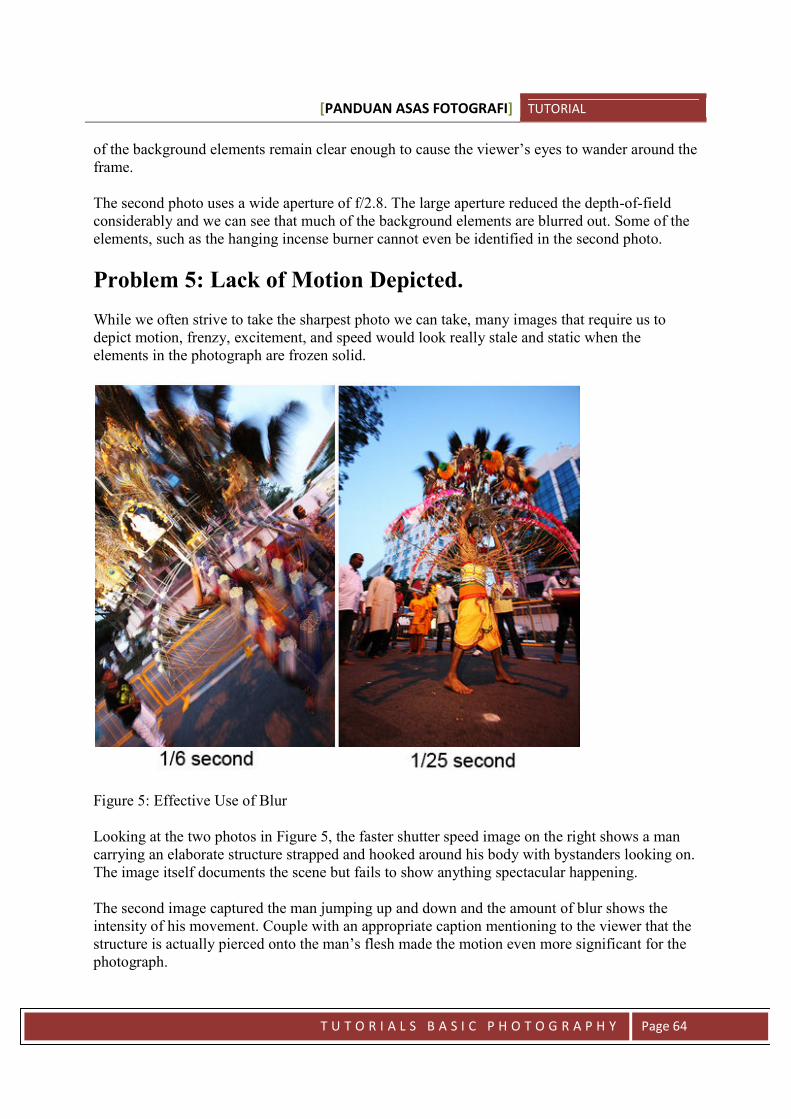
Problem 5: Lack of Motion Depicted.
While we often strive to take the sharpest photo we can take, many images that require us todepict motion, frenzy, excitement, and speed would look really stale and static when theelements in the photograph are frozen solid.
Figure 5: Effective Use of Blur
Looking at the two photos in Figure 5, the faster shutter speed image on the right shows a mancarrying an elaborate structure strapped and hooked around his body with bystanders looking on.The image itself documents the scene but fails to show anything spectacular happening.
The second image captured the man jumping up and down and the amount of blur shows theintensity of his movement. Couple with an appropriate caption mentioning to the viewer that thestructure is actually pierced onto the man’s flesh made the motion even more significant for thephotograph.

[PANDUAN ASAS FOTOGRAFI] TUTORIAL
T U T O R I A L S B A S I C P H O T O G R A P H Y Page 65
These are very basic exposure related problems that occur in many day-to-day scenes that weshoot. By keeping an eye on our subjects and our photograph’s intended purpose, we can capturea scene the way we, the photographer, intended, not the way the camera thinks should becaptured.
It is wise to start off with the camera’s suggested exposure combination as a starting point,digital photography provides us the chance to review what the camera suggested as an exposureusing the LCD and we can make the necessary exposure alterations we need to get our desiredoutput.
The camera has no knowledge of which element in your viewfinder is the subject, neither can thecamera determine how much (or how little) areas in the scene should be kept in focus, or whetheror not you want the subjects to be blurry or sharp. By understanding exposure control we canmake these decisions appear as we want them to in our photographs.
[PANDUAN ASAS FOTOGRAFI] TUTORIAL
T U T O R I A L S B A S I C P H O T O G R A P H Y Page 66
Lesson 7
WHITE BALANCE AND COLOR CAST
What is White?
White balance is essentially a corrective procedure in adjusting colors in photographs to ensurethat scenes are as neutral as possible. That would mean making sure that white areas are actuallywhite.
Technically speaking, the most important aspect of white balance correction is to make surecertain reference areas of the scene is neutral, so it doesn’t always have to involve the colorwhite per se. In short, a scene filled with colored hues without a single shade of white can still beneutralized and rendered in its correct, real-life color hues.
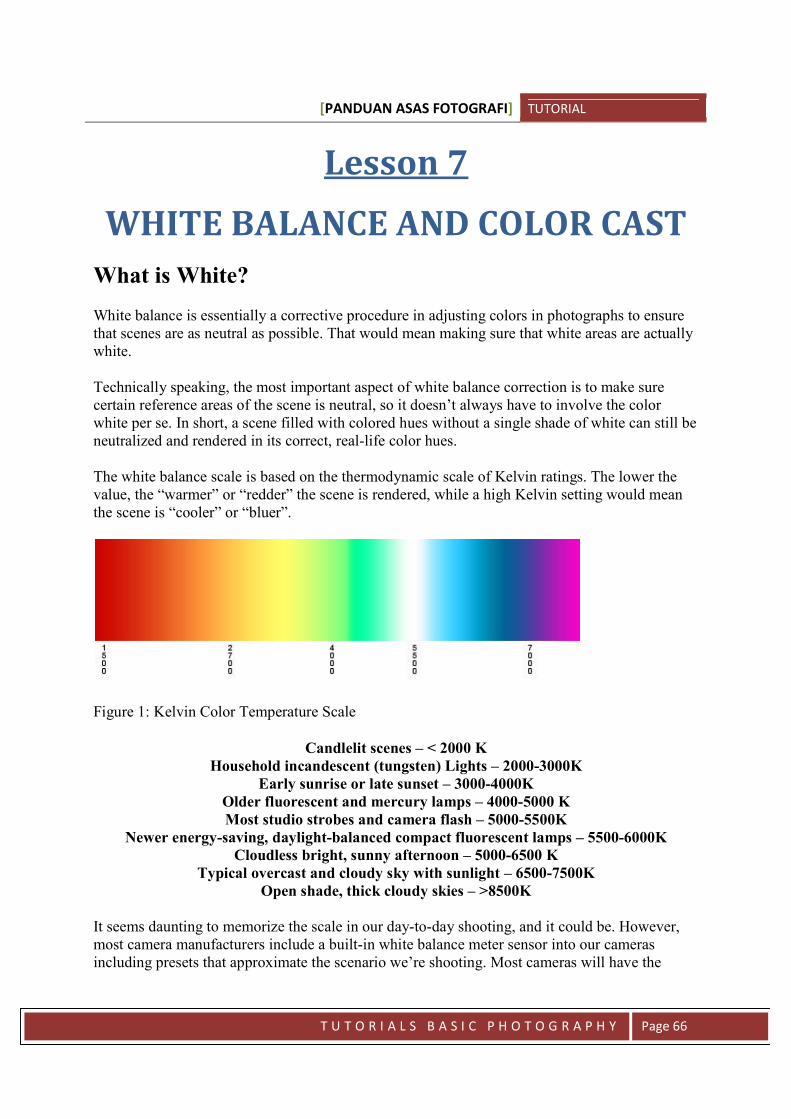
The white balance scale is based on the thermodynamic scale of Kelvin ratings. The lower thevalue, the “warmer” or “redder” the scene is rendered, while a high Kelvin setting would meanthe scene is “cooler” or “bluer”.
Figure 1: Kelvin Color Temperature Scale
Candlelit scenes – < 2000 KHousehold incandescent (tungsten) Lights – 2000-3000K
Early sunrise or late sunset – 3000-4000KOlder fluorescent and mercury lamps – 4000-5000 KMost studio strobes and camera flash – 5000-5500K
Newer energy-saving, daylight-balanced compact fluorescent lamps – 5500-6000KCloudless bright, sunny afternoon – 5000-6500 K
Typical overcast and cloudy sky with sunlight – 6500-7500KOpen shade, thick cloudy skies – >8500K
It seems daunting to memorize the scale in our day-to-day shooting, and it could be. However,most camera manufacturers include a built-in white balance meter sensor into our camerasincluding presets that approximate the scenario we’re shooting. Most cameras will have the
[PANDUAN ASAS FOTOGRAFI] TUTORIAL
T U T O R I A L S B A S I C P H O T O G R A P H Y Page 67
following presets, listed from “coolest” to “warmest” color temperature (with the usual graphicindicator).
Different camera manufacturers may label these presets differently, so please refer to yourcamera’s user manual for specific information about these presets.
Remember that the camera presets are there to neutralize the colors of the scene. If you chose“Tungsten”, for example, it doesn’t turn your image’s color cast warmer, but it neutralizes thewarm scene to a cooler scene. Conversely, if you chose a cooler WB preset like “Fluorescent”,the camera doesn’t add a blue tinge to your image, it neutralizes the cool tones in the scene byadding a warm tone instead.
The presets apply a color cast opposite the actual color cast on the scene to neutralize the scene.
Human eyes are incredible in deciphering colors and our brain has also helped us knowinstinctively if something is a certain color regardless of lighting condition. For example, if wepick up a piece of paper, we know that piece of paper is white whether we’re standing under thesun or underneath an orange street lamp.
Cameras, however, are not as smart as humans are. If you place the same piece of white paper infive different lighting conditions, it will come out as five different shades of white in ourphotographs. The camera doesn’t have a ability to neutralize color casts automatically andaccurately in all lighting conditions.
Daylit Scenes
Here we have a pretty neutral scene with a neutral subject in Figure 2. A glossy white laptop onan off-white paper above a neutral gray cement floor.

[PANDUAN ASAS FOTOGRAFI] TUTORIAL
T U T O R I A L S B A S I C P H O T O G R A P H Y Page 68
Figure 2: Shot with Auto WB
Using Auto WB setting, the camera nails the WB perfectly with no hint of out-of-place color caston the laptop and the ground.
The photograph was in an open shade around 3PM, which is pretty bright and “white” in termsof the light’s color. In most daylit scenes a few hours after sunrise and a few hours before sunset,the camera’s automatic white balance meter does a pretty accurate job in most cases.
We can easily mimic a late afternoon light by switching the white balance to “Shade” or“Cloudy”. The fact that the actual light condition still falls within what our eyes think is “white”,the slightly warm glow is still an acceptable exposure.
[PANDUAN ASAS FOTOGRAFI] TUTORIAL
T U T O R I A L S B A S I C P H O T O G R A P H Y Page 69
Figure 3: Shot with "Shade" Preset
Artificial Lighting Conditions
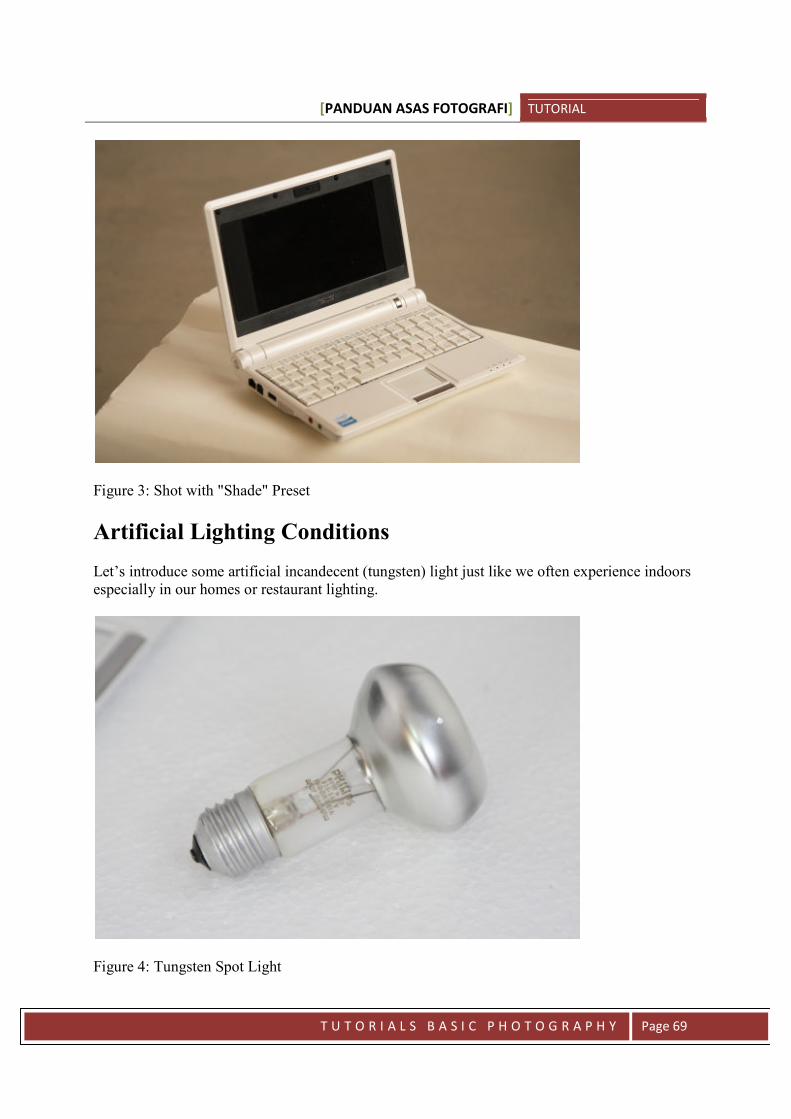
Let’s introduce some artificial incandecent (tungsten) light just like we often experience indoorsespecially in our homes or restaurant lighting.
Figure 4: Tungsten Spot Light
[PANDUAN ASAS FOTOGRAFI] TUTORIAL
T U T O R I A L S B A S I C P H O T O G R A P H Y Page 70
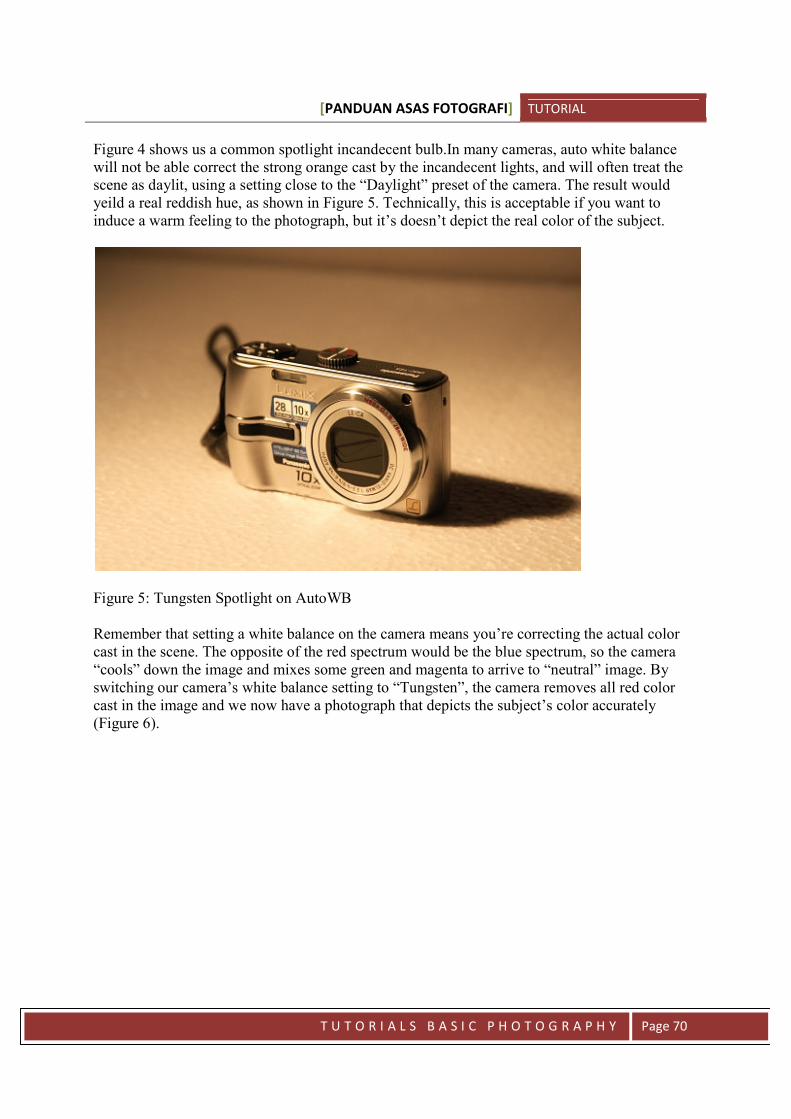
Figure 4 shows us a common spotlight incandecent bulb.In many cameras, auto white balancewill not be able correct the strong orange cast by the incandecent lights, and will often treat thescene as daylit, using a setting close to the “Daylight” preset of the camera. The result wouldyeild a real reddish hue, as shown in Figure 5. Technically, this is acceptable if you want toinduce a warm feeling to the photograph, but it’s doesn’t depict the real color of the subject.
Figure 5: Tungsten Spotlight on AutoWB
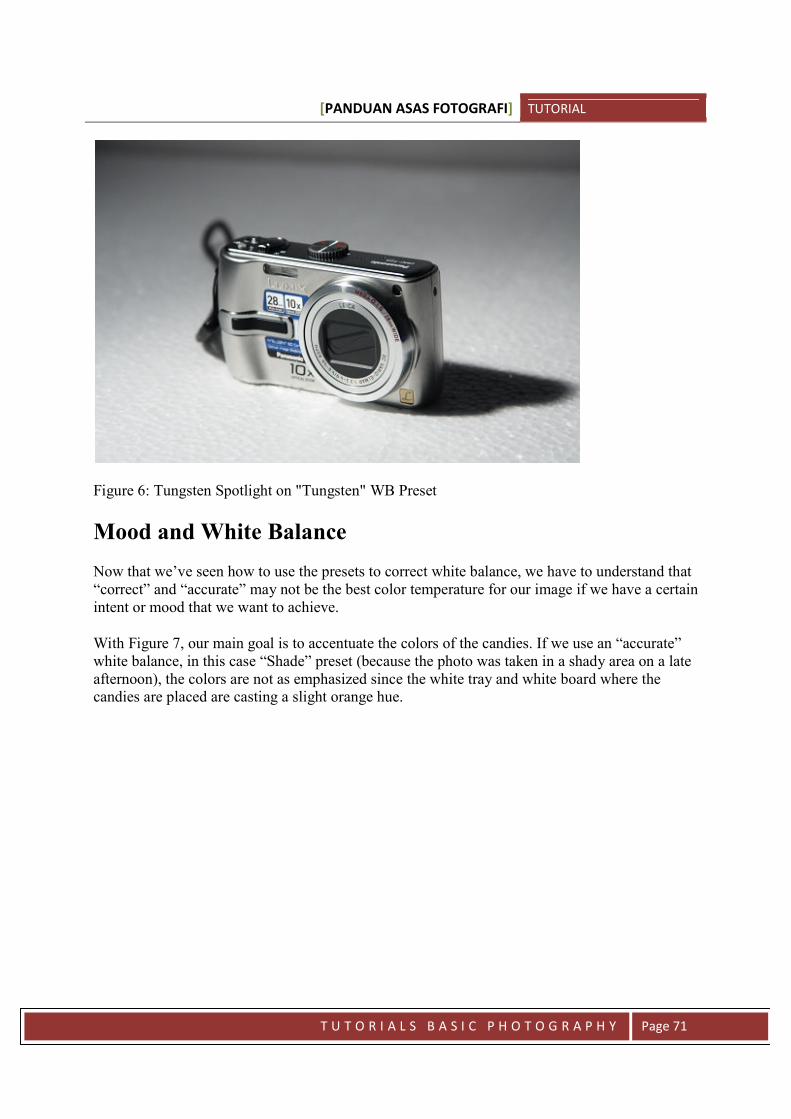
Remember that setting a white balance on the camera means you’re correcting the actual colorcast in the scene. The opposite of the red spectrum would be the blue spectrum, so the camera“cools” down the image and mixes some green and magenta to arrive to “neutral” image. Byswitching our camera’s white balance setting to “Tungsten”, the camera removes all red colorcast in the image and we now have a photograph that depicts the subject’s color accurately(Figure 6).
[PANDUAN ASAS FOTOGRAFI] TUTORIAL
T U T O R I A L S B A S I C P H O T O G R A P H Y Page 71
Figure 6: Tungsten Spotlight on "Tungsten" WB Preset
Mood and White Balance
Now that we’ve seen how to use the presets to correct white balance, we have to understand that“correct” and “accurate” may not be the best color temperature for our image if we have a certainintent or mood that we want to achieve.
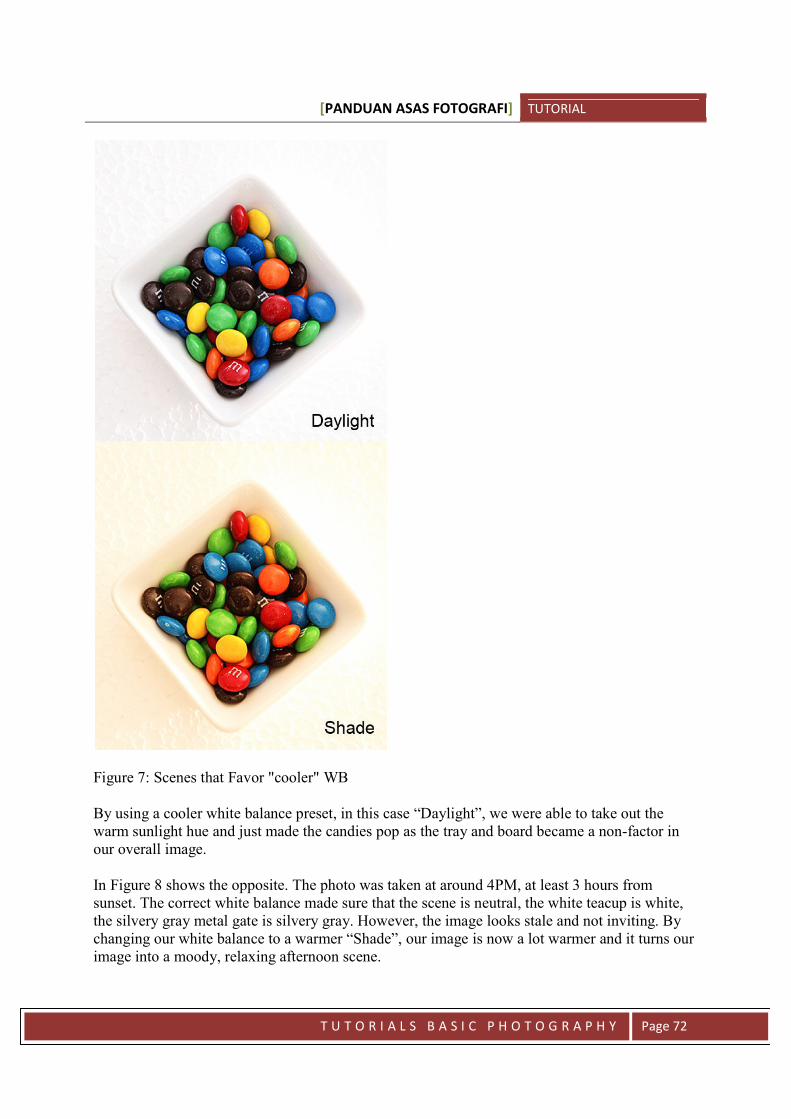
With Figure 7, our main goal is to accentuate the colors of the candies. If we use an “accurate”white balance, in this case “Shade” preset (because the photo was taken in a shady area on a lateafternoon), the colors are not as emphasized since the white tray and white board where thecandies are placed are casting a slight orange hue.
[PANDUAN ASAS FOTOGRAFI] TUTORIAL
T U T O R I A L S B A S I C P H O T O G R A P H Y Page 72
Figure 7: Scenes that Favor "cooler" WB
By using a cooler white balance preset, in this case “Daylight”, we were able to take out thewarm sunlight hue and just made the candies pop as the tray and board became a non-factor inour overall image.
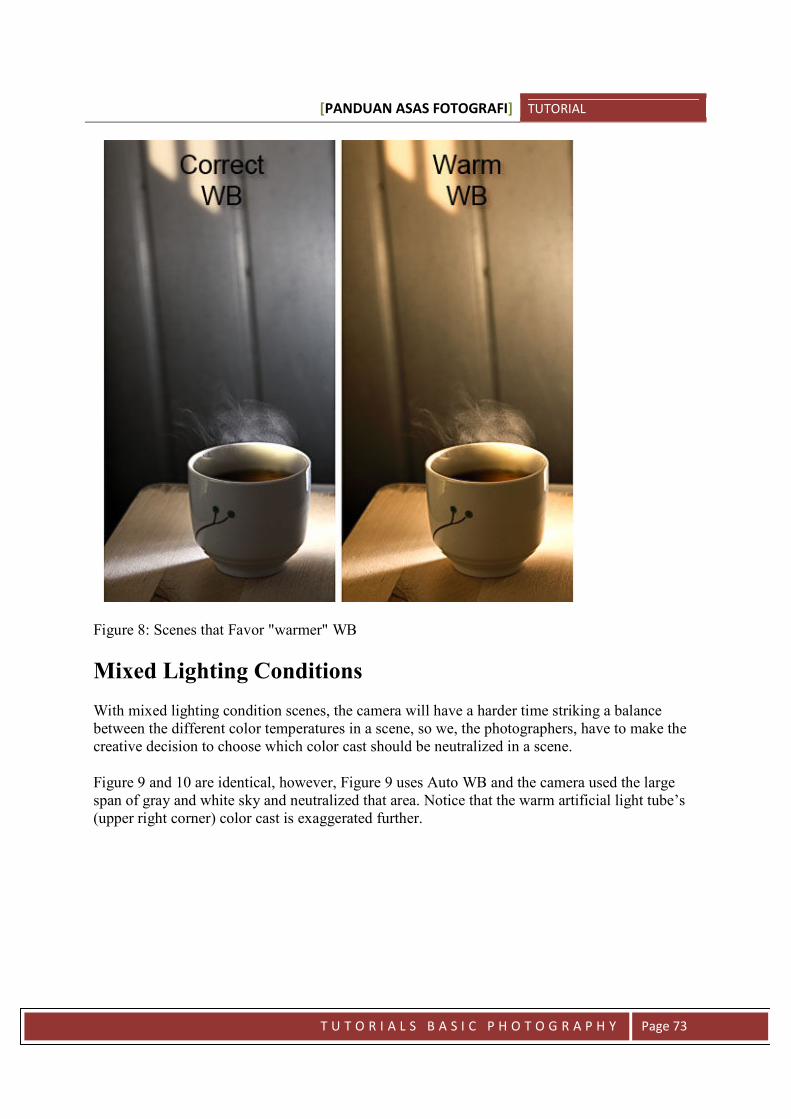
In Figure 8 shows the opposite. The photo was taken at around 4PM, at least 3 hours fromsunset. The correct white balance made sure that the scene is neutral, the white teacup is white,the silvery gray metal gate is silvery gray. However, the image looks stale and not inviting. Bychanging our white balance to a warmer “Shade”, our image is now a lot warmer and it turns ourimage into a moody, relaxing afternoon scene.
[PANDUAN ASAS FOTOGRAFI] TUTORIAL
T U T O R I A L S B A S I C P H O T O G R A P H Y Page 73
Figure 8: Scenes that Favor "warmer" WB
Mixed Lighting Conditions
With mixed lighting condition scenes, the camera will have a harder time striking a balancebetween the different color temperatures in a scene, so we, the photographers, have to make thecreative decision to choose which color cast should be neutralized in a scene.
Figure 9 and 10 are identical, however, Figure 9 uses Auto WB and the camera used the largespan of gray and white sky and neutralized that area. Notice that the warm artificial light tube’s(upper right corner) color cast is exaggerated further.
[PANDUAN ASAS FOTOGRAFI] TUTORIAL
T U T O R I A L S B A S I C P H O T O G R A P H Y Page 74
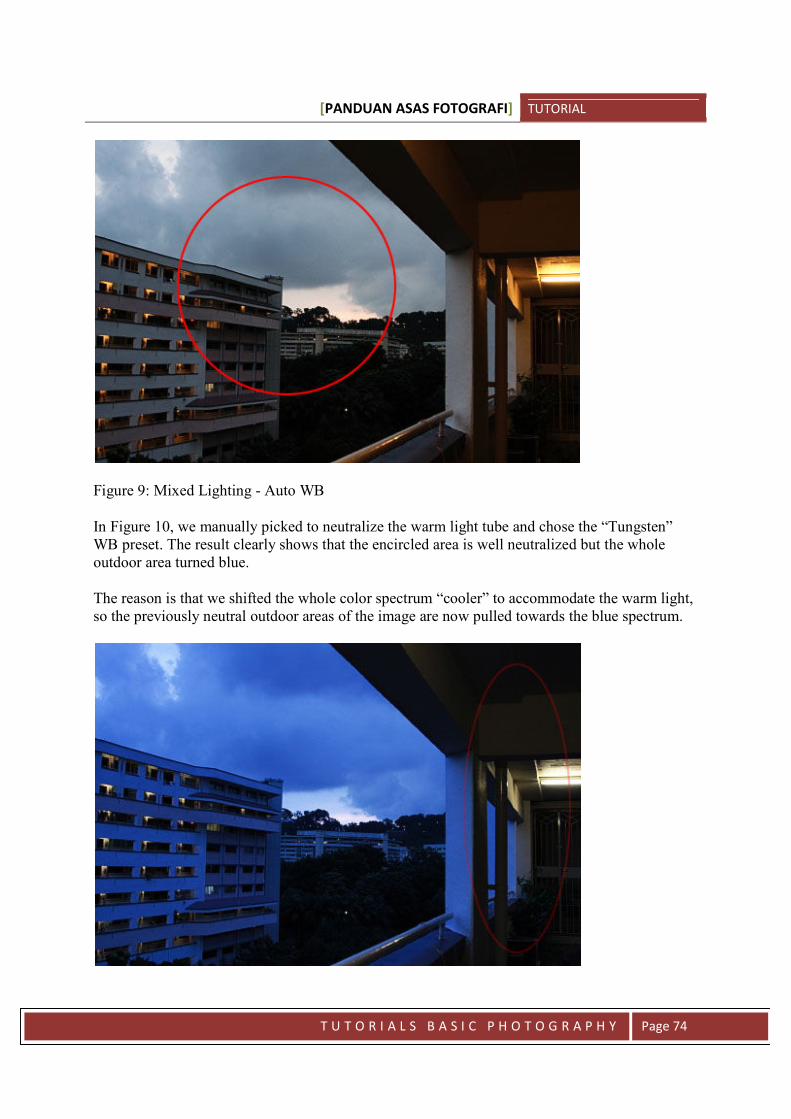
Figure 9: Mixed Lighting - Auto WB
In Figure 10, we manually picked to neutralize the warm light tube and chose the “Tungsten”WB preset. The result clearly shows that the encircled area is well neutralized but the wholeoutdoor area turned blue.
The reason is that we shifted the whole color spectrum “cooler” to accommodate the warm light,so the previously neutral outdoor areas of the image are now pulled towards the blue spectrum.

[PANDUAN ASAS FOTOGRAFI] TUTORIAL
T U T O R I A L S B A S I C P H O T O G R A P H Y Page 75
Figure 10: Mixed Lighting - Tungsten WB Preset
To summarize, in most situations, we should concentrate on achieving accurate colorreproduction as possible. We must keep in mind, however, that there are scenes that simplyappear much better with “moody” colors than accurate colors. Just like metering for exposure,the correct settings would be ideal for most photographs, but adding little adjustments from thecorrect settings can turn a purely technical photograph into a personal creative artwork.
[PANDUAN ASAS FOTOGRAFI] TUTORIAL
T U T O R I A L S B A S I C P H O T O G R A P H Y Page 76
Lesson 8
CHOSING A DIGITAL SLR CAMERA
(PART I)Today’s digital SLR market is flooded with choices ranging from relatively affordable models tohigh-end models that cost as much as a used car. Which one will be right for you? We’re here todissect the primary features of most DSLRs and hopefully clear-up the sugar-coated marketingclaims of some camera ads to help you make a sound decision on your investment.
Most cameras are listed with the following key features as selling points:
Resolution (in Megapixels) Auto-focus points Continuos burst speed (in frames per second – fps) ISO sensitivity range.
We will concentrate on the four specifications above as they have a direct relationship with ourresulting photographs than the other more physical feature differences such as size, weight, etc.
A DSLR package usually consists of a camera body (where all the image capturing, saving,viewing are performed) and a lens.
Before we move on to the key features, it’s best to do our homework when we are consideringour first (or replacement) DSLR. Knowing the difference between what you need, want, and canafford is important, but so are the other incidental costs of owning a DSLR.
We need to sort out three factors before we even look at what’s available in the market:
Frequency of Usage The Budget Choice of Subject
Frequency of Usage
How often are you going to use the camera? Remember that DSLRs are relatively large, bulky,and heavy. You certainly cannot slip one into your pocket easily or stash it into a ladies handbagcompared to pocket digital cameras, so if you’re not the type who likes to bring a kilogram ofequipment often, then a DSLR may not be your cup of tea.
[PANDUAN ASAS FOTOGRAFI] TUTORIAL
T U T O R I A L S B A S I C P H O T O G R A P H Y Page 77
If you don’t plan to use your camera extensively, it would be unwise to invest so much on aDSLR system when cheaper portable digital cameras are readily available.
The Budget
How much can you afford to spend on a DSLR?
Most first time DSLR buyers are confronted with the issue of cost, and the camera companiesstrive to make this first leap into the DSLR work as painless as possible by offering us entry-level cameras that are packed with features, small size, and affordable prices that are ready-to-use, right out of the box.
The price difference between entry level camera bodies and high-end professional camera bodiesis gigantic. A top-of-the-line camera from the same company can cost 10x more than the entrylevel camera.
Unfortunately, a lot of people assume that the price of the camera dictates the quality of output,thinking that a more expensive camera will yield better photographs, which isn’t the case. Bothends of the spectrum have their own pros and cons, but in practice, cameras function in a similarmanner. The higher-end cameras are designed for a more specific genre of photography whilelower-end models aim to satisfy the most number of users needs.
In short, if budget is an issue, get the camera you can easily afford as you’re bound to spend alittle more for the associated costs of owning a DSLR. Which brings us to the next issue of“system cost”.
System Cost
Unlike purchasing a compact digital camera where the camera itself is the only purchase, DSLRsare not as simple. Owning a DSLR often opens a big can of worms of what is available in themarket to “upgrade” your camera, whether it is for function or aesthetics. From lenses to flash,bags to tripod, humidity-controlled cabinets to underwater casings, the options are virtuallyendless.
In reality, all we need is a camera body with a battery, memory card, and lens attached. Mostenthusiast-level cameras are equipped with some form of a “kit” zoom lens that cover the focallength that most photographers tend to use often. It’s no accident that the lens included is a zoomlens that covers a wide angle to standard focal length in most cameras, and with solid knowledgein photography fundamentals, this really is a sufficient lens to use until you have more stringentand specific needs in your photographs, and when you finally reach the stage of upgrading theaccessories for your camera, the issue of system cost comes into play.
Almost all major DSLR manufacturer offers myriads of lenses, flash, and accessories that fittheir camera bodies. In most cases, an lens, flash, or accessory unit will only work with the samebrand of camera. For example, you cannot directly use a Canon lens on a Nikon body as the
[PANDUAN ASAS FOTOGRAFI] TUTORIAL
T U T O R I A L S B A S I C P H O T O G R A P H Y Page 78
physical mount where the lens meet the body are totally different, not to mention that theelectronics cannot communicate between manufacturer’s products.
This is somewhat of a stranglehold by the camera manufacturers to keep you loyal to a particularbrand and as a budget -oriented photographer, you must consider the cost and availability ofaccessories as switching brands can be very costly as you’ll have to start from scratch once againin hardware purchases.
Cost of Accessories
The cost of accessories involved in owning a DLSR is usually ignored but can pile up ratherquickly. An extra memory card or two, extra batteries, protective and effect filters, tripod,camera bags, and flash units are usually not included with an off-the-shelf camera and these arenot exactly cheap relatively speaking.
Another reason why entry level models are the best options for beginners as retailers usuallypackage the cameras with extra accessories that are sufficient for light photographyrequirements. These accessories may add up to a couple of hundreds of dollars but are packagedat a very minimal add-on cost to the camera package.
Higher-end cameras usually won’t include any accessories as manufacturers assume that youeither already have some of these common accessories hence you’re after a more advancedmodel.
Choice of Subject
Finally, the most important question that you must ask yourself would be “what am I going toshoot”? The hardware specification of each camera dictates its pricing and market segment, ascameras move up the price scale, the more technical and specific its purpose usually is. If youplan to photographs just about anything under the sun from family members to sweepingcountryside landscape, most of the time, even the most basic offerings of a camera manufacturerwill be more than capable of serving that purpose.
If you know you’ll be shooting high-speed events most of the time, you should consider acamera that can shoot at a fast pace with a highly responsive auto-focus system. If you know youare shooting fine art or photographs that will end up as a large print, then get a camera that has alot of megapixels, and so on.
It’s utterly pointless to get a high megapixel camera if all you plan to do with your photographsis to print a small 4×6 print or sharing it on the internet. It’s a waste of money to get a sportscamera that can shoot ten frames per second if you only plan to shoot macro or studio shots, forexample.

[PANDUAN ASAS FOTOGRAFI] TUTORIAL
T U T O R I A L S B A S I C P H O T O G R A P H Y Page 79
Just like buying an automobile, you wouldn’t buy a compact 2-seater sports car if you need tocarry a family of five everyday, nor would you buy a family van if you plan to race your carevery weekend.
In summary, do your homework by being honest to yourself first. Ask yourself questions abouttotal budget for the camera and associated accessories, subject preference, and physically go outto a store and hold the cameras before comparing the specifications.
[PANDUAN ASAS FOTOGRAFI] TUTORIAL
T U T O R I A L S B A S I C P H O T O G R A P H Y Page 80
Lesson 9
CHOSING A DIGITAL SLR CAMERA
- RESOLUTION -
(PART II)
Key Camera Feature: Resolution
Resolution is the most common specification that manufacturers advertise when it comes todigital cameras. In terms of digital cameras, resolutiom would be the equivalent of horsepowerwhen marketing a vehicle, where a higher figure will almost always be more enticing for thebuyer than a low number.
However, how can we determine the ideal amount of resolution our cameras should have? Arethe differences between resolution figures really as significant as the advertisement claims? Howdoes resolution amount affect our photographs?
These are important questions to ask and research upon when it comes to the importance ofresolution amount in a digital camera.
What is resolution?
By definition, resolution describes the number of pixels or dots present to create a final image.
All digital cameras utilize an imaging sensor to convert the light that enters the camera lens intodigital data to form an image. As light hits the sensor, the sensor captures each light beam withmillions of tiny light cavities and separates the light beam into red, green, and blue channels.Then the captured information creates a completed image using the camera’s multitude of chipsand processors.
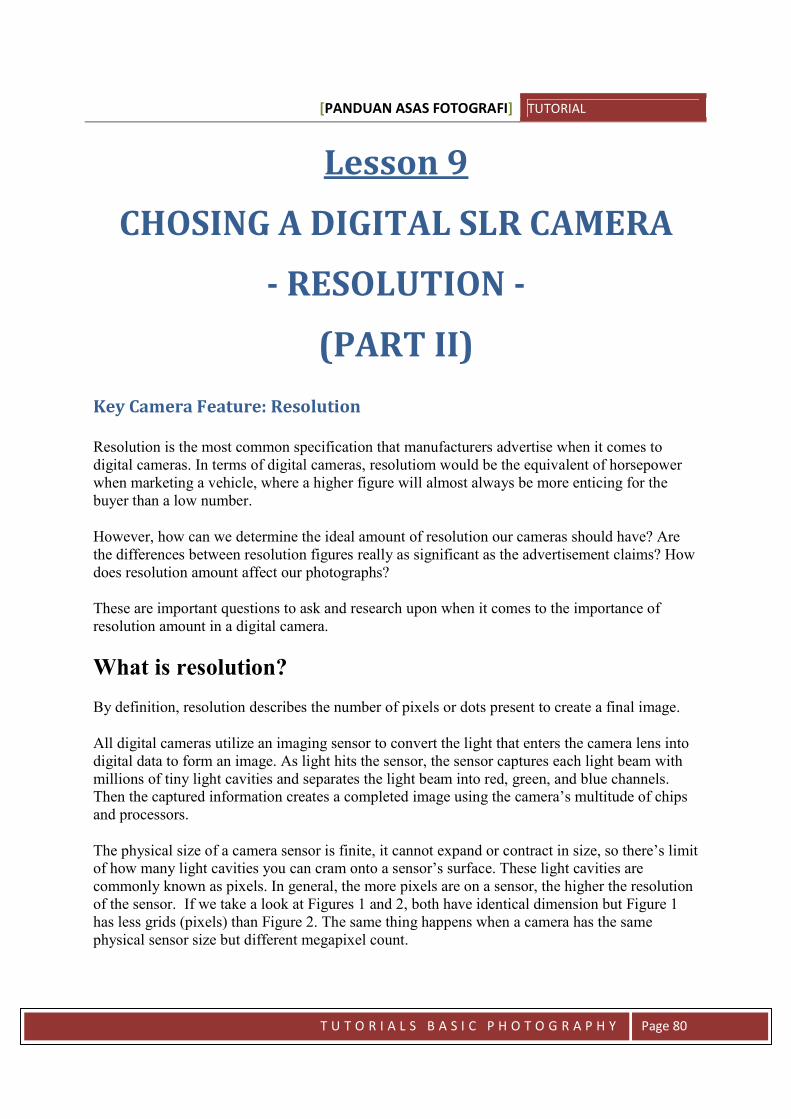
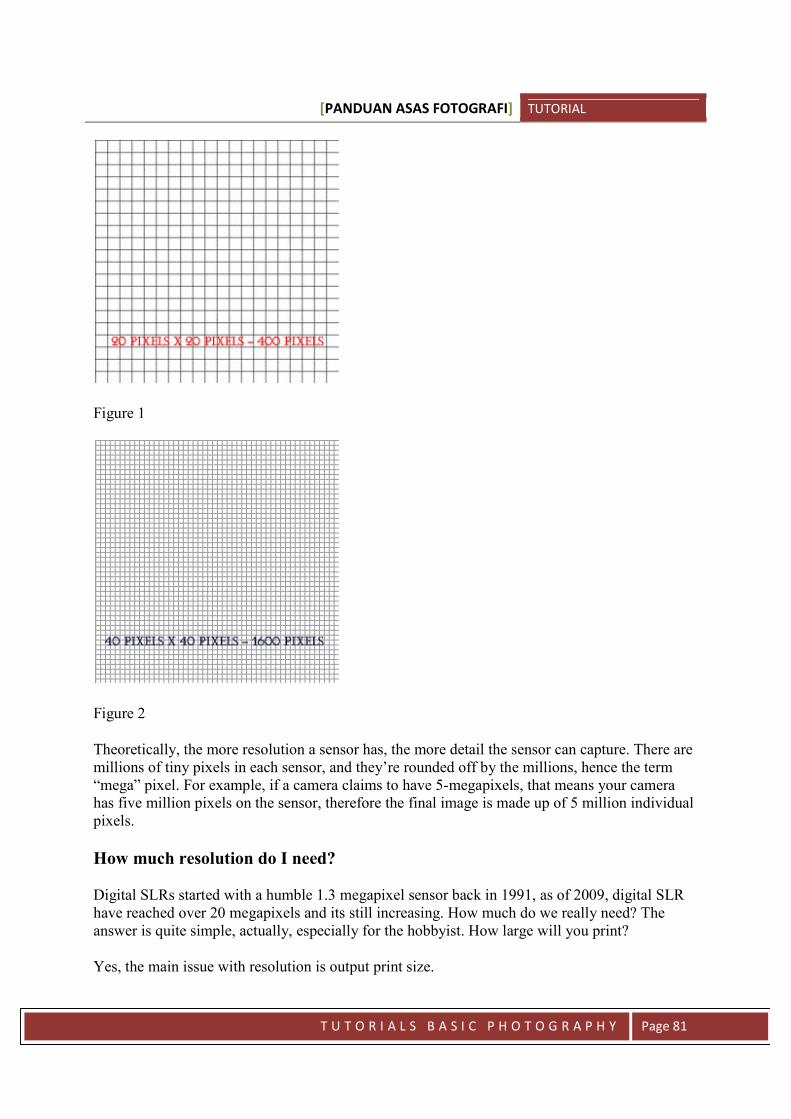
The physical size of a camera sensor is finite, it cannot expand or contract in size, so there’s limitof how many light cavities you can cram onto a sensor’s surface. These light cavities arecommonly known as pixels. In general, the more pixels are on a sensor, the higher the resolutionof the sensor. If we take a look at Figures 1 and 2, both have identical dimension but Figure 1has less grids (pixels) than Figure 2. The same thing happens when a camera has the samephysical sensor size but different megapixel count.
[PANDUAN ASAS FOTOGRAFI] TUTORIAL
T U T O R I A L S B A S I C P H O T O G R A P H Y Page 81
Figure 1
Figure 2
Theoretically, the more resolution a sensor has, the more detail the sensor can capture. There aremillions of tiny pixels in each sensor, and they’re rounded off by the millions, hence the term“mega” pixel. For example, if a camera claims to have 5-megapixels, that means your camerahas five million pixels on the sensor, therefore the final image is made up of 5 million individualpixels.
How much resolution do I need?
Digital SLRs started with a humble 1.3 megapixel sensor back in 1991, as of 2009, digital SLRhave reached over 20 megapixels and its still increasing. How much do we really need? Theanswer is quite simple, actually, especially for the hobbyist. How large will you print?
Yes, the main issue with resolution is output print size.
[PANDUAN ASAS FOTOGRAFI] TUTORIAL
T U T O R I A L S B A S I C P H O T O G R A P H Y Page 82
Most of us will view digital images on screen, which doesn’t offer that much viewing areaanyway. For example, a large, wide screen 33” LCD monitor only displays approximately 2560x 1600 pixels, or 4.1 megapixels. We rarely view images full screen, so most images viewed onscreen won’t require much in resolution. In addition, most digital photos end up being on theinternet, and due to file size restrictions and download speed issues, the image files we upload onthe web will require an even smaller resolution requirement.
In practical terms, the larger the displayed image, whether on screen or on print, the farther wehave to be from the display to view the entire image. As we move farther from the subject, themore difficult it is for human eyes to scrutinize details as well.
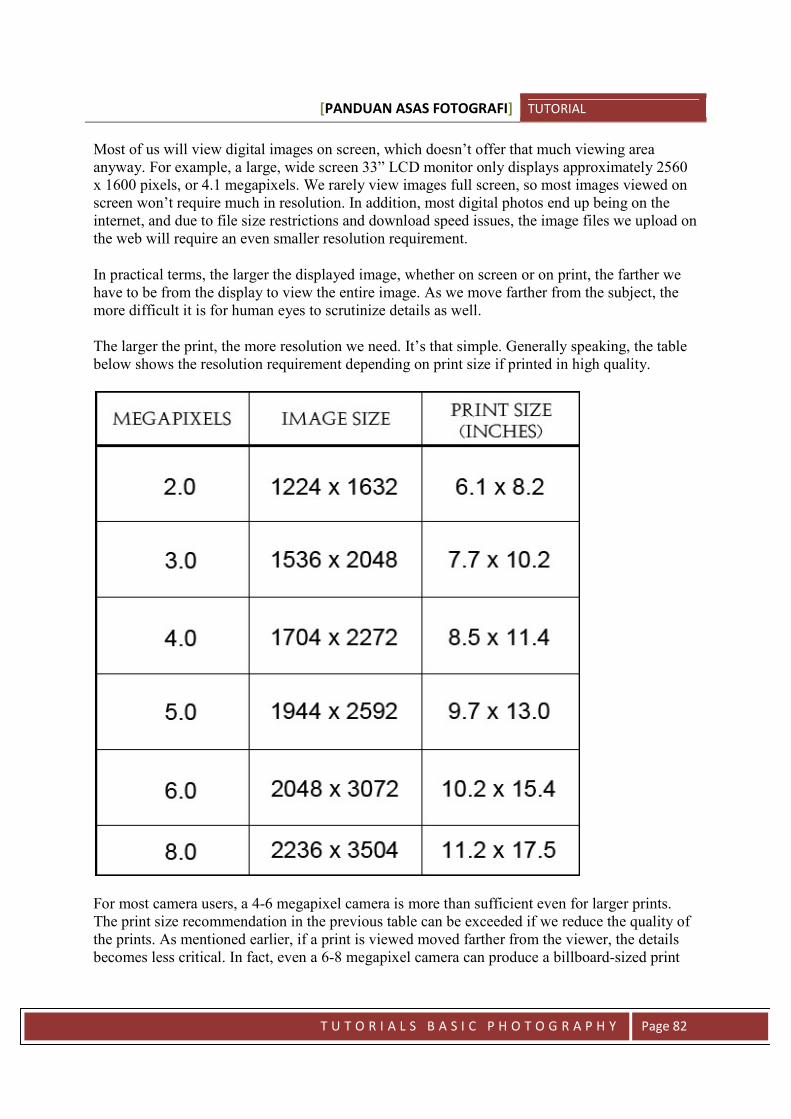
The larger the print, the more resolution we need. It’s that simple. Generally speaking, the tablebelow shows the resolution requirement depending on print size if printed in high quality.
For most camera users, a 4-6 megapixel camera is more than sufficient even for larger prints.The print size recommendation in the previous table can be exceeded if we reduce the quality ofthe prints. As mentioned earlier, if a print is viewed moved farther from the viewer, the detailsbecomes less critical. In fact, even a 6-8 megapixel camera can produce a billboard-sized print
[PANDUAN ASAS FOTOGRAFI] TUTORIAL
T U T O R I A L S B A S I C P H O T O G R A P H Y Page 83
with proper graphic interpolation (upsizing) software, as we never view billboards at closedistances, we can clearly see that most billboards are sufficiently clear when viewed from adistance.
With the current crop of digital SLRs bottoming out at 6 megapixels, there’s really no reason toworry about not having enough megapixels for our photographs.
Why not get the most megapixels I can afford?
You shouldn’t because megapixels is just part of the equation when it comes to image quality.The sensor alone doesn’t dictate how an great the camera can translate those pixels into a finalphotograph.
Higher resolution sensors often cost more to purchase and also cost more to maintain. Asmegapixel count grows, so does file sizes. Larger file sizes would require much larger memorycards, larger computer storage space, and more powerful computer to view and edit the images.All of these will become required expenses as megapixel count in cameras increase.
We may wonder “can’t we just reduce the resolution setting in the camera and use smaller filesizes?”. Yes we can do that, but whenever we choose a file size within the camera that’s not fullresolution, we’re only using part of the sensor and effectively reducing our high megapixelcamera to a lower megapixel camera.
For example, a typical 8-megapixel camera gives us a large image with 3504 x 2336 pixels at fullresolution, if we change our image size to “medium”, our image size drops to 2544 x 1696,which is just 4.3 megapixels. Now if we’ll only use 4.3 megapixels all the time, wouldn’t it makesense to save hundreds of dollars by buying a 4.3 megapixel camera to begin with?
There are technical issues to contend with when it comes to choosing higher resolution sensorssuch as noise control, dynamic range, buffer speed, etc. but in most cases, the differences arerather minor and doesn’t affect most photographers in practice.
So don’t worry too much about resolution and megapixel specifications. Any digital SLR withover 6 to 8 megapixels should be sufficient in terms of resolution requirements for most usersonly if you habitually print large images when megapixel requirements will be higher.
[PANDUAN ASAS FOTOGRAFI] TUTORIAL
T U T O R I A L S B A S I C P H O T O G R A P H Y Page 84
Lesson 10
SITUATIONAL ACCESSORIESThe basic essentials are universal items for all photographers to purchase as they work regardlessof brand, model, or photographic preference. There are other important accessories thatphotographers should include in their arsenal depending on the type of subjects you shoot mostoften.
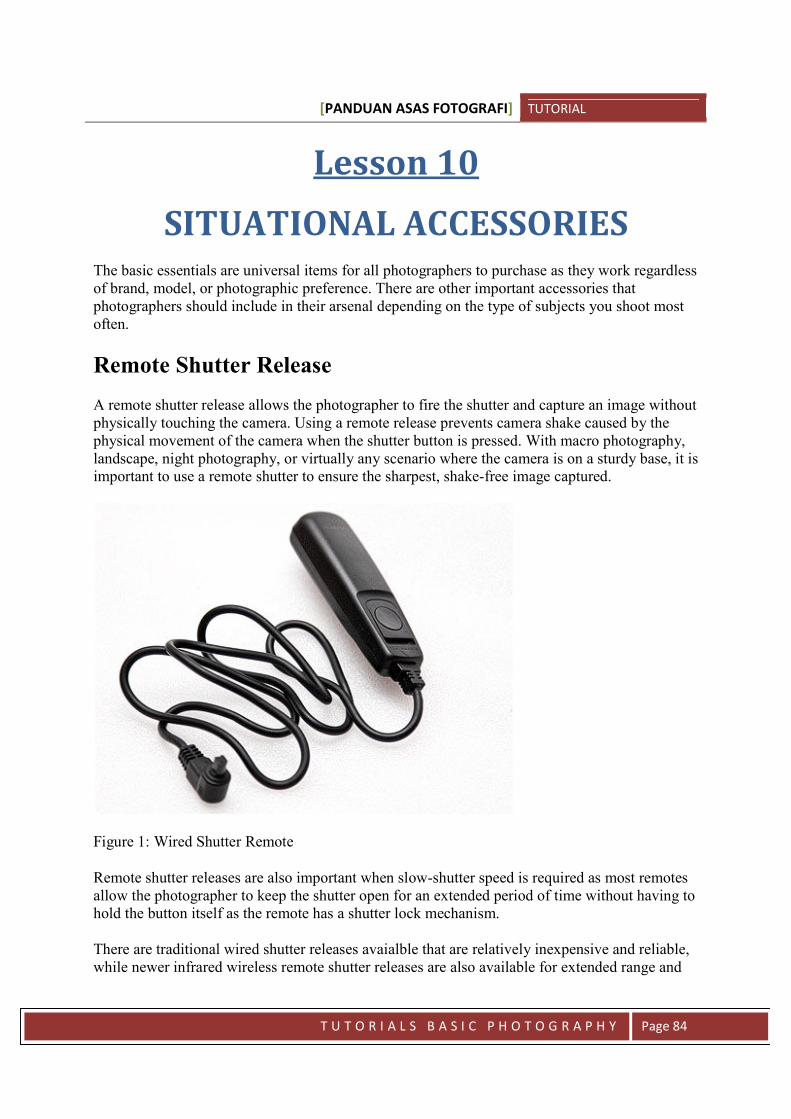
Remote Shutter Release
A remote shutter release allows the photographer to fire the shutter and capture an image withoutphysically touching the camera. Using a remote release prevents camera shake caused by thephysical movement of the camera when the shutter button is pressed. With macro photography,landscape, night photography, or virtually any scenario where the camera is on a sturdy base, it isimportant to use a remote shutter to ensure the sharpest, shake-free image captured.
Figure 1: Wired Shutter Remote
Remote shutter releases are also important when slow-shutter speed is required as most remotesallow the photographer to keep the shutter open for an extended period of time without having tohold the button itself as the remote has a shutter lock mechanism.
There are traditional wired shutter releases avaialble that are relatively inexpensive and reliable,while newer infrared wireless remote shutter releases are also available for extended range and
[PANDUAN ASAS FOTOGRAFI] TUTORIAL
T U T O R I A L S B A S I C P H O T O G R A P H Y Page 85
wireless triggering. The latter is especially useful for group portraits or self-portraits where thephotographer has to stand far from the camera’s position as well.
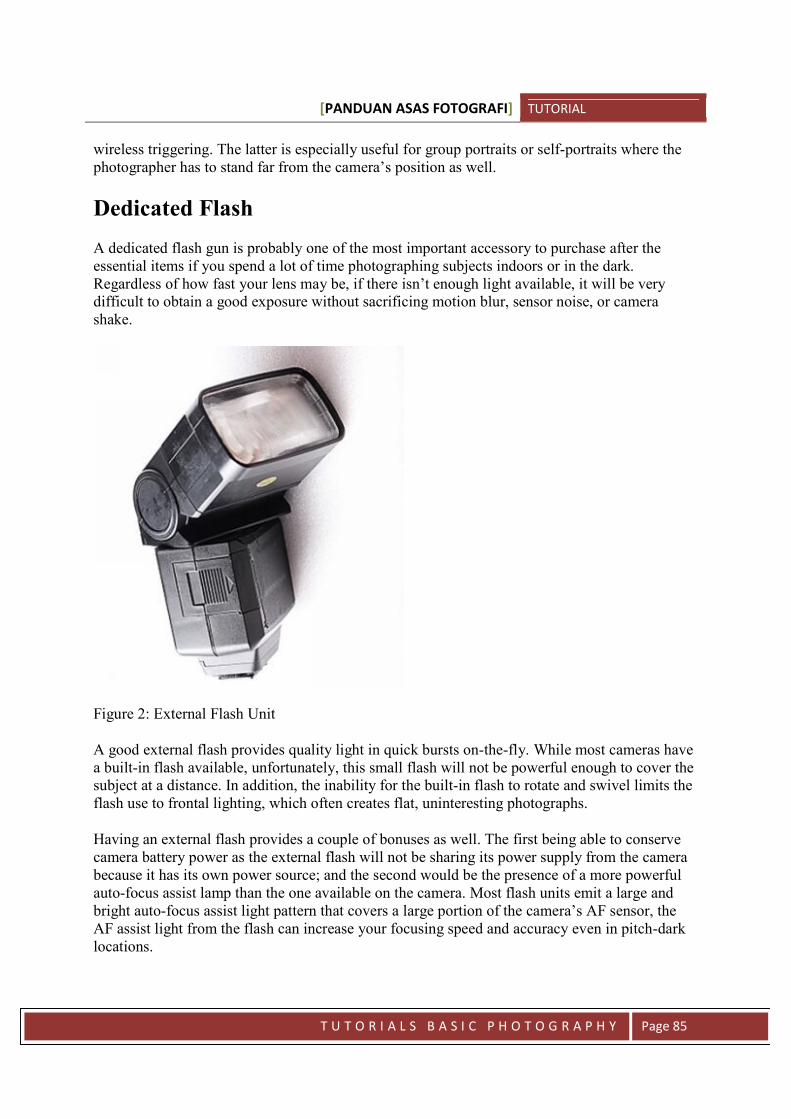
Dedicated Flash
A dedicated flash gun is probably one of the most important accessory to purchase after theessential items if you spend a lot of time photographing subjects indoors or in the dark.Regardless of how fast your lens may be, if there isn’t enough light available, it will be verydifficult to obtain a good exposure without sacrificing motion blur, sensor noise, or camerashake.
Figure 2: External Flash Unit
A good external flash provides quality light in quick bursts on-the-fly. While most cameras havea built-in flash available, unfortunately, this small flash will not be powerful enough to cover thesubject at a distance. In addition, the inability for the built-in flash to rotate and swivel limits theflash use to frontal lighting, which often creates flat, uninteresting photographs.
Having an external flash provides a couple of bonuses as well. The first being able to conservecamera battery power as the external flash will not be sharing its power supply from the camerabecause it has its own power source; and the second would be the presence of a more powerfulauto-focus assist lamp than the one available on the camera. Most flash units emit a large andbright auto-focus assist light pattern that covers a large portion of the camera’s AF sensor, theAF assist light from the flash can increase your focusing speed and accuracy even in pitch-darklocations.

[PANDUAN ASAS FOTOGRAFI] TUTORIAL
T U T O R I A L S B A S I C P H O T O G R A P H Y Page 86
Tripods
The last important situational accessory is the tripod. A tripod helps solve many fundamentalphotography problems when it comes to issues like camera movement, composition lapses, focusissues, among others.When light levels are low and you’re forced to use a slow shutter speed toget a proper exposure, a tripod is essential as there’s almost no chance for a photographer tohand-hold the camera and still obtain a sharp image. A tripod allows the camera to rest on astable surface at variable height and angles which may not be available if the camera is merelyplaced on a ledge or table top.
Some of the benefits of using a tripod include:
Maximizing sharpness of your image (due to camera shake) – this applies even with highshutter speeds and more pronounced with longer focal length, sharpness is critical forlarge print works as well.
Maximize image quality – the ability to stabilize a camera allows the photographer to uselower ISO settings due to the amount of time the camera’s shutter can remain openwithout bumping up the ISO setting. Lower ISO results to cleaner and sharper images.
More deliberate framing of a scene. Setting up a tripod requires deliberate efforts, andcomposing with a tripod allows the photographer to take his time and see everything in aframe before pressing the shutter. A tripod is also a must when bracketing or multipleexposures of the same scene are required. Problems such as tilted horizons and othertechnical faults are also minimized.
Ability to increase depth of field (DOF) – Again, due to the ability to use slower shutterspeeds, a photographer can reduce the size of the aperture considerably to get increasedDOF for the photograph without sacrificing image sharpness due to camera movementresulting from a slow shutter speed.
Types of Tripods
There are many forms of tripod in the market, most of them vary with weight, dimensions, price,load capacity, and flexibility. From mini table-top tripods (Figure 3) to larger studio tripods, eachhas its own use and purpose.
Tripods basically have two main parts, the legs and the head. The legs are the three legs thatextends between the camera and ground, while the head is the actual part where the camera ismounted that allows three-dimentional movement of the camera.
The small table-top tripods are best for light cameras and smaller form factor cameras. Thesetripods are ideal for casual self-portraits or spur-of-the-moment group shots but these tripodsoften cannot support heavy loads nor do they offer a lot of stability.
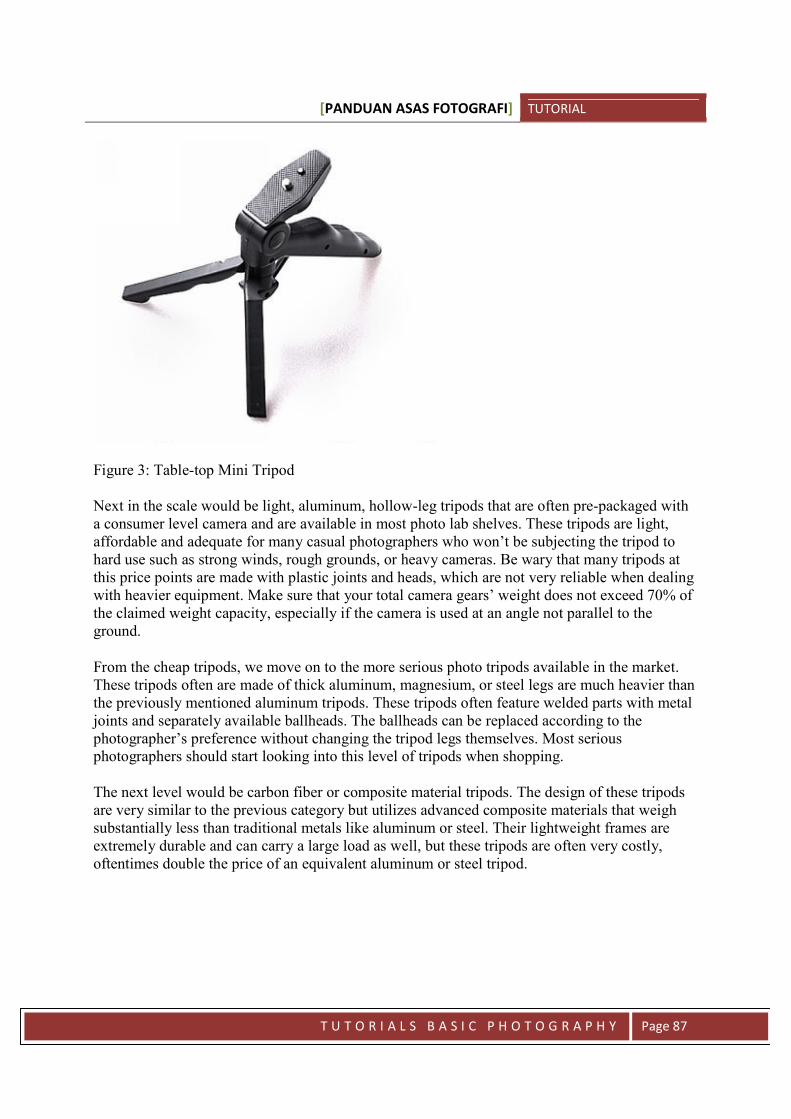
[PANDUAN ASAS FOTOGRAFI] TUTORIAL
T U T O R I A L S B A S I C P H O T O G R A P H Y Page 87
Figure 3: Table-top Mini Tripod
Next in the scale would be light, aluminum, hollow-leg tripods that are often pre-packaged witha consumer level camera and are available in most photo lab shelves. These tripods are light,affordable and adequate for many casual photographers who won’t be subjecting the tripod tohard use such as strong winds, rough grounds, or heavy cameras. Be wary that many tripods atthis price points are made with plastic joints and heads, which are not very reliable when dealingwith heavier equipment. Make sure that your total camera gears’ weight does not exceed 70% ofthe claimed weight capacity, especially if the camera is used at an angle not parallel to theground.
From the cheap tripods, we move on to the more serious photo tripods available in the market.These tripods often are made of thick aluminum, magnesium, or steel legs are much heavier thanthe previously mentioned aluminum tripods. These tripods often feature welded parts with metaljoints and separately available ballheads. The ballheads can be replaced according to thephotographer’s preference without changing the tripod legs themselves. Most seriousphotographers should start looking into this level of tripods when shopping.
The next level would be carbon fiber or composite material tripods. The design of these tripodsare very similar to the previous category but utilizes advanced composite materials that weighsubstantially less than traditional metals like aluminum or steel. Their lightweight frames areextremely durable and can carry a large load as well, but these tripods are often very costly,oftentimes double the price of an equivalent aluminum or steel tripod.
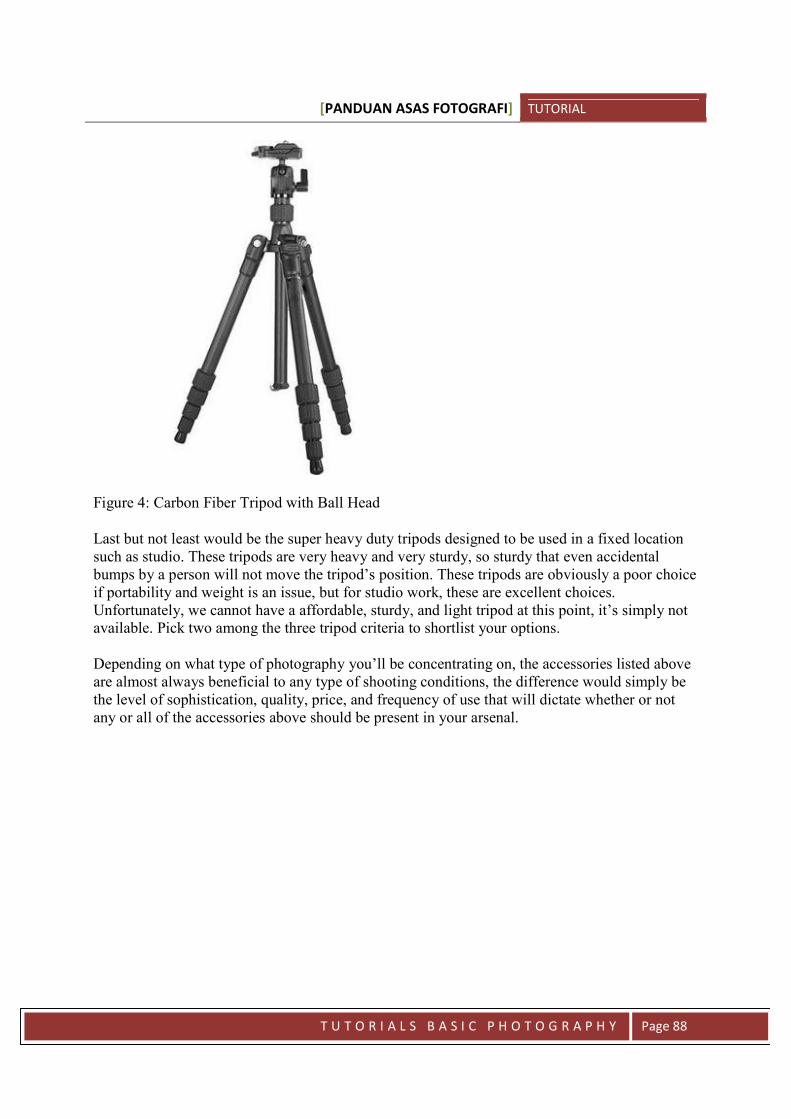
[PANDUAN ASAS FOTOGRAFI] TUTORIAL
T U T O R I A L S B A S I C P H O T O G R A P H Y Page 88
Figure 4: Carbon Fiber Tripod with Ball Head
Last but not least would be the super heavy duty tripods designed to be used in a fixed locationsuch as studio. These tripods are very heavy and very sturdy, so sturdy that even accidentalbumps by a person will not move the tripod’s position. These tripods are obviously a poor choiceif portability and weight is an issue, but for studio work, these are excellent choices.Unfortunately, we cannot have a affordable, sturdy, and light tripod at this point, it’s simply notavailable. Pick two among the three tripod criteria to shortlist your options.
Depending on what type of photography you’ll be concentrating on, the accessories listed aboveare almost always beneficial to any type of shooting conditions, the difference would simply bethe level of sophistication, quality, price, and frequency of use that will dictate whether or notany or all of the accessories above should be present in your arsenal.

[PANDUAN ASAS FOTOGRAFI] TUTORIAL
T U T O R I A L S B A S I C P H O T O G R A P H Y Page 89
Lesson 11
BASIC ESSENTIAL CAMERAACCESSORIES
After purchasing your first digital SLR camera along with a lens to go with it, you now have todeal with the essential accessories that accompany even the most basic digital SLR camera.While many stores include some of these accessories as a “special package”, most of thepackaged items are either overpriced, inadequate, or substandard. So let’s dissect the basicessential accessories that a photographer must have at least one of.
Memory Cards
All digital cameras require a memory card. Depending on your camera’s model, you may eitherrequire a compact flash card, a secure-digital card (SD Card), or other proprietary memory cards.The memory card serves as an instant storage device that replaces film for your camera and oftencomes in different storage sizes.
Figure 1: Memory Cards
Memory cards differ in storage size, physical shape, and transfer speed. It’s best to buy thefastest memory card you can afford to minimize read/write delays from your camera. Even ifyour current camera doesn’t require a high read/write transfer speed, you may upgrade yourcamera in the future and you wouldn’t want to buy another set of memory cards just becauseyour existing card isn’t fast enough.

[PANDUAN ASAS FOTOGRAFI] TUTORIAL
T U T O R I A L S B A S I C P H O T O G R A P H Y Page 90
In terms of storage capacity, there are memory cards in the market as of today that can store ahuge amount of data, as much as 64-gigabyte of information. It may be convenient to just haveone large memory card than carrying several smaller ones, but it’s safer to keep several memorycards in lower storage capacity than to put all your images in one due to the risk of datacorruption.
As with any digital storage media, there will always be a very small risk that the stored datacould get corrupted. For example, if a set of files in a group of thousand images gets corrupted,there’s a big risk that all the images stored will be inaccessible and all photos will be lost. If youused five memory cards that stored 200 photos each, odds are slim that all five will have dataerrors and your risk of total image loss is dramatically decreased.
Batteries
All digital cameras require a power source as well, and in almost all cases, this power source willbe supplied by a battery or a set of batteries. Some cameras utilize traditional AA penlightbatteries which are very handy when a charging outlet isn’t present and you can just purchase apack of batteries from a nearby convenient store to keep the camera working. However, mostdigital SLRs use a proprietary battery pack that would require a dedicated charger to rechargewhen the power has been exhausted.
Figure 2: Batteries
At the very least, there must be one spare battery available with you at all times as most camerasdon’t have comprehensive battery indicators and the battery status can go from “half” to “empty”
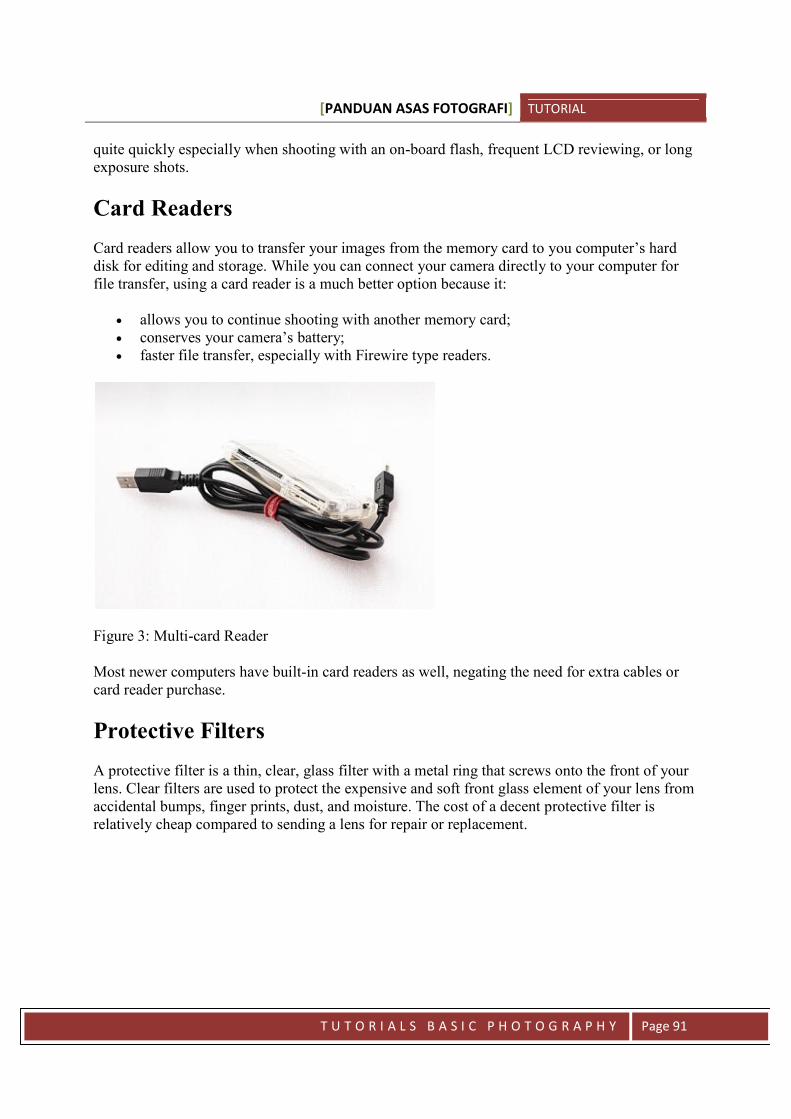
[PANDUAN ASAS FOTOGRAFI] TUTORIAL
T U T O R I A L S B A S I C P H O T O G R A P H Y Page 91
quite quickly especially when shooting with an on-board flash, frequent LCD reviewing, or longexposure shots.
Card Readers
Card readers allow you to transfer your images from the memory card to you computer’s harddisk for editing and storage. While you can connect your camera directly to your computer forfile transfer, using a card reader is a much better option because it:
allows you to continue shooting with another memory card; conserves your camera’s battery; faster file transfer, especially with Firewire type readers.
Figure 3: Multi-card Reader
Most newer computers have built-in card readers as well, negating the need for extra cables orcard reader purchase.
Protective Filters
A protective filter is a thin, clear, glass filter with a metal ring that screws onto the front of yourlens. Clear filters are used to protect the expensive and soft front glass element of your lens fromaccidental bumps, finger prints, dust, and moisture. The cost of a decent protective filter isrelatively cheap compared to sending a lens for repair or replacement.

[PANDUAN ASAS FOTOGRAFI] TUTORIAL
T U T O R I A L S B A S I C P H O T O G R A P H Y Page 92
Figure 4: Protective Clear Filter
In most cases, you can use a UV filter for protective purposes as it’s optically clear yet reducesUV light from entering your lens.
There are debates on whether or not a UV filter degrades the optical quality of a lens and therehasn’t been a consensus agreement to this theory. For most photographers, the cheap “insurance”of a UV filter is well worth whatever minor image degradation there may be that a UV filter mayinduce.
Lens Hood
A lens hood attaches to the front opening of lens and prevents stray light from entering the lensat an oblique angle. Using a lens hood ensures that your image is captured with the mostcontrast, clarity, and saturation due to the absence of glare. As an added bonus, a lens hoodprevents accidental knocks and dings on your lens’ front element.
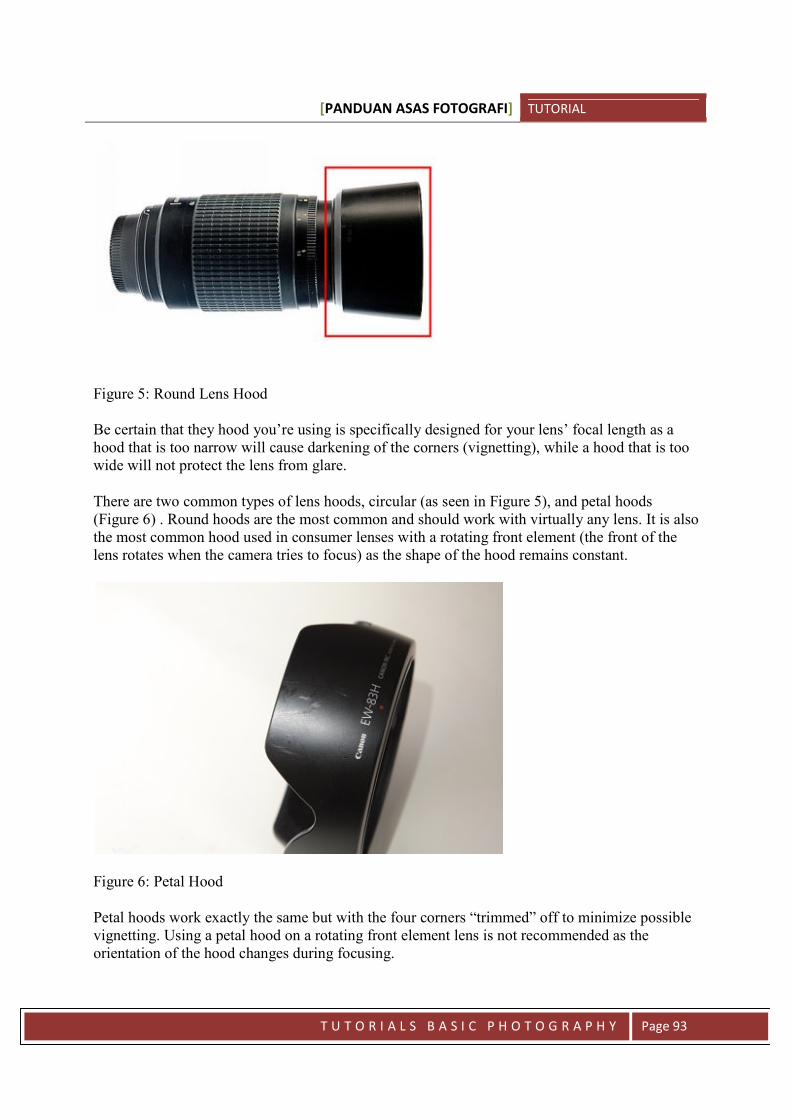
[PANDUAN ASAS FOTOGRAFI] TUTORIAL
T U T O R I A L S B A S I C P H O T O G R A P H Y Page 93
Figure 5: Round Lens Hood
Be certain that they hood you’re using is specifically designed for your lens’ focal length as ahood that is too narrow will cause darkening of the corners (vignetting), while a hood that is toowide will not protect the lens from glare.
There are two common types of lens hoods, circular (as seen in Figure 5), and petal hoods(Figure 6) . Round hoods are the most common and should work with virtually any lens. It is alsothe most common hood used in consumer lenses with a rotating front element (the front of thelens rotates when the camera tries to focus) as the shape of the hood remains constant.
Figure 6: Petal Hood
Petal hoods work exactly the same but with the four corners “trimmed” off to minimize possiblevignetting. Using a petal hood on a rotating front element lens is not recommended as theorientation of the hood changes during focusing.

[PANDUAN ASAS FOTOGRAFI] TUTORIAL
T U T O R I A L S B A S I C P H O T O G R A P H Y Page 94
Cleaning Kit
There are many cleaning products available in the market and the most important one would be akit to clean your lenses. The lens requires gentle but constant care as dust, moisture, grit, oil, andhuman sweat can cause permanent smudges and haze on delicate glass elements.
Figure 7: Cleaning Kit
The most basic cleaning kit would include an air blower, a brush, lens cleaning fluid, and lenscloth/tissue.
A blower brush simply uses air to dislodge any solid particles resting on top of the glass. It isimportant to thoroughly blow off as much dirt as possible with air before attempting to use abrush or lens cloth as any dirt trapped between the glass and the cleaning brush or cloth willinduce scratches.
A microfiber cloth is often used to clean lenses as these towels are very smooth and soft andwork extremely well even without any liquid cleaning agents. However, many prefer disposablelens cleaning tissue to ensure that the wiping material used is fresh and dirt free. When using anycloth or tissue, it’s best to use a small drop of quick-drying lens cleaning fluid onto the cleaningcloth to remove oily smudges and grime before using a dry cloth/tissue to polish the lens.
Never apply the fluid directly onto the glass as it can seep into the gaps of the glass mount.
[PANDUAN ASAS FOTOGRAFI] TUTORIAL
T U T O R I A L S B A S I C P H O T O G R A P H Y Page 95
Camera Bag
Finally, we need a bag to store all these items securely and accessibly. A camera bag is a verypersonal item and it’s best to visit a store and physically try different bag types to see which onesuits you best.
The main bag categories include backpacks, messenger/sling bags, belt bags, and hard cases.With the exception of hard cases, most bags are made with tough nylon mixed with other fabricand plastics to resist wear-and-tear, moisture, and foam walls for impact protection.
Backpacks are often chosen by photographers on-the-go that carries a lot of equipment.Backpacks allow more storage configuration (with the removable inserts) and are easier to carrydespite the size and weight. The main disadvantage of backpacks is that the photographer cannoteasily retrieve items in the bag unless the bag is removed from the body or laid on a surface asmost of the items are stored vertically.
Sling and messenger bags are the most common bags used because of their smaller size and easeof usage. As the bag is often positioned at the side or in front of the photographer at all times, it’seasy to just open the flap and grab the camera (or other accessories) without having the need toalter the bag’s position from the photographer’s body.
The downside of a messenger/sling bag would be the weight of the bag is often heavily biased toone shoulder and can strain the photographer over a period of time.
Belt bags are often limited to one camera and lens combo plus a couple of smaller items. If youprefer shooting with minimal gear, this is a great option as your whole upper body is free fromany carrying duties and both your hands are available to use.
Hard cases are suitcase-like containers with heavy foam padding and impact resistant shells thatprovide maximum impact protection for camera gears. These are often used by professionalswho have to travel to destinations while carrying a lot of photographic items. These cases aresturdy enough to be stood on by stacked one on top of another. As always, maximum protectionwould also mean maximum weight. These hard cases are very cumbersome and heavy to usewithout transportation.
These basic essentials are must haves in any photographer camera bag as these items help retainyour camera equipment’s peak performance and cosmetic condition.
[PANDUAN ASAS FOTOGRAFI] TUTORIAL
T U T O R I A L S B A S I C P H O T O G R A P H Y Page 96
Lesson 12
CHOSING A DIGITAL SLR CAMERA
- AUTO FOCUS -
(PART III)Following megapixel specification, the next major feature that manufacturers list would be theauto-focus performance of the camera.
Most modern DSLRs come with an auto-focus sensor that allows us to quickly lock focus on aparticular area of a scene. It is highly convenient and incredibly accurate in most cases. Thesensor in DSLR systems are considerably better than those of portable digital cameras as thesesensors because of their design. DSLR auto-focus sensors (AF sensor, hereonout) use a passiveauto-focus system. Passive auto-focus system analyzes the actual subject itself and seeks outareas with high contrast (clear distinction of dark and light edges) edges to lock focus on.
Portable digital cameras often use an active system by emitting infrared beams to determinefocus distance, which is a lot slower and less accurate.
With both systems, if there isn’t enough light for the system to detect an object to focus on, itwill not be able to achieve focus as all. Therefore, most cameras employ a focus-assist light thatmomentarily lights up the scene to allow the sensors to pick an area to lock focus on.
Differences in Auto Focus Systems
So what are the differences between entry-level and professional DSLR models if they all use apassive contrast-detecting AF sensor? In most cases, the differences are centered around thenumber of AF points and the sensitivity of each AF points.
Most entry level DSLRs will have a minimum of around three AF points. This is usually theminimum standard since auto focus film SLRs were invented several decades ago. The AF pointsare usually positioned in a horizontal pattern running from left-to-right of the viewfinder.
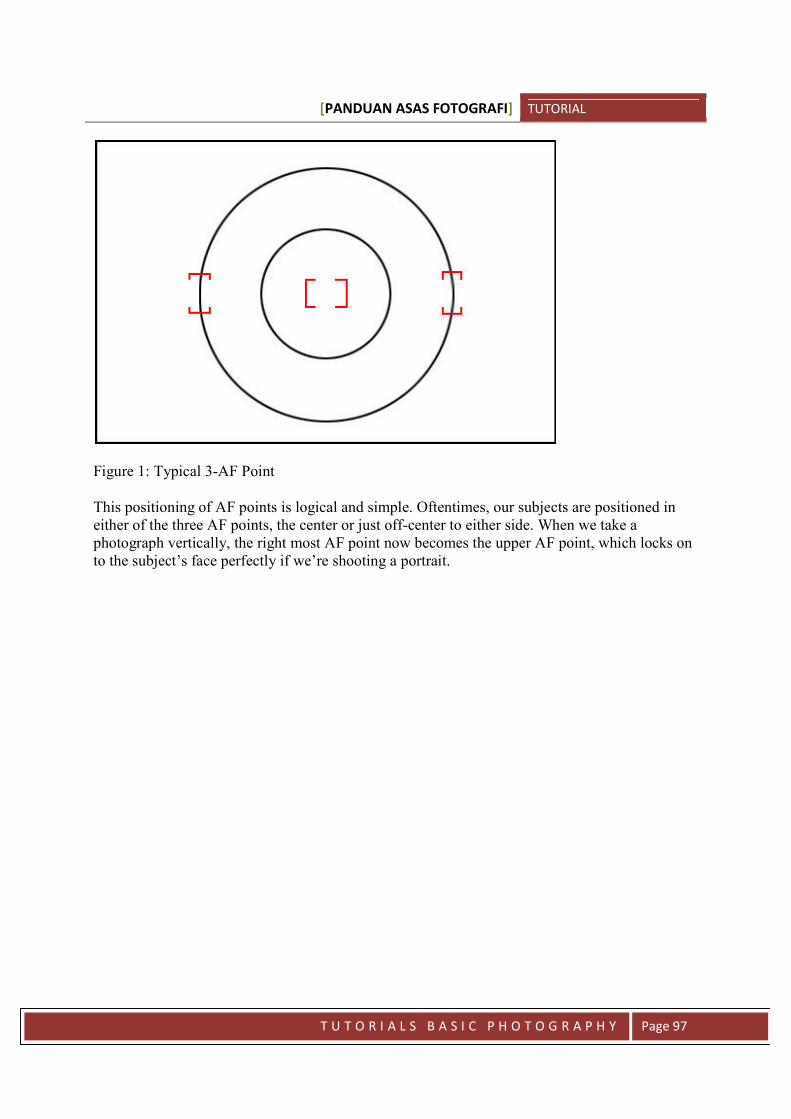
[PANDUAN ASAS FOTOGRAFI] TUTORIAL
T U T O R I A L S B A S I C P H O T O G R A P H Y Page 97
Figure 1: Typical 3-AF Point
This positioning of AF points is logical and simple. Oftentimes, our subjects are positioned ineither of the three AF points, the center or just off-center to either side. When we take aphotograph vertically, the right most AF point now becomes the upper AF point, which locks onto the subject’s face perfectly if we’re shooting a portrait.
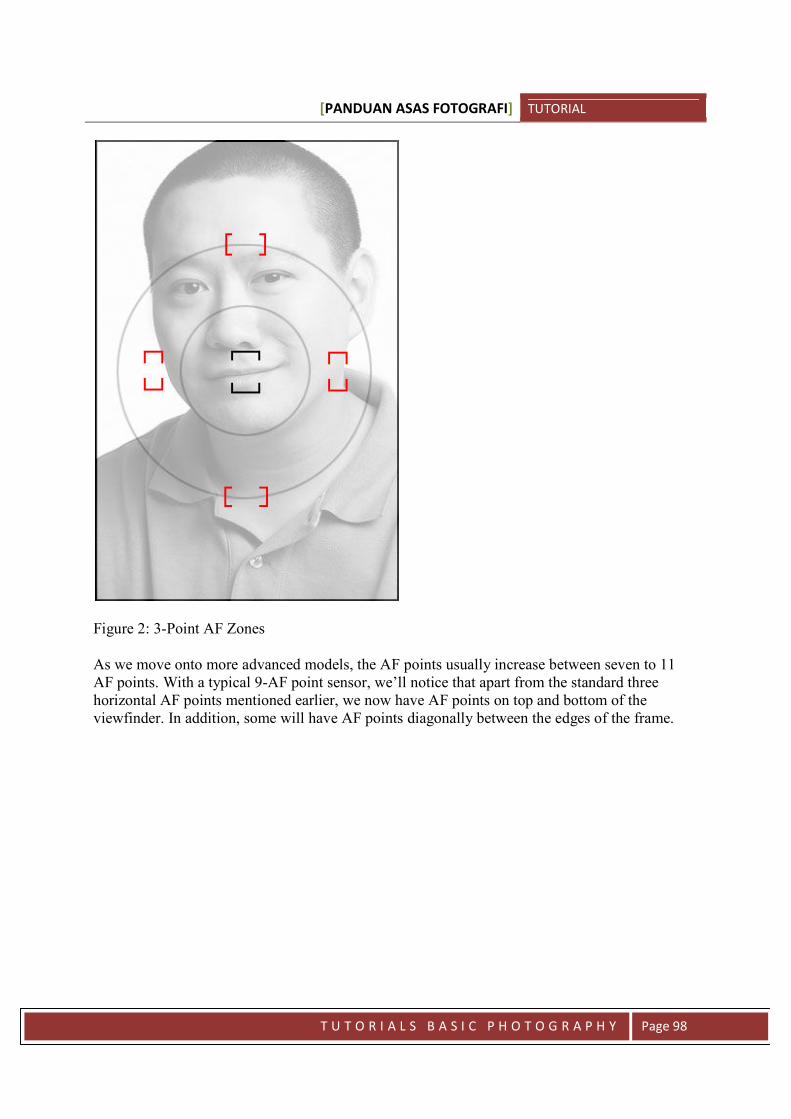
[PANDUAN ASAS FOTOGRAFI] TUTORIAL
T U T O R I A L S B A S I C P H O T O G R A P H Y Page 98
Figure 2: 3-Point AF Zones
As we move onto more advanced models, the AF points usually increase between seven to 11AF points. With a typical 9-AF point sensor, we’ll notice that apart from the standard threehorizontal AF points mentioned earlier, we now have AF points on top and bottom of theviewfinder. In addition, some will have AF points diagonally between the edges of the frame.
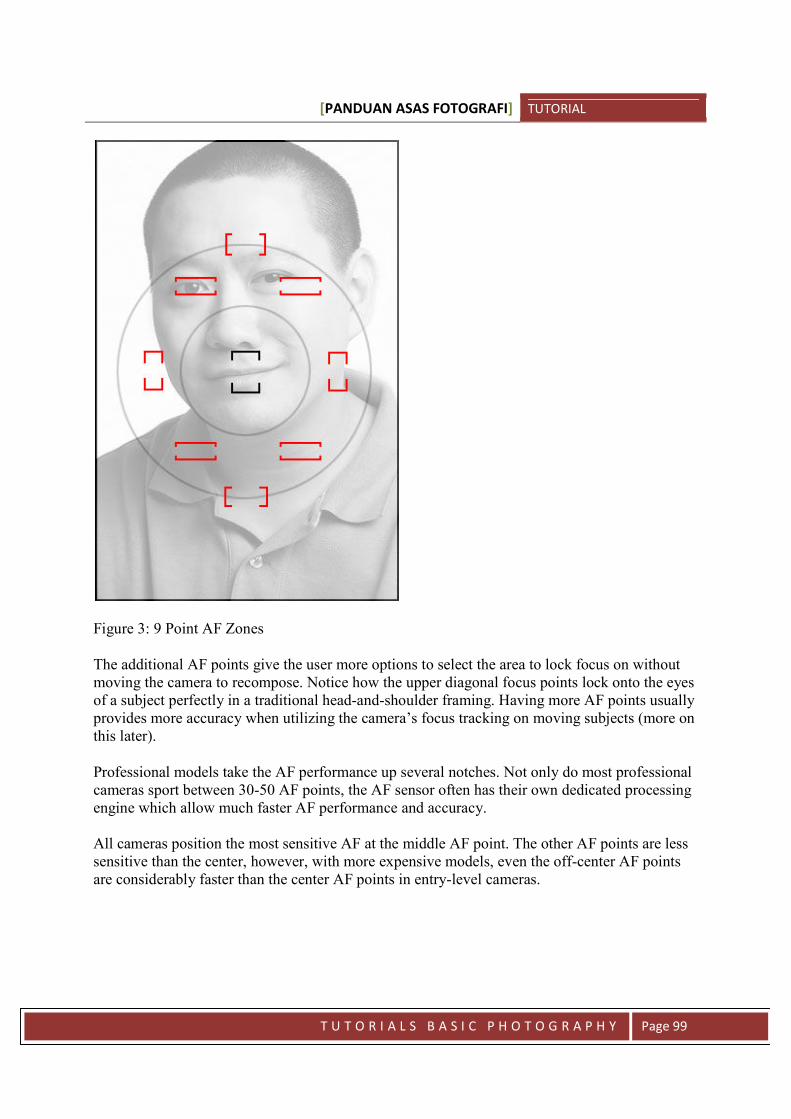
[PANDUAN ASAS FOTOGRAFI] TUTORIAL
T U T O R I A L S B A S I C P H O T O G R A P H Y Page 99
Figure 3: 9 Point AF Zones
The additional AF points give the user more options to select the area to lock focus on withoutmoving the camera to recompose. Notice how the upper diagonal focus points lock onto the eyesof a subject perfectly in a traditional head-and-shoulder framing. Having more AF points usuallyprovides more accuracy when utilizing the camera’s focus tracking on moving subjects (more onthis later).
Professional models take the AF performance up several notches. Not only do most professionalcameras sport between 30-50 AF points, the AF sensor often has their own dedicated processingengine which allow much faster AF performance and accuracy.
All cameras position the most sensitive AF at the middle AF point. The other AF points are lesssensitive than the center, however, with more expensive models, even the off-center AF pointsare considerably faster than the center AF points in entry-level cameras.
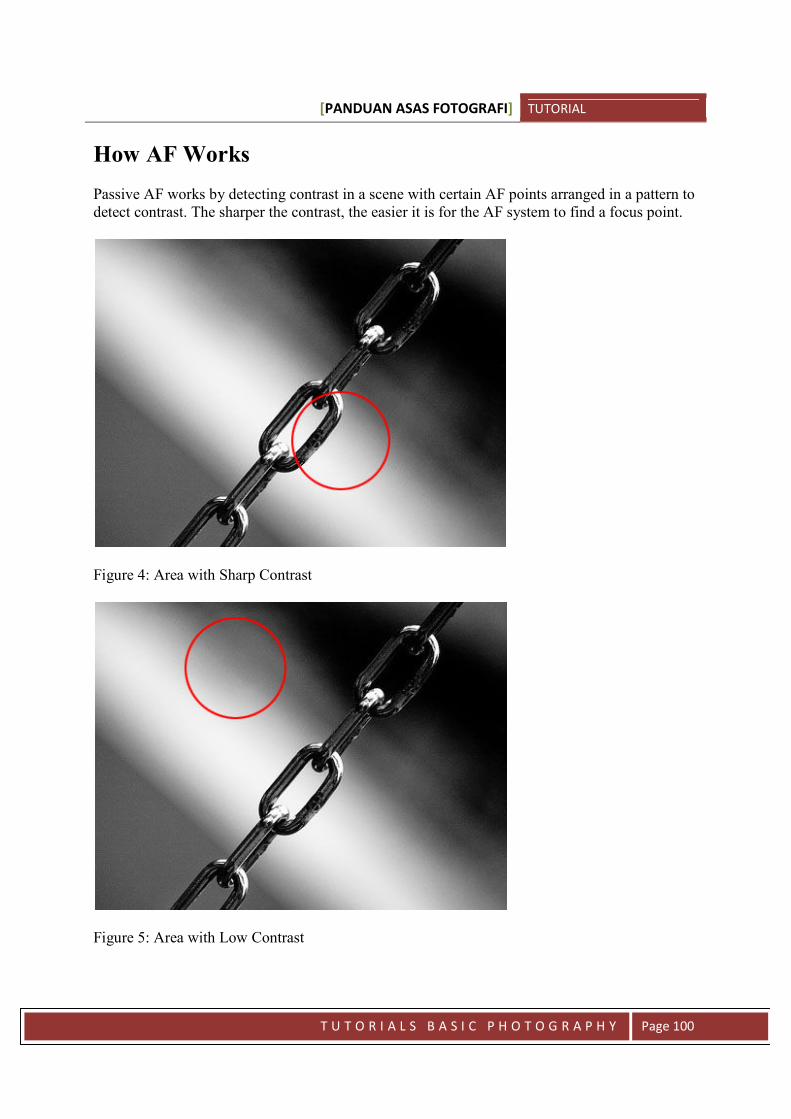
[PANDUAN ASAS FOTOGRAFI] TUTORIAL
T U T O R I A L S B A S I C P H O T O G R A P H Y Page 100
How AF Works
Passive AF works by detecting contrast in a scene with certain AF points arranged in a pattern todetect contrast. The sharper the contrast, the easier it is for the AF system to find a focus point.
Figure 4: Area with Sharp Contrast
Figure 5: Area with Low Contrast
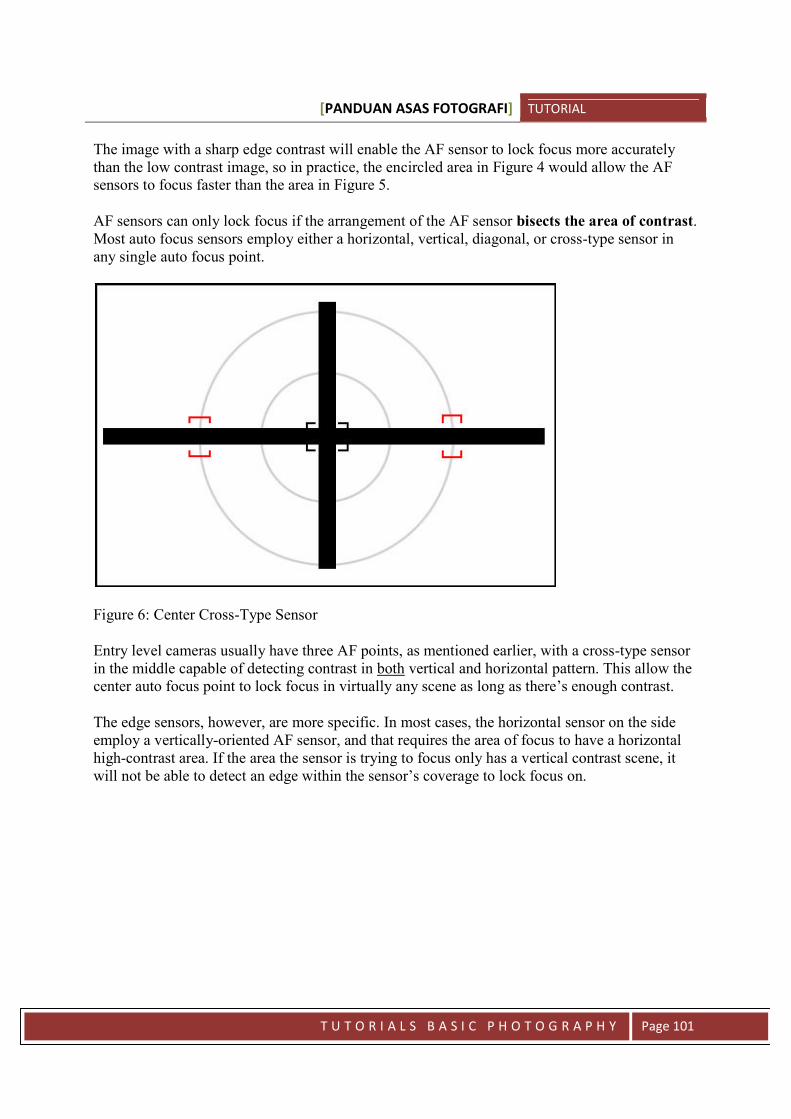
[PANDUAN ASAS FOTOGRAFI] TUTORIAL
T U T O R I A L S B A S I C P H O T O G R A P H Y Page 101
The image with a sharp edge contrast will enable the AF sensor to lock focus more accuratelythan the low contrast image, so in practice, the encircled area in Figure 4 would allow the AFsensors to focus faster than the area in Figure 5.
AF sensors can only lock focus if the arrangement of the AF sensor bisects the area of contrast.Most auto focus sensors employ either a horizontal, vertical, diagonal, or cross-type sensor inany single auto focus point.
Figure 6: Center Cross-Type Sensor
Entry level cameras usually have three AF points, as mentioned earlier, with a cross-type sensorin the middle capable of detecting contrast in both vertical and horizontal pattern. This allow thecenter auto focus point to lock focus in virtually any scene as long as there’s enough contrast.
The edge sensors, however, are more specific. In most cases, the horizontal sensor on the sideemploy a vertically-oriented AF sensor, and that requires the area of focus to have a horizontalhigh-contrast area. If the area the sensor is trying to focus only has a vertical contrast scene, itwill not be able to detect an edge within the sensor’s coverage to lock focus on.
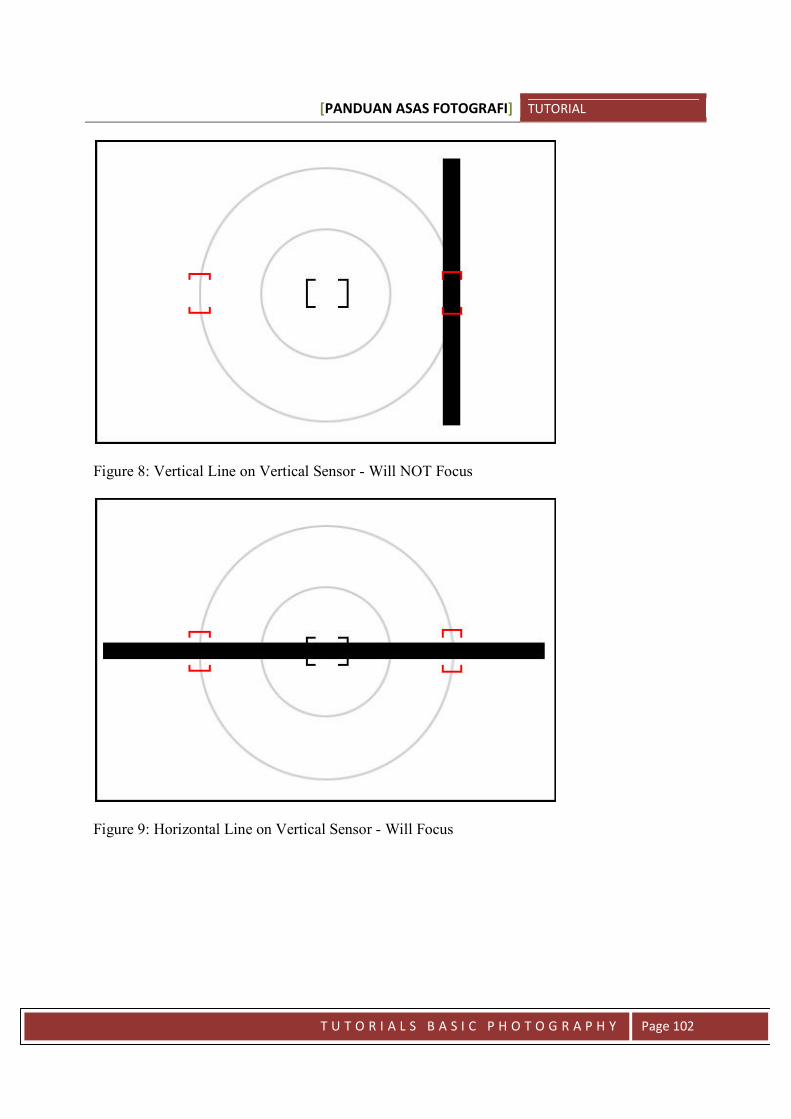
[PANDUAN ASAS FOTOGRAFI] TUTORIAL
T U T O R I A L S B A S I C P H O T O G R A P H Y Page 102
Figure 8: Vertical Line on Vertical Sensor - Will NOT Focus
Figure 9: Horizontal Line on Vertical Sensor - Will Focus
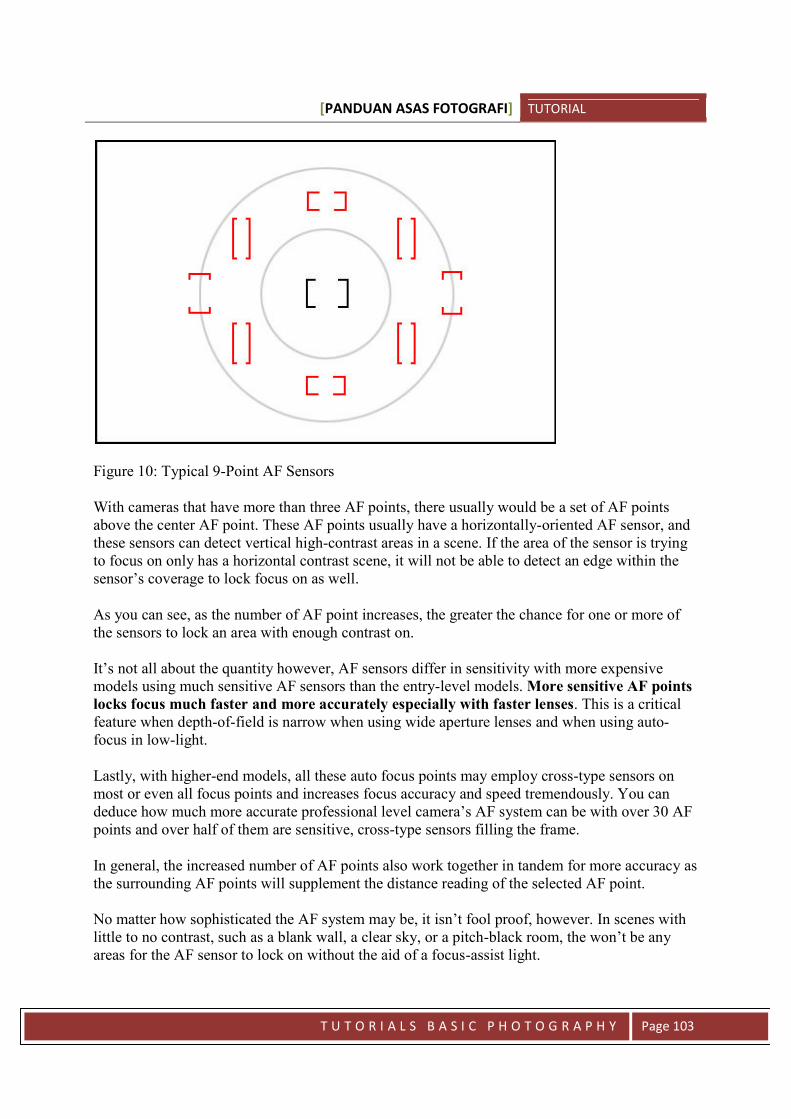
[PANDUAN ASAS FOTOGRAFI] TUTORIAL
T U T O R I A L S B A S I C P H O T O G R A P H Y Page 103
Figure 10: Typical 9-Point AF Sensors
With cameras that have more than three AF points, there usually would be a set of AF pointsabove the center AF point. These AF points usually have a horizontally-oriented AF sensor, andthese sensors can detect vertical high-contrast areas in a scene. If the area of the sensor is tryingto focus on only has a horizontal contrast scene, it will not be able to detect an edge within thesensor’s coverage to lock focus on as well.
As you can see, as the number of AF point increases, the greater the chance for one or more ofthe sensors to lock an area with enough contrast on.
It’s not all about the quantity however, AF sensors differ in sensitivity with more expensivemodels using much sensitive AF sensors than the entry-level models. More sensitive AF pointslocks focus much faster and more accurately especially with faster lenses. This is a criticalfeature when depth-of-field is narrow when using wide aperture lenses and when using auto-focus in low-light.
Lastly, with higher-end models, all these auto focus points may employ cross-type sensors onmost or even all focus points and increases focus accuracy and speed tremendously. You candeduce how much more accurate professional level camera’s AF system can be with over 30 AFpoints and over half of them are sensitive, cross-type sensors filling the frame.
In general, the increased number of AF points also work together in tandem for more accuracy asthe surrounding AF points will supplement the distance reading of the selected AF point.
No matter how sophisticated the AF system may be, it isn’t fool proof, however. In scenes withlittle to no contrast, such as a blank wall, a clear sky, or a pitch-black room, the won’t be anyareas for the AF sensor to lock on without the aid of a focus-assist light.
[PANDUAN ASAS FOTOGRAFI] TUTORIAL
T U T O R I A L S B A S I C P H O T O G R A P H Y Page 104
Single Shot vs Continuous Focus Tracking
Almost all cameras offer single-shot focus lock and continous focus tracking. Single shot simplymeans that the camera will attempt to lock focus when you half-press the shutter button rightwhen you’re taking a photo. Single shot is best utilized for static or slow-moving subjects, whenshooting fast moving subjects single shot will not be accurate enough as the moment the image iscaptured, the subject will no longer be in the same spot where you locked focus.
Continuous focus and servo tracking keep track of subject movement without locking onto thesubject until the last moment when the shutter is pressed. This feature is best when shooting fastmoving subjects that are moving towards or away from the camera’s position. Continuous AFmay not be accurate when shooting static subjects, however, as the AF sensor will track anymovement in the scene and may shift the focus to the moving element instead of your staticsubject.
Naturally, when we only have three AF points, the amount of tracking available will not be asaccurate as having 30+ AF points, however, if we only plan to shoot landscape, still life, andportraits often, there’s no need to have more than three to 11 AF points.
So How Much AF Points Do We Need?
While having a lot of AF points may seem impressive, in many cases, the sensitivity of the AFsensors are more important. However, if you plan to concentrate on sports and high-speedevents, then the number of fast AF points will be an important factor.
The specification of a camera’s AF system should match the type of subject we shoot most often.If we never shoot professional sports, for example, majority of non-professional camera’s AFsystem are more than sufficient. If we’re shooting portraits and landscape, we won’t even needmore than three and it’s actually easier and faster to work with less AF points in such cases. Ifwe are shooting a fast-paced sporting event or car races, for example, then it’s a wise decision toinvest on a camera that is equipped with a sophisticated AF system, and finally, if we shootmacro for a living, then we won’t even need auto focus at all!
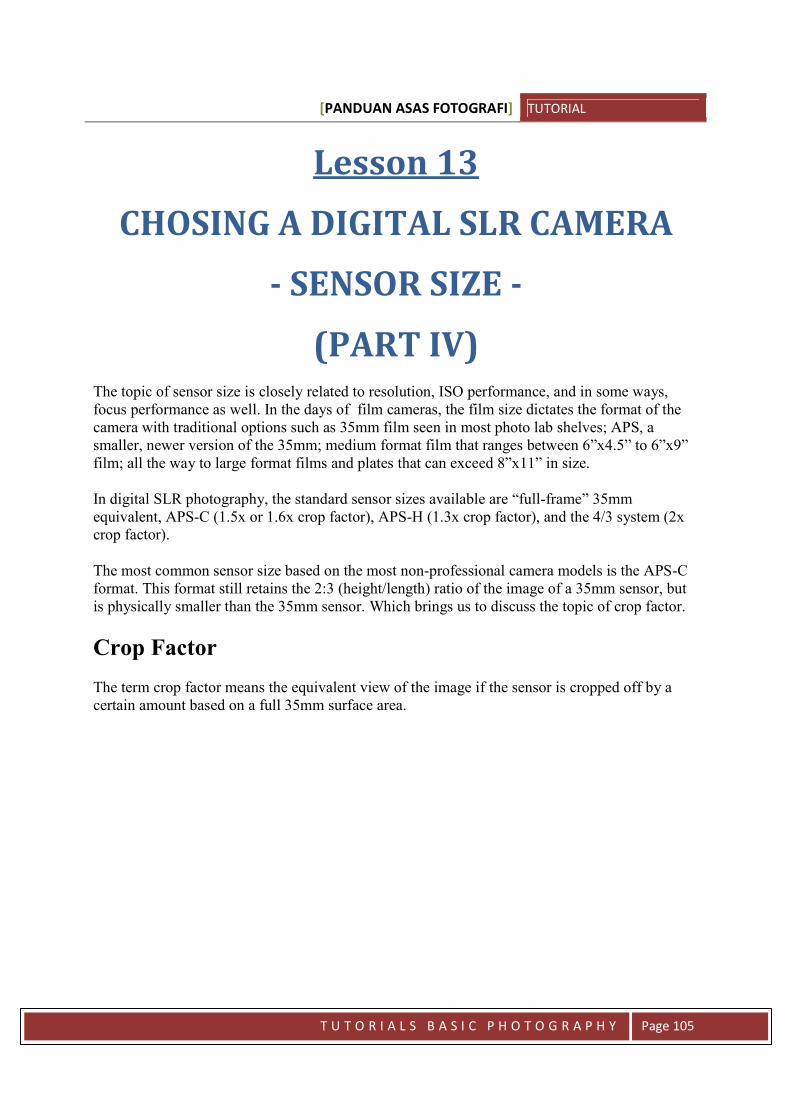
[PANDUAN ASAS FOTOGRAFI] TUTORIAL
T U T O R I A L S B A S I C P H O T O G R A P H Y Page 105
Lesson 13
CHOSING A DIGITAL SLR CAMERA
- SENSOR SIZE -
(PART IV)The topic of sensor size is closely related to resolution, ISO performance, and in some ways,focus performance as well. In the days of film cameras, the film size dictates the format of thecamera with traditional options such as 35mm film seen in most photo lab shelves; APS, asmaller, newer version of the 35mm; medium format film that ranges between 6”x4.5” to 6”x9”film; all the way to large format films and plates that can exceed 8”x11” in size.
In digital SLR photography, the standard sensor sizes available are “full-frame” 35mmequivalent, APS-C (1.5x or 1.6x crop factor), APS-H (1.3x crop factor), and the 4/3 system (2xcrop factor).
The most common sensor size based on the most non-professional camera models is the APS-Cformat. This format still retains the 2:3 (height/length) ratio of the image of a 35mm sensor, butis physically smaller than the 35mm sensor. Which brings us to discuss the topic of crop factor.
Crop Factor
The term crop factor means the equivalent view of the image if the sensor is cropped off by acertain amount based on a full 35mm surface area.
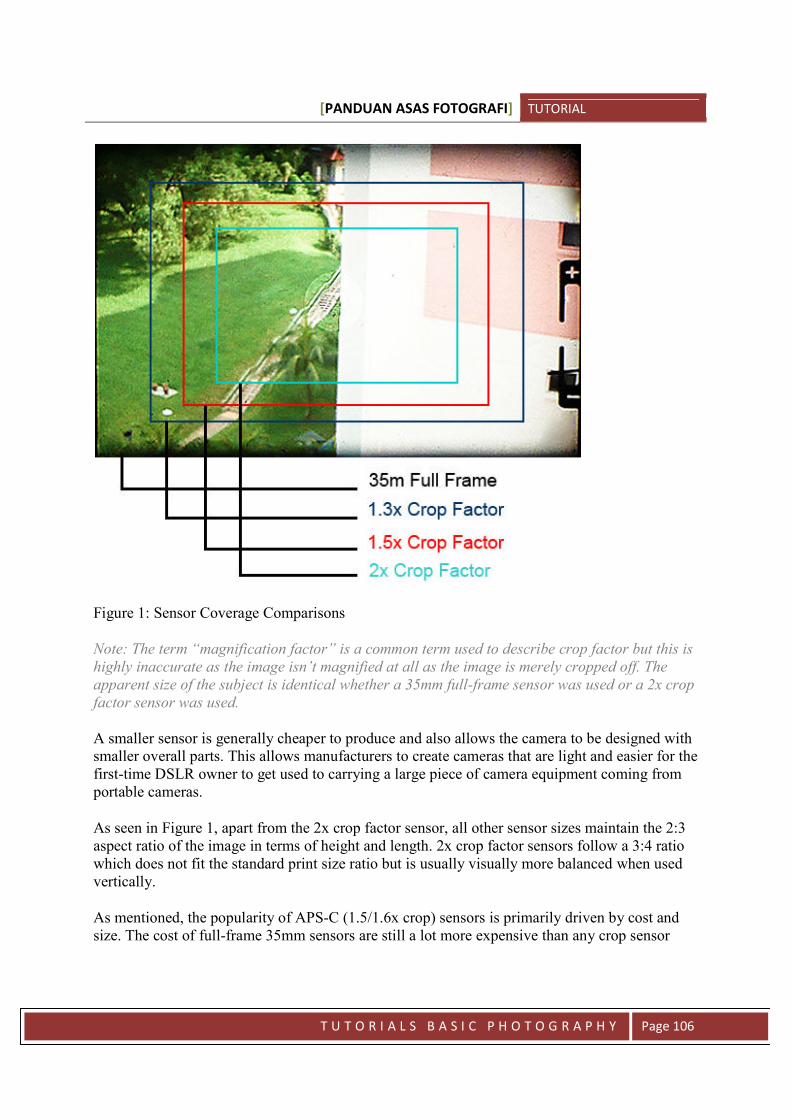
[PANDUAN ASAS FOTOGRAFI] TUTORIAL
T U T O R I A L S B A S I C P H O T O G R A P H Y Page 106
Figure 1: Sensor Coverage Comparisons
Note: The term “magnification factor” is a common term used to describe crop factor but this ishighly inaccurate as the image isn’t magnified at all as the image is merely cropped off. Theapparent size of the subject is identical whether a 35mm full-frame sensor was used or a 2x cropfactor sensor was used.
A smaller sensor is generally cheaper to produce and also allows the camera to be designed withsmaller overall parts. This allows manufacturers to create cameras that are light and easier for thefirst-time DSLR owner to get used to carrying a large piece of camera equipment coming fromportable cameras.
As seen in Figure 1, apart from the 2x crop factor sensor, all other sensor sizes maintain the 2:3aspect ratio of the image in terms of height and length. 2x crop factor sensors follow a 3:4 ratiowhich does not fit the standard print size ratio but is usually visually more balanced when usedvertically.
As mentioned, the popularity of APS-C (1.5/1.6x crop) sensors is primarily driven by cost andsize. The cost of full-frame 35mm sensors are still a lot more expensive than any crop sensor
[PANDUAN ASAS FOTOGRAFI] TUTORIAL
T U T O R I A L S B A S I C P H O T O G R A P H Y Page 107
cameras, often twice the cost of the most expensive crop sensors, so the APS-C format is a goodcompromise between image area and cost.
The APS-C sensor, however, is almost half the size of a full-frame 35mm sensor size. Thereduction of sensor size affects several technical factors such as depth-of-field, image quality,resolution, auto-focus performance, viewfinder visibility, and ISO noise control. These issues arecompounded even more with smaller 2x crop sensor cameras.
Effect of Sensor Size on Photographs
As mentioned previously, different sensor sizes affects the final photograph differently. We’lldiscuss the following differences in the following order:
Depth-of-Field (DOF), Image Quality and Resolution, and Noise Control, and Auto-Focus Performance and Viewfinder Visibility.
Depth-of-Field (DOF)
In simplified terms, the physical size of a camera’s sensor affects depth-of-field in an inversemanner, meaning, the smaller the sensor, the greater the depth-of-field, the larger the sensor, thesmaller the depth-of-field. This inverse ratio is increased as the subject gets closer to theminimum focus distance of the lens assuming the camera is using the same lens.
As shown in Figure 1 and 2, a cropped sensor is literally a 35mm sensor chopped off to asmaller, physical size. The reduction of sensor size results to a narrower view in our viewfinder,essentially masking off all four edges of a 35mm sensor. When we mount a 50mm lens on a35mm full-frame camera, for example, the actual focal length is 50mm, with an effective field-of-view of a 50mm lens, as it should be.
However, when we mount the same 50mm lens on a 1.5x crop sensor camera, the reduction ofsensor size results to an image that appear similar to a 75mm lens on a full-frame sensor camera(50mm x 1.5 crop factor).
If we mount the 50mm on a 2x crop sensor, the resulting image will appear to be similar to a100mm lens on a full-frame sensor (50mm x 2). As the field-of-view narrows with a smallersensor, the depth-of-field changes as well.
It is incorrect to assume that just because the resulting field-of-view of a smaller sensor image issimilar to a longer lens on a full-frame camera that the two image produce identical outputs.
The physical focal length of a lens alters the minimum focus distance, depth-of-field, anddistortion between the subject and camera. So just because 50mm on a APS-C sensor appears tohave the same area of coverage as a 75mm on a full-frame, we’re not getting identical images,just an apparent image size in relation to the frame.

[PANDUAN ASAS FOTOGRAFI] TUTORIAL
T U T O R I A L S B A S I C P H O T O G R A P H Y Page 108
With wider angle lenses, subject distortion is evident and the closer the subjects are to thesubject, the more pronounced the distortion will appear. The distortion at 35mm on a crop sensorwill be more pronounced than a 50mm on a full frame.
Image Quality, Resolution and Noise Control
If we refer back to our discussion about resolution, a larger sensor can support a larger amount ofpixels compared to a cropped sensor.
As resolution increases, the amount of pixels packed together in a finite sensor surface increasesas well.
Generally speaking, the more pixels are present the less sensitive each pixel is to light becauseeach pixel is now smaller in surface area. The risk of each pixel “spilling” color data to the nextpixel also increases as the signal-to-noise ratio is lower than larger pixels. Larger pixels wouldrequire a larger sensor and/or smaller amounts of individual pixels for optimal dynamic range,color rendition, and general image quality. Technology continues to push this gap smallerbetween small and large sensor size when it comes to overall image quality, but full-framesensors still has an advantage as of now.
The discrepancy between physical sensor size is still big right now for crop sensors to matchimage quality, noise control, and resolution if the same amount of pixels are present per givenarea, partly because of lens limitations. As resolution increases, the higher the demand on lensesas well.
Since there is less surface area to project a full image in smaller sensors, a lens must to be able toseparate details in smaller increments to retain the high amount of detail and resolution captured.
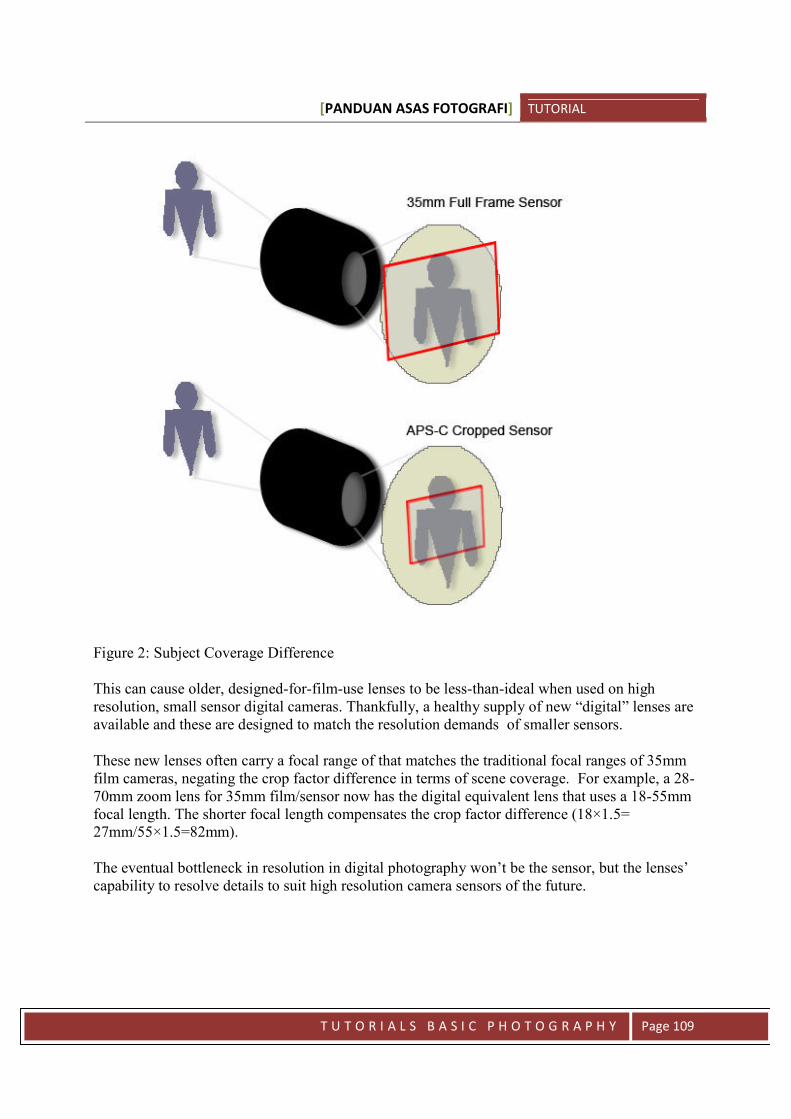
[PANDUAN ASAS FOTOGRAFI] TUTORIAL
T U T O R I A L S B A S I C P H O T O G R A P H Y Page 109
Figure 2: Subject Coverage Difference
This can cause older, designed-for-film-use lenses to be less-than-ideal when used on highresolution, small sensor digital cameras. Thankfully, a healthy supply of new “digital” lenses areavailable and these are designed to match the resolution demands of smaller sensors.
These new lenses often carry a focal range of that matches the traditional focal ranges of 35mmfilm cameras, negating the crop factor difference in terms of scene coverage. For example, a 28-70mm zoom lens for 35mm film/sensor now has the digital equivalent lens that uses a 18-55mmfocal length. The shorter focal length compensates the crop factor difference (18×1.5=27mm/55×1.5=82mm).
The eventual bottleneck in resolution in digital photography won’t be the sensor, but the lenses’capability to resolve details to suit high resolution camera sensors of the future.
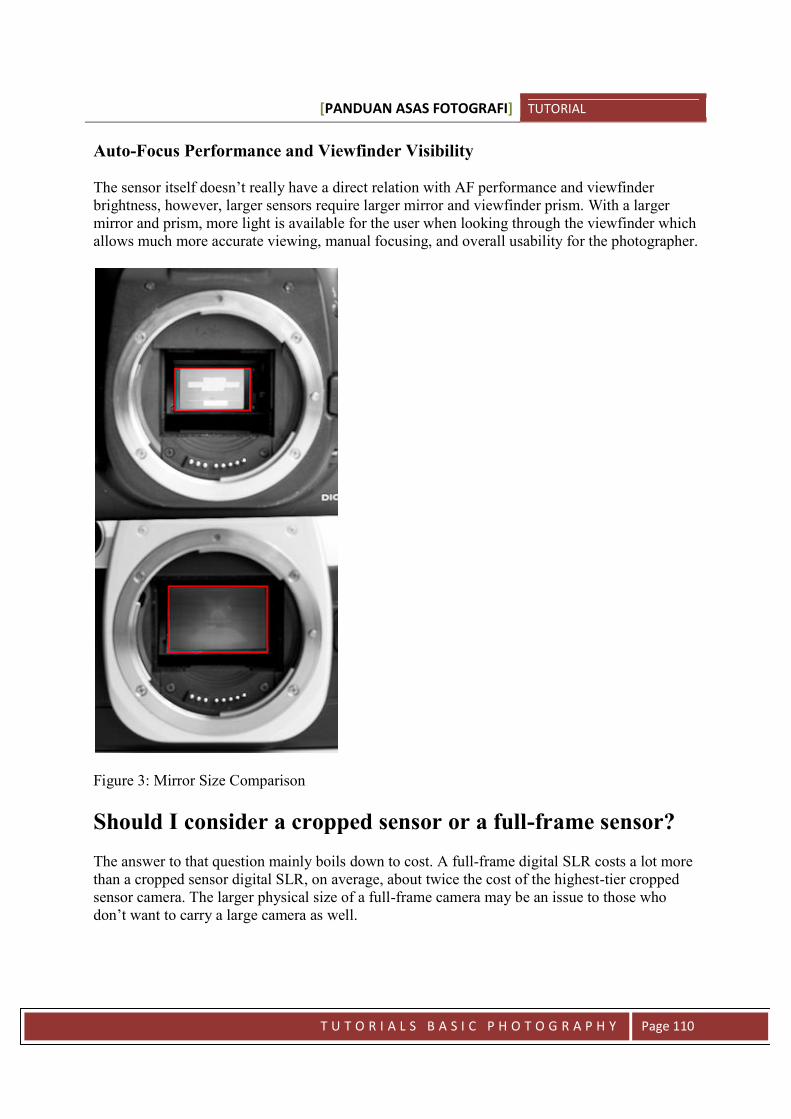
[PANDUAN ASAS FOTOGRAFI] TUTORIAL
T U T O R I A L S B A S I C P H O T O G R A P H Y Page 110
Auto-Focus Performance and Viewfinder Visibility
The sensor itself doesn’t really have a direct relation with AF performance and viewfinderbrightness, however, larger sensors require larger mirror and viewfinder prism. With a largermirror and prism, more light is available for the user when looking through the viewfinder whichallows much more accurate viewing, manual focusing, and overall usability for the photographer.
Figure 3: Mirror Size Comparison
Should I consider a cropped sensor or a full-frame sensor?
The answer to that question mainly boils down to cost. A full-frame digital SLR costs a lot morethan a cropped sensor digital SLR, on average, about twice the cost of the highest-tier croppedsensor camera. The larger physical size of a full-frame camera may be an issue to those whodon’t want to carry a large camera as well.
[PANDUAN ASAS FOTOGRAFI] TUTORIAL
T U T O R I A L S B A S I C P H O T O G R A P H Y Page 111
The image quality and noise control benefits of a full-frame sensor is apparent to mostexperienced users but the main question boils down to whether the advantages are worth theprice difference compared to a crop-sensor camera.
If you can afford a full-frame digital SLR, and you’re used to shooting with film cameras in thepast, then the transition from film to digtal SLR would be seamless as the resulting images willlook very familiar in framing. If you’re just starting out on a budget or maybe have a collectionof crop-sensor optimized lenses, then it may be best to stick to cropped sensor cameras instead.
The choice between a cropped sensor and a full-frame sensor digital SLR camera should bebased more on cost and size as the image quality differences are usually not as noticeable unlessscrutinized extensively through test charts and large prints. The initial cost of the camera coupledwith its physical size are the main disadvantage of a full-frame camera, while a crop sensorcamera often will reach its image quality limitations faster than a full-frame camera as megapixelcount continues to increase. There’s nothing wrong with choosing either format, both will full-frame and crop sensor cameras are capable in provide high-quality images, just pick one thatsuits your budget, ergonomics, and print requirements.
[PANDUAN ASAS FOTOGRAFI] TUTORIAL
T U T O R I A L S B A S I C P H O T O G R A P H Y Page 112
Lesson 14
CHOSING A DIGITAL SLR CAMERA
(SUMMARY)Whether you’re buying a digital SLR for the first time or upgrading an existing digital SLR unit,the decision making process is pretty similar. As always, we start off with the budget, then theintention of use, then finally, specification comparison.
As we’ve covered the key specifications to look out for when dealing with the feature list of acamera, the important pointers that we have to keep in mind is how these different features playinto our most common photographic subject and shooting conditions.
Simply buying the most expensive unit may not be the best decision even if budget isn’t aconcern as the more expensive a digital SLR gets, the more specific its purpose and functionalityin most cases.
Apart from the technical specifications discussed, here are several subjective issues that you maywant to think about as well.
Size and Weight
Many first-time digital SLR buyers will find the size of most entry-level models large comparedto their previous pocketable cameras. Naturally, the excitement will be high for buying a muchlarger camera with a relatively large lens compared to compact cameras.
However, a lot of new digital camera users quickly get the impression that size matters (a lot)and develop user-envy when exposed to much larger mid-range and professional lines and mayimmediately consider upgrading to a larger camera.
Not so fast!
While a larger camera often has better ergonomics, the differences may not be as large as youthink. The disadvantage of using a heavier and larger camera will be very obvious when you startshooting for an extended period of time. Holding a heavy camera and large lens for several hourswhile traveling would really strain ones neck and wrist. A smaller entry-level digital SLR will bea godsend for most people.
Oftentimes new digital SLR users are shy to whip out a large camera in public as well, this is abig disadvantage for a beginner as the more often you shoot, the greater your chance to succeedin photography.
[PANDUAN ASAS FOTOGRAFI] TUTORIAL
T U T O R I A L S B A S I C P H O T O G R A P H Y Page 113
If a camera is so large that it would require you to carry a large bag or too heavy to hang aroundyour neck, chances are you’ll find carrying a camera too cumbersome and decide not to bring itat all. Remember that you cannot take a photograph without a camera. If a great photographicopportunity comes up and you don’t have a camera because you find your camera too heavy orbulky, then the digital SLR purchase will seem to be a wasted purchase.
Ergonomics
You’ll most likely use a camera at least an hour each time you bring your camera out of the bag.If the camera’s body design, weight balance, or button placement isn’t ideal in your hands or ifparts like the viewfinder distance is too close your eye, for example, then every time you useyour camera will be an agonizing and frustrating experience.
Make sure you test your potential unit beforehand and see how easy it is for you to changesettings of the camera or changing batteries/memory cards. Look through the viewfinder and seeif the viewfinder is bright enough. Does the camera’s design cause your hand to cramp, and soforth.
You can test most of these functions without the need to actually take photos. Oftentimes, you’llfind a camera that will fit your hand like glove.
After-sales Support
It is safe to say that virtually all digital SLRs in the market are very well made and should serveyou for a long period of time before any part of the camera gets damaged. Oftentimes, peopleupgrade their cameras way before the camera is close to being too being considered old or worn.
However, even the best camera will inevitably fail one way or another, whether due tomanufacturing defects, user error, or simply wear-and-tear. When service is required, it’s best tocheck if the camera brand has a strong service center where you live.
Odds are low that a camera would need servicing before your first upgrade, but if and whenservice is required, you wouldn’t want to wait a month because the repair center doesn’t have theparts or there isn’t a service center at all in the city where you live.Summary
Let’s summarize our buying decision checklist for the last time.
Determine the budget including the cost of basic accessories. Know what kind of subjects you’ll be shooting often. Physically hold and test the camera to see if you’re comfortable with the weight, size, and
button placements. Check the availability and cost of eventual upgrade items such as lenses, flash, and other
accessories. Check the after-sales support availability and reliability.

[PANDUAN ASAS FOTOGRAFI] TUTORIAL
T U T O R I A L S B A S I C P H O T O G R A P H Y Page 114
Compare the specifications based on your needs determined in checklist item 2. Search for camera reviews on the internet.
Those are the main pointers to remember or to be determined before even walking into a store tomake a purchase. It’s important that you’ve already armed yourself with a clear understanding ofwhat you need and want, otherwise you’ll be easily persuaded by sales personnel to purchase acamera may not suit your needs or photographic plans.
Hope that this series of Choosing a DSLR Camera made you a better shopper and get you startedin the exciting world of photography using a digital SLR!
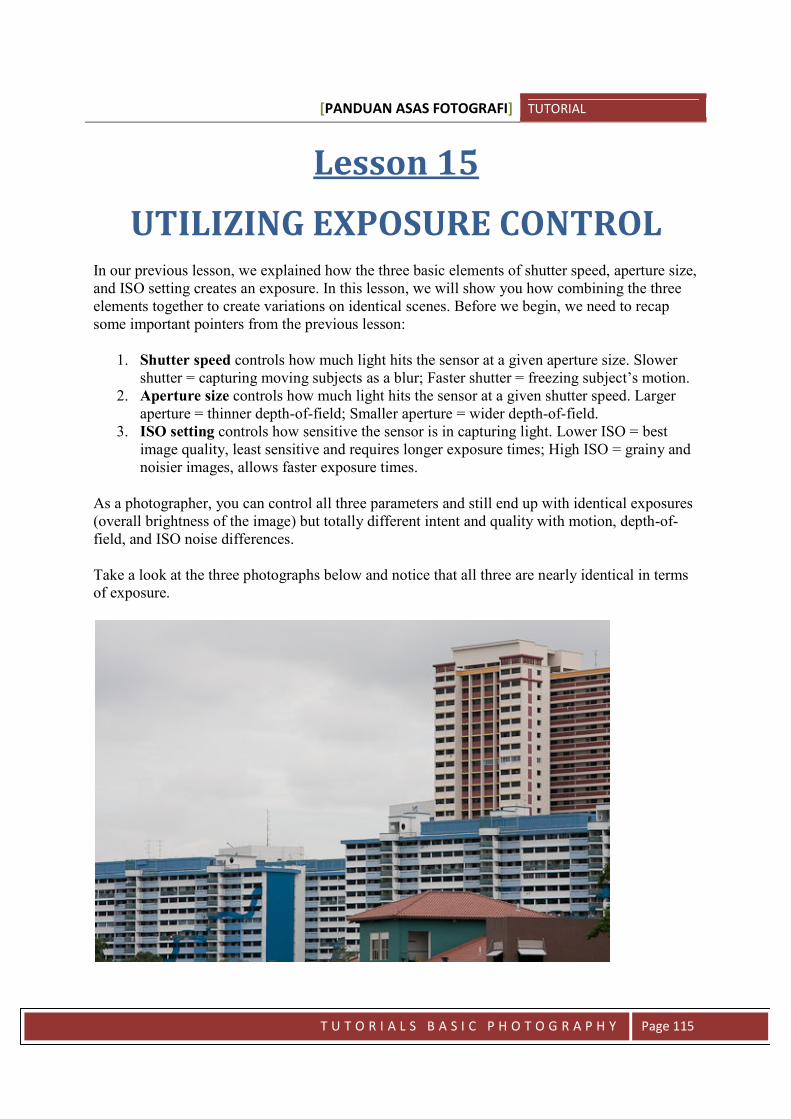
[PANDUAN ASAS FOTOGRAFI] TUTORIAL
T U T O R I A L S B A S I C P H O T O G R A P H Y Page 115
Lesson 15
UTILIZING EXPOSURE CONTROLIn our previous lesson, we explained how the three basic elements of shutter speed, aperture size,and ISO setting creates an exposure. In this lesson, we will show you how combining the threeelements together to create variations on identical scenes. Before we begin, we need to recapsome important pointers from the previous lesson:
1. Shutter speed controls how much light hits the sensor at a given aperture size. Slowershutter = capturing moving subjects as a blur; Faster shutter = freezing subject’s motion.
2. Aperture size controls how much light hits the sensor at a given shutter speed. Largeraperture = thinner depth-of-field; Smaller aperture = wider depth-of-field.
3. ISO setting controls how sensitive the sensor is in capturing light. Lower ISO = bestimage quality, least sensitive and requires longer exposure times; High ISO = grainy andnoisier images, allows faster exposure times.
As a photographer, you can control all three parameters and still end up with identical exposures(overall brightness of the image) but totally different intent and quality with motion, depth-of-field, and ISO noise differences.
Take a look at the three photographs below and notice that all three are nearly identical in termsof exposure.
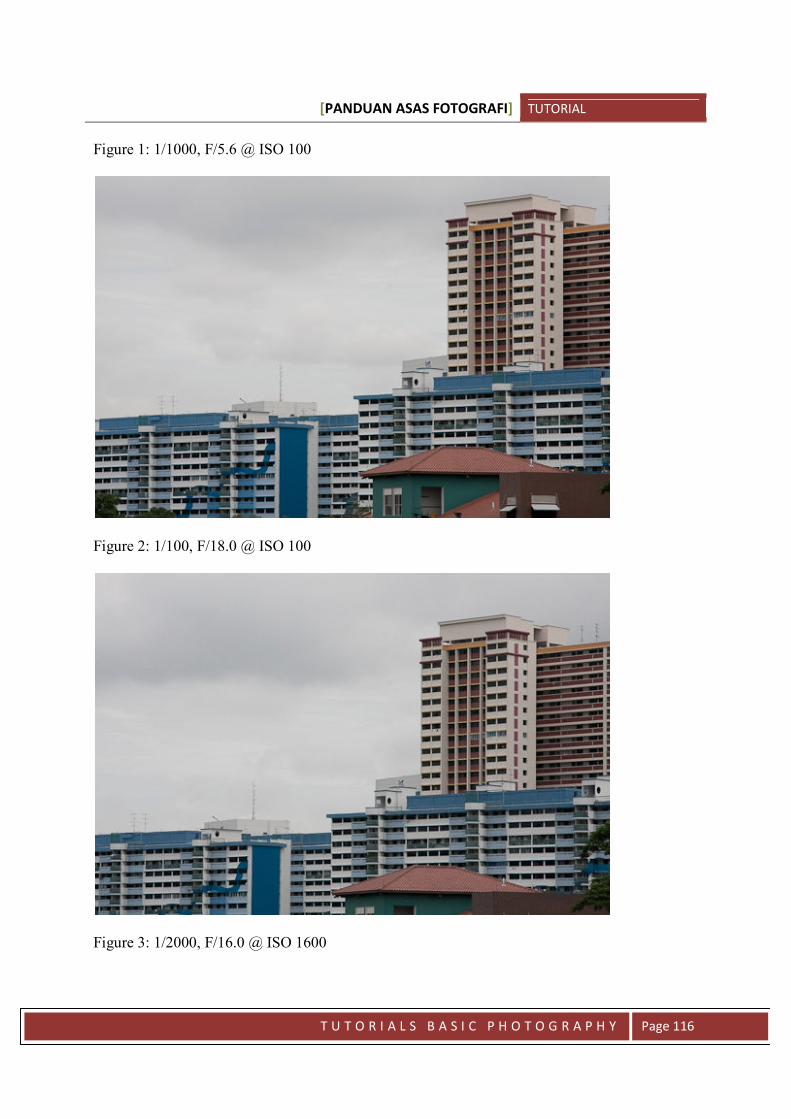
[PANDUAN ASAS FOTOGRAFI] TUTORIAL
T U T O R I A L S B A S I C P H O T O G R A P H Y Page 116
Figure 1: 1/1000, F/5.6 @ ISO 100
Figure 2: 1/100, F/18.0 @ ISO 100
Figure 3: 1/2000, F/16.0 @ ISO 1600

[PANDUAN ASAS FOTOGRAFI] TUTORIAL
T U T O R I A L S B A S I C P H O T O G R A P H Y Page 117
Now study the exposure information for a minute.
Figure 1 used a fast shutter speed (1/1000) with a relatively large aperture opening(f/5.6) at a low ISO setting of 100.
Figure 2 used a slower shutter speed (1/100) with a smaller aperture size (f/18.0), andlow ISO 100.
Figure 3 used a fast shutter speed (1/2000), and a small aperture size (f/16.0), and a highISO (1600).
Using the faucet analogy from our previous lesson, let’s assume that our bucket has a volume of1 liter.
Figure 1 equates to a quick opening of the faucet valve (fast shutter) with a large faucetdiameter (big aperture opening) filling the 1L bucket (low ISO).
Figure 2 equates to leaving the faucet valve open longer (slower shutter) while using asmall faucet diameter (small aperture size) filling a 1L bucket (low ISO).
Figure 3 equates to a opening the faucet valve quickly (fast shutter) with a small faucetdiamter (small aperture size) filling a 200ml cup (high ISO). Let’s take a look at a morepractical application.
Exposure Scenario: Freezing Motion
We know that in order to freeze motion, we would need a relatively high shutter speed. Oursubject involves a set of pendulum balls in motion and our goal is to freeze the first pendulumball’s motion. We switched our camera to “Program” mode and allow the camera toautomatically calculate an exposure and provide us with a baseline image for reference.
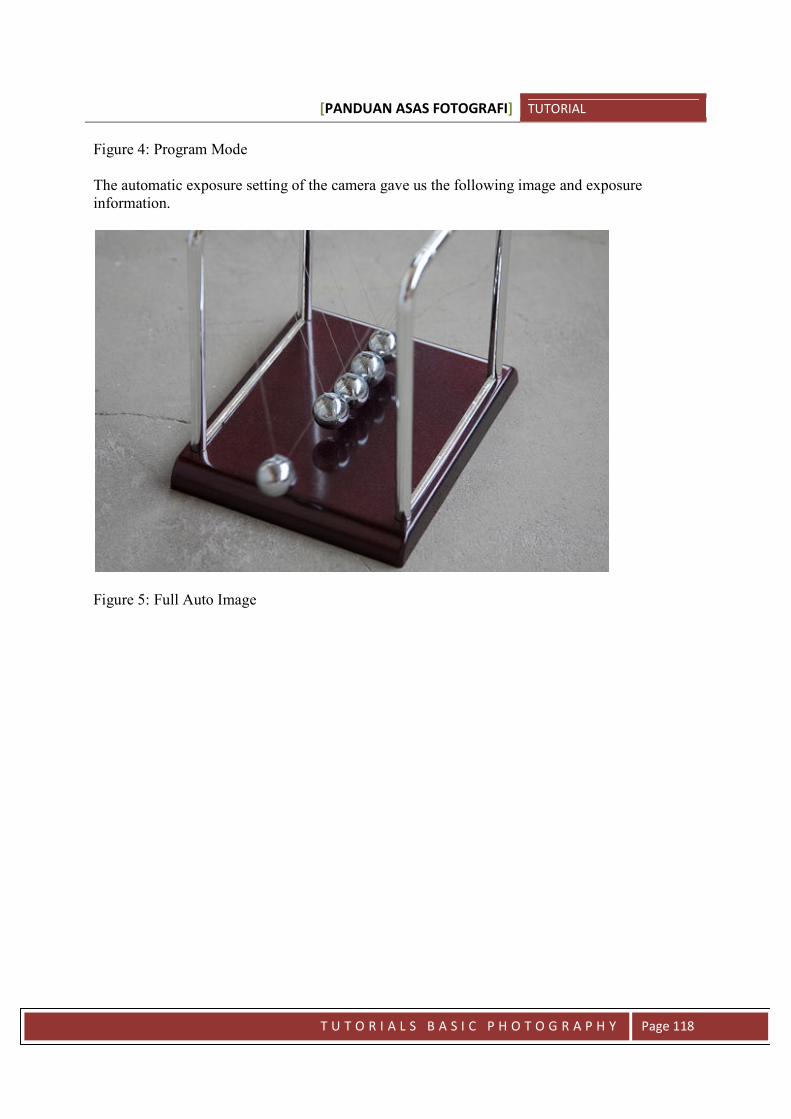
[PANDUAN ASAS FOTOGRAFI] TUTORIAL
T U T O R I A L S B A S I C P H O T O G R A P H Y Page 118
Figure 4: Program Mode
The automatic exposure setting of the camera gave us the following image and exposureinformation.
Figure 5: Full Auto Image
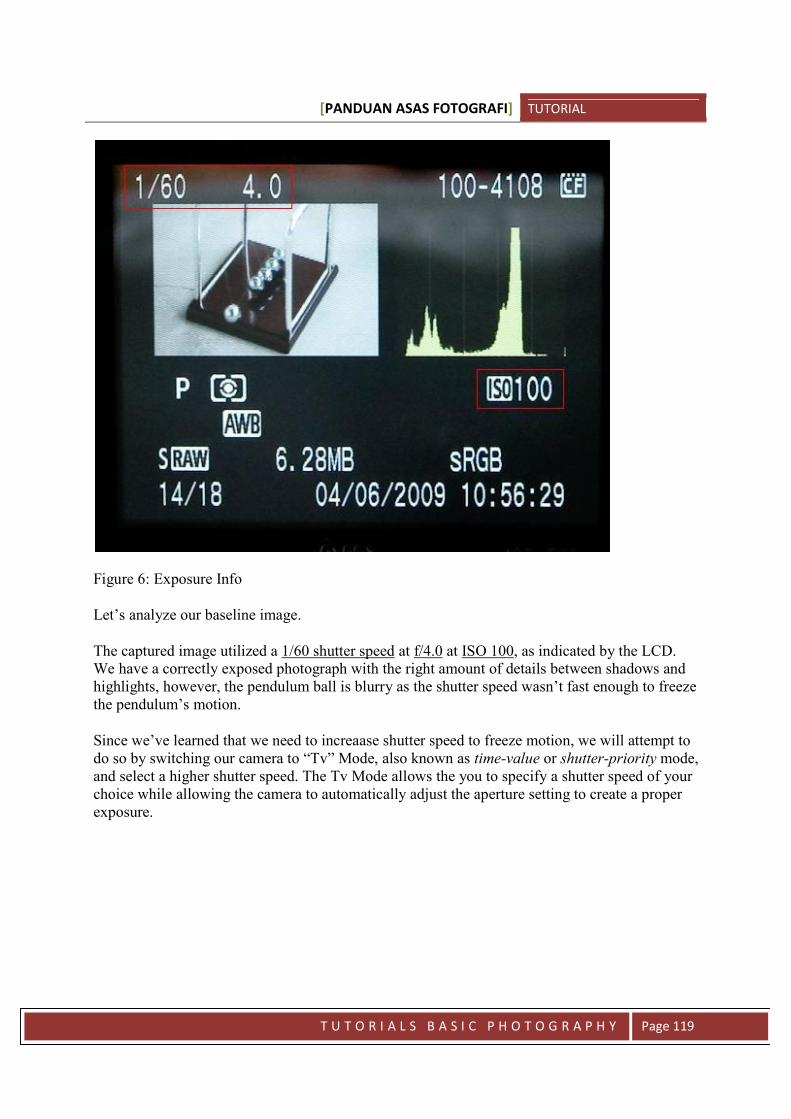
[PANDUAN ASAS FOTOGRAFI] TUTORIAL
T U T O R I A L S B A S I C P H O T O G R A P H Y Page 119
Figure 6: Exposure Info
Let’s analyze our baseline image.
The captured image utilized a 1/60 shutter speed at f/4.0 at ISO 100, as indicated by the LCD.We have a correctly exposed photograph with the right amount of details between shadows andhighlights, however, the pendulum ball is blurry as the shutter speed wasn’t fast enough to freezethe pendulum’s motion.
Since we’ve learned that we need to increaase shutter speed to freeze motion, we will attempt todo so by switching our camera to “Tv” Mode, also known as time-value or shutter-priority mode,and select a higher shutter speed. The Tv Mode allows the you to specify a shutter speed of yourchoice while allowing the camera to automatically adjust the aperture setting to create a properexposure.
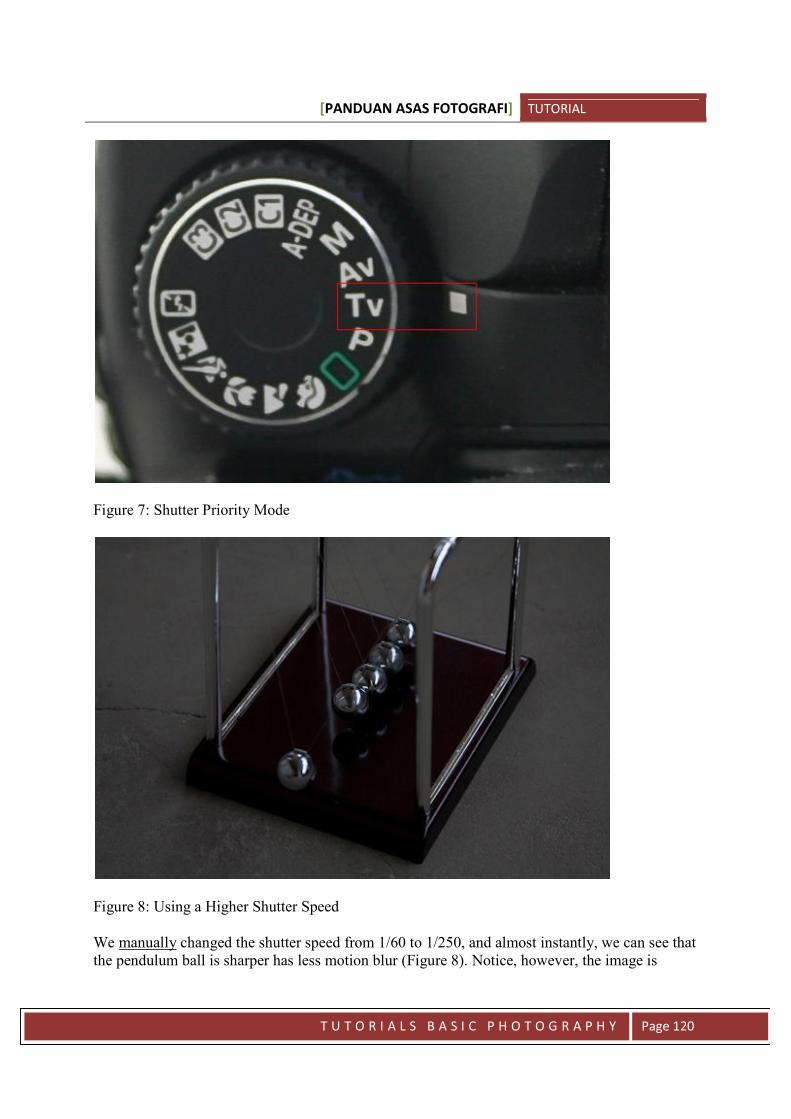
[PANDUAN ASAS FOTOGRAFI] TUTORIAL
T U T O R I A L S B A S I C P H O T O G R A P H Y Page 120
Figure 7: Shutter Priority Mode
Figure 8: Using a Higher Shutter Speed
We manually changed the shutter speed from 1/60 to 1/250, and almost instantly, we can see thatthe pendulum ball is sharper has less motion blur (Figure 8). Notice, however, the image is
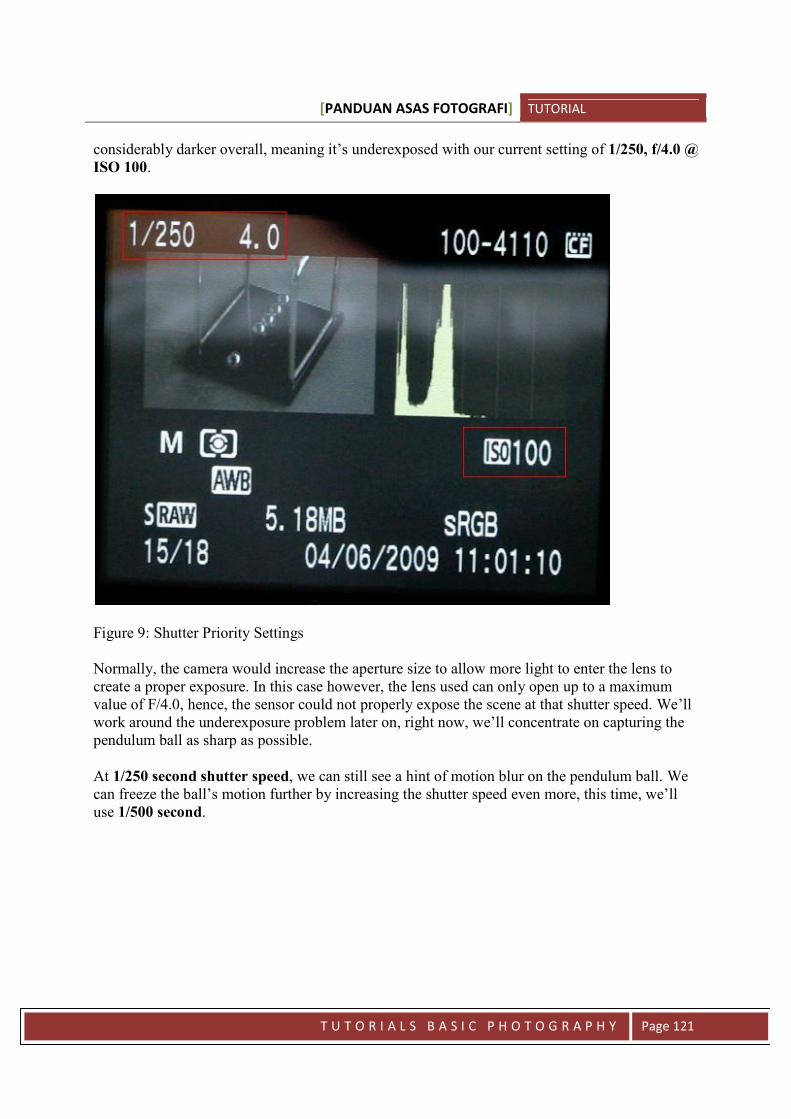
[PANDUAN ASAS FOTOGRAFI] TUTORIAL
T U T O R I A L S B A S I C P H O T O G R A P H Y Page 121
considerably darker overall, meaning it’s underexposed with our current setting of 1/250, f/4.0 @ISO 100.
Figure 9: Shutter Priority Settings
Normally, the camera would increase the aperture size to allow more light to enter the lens tocreate a proper exposure. In this case however, the lens used can only open up to a maximumvalue of F/4.0, hence, the sensor could not properly expose the scene at that shutter speed. We’llwork around the underexposure problem later on, right now, we’ll concentrate on capturing thependulum ball as sharp as possible.
At 1/250 second shutter speed, we can still see a hint of motion blur on the pendulum ball. Wecan freeze the ball’s motion further by increasing the shutter speed even more, this time, we’lluse 1/500 second.
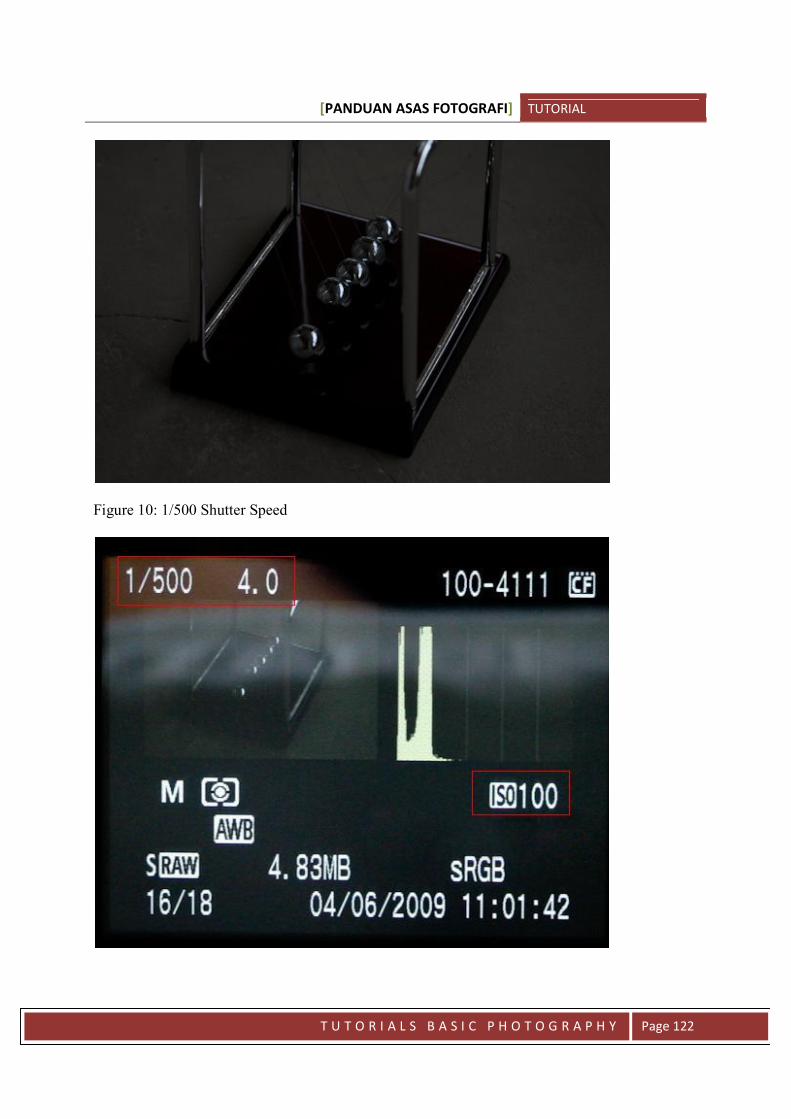
[PANDUAN ASAS FOTOGRAFI] TUTORIAL
T U T O R I A L S B A S I C P H O T O G R A P H Y Page 122
Figure 10: 1/500 Shutter Speed
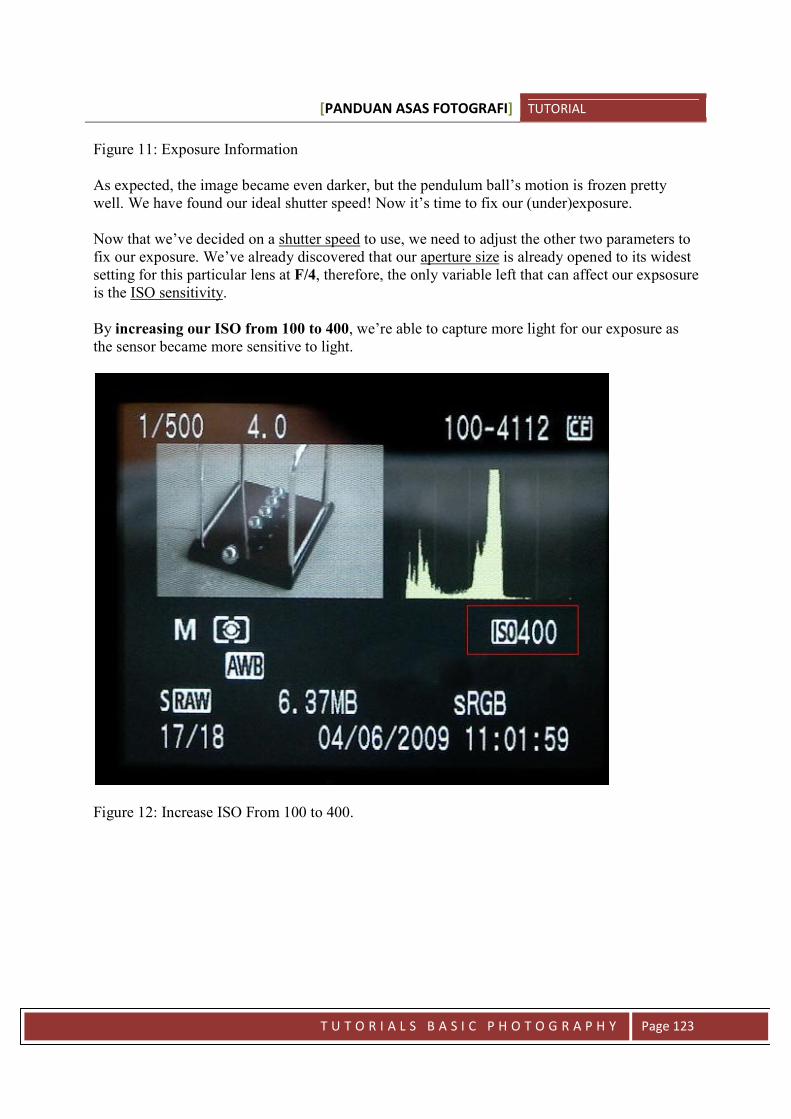
[PANDUAN ASAS FOTOGRAFI] TUTORIAL
T U T O R I A L S B A S I C P H O T O G R A P H Y Page 123
Figure 11: Exposure Information
As expected, the image became even darker, but the pendulum ball’s motion is frozen prettywell. We have found our ideal shutter speed! Now it’s time to fix our (under)exposure.
Now that we’ve decided on a shutter speed to use, we need to adjust the other two parameters tofix our exposure. We’ve already discovered that our aperture size is already opened to its widestsetting for this particular lens at F/4, therefore, the only variable left that can affect our expsosureis the ISO sensitivity.
By increasing our ISO from 100 to 400, we’re able to capture more light for our exposure asthe sensor became more sensitive to light.
Figure 12: Increase ISO From 100 to 400.

[PANDUAN ASAS FOTOGRAFI] TUTORIAL
T U T O R I A L S B A S I C P H O T O G R A P H Y Page 124
Figure 13: Result of Increased ISO from 100 to 400
Let’s increase our ISO some more to replicate the proper exposure we got in Figure 5.
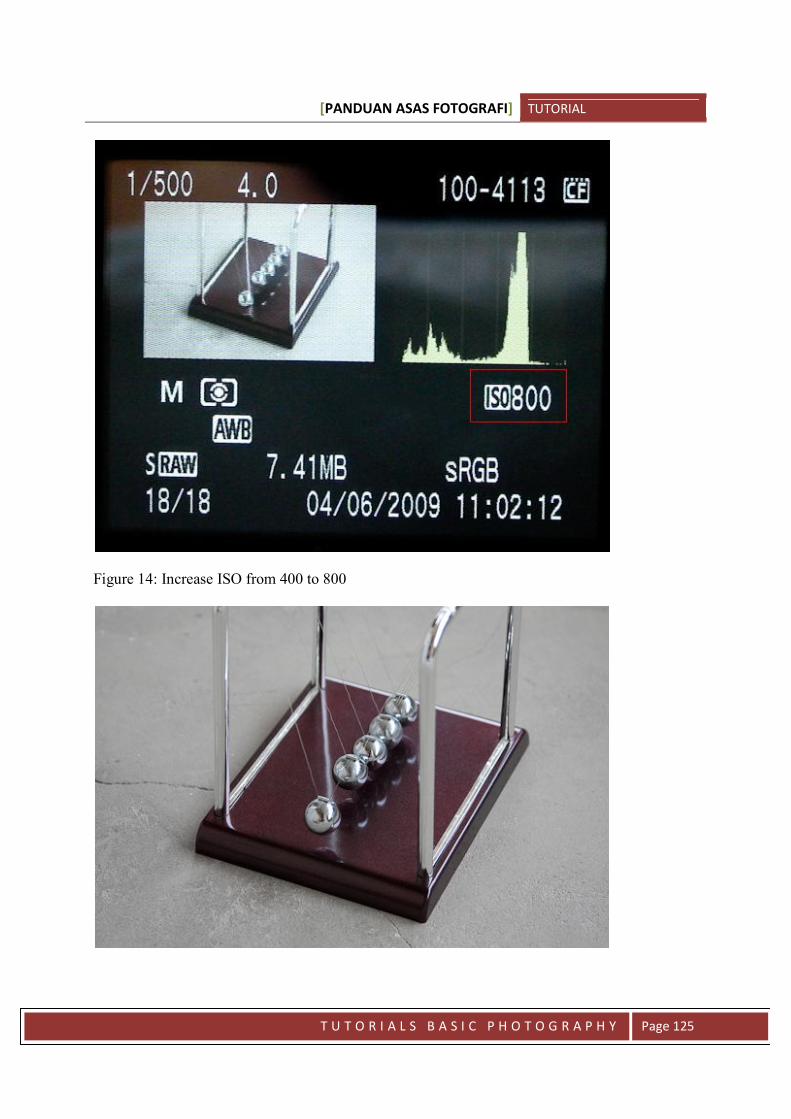
[PANDUAN ASAS FOTOGRAFI] TUTORIAL
T U T O R I A L S B A S I C P H O T O G R A P H Y Page 125
Figure 14: Increase ISO from 400 to 800
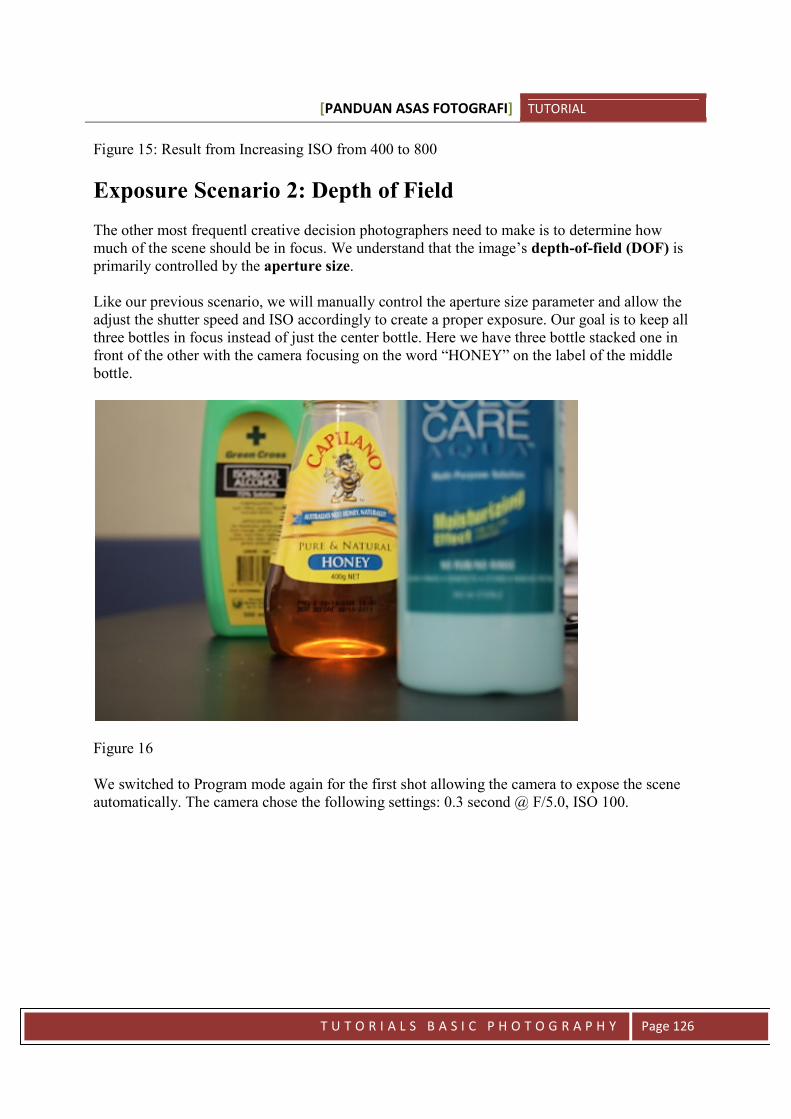
[PANDUAN ASAS FOTOGRAFI] TUTORIAL
T U T O R I A L S B A S I C P H O T O G R A P H Y Page 126
Figure 15: Result from Increasing ISO from 400 to 800
Exposure Scenario 2: Depth of Field
The other most frequentl creative decision photographers need to make is to determine howmuch of the scene should be in focus. We understand that the image’s depth-of-field (DOF) isprimarily controlled by the aperture size.
Like our previous scenario, we will manually control the aperture size parameter and allow theadjust the shutter speed and ISO accordingly to create a proper exposure. Our goal is to keep allthree bottles in focus instead of just the center bottle. Here we have three bottle stacked one infront of the other with the camera focusing on the word “HONEY” on the label of the middlebottle.
Figure 16
We switched to Program mode again for the first shot allowing the camera to expose the sceneautomatically. The camera chose the following settings: 0.3 second @ F/5.0, ISO 100.
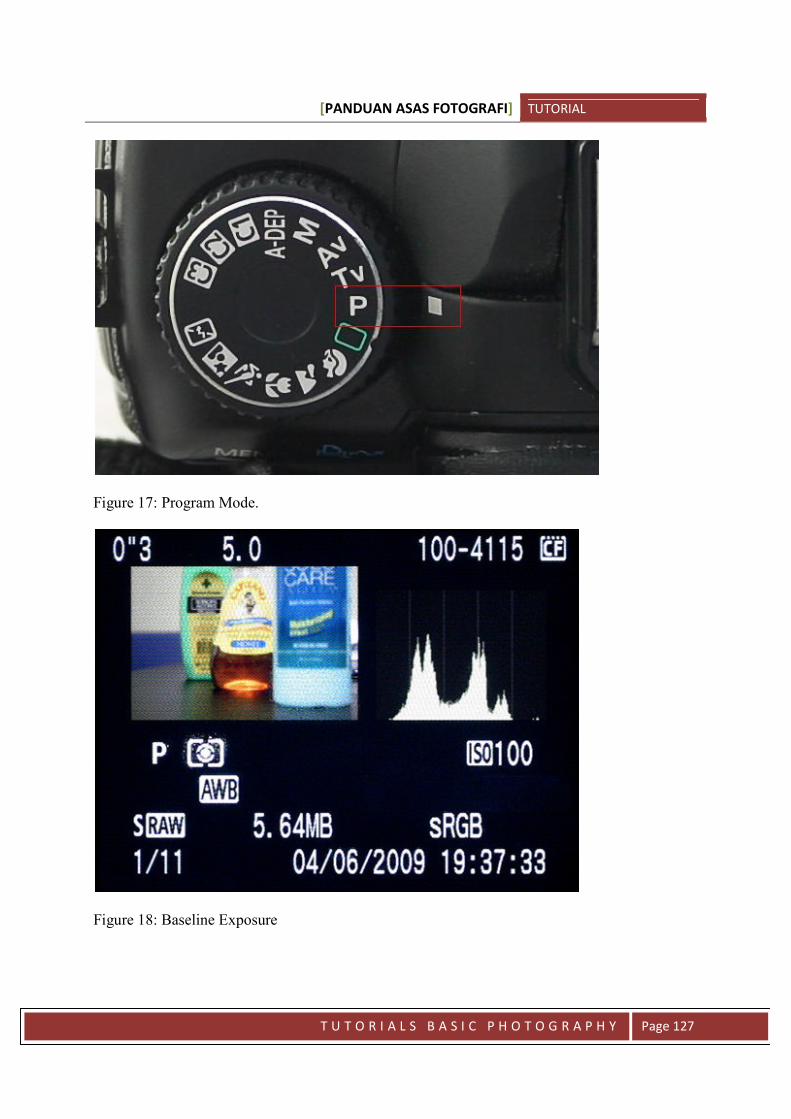
[PANDUAN ASAS FOTOGRAFI] TUTORIAL
T U T O R I A L S B A S I C P H O T O G R A P H Y Page 127
Figure 17: Program Mode.
Figure 18: Baseline Exposure
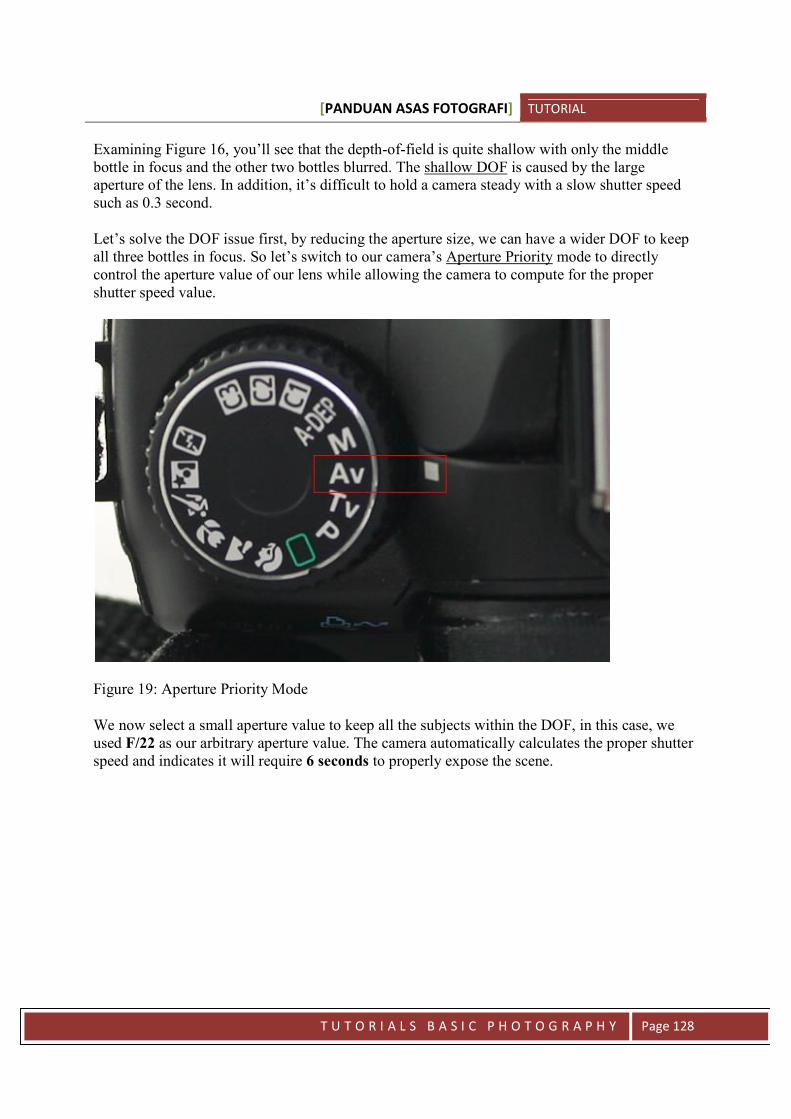
[PANDUAN ASAS FOTOGRAFI] TUTORIAL
T U T O R I A L S B A S I C P H O T O G R A P H Y Page 128
Examining Figure 16, you’ll see that the depth-of-field is quite shallow with only the middlebottle in focus and the other two bottles blurred. The shallow DOF is caused by the largeaperture of the lens. In addition, it’s difficult to hold a camera steady with a slow shutter speedsuch as 0.3 second.
Let’s solve the DOF issue first, by reducing the aperture size, we can have a wider DOF to keepall three bottles in focus. So let’s switch to our camera’s Aperture Priority mode to directlycontrol the aperture value of our lens while allowing the camera to compute for the propershutter speed value.
Figure 19: Aperture Priority Mode
We now select a small aperture value to keep all the subjects within the DOF, in this case, weused F/22 as our arbitrary aperture value. The camera automatically calculates the proper shutterspeed and indicates it will require 6 seconds to properly expose the scene.
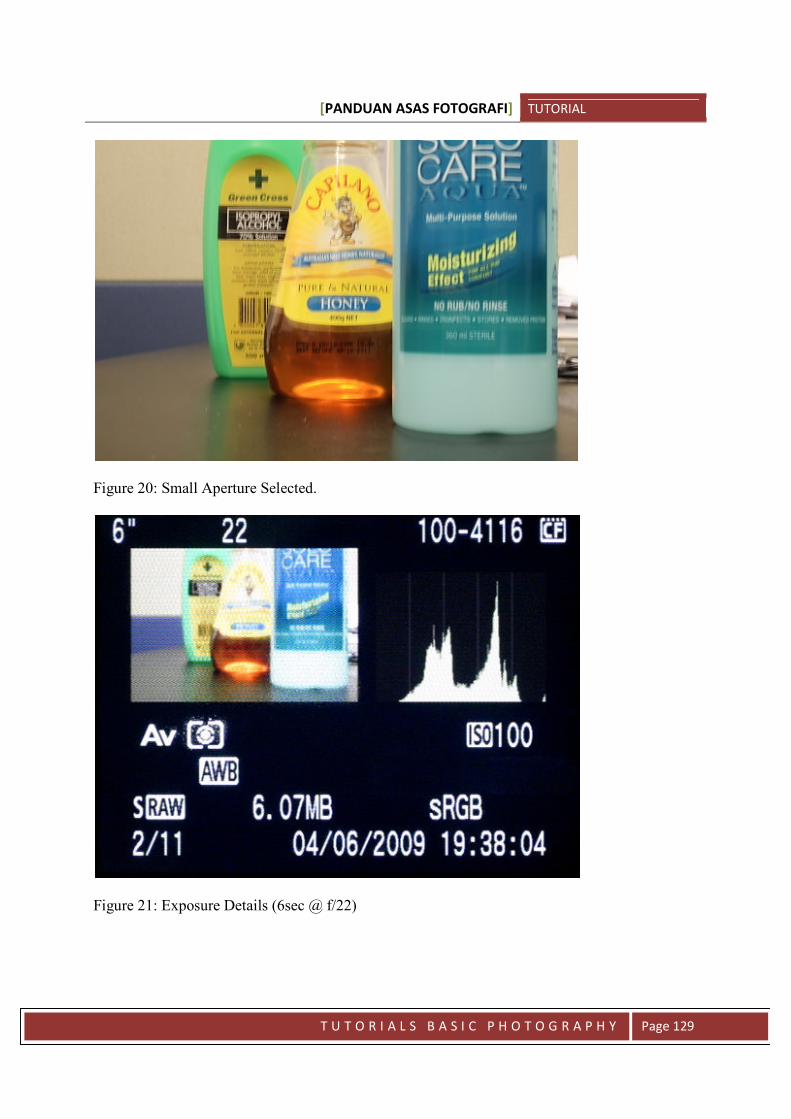
[PANDUAN ASAS FOTOGRAFI] TUTORIAL
T U T O R I A L S B A S I C P H O T O G R A P H Y Page 129
Figure 20: Small Aperture Selected.
Figure 21: Exposure Details (6sec @ f/22)
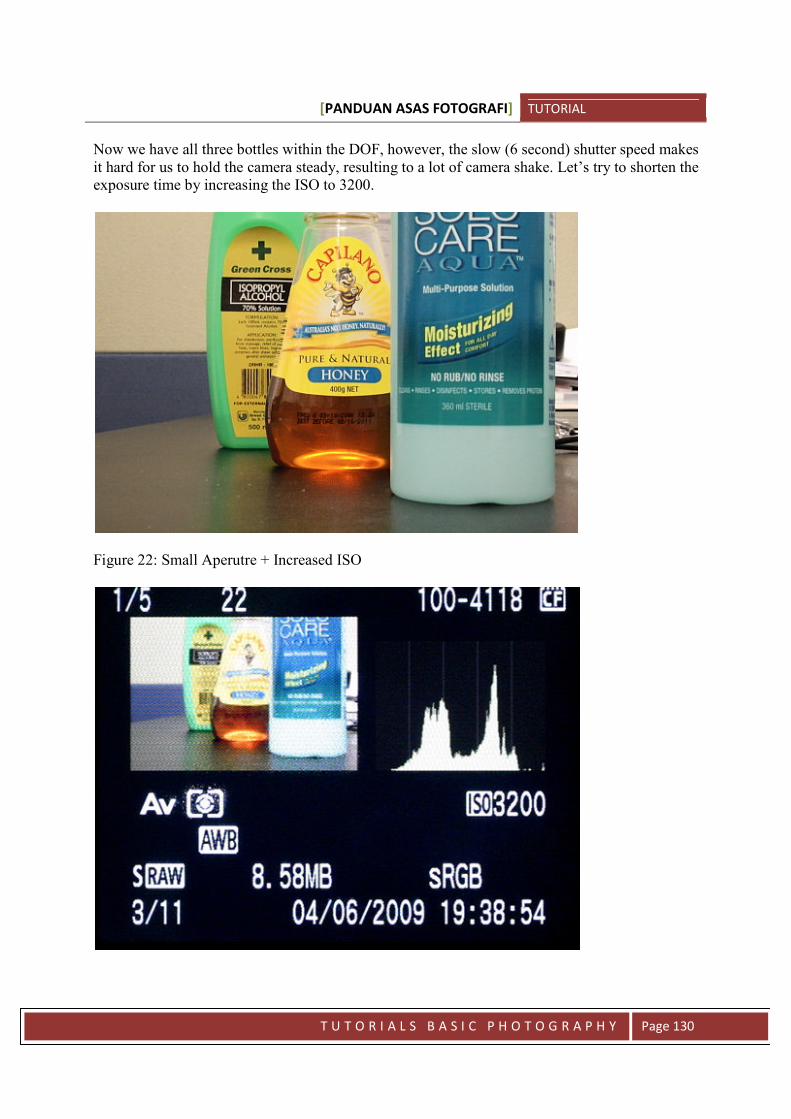
[PANDUAN ASAS FOTOGRAFI] TUTORIAL
T U T O R I A L S B A S I C P H O T O G R A P H Y Page 130
Now we have all three bottles within the DOF, however, the slow (6 second) shutter speed makesit hard for us to hold the camera steady, resulting to a lot of camera shake. Let’s try to shorten theexposure time by increasing the ISO to 3200.
Figure 22: Small Aperutre + Increased ISO
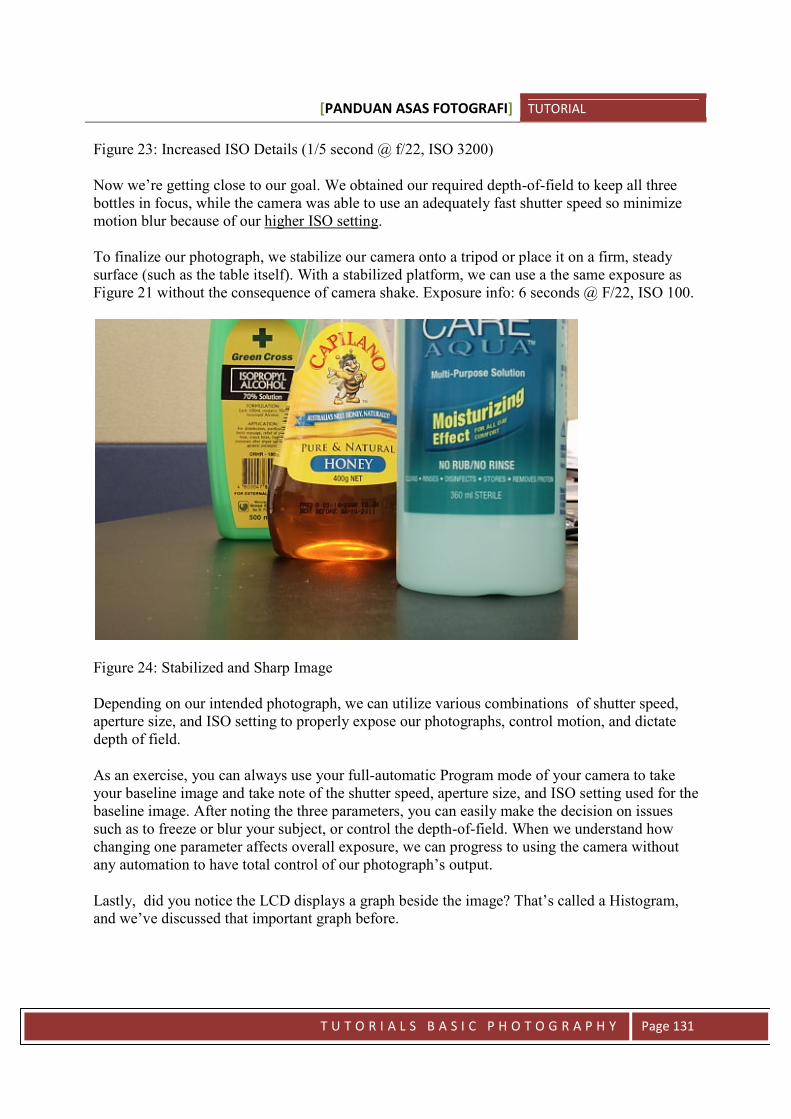
[PANDUAN ASAS FOTOGRAFI] TUTORIAL
T U T O R I A L S B A S I C P H O T O G R A P H Y Page 131
Figure 23: Increased ISO Details (1/5 second @ f/22, ISO 3200)
Now we’re getting close to our goal. We obtained our required depth-of-field to keep all threebottles in focus, while the camera was able to use an adequately fast shutter speed so minimizemotion blur because of our higher ISO setting.
To finalize our photograph, we stabilize our camera onto a tripod or place it on a firm, steadysurface (such as the table itself). With a stabilized platform, we can use a the same exposure asFigure 21 without the consequence of camera shake. Exposure info: 6 seconds @ F/22, ISO 100.
Figure 24: Stabilized and Sharp Image
Depending on our intended photograph, we can utilize various combinations of shutter speed,aperture size, and ISO setting to properly expose our photographs, control motion, and dictatedepth of field.
As an exercise, you can always use your full-automatic Program mode of your camera to takeyour baseline image and take note of the shutter speed, aperture size, and ISO setting used for thebaseline image. After noting the three parameters, you can easily make the decision on issuessuch as to freeze or blur your subject, or control the depth-of-field. When we understand howchanging one parameter affects overall exposure, we can progress to using the camera withoutany automation to have total control of our photograph’s output.
Lastly, did you notice the LCD displays a graph beside the image? That’s called a Histogram,and we’ve discussed that important graph before.
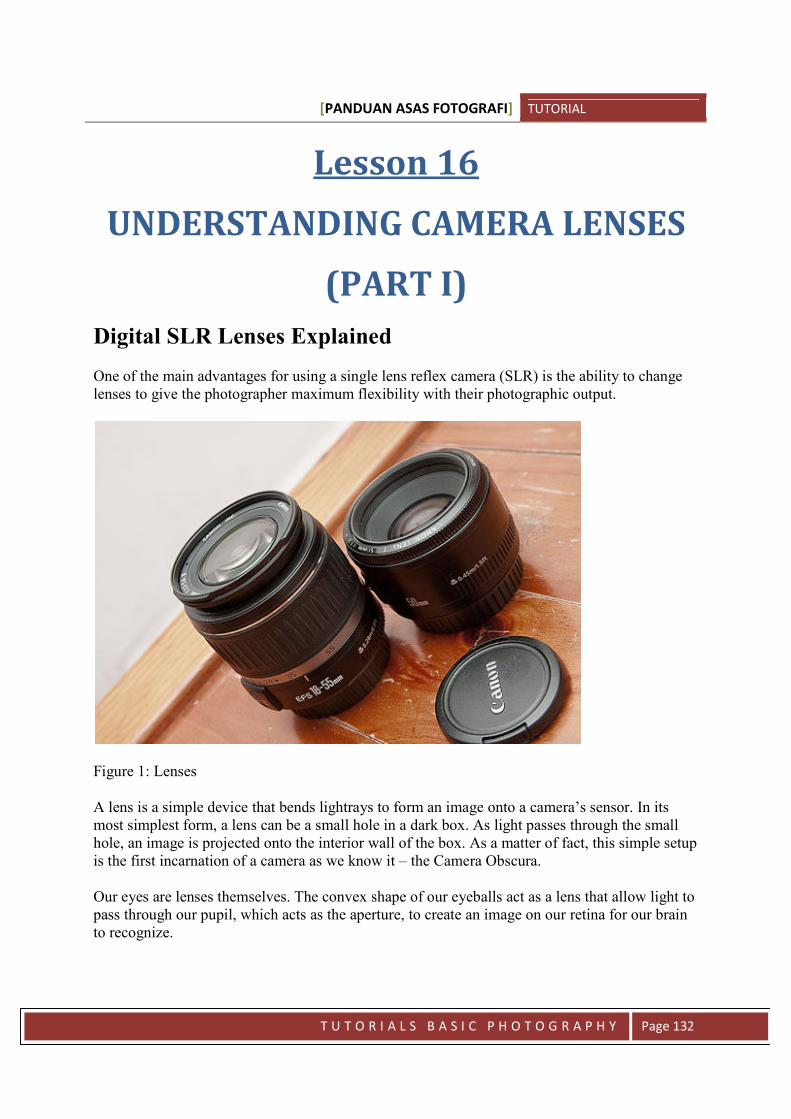
[PANDUAN ASAS FOTOGRAFI] TUTORIAL
T U T O R I A L S B A S I C P H O T O G R A P H Y Page 132
Lesson 16
UNDERSTANDING CAMERA LENSES
(PART I)
Digital SLR Lenses Explained
One of the main advantages for using a single lens reflex camera (SLR) is the ability to changelenses to give the photographer maximum flexibility with their photographic output.
Figure 1: Lenses
A lens is a simple device that bends lightrays to form an image onto a camera’s sensor. In itsmost simplest form, a lens can be a small hole in a dark box. As light passes through the smallhole, an image is projected onto the interior wall of the box. As a matter of fact, this simple setupis the first incarnation of a camera as we know it – the Camera Obscura.
Our eyes are lenses themselves. The convex shape of our eyeballs act as a lens that allow light topass through our pupil, which acts as the aperture, to create an image on our retina for our brainto recognize.
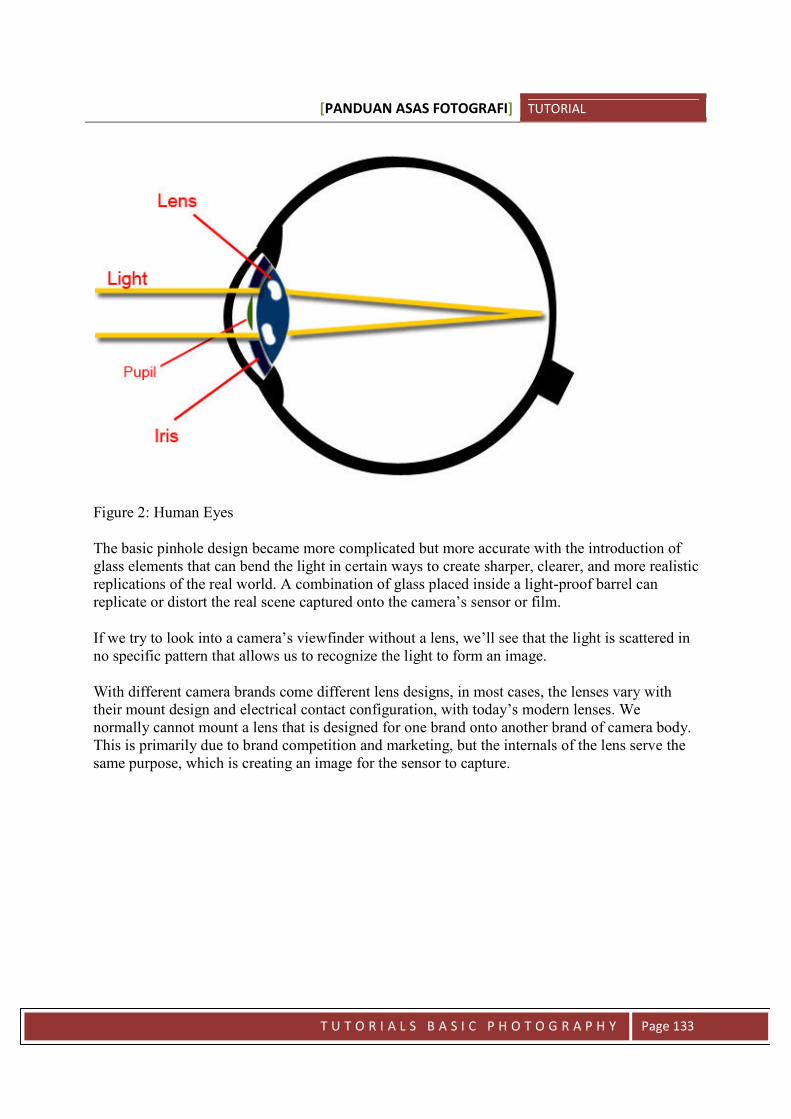
[PANDUAN ASAS FOTOGRAFI] TUTORIAL
T U T O R I A L S B A S I C P H O T O G R A P H Y Page 133
Figure 2: Human Eyes
The basic pinhole design became more complicated but more accurate with the introduction ofglass elements that can bend the light in certain ways to create sharper, clearer, and more realisticreplications of the real world. A combination of glass placed inside a light-proof barrel canreplicate or distort the real scene captured onto the camera’s sensor or film.
If we try to look into a camera’s viewfinder without a lens, we’ll see that the light is scattered inno specific pattern that allows us to recognize the light to form an image.
With different camera brands come different lens designs, in most cases, the lenses vary withtheir mount design and electrical contact configuration, with today’s modern lenses. Wenormally cannot mount a lens that is designed for one brand onto another brand of camera body.This is primarily due to brand competition and marketing, but the internals of the lens serve thesame purpose, which is creating an image for the sensor to capture.
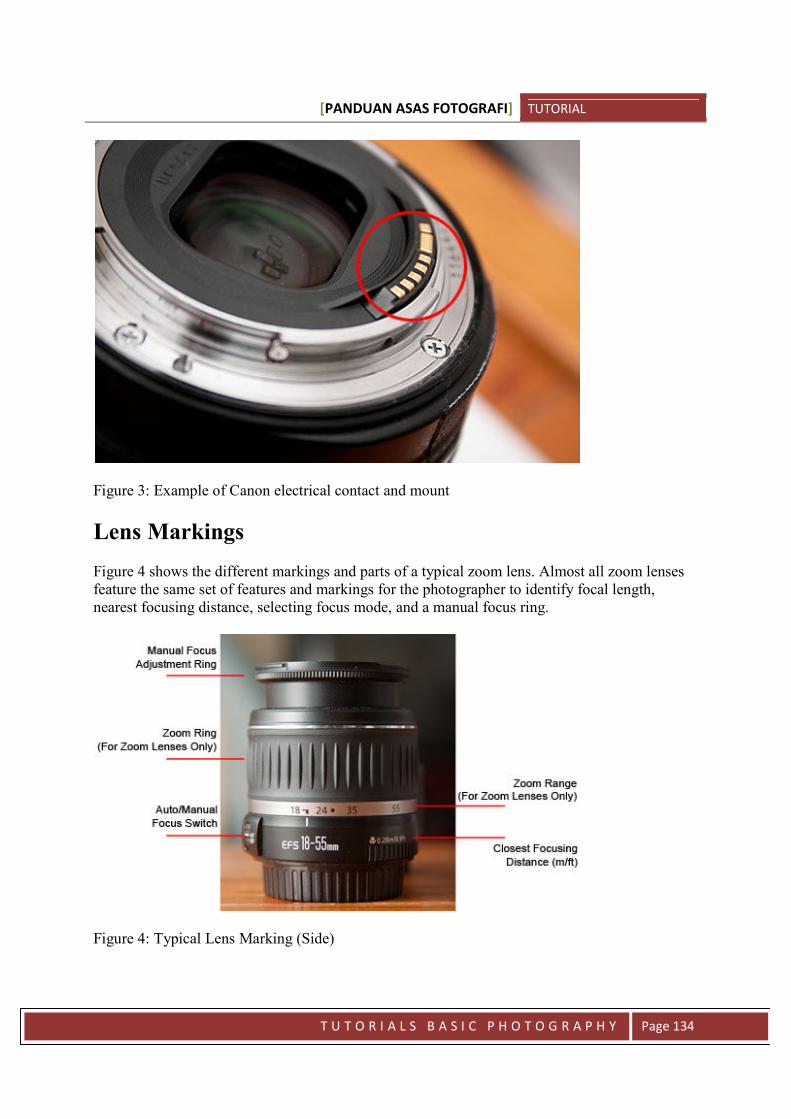
[PANDUAN ASAS FOTOGRAFI] TUTORIAL
T U T O R I A L S B A S I C P H O T O G R A P H Y Page 134
Figure 3: Example of Canon electrical contact and mount
Lens Markings
Figure 4 shows the different markings and parts of a typical zoom lens. Almost all zoom lensesfeature the same set of features and markings for the photographer to identify focal length,nearest focusing distance, selecting focus mode, and a manual focus ring.
Figure 4: Typical Lens Marking (Side)
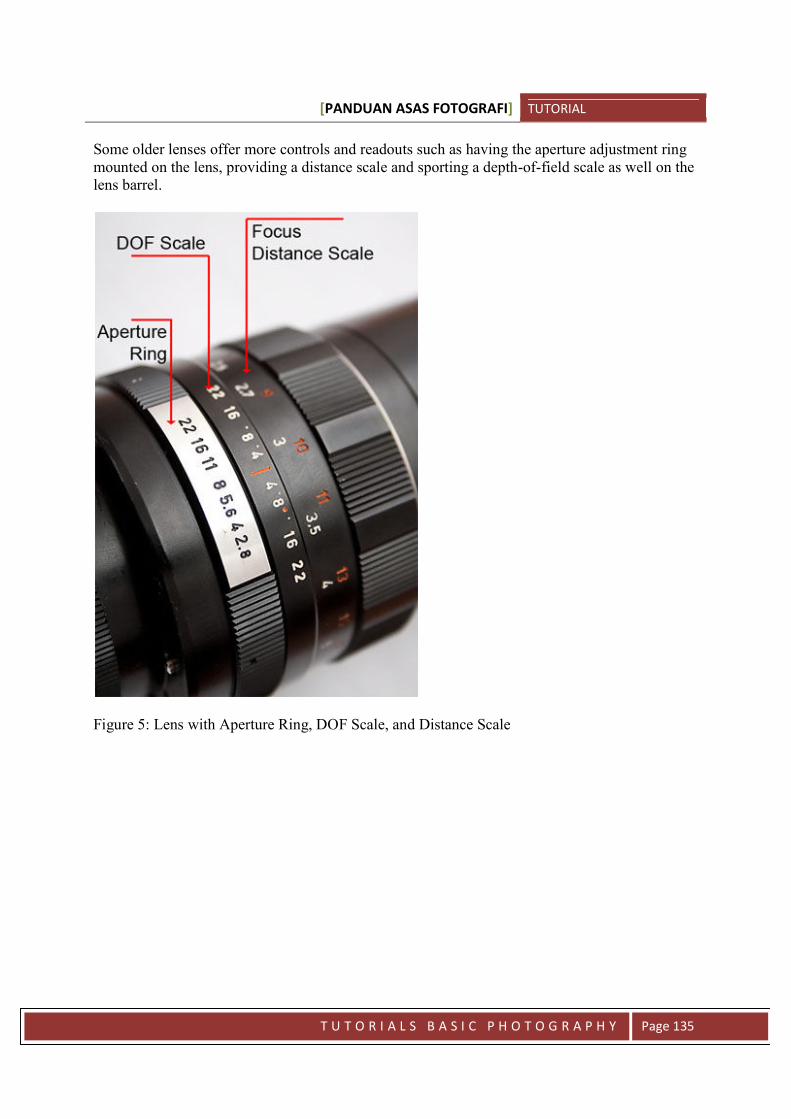
[PANDUAN ASAS FOTOGRAFI] TUTORIAL
T U T O R I A L S B A S I C P H O T O G R A P H Y Page 135
Some older lenses offer more controls and readouts such as having the aperture adjustment ringmounted on the lens, providing a distance scale and sporting a depth-of-field scale as well on thelens barrel.
Figure 5: Lens with Aperture Ring, DOF Scale, and Distance Scale
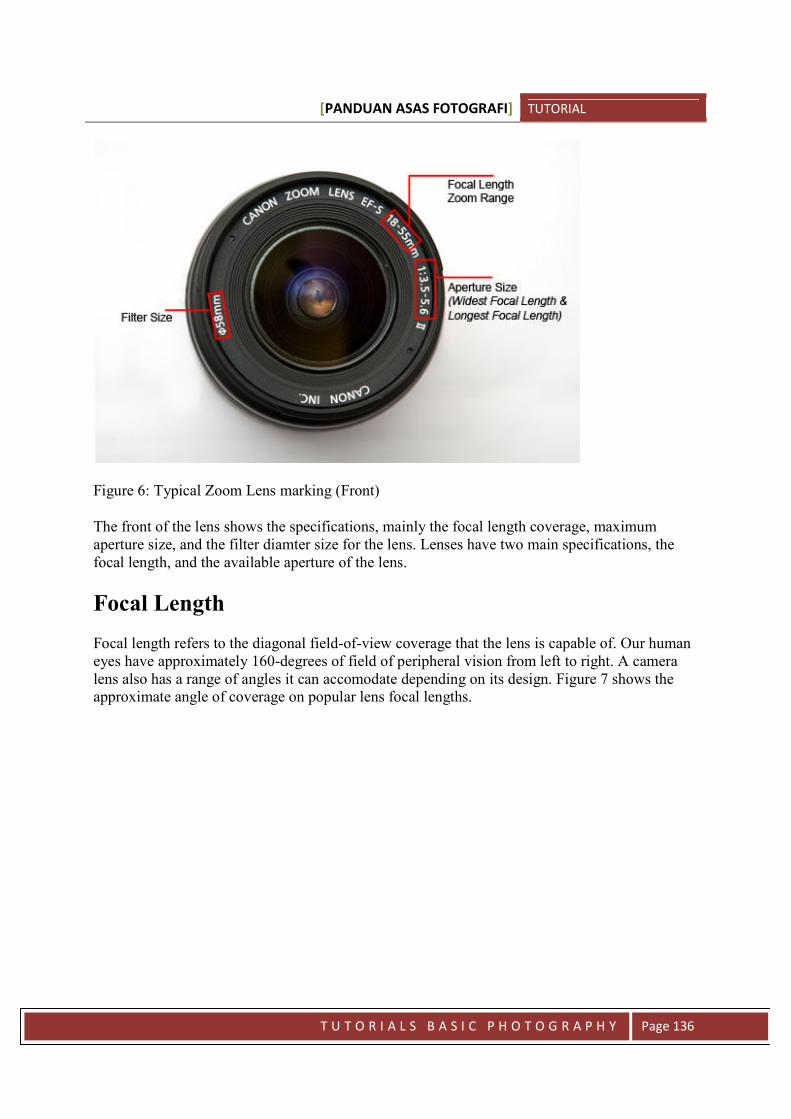
[PANDUAN ASAS FOTOGRAFI] TUTORIAL
T U T O R I A L S B A S I C P H O T O G R A P H Y Page 136
Figure 6: Typical Zoom Lens marking (Front)
The front of the lens shows the specifications, mainly the focal length coverage, maximumaperture size, and the filter diamter size for the lens. Lenses have two main specifications, thefocal length, and the available aperture of the lens.
Focal Length
Focal length refers to the diagonal field-of-view coverage that the lens is capable of. Our humaneyes have approximately 160-degrees of field of peripheral vision from left to right. A cameralens also has a range of angles it can accomodate depending on its design. Figure 7 shows theapproximate angle of coverage on popular lens focal lengths.
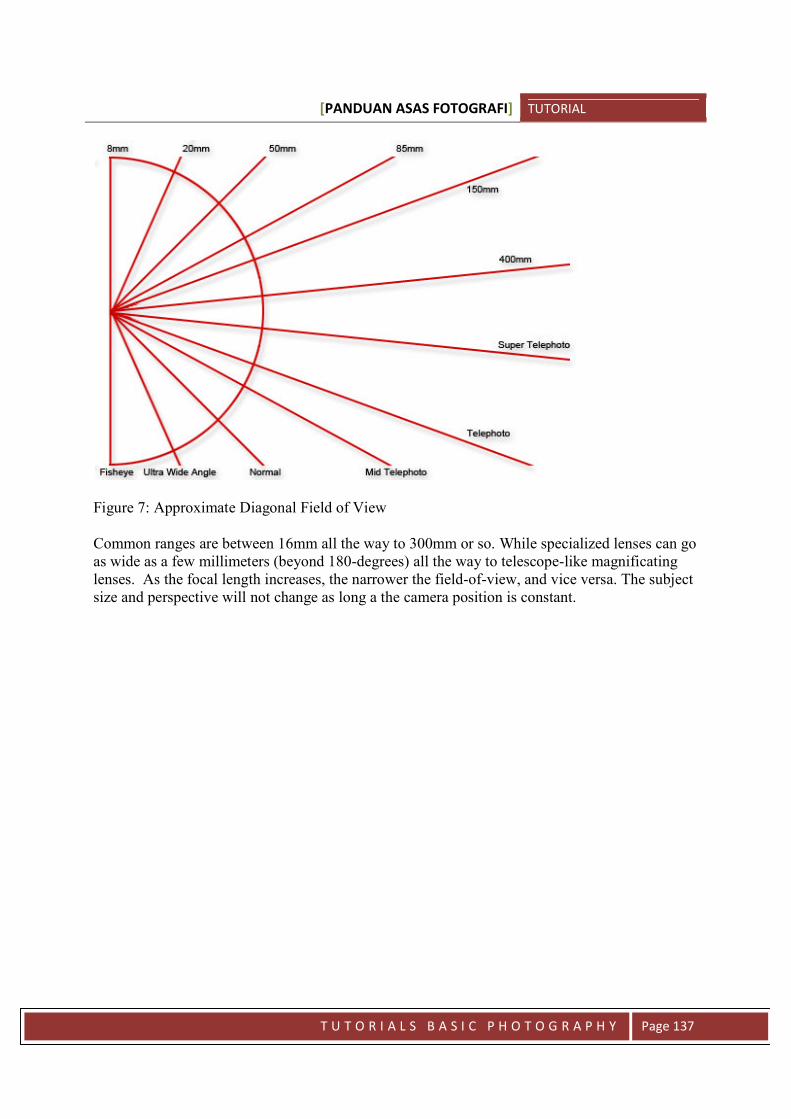
[PANDUAN ASAS FOTOGRAFI] TUTORIAL
T U T O R I A L S B A S I C P H O T O G R A P H Y Page 137
Figure 7: Approximate Diagonal Field of View
Common ranges are between 16mm all the way to 300mm or so. While specialized lenses can goas wide as a few millimeters (beyond 180-degrees) all the way to telescope-like magnificatinglenses. As the focal length increases, the narrower the field-of-view, and vice versa. The subjectsize and perspective will not change as long a the camera position is constant.
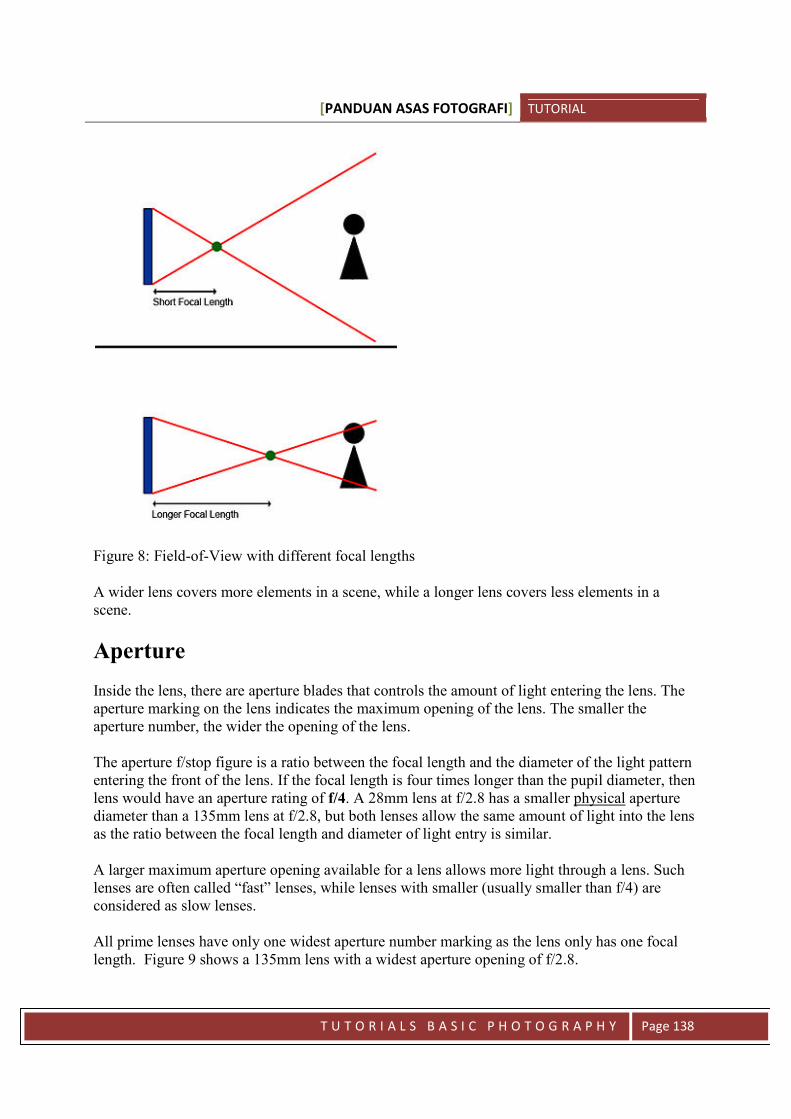
[PANDUAN ASAS FOTOGRAFI] TUTORIAL
T U T O R I A L S B A S I C P H O T O G R A P H Y Page 138
Figure 8: Field-of-View with different focal lengths
A wider lens covers more elements in a scene, while a longer lens covers less elements in ascene.
Aperture
Inside the lens, there are aperture blades that controls the amount of light entering the lens. Theaperture marking on the lens indicates the maximum opening of the lens. The smaller theaperture number, the wider the opening of the lens.
The aperture f/stop figure is a ratio between the focal length and the diameter of the light patternentering the front of the lens. If the focal length is four times longer than the pupil diameter, thenlens would have an aperture rating of f/4. A 28mm lens at f/2.8 has a smaller physical aperturediameter than a 135mm lens at f/2.8, but both lenses allow the same amount of light into the lensas the ratio between the focal length and diameter of light entry is similar.
A larger maximum aperture opening available for a lens allows more light through a lens. Suchlenses are often called “fast” lenses, while lenses with smaller (usually smaller than f/4) areconsidered as slow lenses.
All prime lenses have only one widest aperture number marking as the lens only has one focallength. Figure 9 shows a 135mm lens with a widest aperture opening of f/2.8.
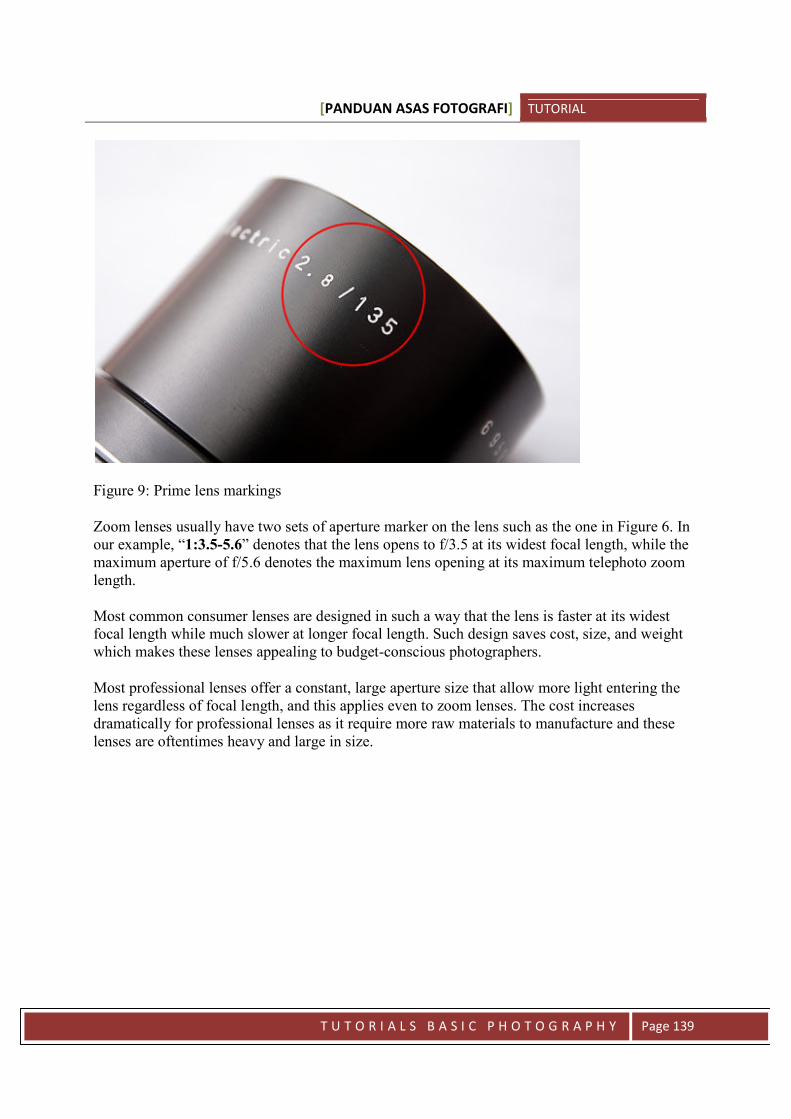
[PANDUAN ASAS FOTOGRAFI] TUTORIAL
T U T O R I A L S B A S I C P H O T O G R A P H Y Page 139
Figure 9: Prime lens markings
Zoom lenses usually have two sets of aperture marker on the lens such as the one in Figure 6. Inour example, “1:3.5-5.6” denotes that the lens opens to f/3.5 at its widest focal length, while themaximum aperture of f/5.6 denotes the maximum lens opening at its maximum telephoto zoomlength.
Most common consumer lenses are designed in such a way that the lens is faster at its widestfocal length while much slower at longer focal length. Such design saves cost, size, and weightwhich makes these lenses appealing to budget-conscious photographers.
Most professional lenses offer a constant, large aperture size that allow more light entering thelens regardless of focal length, and this applies even to zoom lenses. The cost increasesdramatically for professional lenses as it require more raw materials to manufacture and theselenses are oftentimes heavy and large in size.
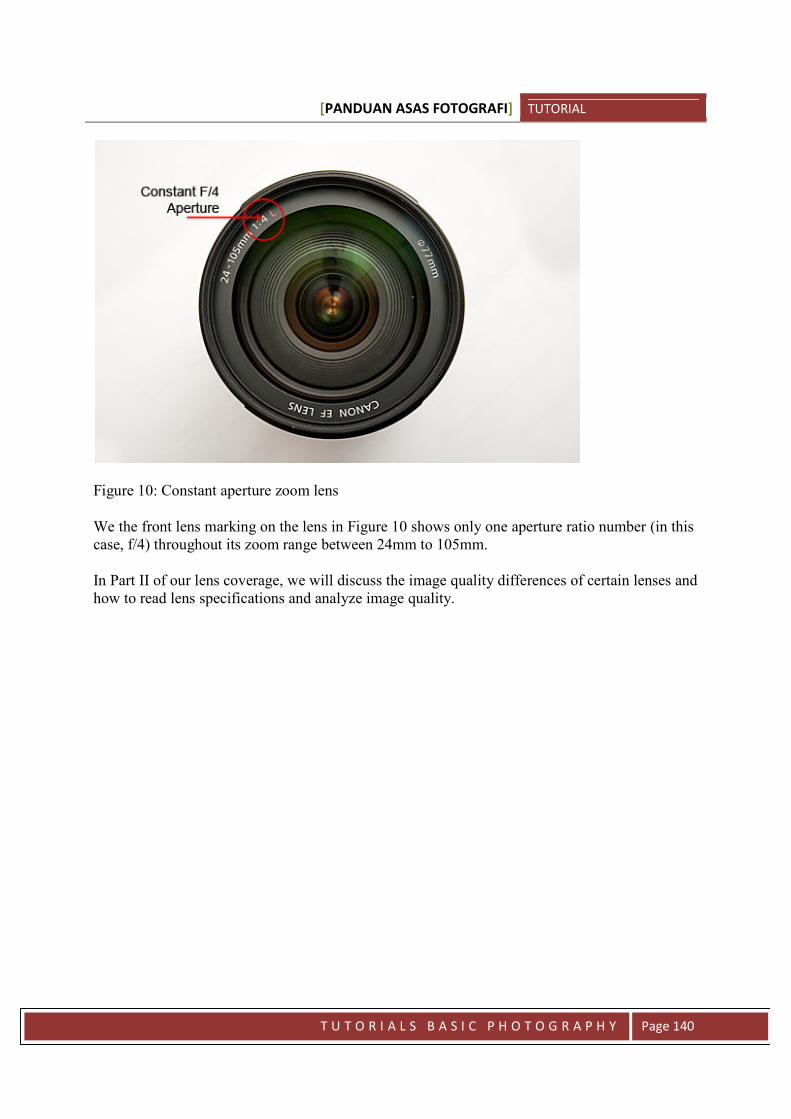
[PANDUAN ASAS FOTOGRAFI] TUTORIAL
T U T O R I A L S B A S I C P H O T O G R A P H Y Page 140
Figure 10: Constant aperture zoom lens
We the front lens marking on the lens in Figure 10 shows only one aperture ratio number (in thiscase, f/4) throughout its zoom range between 24mm to 105mm.
In Part II of our lens coverage, we will discuss the image quality differences of certain lenses andhow to read lens specifications and analyze image quality.
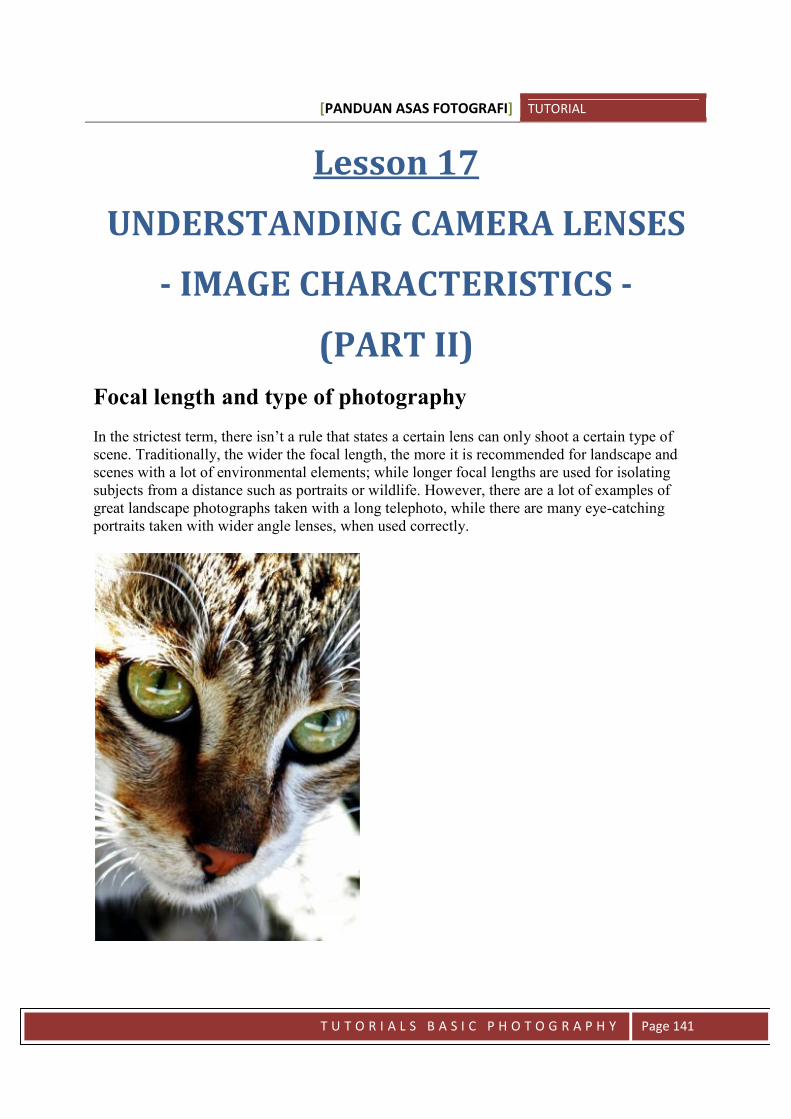
[PANDUAN ASAS FOTOGRAFI] TUTORIAL
T U T O R I A L S B A S I C P H O T O G R A P H Y Page 141
Lesson 17
UNDERSTANDING CAMERA LENSES
- IMAGE CHARACTERISTICS -
(PART II)
Focal length and type of photography
In the strictest term, there isn’t a rule that states a certain lens can only shoot a certain type ofscene. Traditionally, the wider the focal length, the more it is recommended for landscape andscenes with a lot of environmental elements; while longer focal lengths are used for isolatingsubjects from a distance such as portraits or wildlife. However, there are a lot of examples ofgreat landscape photographs taken with a long telephoto, while there are many eye-catchingportraits taken with wider angle lenses, when used correctly.
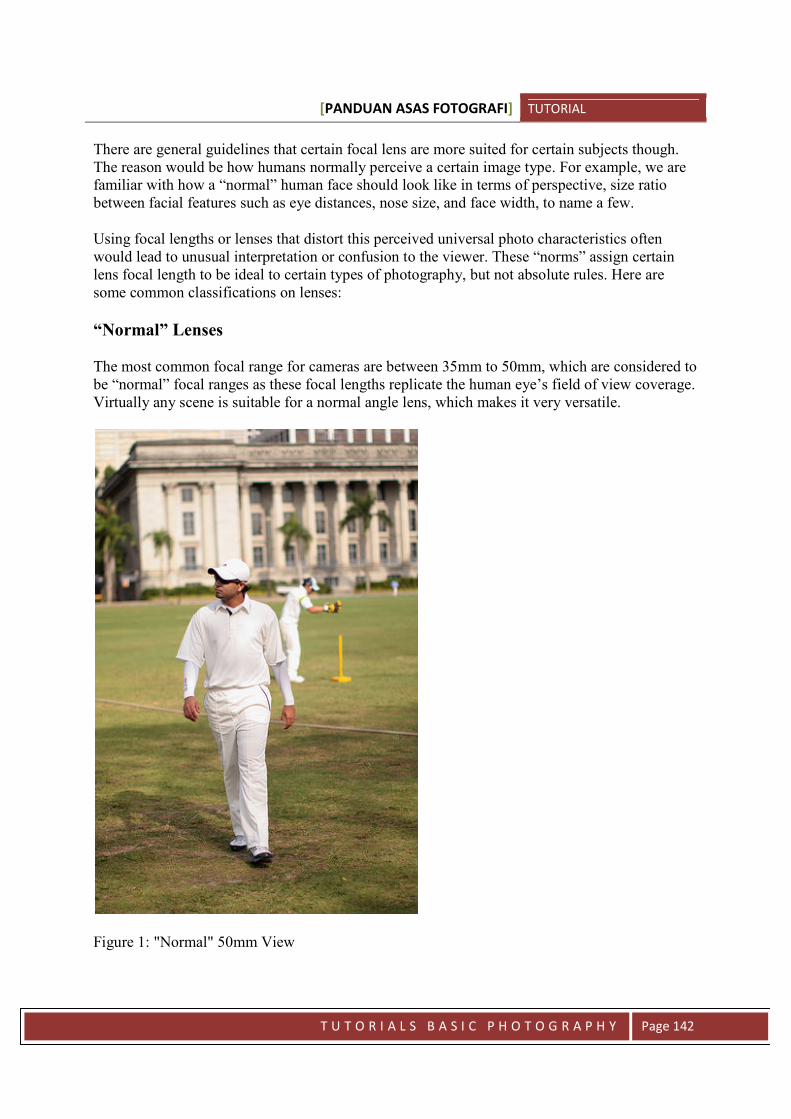
[PANDUAN ASAS FOTOGRAFI] TUTORIAL
T U T O R I A L S B A S I C P H O T O G R A P H Y Page 142
There are general guidelines that certain focal lens are more suited for certain subjects though.The reason would be how humans normally perceive a certain image type. For example, we arefamiliar with how a “normal” human face should look like in terms of perspective, size ratiobetween facial features such as eye distances, nose size, and face width, to name a few.
Using focal lengths or lenses that distort this perceived universal photo characteristics oftenwould lead to unusual interpretation or confusion to the viewer. These “norms” assign certainlens focal length to be ideal to certain types of photography, but not absolute rules. Here aresome common classifications on lenses:
“Normal” Lenses
The most common focal range for cameras are between 35mm to 50mm, which are considered tobe “normal” focal ranges as these focal lengths replicate the human eye’s field of view coverage.Virtually any scene is suitable for a normal angle lens, which makes it very versatile.
Figure 1: "Normal" 50mm View
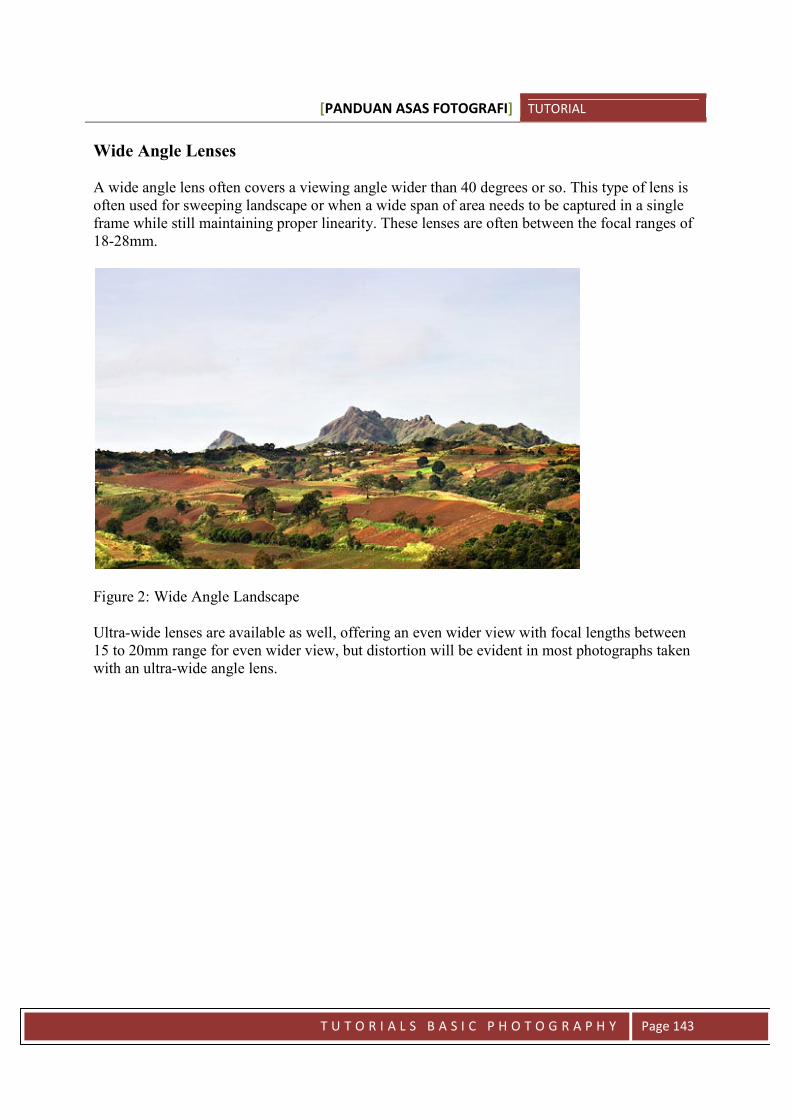
[PANDUAN ASAS FOTOGRAFI] TUTORIAL
T U T O R I A L S B A S I C P H O T O G R A P H Y Page 143
Wide Angle Lenses
A wide angle lens often covers a viewing angle wider than 40 degrees or so. This type of lens isoften used for sweeping landscape or when a wide span of area needs to be captured in a singleframe while still maintaining proper linearity. These lenses are often between the focal ranges of18-28mm.
Figure 2: Wide Angle Landscape
Ultra-wide lenses are available as well, offering an even wider view with focal lengths between15 to 20mm range for even wider view, but distortion will be evident in most photographs takenwith an ultra-wide angle lens.
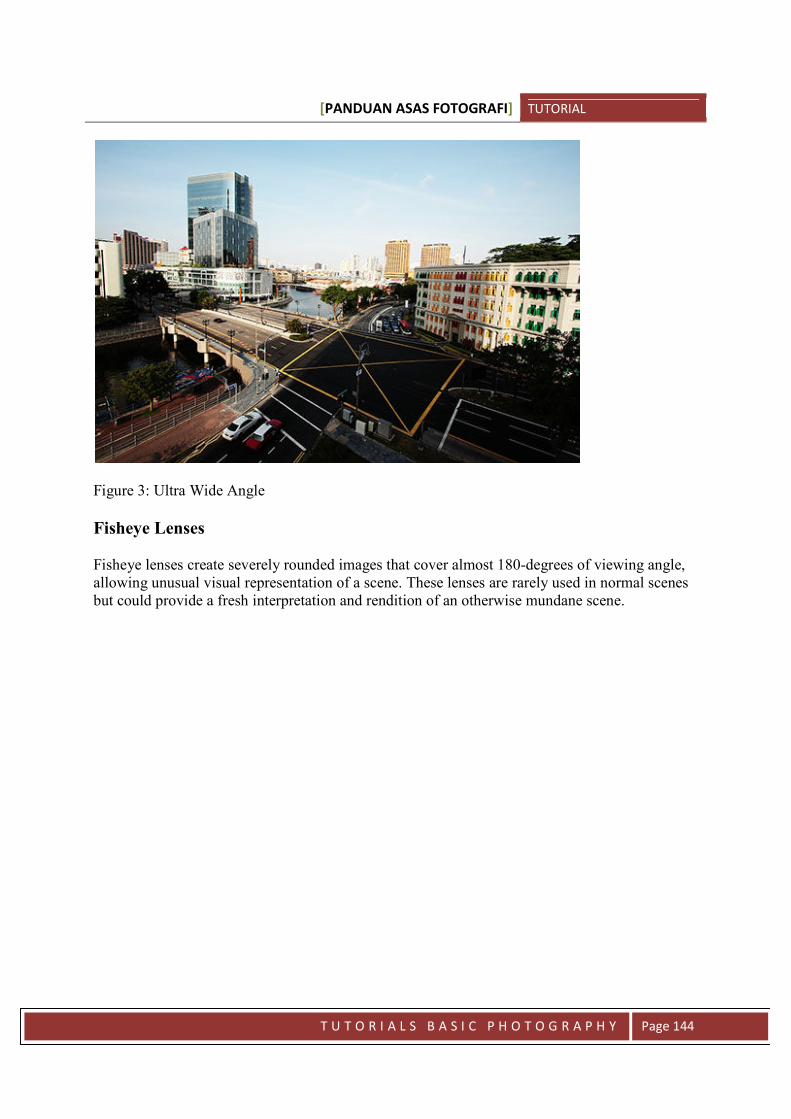
[PANDUAN ASAS FOTOGRAFI] TUTORIAL
T U T O R I A L S B A S I C P H O T O G R A P H Y Page 144
Figure 3: Ultra Wide Angle
Fisheye Lenses
Fisheye lenses create severely rounded images that cover almost 180-degrees of viewing angle,allowing unusual visual representation of a scene. These lenses are rarely used in normal scenesbut could provide a fresh interpretation and rendition of an otherwise mundane scene.
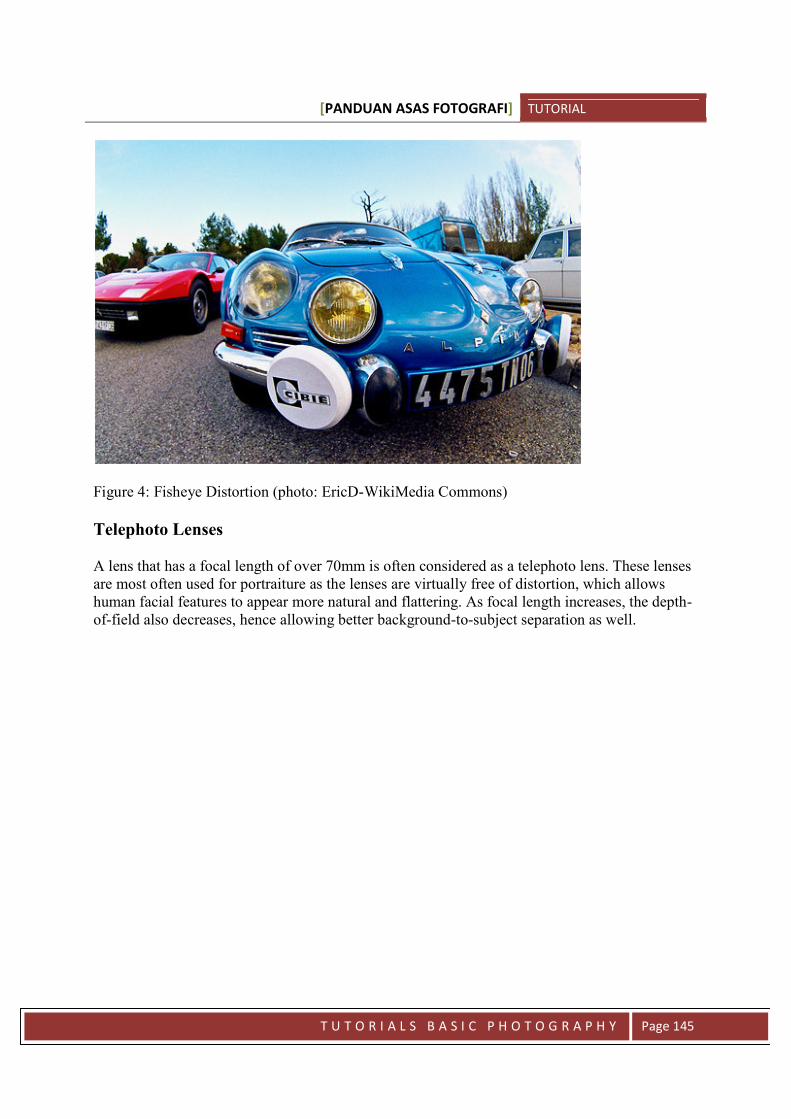
[PANDUAN ASAS FOTOGRAFI] TUTORIAL
T U T O R I A L S B A S I C P H O T O G R A P H Y Page 145
Figure 4: Fisheye Distortion (photo: EricD-WikiMedia Commons)
Telephoto Lenses
A lens that has a focal length of over 70mm is often considered as a telephoto lens. These lensesare most often used for portraiture as the lenses are virtually free of distortion, which allowshuman facial features to appear more natural and flattering. As focal length increases, the depth-of-field also decreases, hence allowing better background-to-subject separation as well.
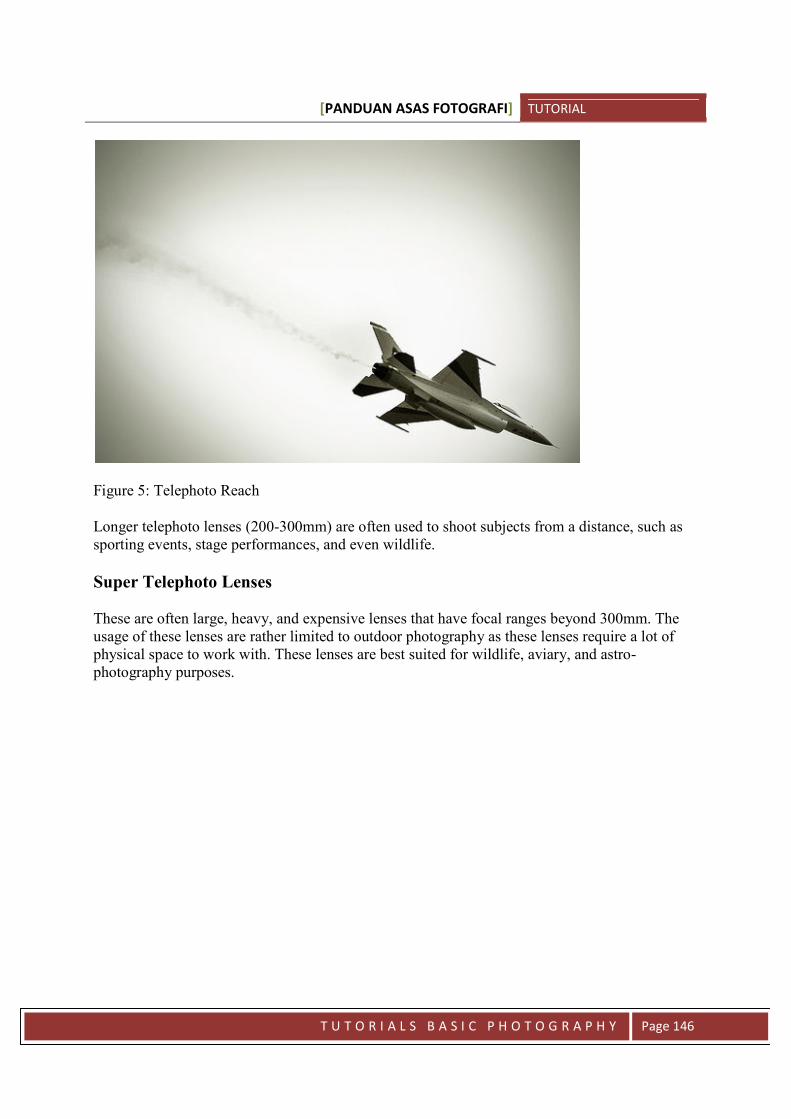
[PANDUAN ASAS FOTOGRAFI] TUTORIAL
T U T O R I A L S B A S I C P H O T O G R A P H Y Page 146
Figure 5: Telephoto Reach
Longer telephoto lenses (200-300mm) are often used to shoot subjects from a distance, such assporting events, stage performances, and even wildlife.
Super Telephoto Lenses
These are often large, heavy, and expensive lenses that have focal ranges beyond 300mm. Theusage of these lenses are rather limited to outdoor photography as these lenses require a lot ofphysical space to work with. These lenses are best suited for wildlife, aviary, and astro-photography purposes.

[PANDUAN ASAS FOTOGRAFI] TUTORIAL
T U T O R I A L S B A S I C P H O T O G R A P H Y Page 147
Figure 6: Super Telephoto
Macro Lens
Macro lenses utilize additional optics that allow the lens to be positioned much closer to thesubject than normal lenses. Macro lenses can magnify small objects beyond their life-sizedimensions on the sensor. Macro lenses are great for shooting insects and flora. Using a macrolens often creates a wide range of unseen and interesting subjects that we may not see with ourday-to-day visual scenes.
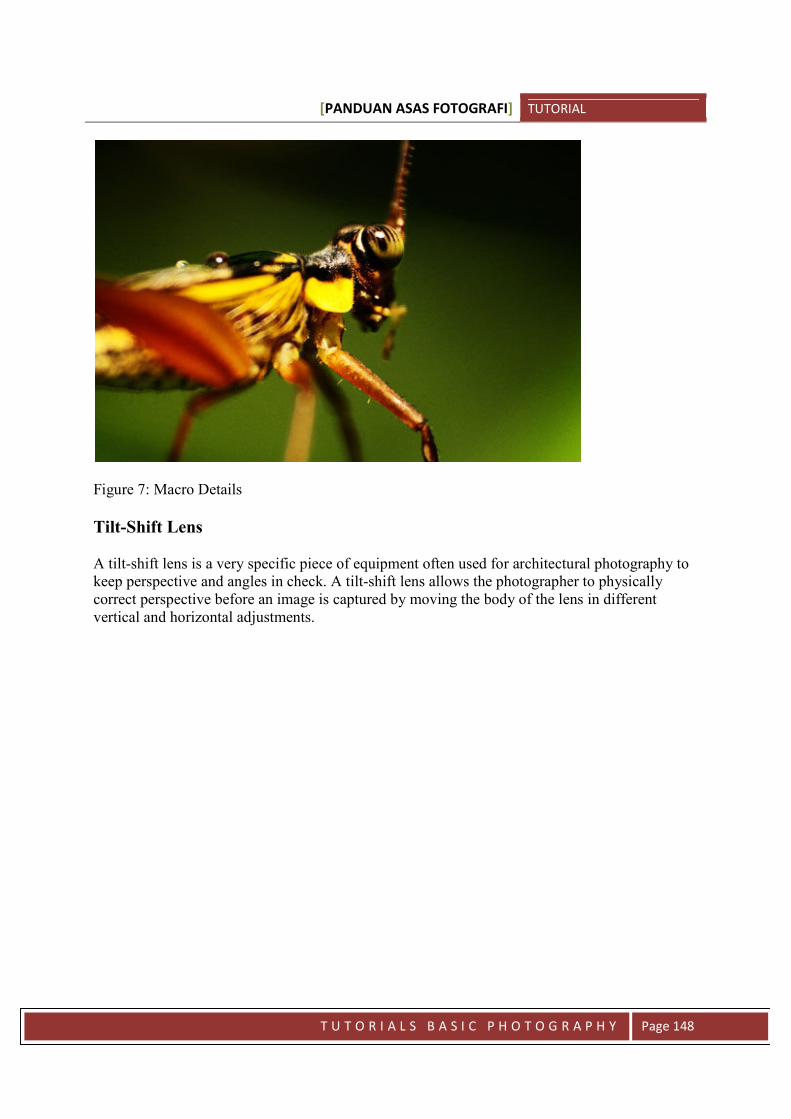
[PANDUAN ASAS FOTOGRAFI] TUTORIAL
T U T O R I A L S B A S I C P H O T O G R A P H Y Page 148
Figure 7: Macro Details
Tilt-Shift Lens
A tilt-shift lens is a very specific piece of equipment often used for architectural photography tokeep perspective and angles in check. A tilt-shift lens allows the photographer to physicallycorrect perspective before an image is captured by moving the body of the lens in differentvertical and horizontal adjustments.
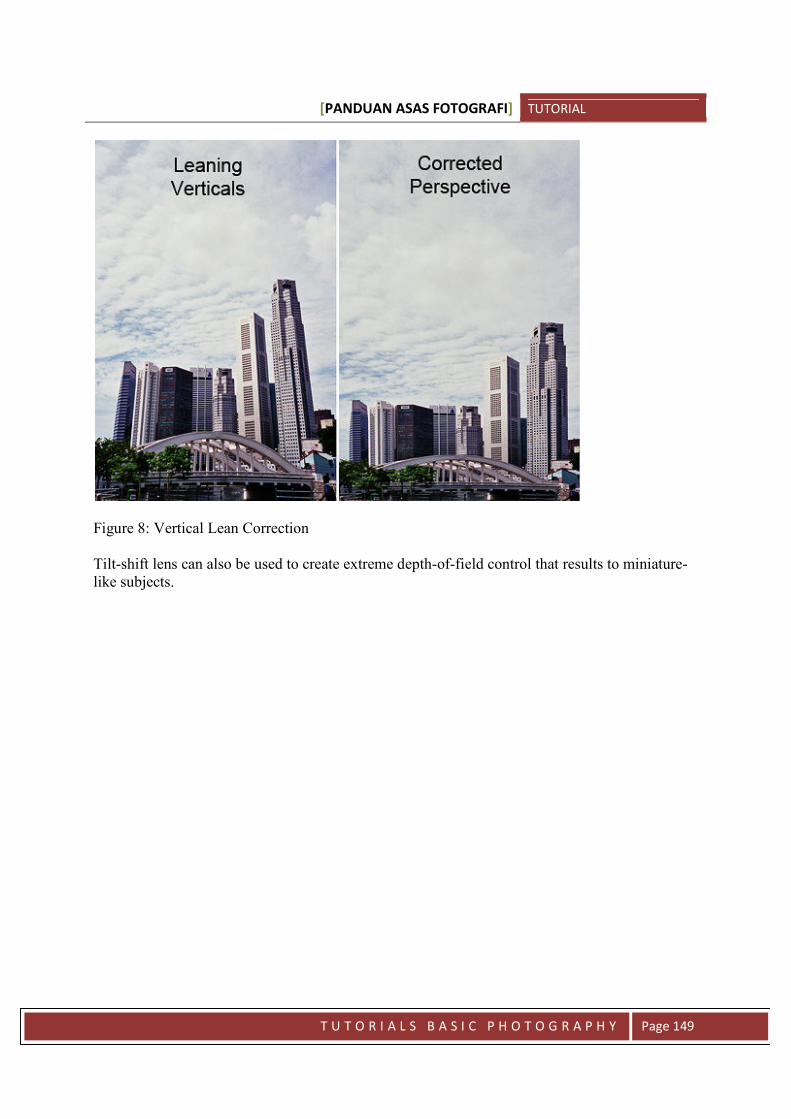
[PANDUAN ASAS FOTOGRAFI] TUTORIAL
T U T O R I A L S B A S I C P H O T O G R A P H Y Page 149
Figure 8: Vertical Lean Correction
Tilt-shift lens can also be used to create extreme depth-of-field control that results to miniature-like subjects.
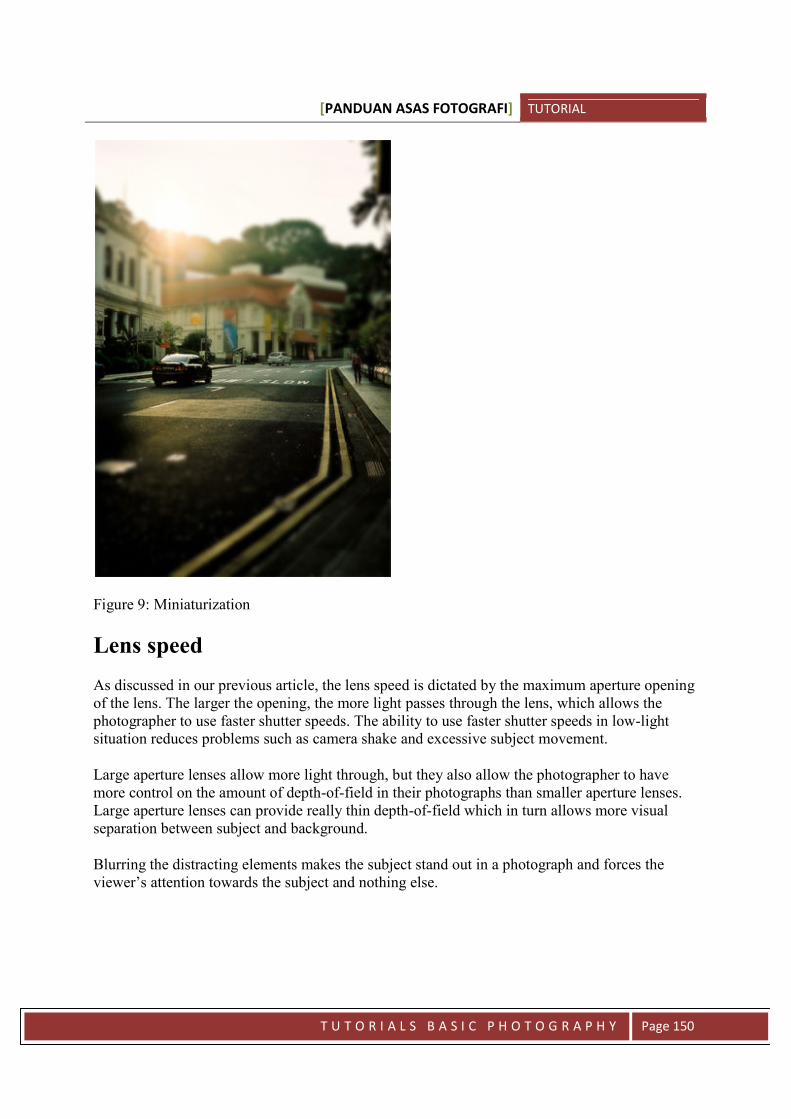
[PANDUAN ASAS FOTOGRAFI] TUTORIAL
T U T O R I A L S B A S I C P H O T O G R A P H Y Page 150
Figure 9: Miniaturization
Lens speed
As discussed in our previous article, the lens speed is dictated by the maximum aperture openingof the lens. The larger the opening, the more light passes through the lens, which allows thephotographer to use faster shutter speeds. The ability to use faster shutter speeds in low-lightsituation reduces problems such as camera shake and excessive subject movement.
Large aperture lenses allow more light through, but they also allow the photographer to havemore control on the amount of depth-of-field in their photographs than smaller aperture lenses.Large aperture lenses can provide really thin depth-of-field which in turn allows more visualseparation between subject and background.
Blurring the distracting elements makes the subject stand out in a photograph and forces theviewer’s attention towards the subject and nothing else.
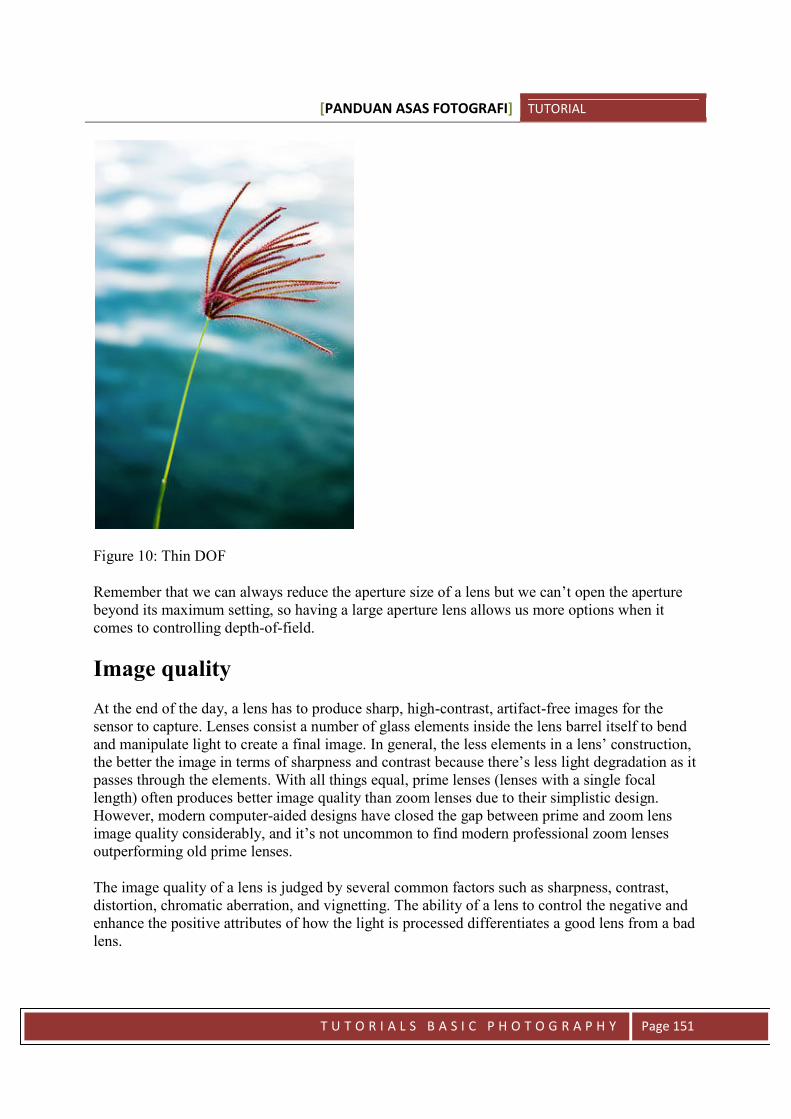
[PANDUAN ASAS FOTOGRAFI] TUTORIAL
T U T O R I A L S B A S I C P H O T O G R A P H Y Page 151
Figure 10: Thin DOF
Remember that we can always reduce the aperture size of a lens but we can’t open the aperturebeyond its maximum setting, so having a large aperture lens allows us more options when itcomes to controlling depth-of-field.
Image quality
At the end of the day, a lens has to produce sharp, high-contrast, artifact-free images for thesensor to capture. Lenses consist a number of glass elements inside the lens barrel itself to bendand manipulate light to create a final image. In general, the less elements in a lens’ construction,the better the image in terms of sharpness and contrast because there’s less light degradation as itpasses through the elements. With all things equal, prime lenses (lenses with a single focallength) often produces better image quality than zoom lenses due to their simplistic design.However, modern computer-aided designs have closed the gap between prime and zoom lensimage quality considerably, and it’s not uncommon to find modern professional zoom lensesoutperforming old prime lenses.
The image quality of a lens is judged by several common factors such as sharpness, contrast,distortion, chromatic aberration, and vignetting. The ability of a lens to control the negative andenhance the positive attributes of how the light is processed differentiates a good lens from a badlens.
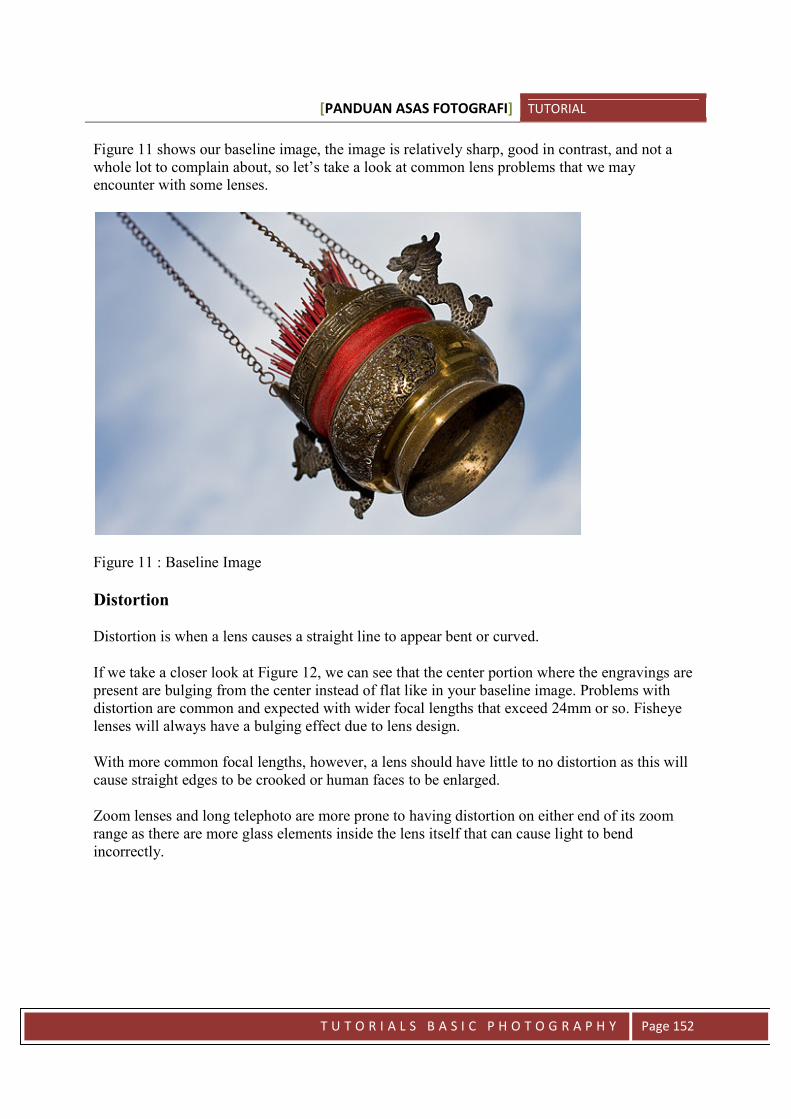
[PANDUAN ASAS FOTOGRAFI] TUTORIAL
T U T O R I A L S B A S I C P H O T O G R A P H Y Page 152
Figure 11 shows our baseline image, the image is relatively sharp, good in contrast, and not awhole lot to complain about, so let’s take a look at common lens problems that we mayencounter with some lenses.
Figure 11 : Baseline Image
Distortion
Distortion is when a lens causes a straight line to appear bent or curved.
If we take a closer look at Figure 12, we can see that the center portion where the engravings arepresent are bulging from the center instead of flat like in your baseline image. Problems withdistortion are common and expected with wider focal lengths that exceed 24mm or so. Fisheyelenses will always have a bulging effect due to lens design.
With more common focal lengths, however, a lens should have little to no distortion as this willcause straight edges to be crooked or human faces to be enlarged.
Zoom lenses and long telephoto are more prone to having distortion on either end of its zoomrange as there are more glass elements inside the lens itself that can cause light to bendincorrectly.
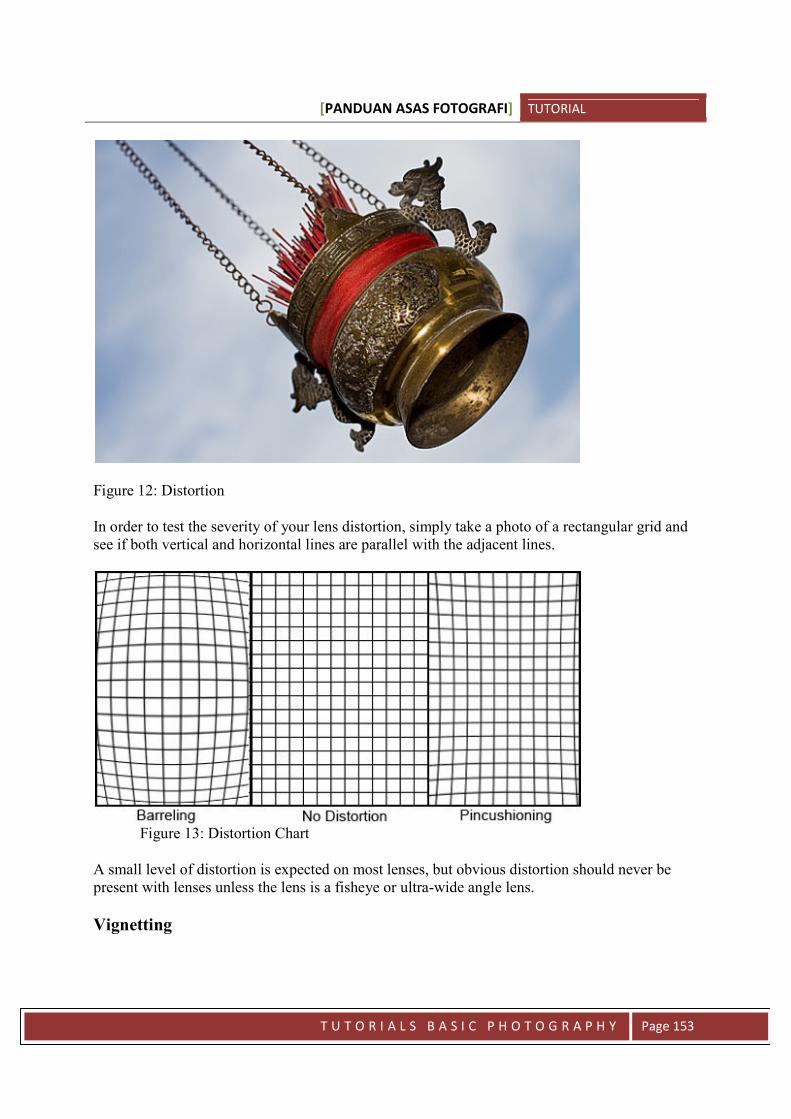
[PANDUAN ASAS FOTOGRAFI] TUTORIAL
T U T O R I A L S B A S I C P H O T O G R A P H Y Page 153
Figure 12: Distortion
In order to test the severity of your lens distortion, simply take a photo of a rectangular grid andsee if both vertical and horizontal lines are parallel with the adjacent lines.
Figure 13: Distortion Chart
A small level of distortion is expected on most lenses, but obvious distortion should never bepresent with lenses unless the lens is a fisheye or ultra-wide angle lens.
Vignetting
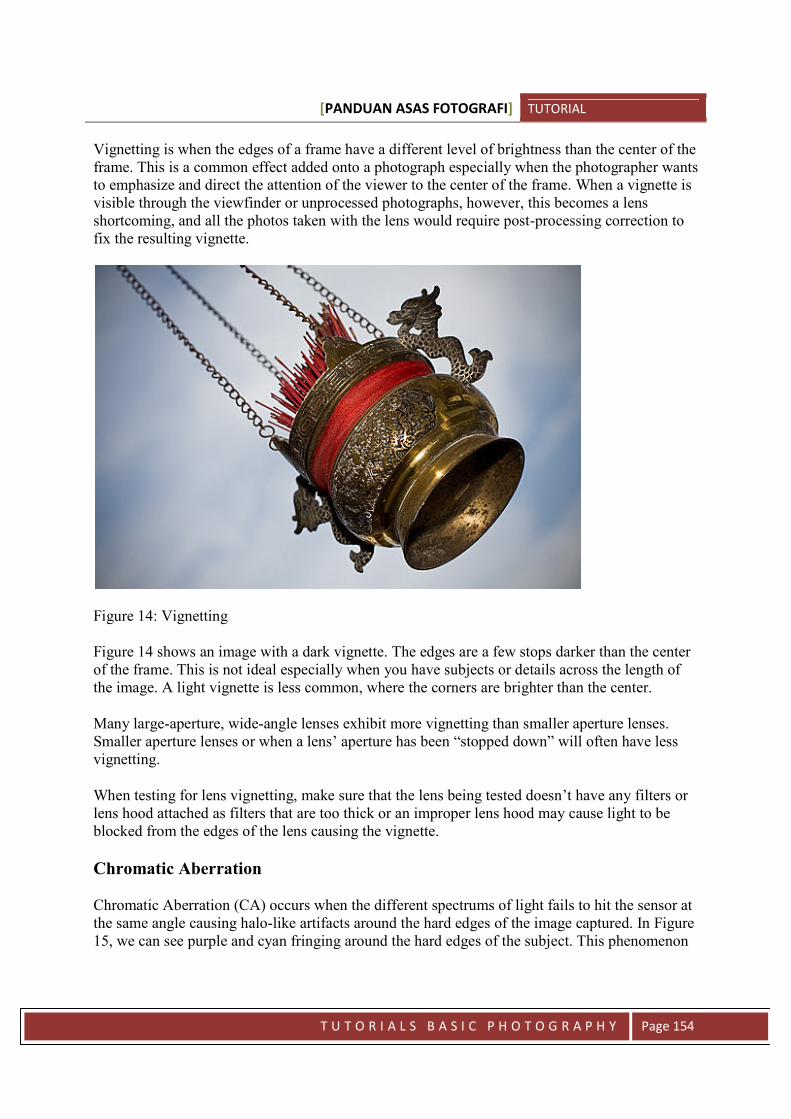
[PANDUAN ASAS FOTOGRAFI] TUTORIAL
T U T O R I A L S B A S I C P H O T O G R A P H Y Page 154
Vignetting is when the edges of a frame have a different level of brightness than the center of theframe. This is a common effect added onto a photograph especially when the photographer wantsto emphasize and direct the attention of the viewer to the center of the frame. When a vignette isvisible through the viewfinder or unprocessed photographs, however, this becomes a lensshortcoming, and all the photos taken with the lens would require post-processing correction tofix the resulting vignette.
Figure 14: Vignetting
Figure 14 shows an image with a dark vignette. The edges are a few stops darker than the centerof the frame. This is not ideal especially when you have subjects or details across the length ofthe image. A light vignette is less common, where the corners are brighter than the center.
Many large-aperture, wide-angle lenses exhibit more vignetting than smaller aperture lenses.Smaller aperture lenses or when a lens’ aperture has been “stopped down” will often have lessvignetting.
When testing for lens vignetting, make sure that the lens being tested doesn’t have any filters orlens hood attached as filters that are too thick or an improper lens hood may cause light to beblocked from the edges of the lens causing the vignette.
Chromatic Aberration
Chromatic Aberration (CA) occurs when the different spectrums of light fails to hit the sensor atthe same angle causing halo-like artifacts around the hard edges of the image captured. In Figure15, we can see purple and cyan fringing around the hard edges of the subject. This phenomenon
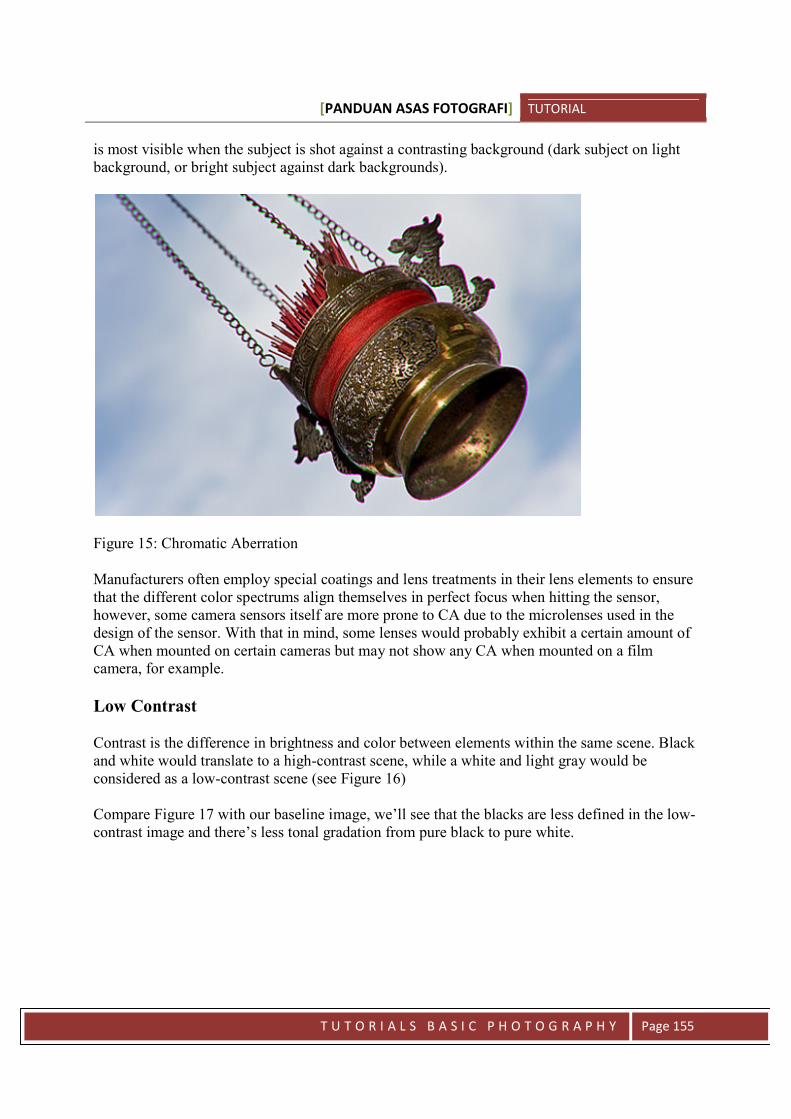
[PANDUAN ASAS FOTOGRAFI] TUTORIAL
T U T O R I A L S B A S I C P H O T O G R A P H Y Page 155
is most visible when the subject is shot against a contrasting background (dark subject on lightbackground, or bright subject against dark backgrounds).
Figure 15: Chromatic Aberration
Manufacturers often employ special coatings and lens treatments in their lens elements to ensurethat the different color spectrums align themselves in perfect focus when hitting the sensor,however, some camera sensors itself are more prone to CA due to the microlenses used in thedesign of the sensor. With that in mind, some lenses would probably exhibit a certain amount ofCA when mounted on certain cameras but may not show any CA when mounted on a filmcamera, for example.
Low Contrast
Contrast is the difference in brightness and color between elements within the same scene. Blackand white would translate to a high-contrast scene, while a white and light gray would beconsidered as a low-contrast scene (see Figure 16)
Compare Figure 17 with our baseline image, we’ll see that the blacks are less defined in the low-contrast image and there’s less tonal gradation from pure black to pure white.
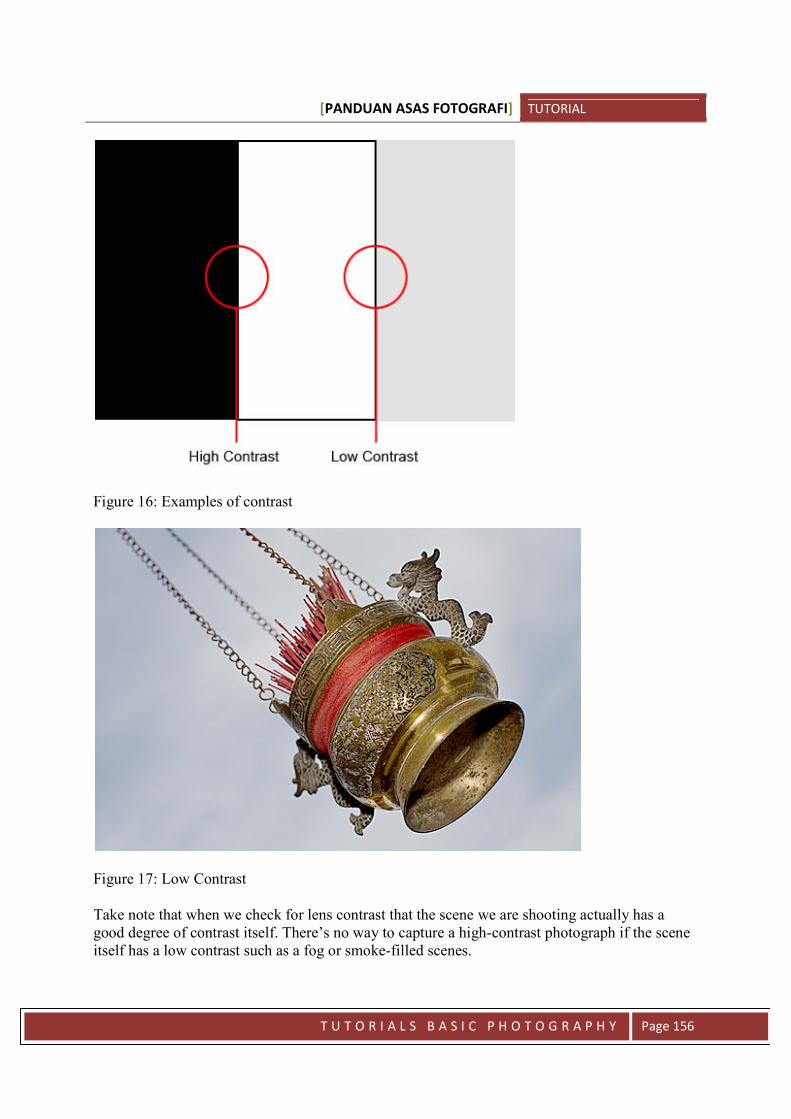
[PANDUAN ASAS FOTOGRAFI] TUTORIAL
T U T O R I A L S B A S I C P H O T O G R A P H Y Page 156
Figure 16: Examples of contrast
Figure 17: Low Contrast
Take note that when we check for lens contrast that the scene we are shooting actually has agood degree of contrast itself. There’s no way to capture a high-contrast photograph if the sceneitself has a low contrast such as a fog or smoke-filled scenes.
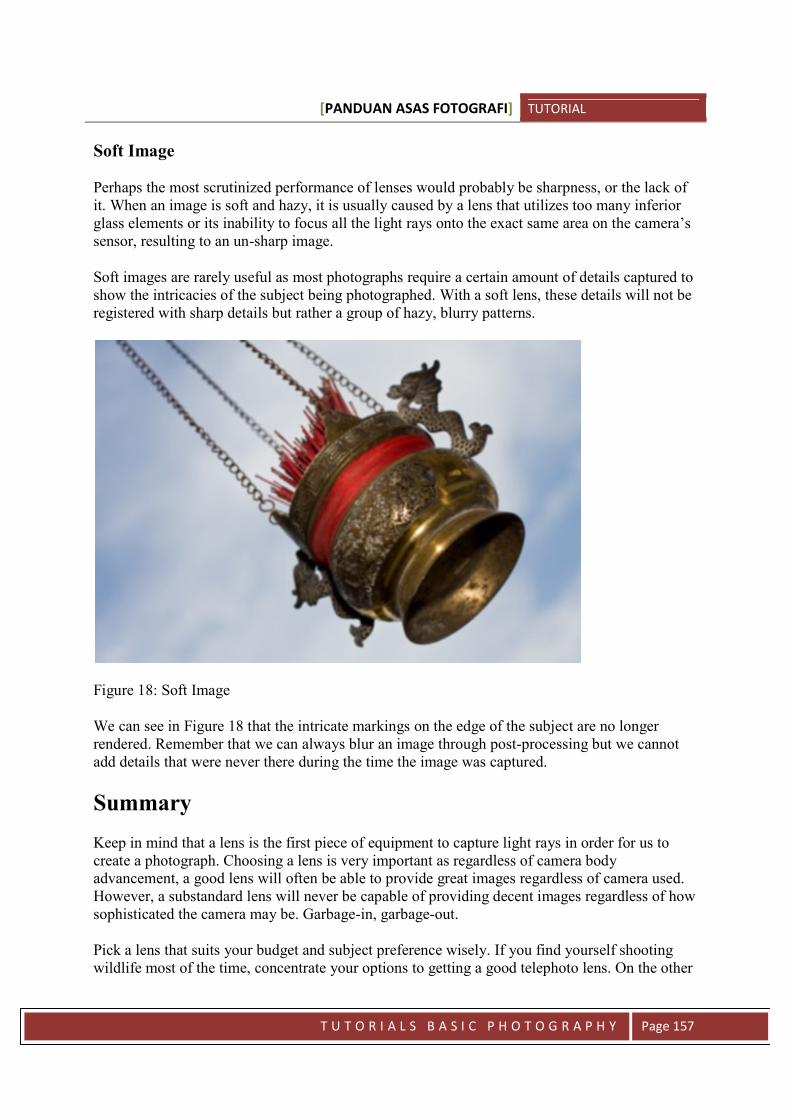
[PANDUAN ASAS FOTOGRAFI] TUTORIAL
T U T O R I A L S B A S I C P H O T O G R A P H Y Page 157
Soft Image
Perhaps the most scrutinized performance of lenses would probably be sharpness, or the lack ofit. When an image is soft and hazy, it is usually caused by a lens that utilizes too many inferiorglass elements or its inability to focus all the light rays onto the exact same area on the camera’ssensor, resulting to an un-sharp image.
Soft images are rarely useful as most photographs require a certain amount of details captured toshow the intricacies of the subject being photographed. With a soft lens, these details will not beregistered with sharp details but rather a group of hazy, blurry patterns.
Figure 18: Soft Image
We can see in Figure 18 that the intricate markings on the edge of the subject are no longerrendered. Remember that we can always blur an image through post-processing but we cannotadd details that were never there during the time the image was captured.
Summary
Keep in mind that a lens is the first piece of equipment to capture light rays in order for us tocreate a photograph. Choosing a lens is very important as regardless of camera bodyadvancement, a good lens will often be able to provide great images regardless of camera used.However, a substandard lens will never be capable of providing decent images regardless of howsophisticated the camera may be. Garbage-in, garbage-out.
Pick a lens that suits your budget and subject preference wisely. If you find yourself shootingwildlife most of the time, concentrate your options to getting a good telephoto lens. On the other

[PANDUAN ASAS FOTOGRAFI] TUTORIAL
T U T O R I A L S B A S I C P H O T O G R A P H Y Page 158
hand, if you know you’ll be shooting macro often, there’s no reason to even consider a fisheyelens or a super telephoto, for example.
Lenses are great photographic investments as their value rarely depreciates as fast as camerabodies. So picking a great lens can serve you for decades even if we change cameras multipletimes in the future.
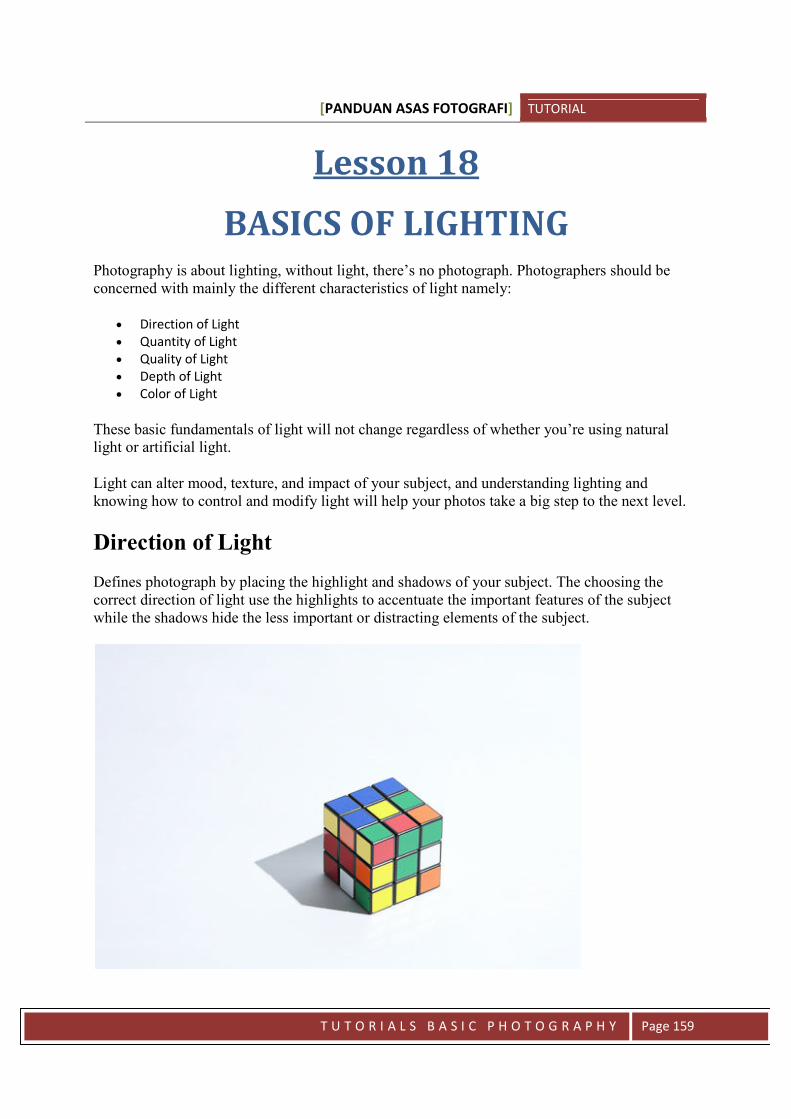
[PANDUAN ASAS FOTOGRAFI] TUTORIAL
T U T O R I A L S B A S I C P H O T O G R A P H Y Page 159
Lesson 18
BASICS OF LIGHTINGPhotography is about lighting, without light, there’s no photograph. Photographers should beconcerned with mainly the different characteristics of light namely:
Direction of Light Quantity of Light Quality of Light Depth of Light Color of Light
These basic fundamentals of light will not change regardless of whether you’re using naturallight or artificial light.
Light can alter mood, texture, and impact of your subject, and understanding lighting andknowing how to control and modify light will help your photos take a big step to the next level.
Direction of Light
Defines photograph by placing the highlight and shadows of your subject. The choosing thecorrect direction of light use the highlights to accentuate the important features of the subjectwhile the shadows hide the less important or distracting elements of the subject.

[PANDUAN ASAS FOTOGRAFI] TUTORIAL
T U T O R I A L S B A S I C P H O T O G R A P H Y Page 160
Figure 1: High 3/4 Lighting
Figure 2: Low Angle Light
Figure 3: High Lighting
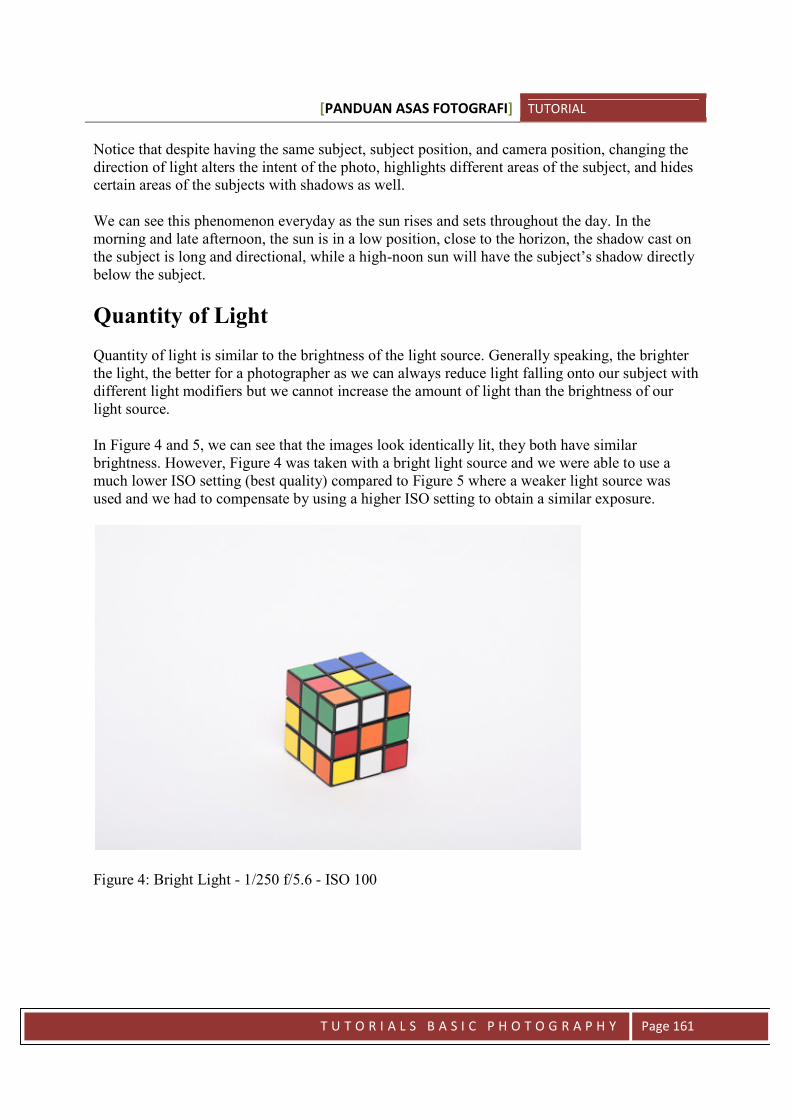
[PANDUAN ASAS FOTOGRAFI] TUTORIAL
T U T O R I A L S B A S I C P H O T O G R A P H Y Page 161
Notice that despite having the same subject, subject position, and camera position, changing thedirection of light alters the intent of the photo, highlights different areas of the subject, and hidescertain areas of the subjects with shadows as well.
We can see this phenomenon everyday as the sun rises and sets throughout the day. In themorning and late afternoon, the sun is in a low position, close to the horizon, the shadow cast onthe subject is long and directional, while a high-noon sun will have the subject’s shadow directlybelow the subject.
Quantity of Light
Quantity of light is similar to the brightness of the light source. Generally speaking, the brighterthe light, the better for a photographer as we can always reduce light falling onto our subject withdifferent light modifiers but we cannot increase the amount of light than the brightness of ourlight source.
In Figure 4 and 5, we can see that the images look identically lit, they both have similarbrightness. However, Figure 4 was taken with a bright light source and we were able to use amuch lower ISO setting (best quality) compared to Figure 5 where a weaker light source wasused and we had to compensate by using a higher ISO setting to obtain a similar exposure.
Figure 4: Bright Light - 1/250 f/5.6 - ISO 100
[PANDUAN ASAS FOTOGRAFI] TUTORIAL
T U T O R I A L S B A S I C P H O T O G R A P H Y Page 162
Figure 5: Low Brightness - 1/250, f/5.6 - ISO 1600
The quantity of light plays a big role in exposure as the more light is available, the wider rangeof shutter speed and aperture combination a photographer can use. When the is an abundance oflight, a photographer can use lower ISOs (best quality), faster shutter speeds (minimize camerashake and subject movement), and a wider range of aperture size (for depth-of-field). Withoutample amount of light, a photographer will be required to use higher ISO, slower shutter speeds,and wide apertures that may not provide adequate depth-of-field.
Quality of Light
The quality of light is the same as the contrast of light. A high-contrast lightsource would usuallybe a light that has a narrow beam pattern of light creating a sharp transition between shadow andhighlight, while a low contrast lightsoure would be a wider or omni-directional light source thatcreates soft shadows with no gradual transition between highlight and shadow areas.
Hard Light
A prime example of hard lighting would be the shadows created by a high-noon sun in a clearsky. The shadows are sharply defined and would be really dark compared to the lit part of theground. Without clouds acting as diffusing layers, the sun is a distant, pin-point light source thatwill cast hard shadows.
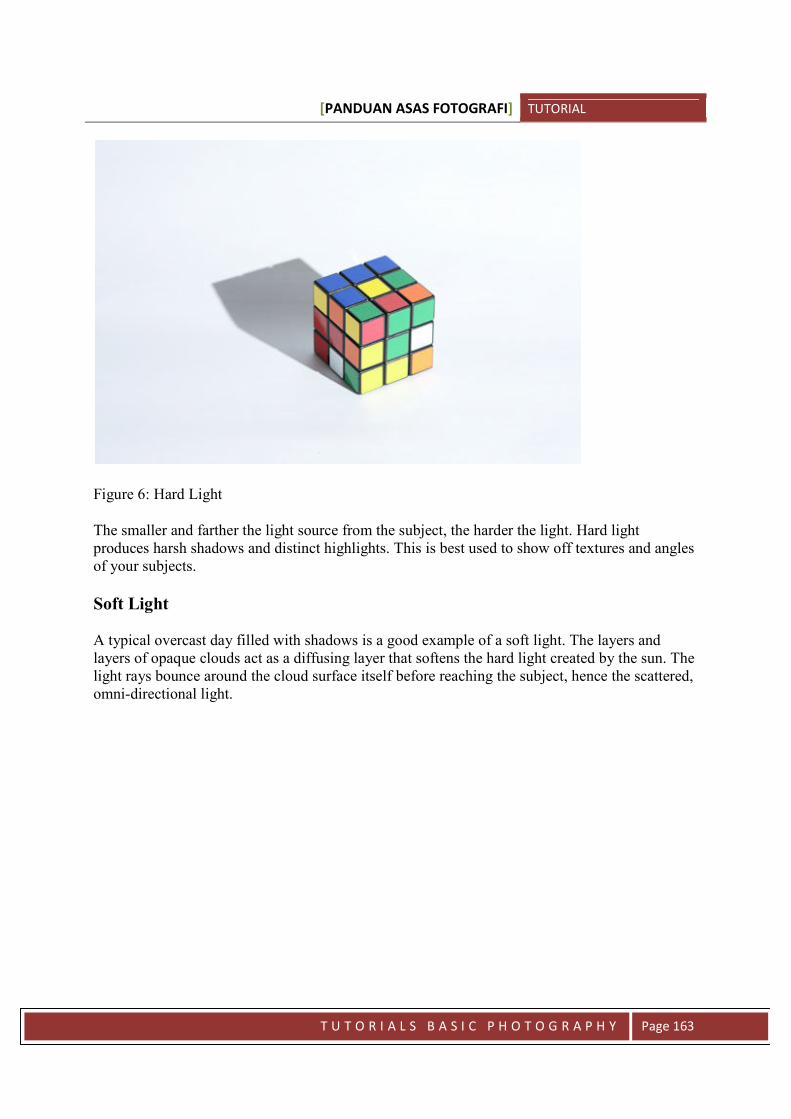
[PANDUAN ASAS FOTOGRAFI] TUTORIAL
T U T O R I A L S B A S I C P H O T O G R A P H Y Page 163
Figure 6: Hard Light
The smaller and farther the light source from the subject, the harder the light. Hard lightproduces harsh shadows and distinct highlights. This is best used to show off textures and anglesof your subjects.
Soft Light
A typical overcast day filled with shadows is a good example of a soft light. The layers andlayers of opaque clouds act as a diffusing layer that softens the hard light created by the sun. Thelight rays bounce around the cloud surface itself before reaching the subject, hence the scattered,omni-directional light.
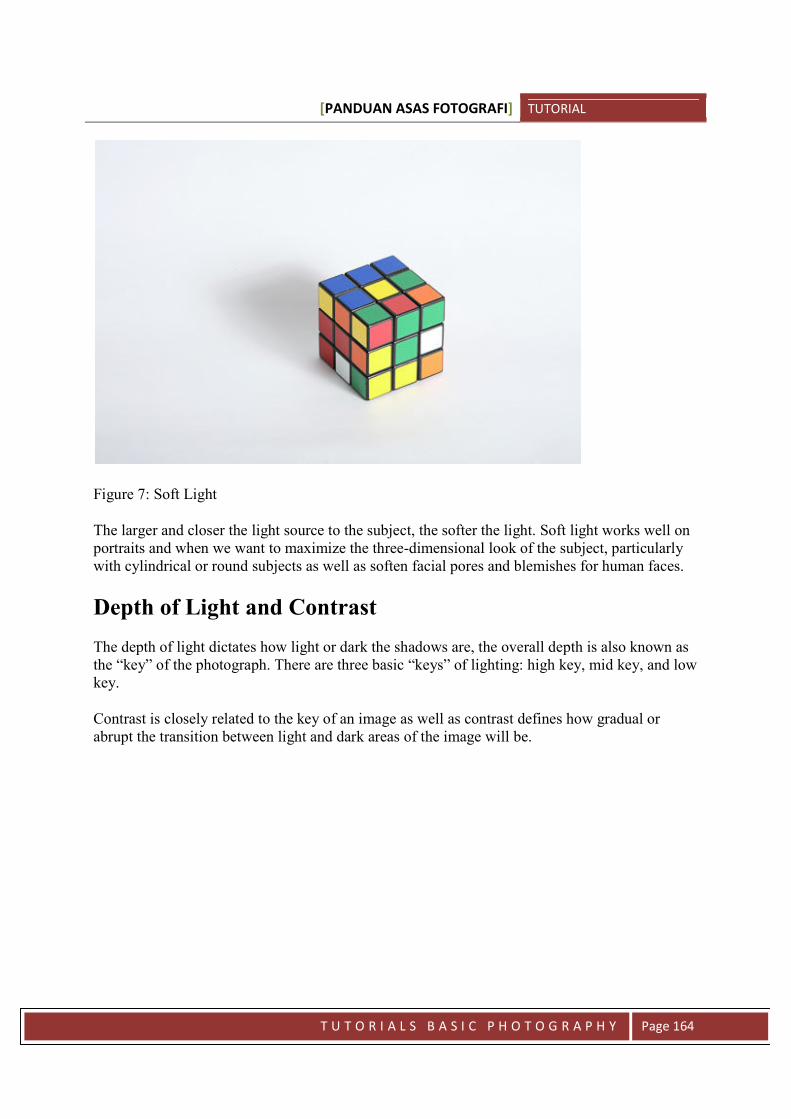
[PANDUAN ASAS FOTOGRAFI] TUTORIAL
T U T O R I A L S B A S I C P H O T O G R A P H Y Page 164
Figure 7: Soft Light
The larger and closer the light source to the subject, the softer the light. Soft light works well onportraits and when we want to maximize the three-dimensional look of the subject, particularlywith cylindrical or round subjects as well as soften facial pores and blemishes for human faces.
Depth of Light and Contrast
The depth of light dictates how light or dark the shadows are, the overall depth is also known asthe “key” of the photograph. There are three basic “keys” of lighting: high key, mid key, and lowkey.
Contrast is closely related to the key of an image as well as contrast defines how gradual orabrupt the transition between light and dark areas of the image will be.

[PANDUAN ASAS FOTOGRAFI] TUTORIAL
T U T O R I A L S B A S I C P H O T O G R A P H Y Page 165
Figure 8: High Contrast
Figure 9: Low Contrast
Notice how the shape of the shadow and the intensity of the light falling on the subject isidentical, but the shadow in Figure 8 is a lot darker than of Figure 9. Figure 8 therefore has ahigher contrast than Figure 9.
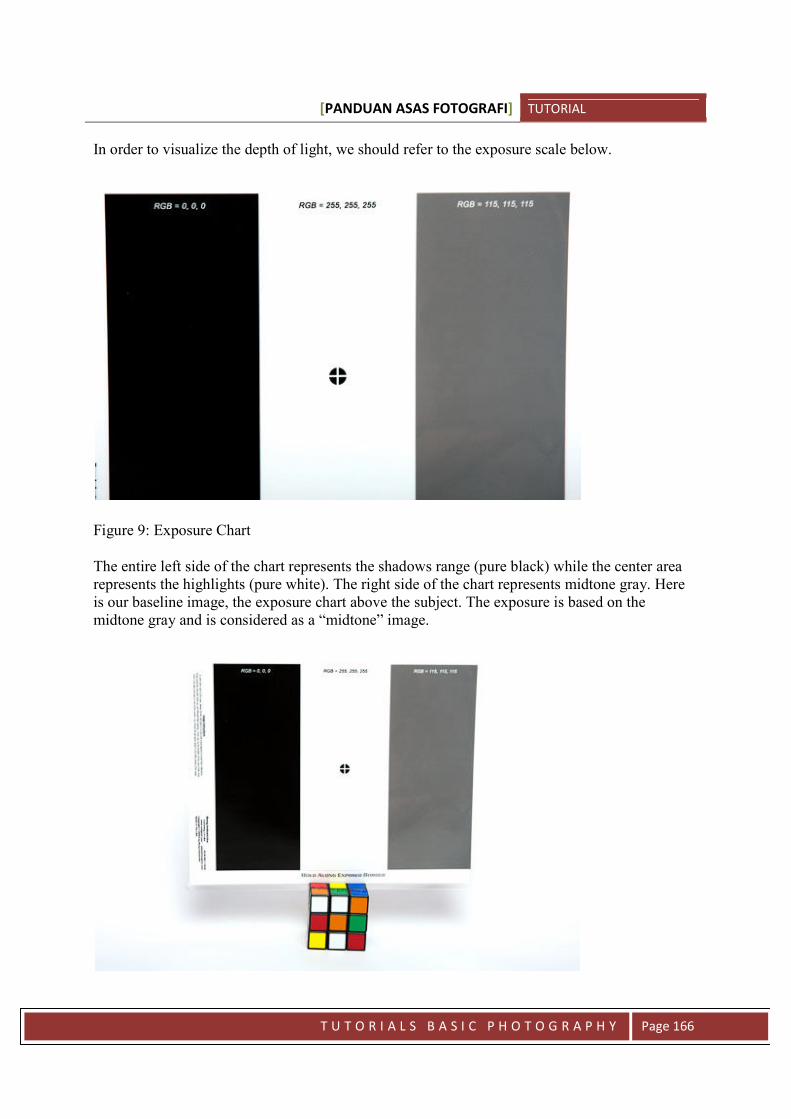
[PANDUAN ASAS FOTOGRAFI] TUTORIAL
T U T O R I A L S B A S I C P H O T O G R A P H Y Page 166
In order to visualize the depth of light, we should refer to the exposure scale below.
Figure 9: Exposure Chart
The entire left side of the chart represents the shadows range (pure black) while the center arearepresents the highlights (pure white). The right side of the chart represents midtone gray. Hereis our baseline image, the exposure chart above the subject. The exposure is based on themidtone gray and is considered as a “midtone” image.
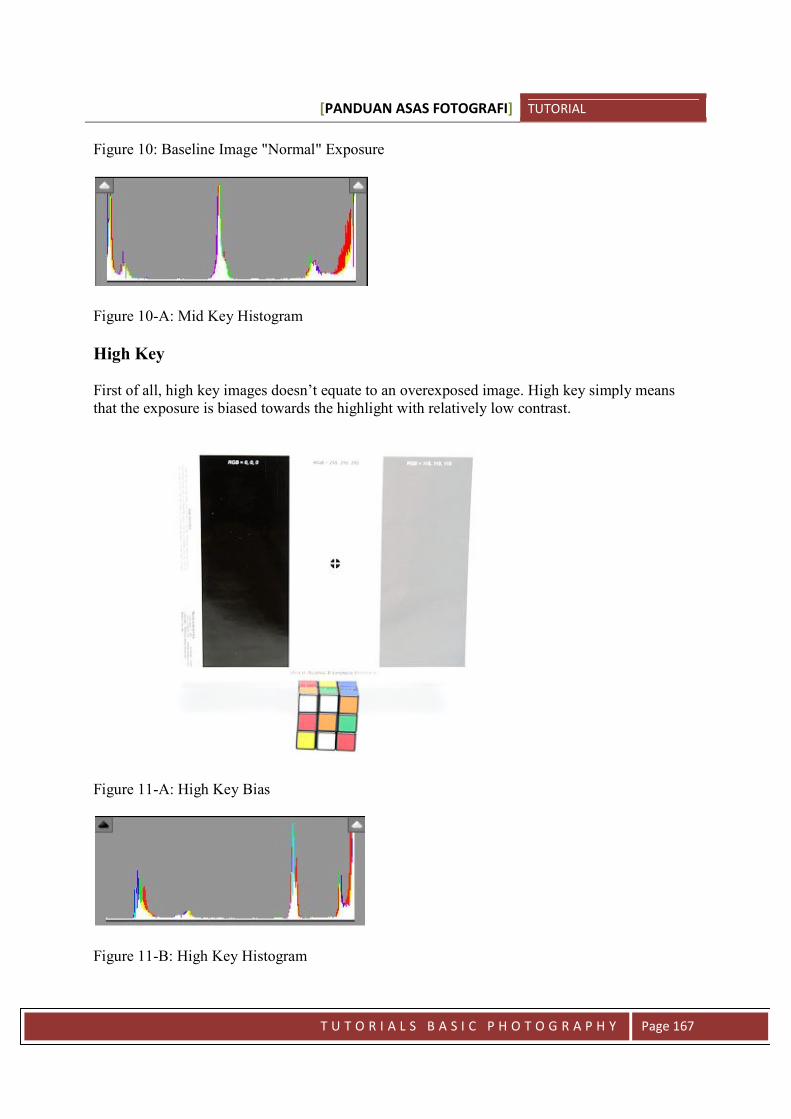
[PANDUAN ASAS FOTOGRAFI] TUTORIAL
T U T O R I A L S B A S I C P H O T O G R A P H Y Page 167
Figure 10: Baseline Image "Normal" Exposure
Figure 10-A: Mid Key Histogram
High Key
First of all, high key images doesn’t equate to an overexposed image. High key simply meansthat the exposure is biased towards the highlight with relatively low contrast.
Figure 11-A: High Key Bias
Figure 11-B: High Key Histogram
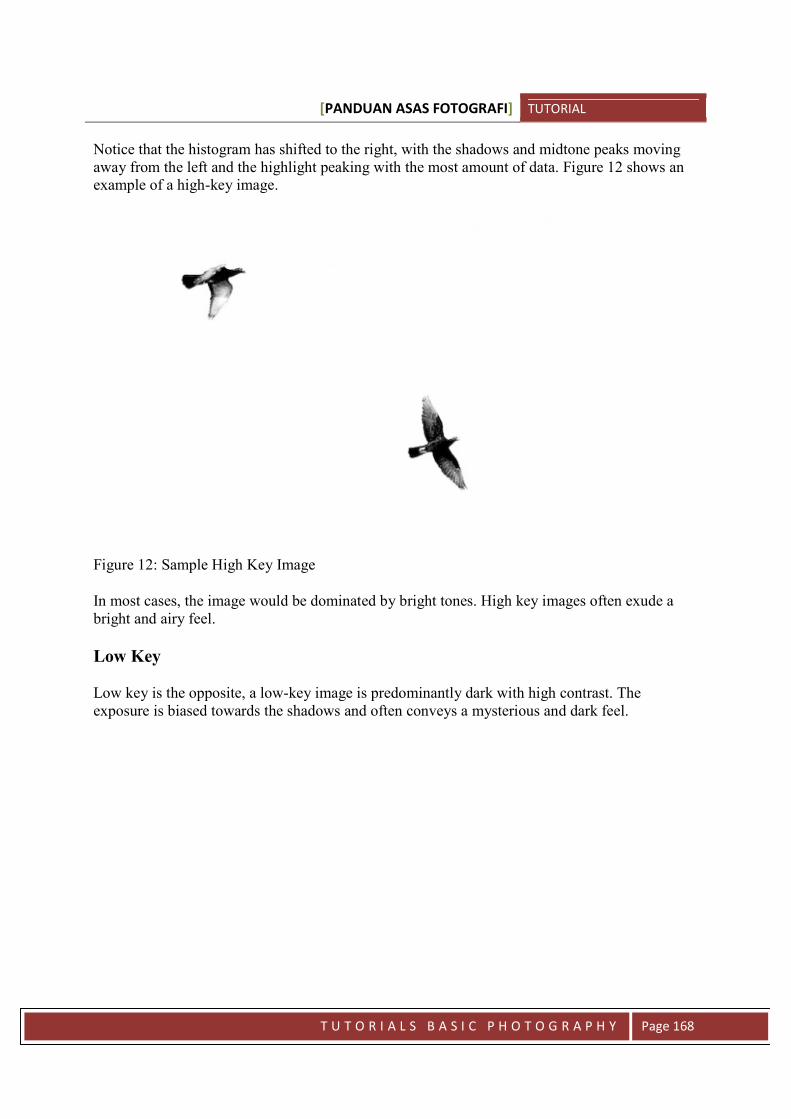
[PANDUAN ASAS FOTOGRAFI] TUTORIAL
T U T O R I A L S B A S I C P H O T O G R A P H Y Page 168
Notice that the histogram has shifted to the right, with the shadows and midtone peaks movingaway from the left and the highlight peaking with the most amount of data. Figure 12 shows anexample of a high-key image.
Figure 12: Sample High Key Image
In most cases, the image would be dominated by bright tones. High key images often exude abright and airy feel.
Low Key
Low key is the opposite, a low-key image is predominantly dark with high contrast. Theexposure is biased towards the shadows and often conveys a mysterious and dark feel.

[PANDUAN ASAS FOTOGRAFI] TUTORIAL
T U T O R I A L S B A S I C P H O T O G R A P H Y Page 169
Figure 13-A: Low Key Bias
Figure 13-B: Low Key Histogram
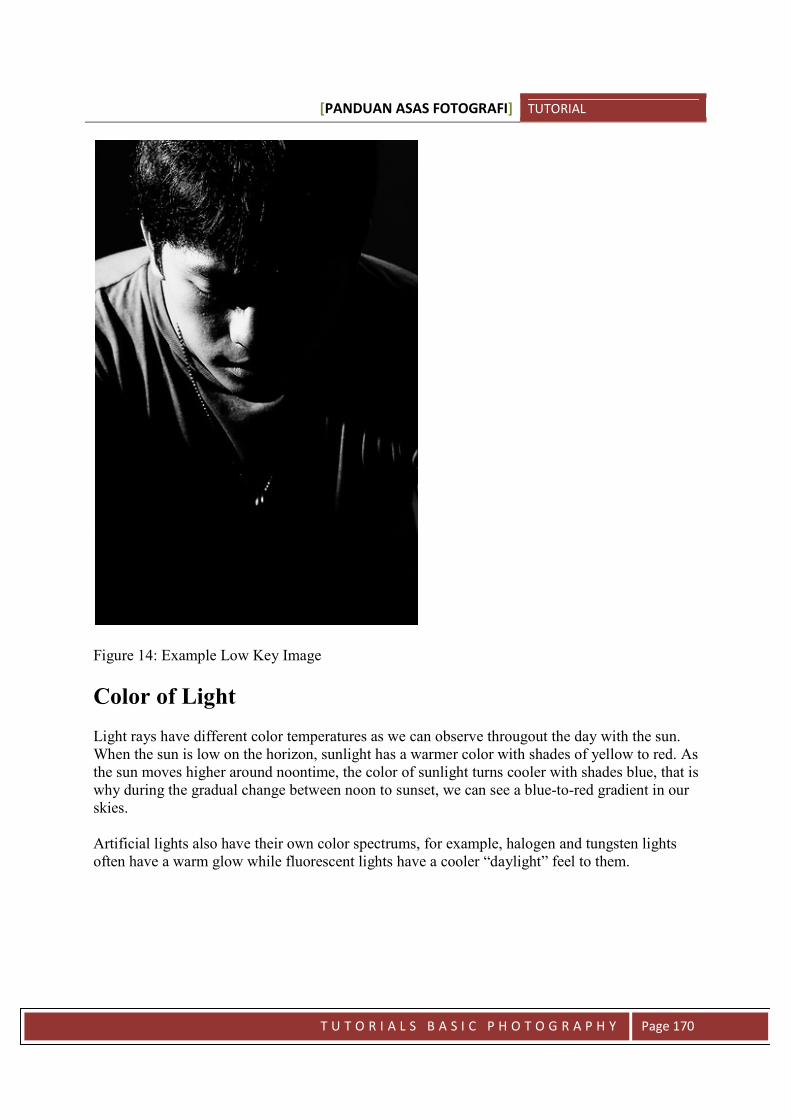
[PANDUAN ASAS FOTOGRAFI] TUTORIAL
T U T O R I A L S B A S I C P H O T O G R A P H Y Page 170
Figure 14: Example Low Key Image
Color of Light
Light rays have different color temperatures as we can observe througout the day with the sun.When the sun is low on the horizon, sunlight has a warmer color with shades of yellow to red. Asthe sun moves higher around noontime, the color of sunlight turns cooler with shades blue, that iswhy during the gradual change between noon to sunset, we can see a blue-to-red gradient in ourskies.
Artificial lights also have their own color spectrums, for example, halogen and tungsten lightsoften have a warm glow while fluorescent lights have a cooler “daylight” feel to them.
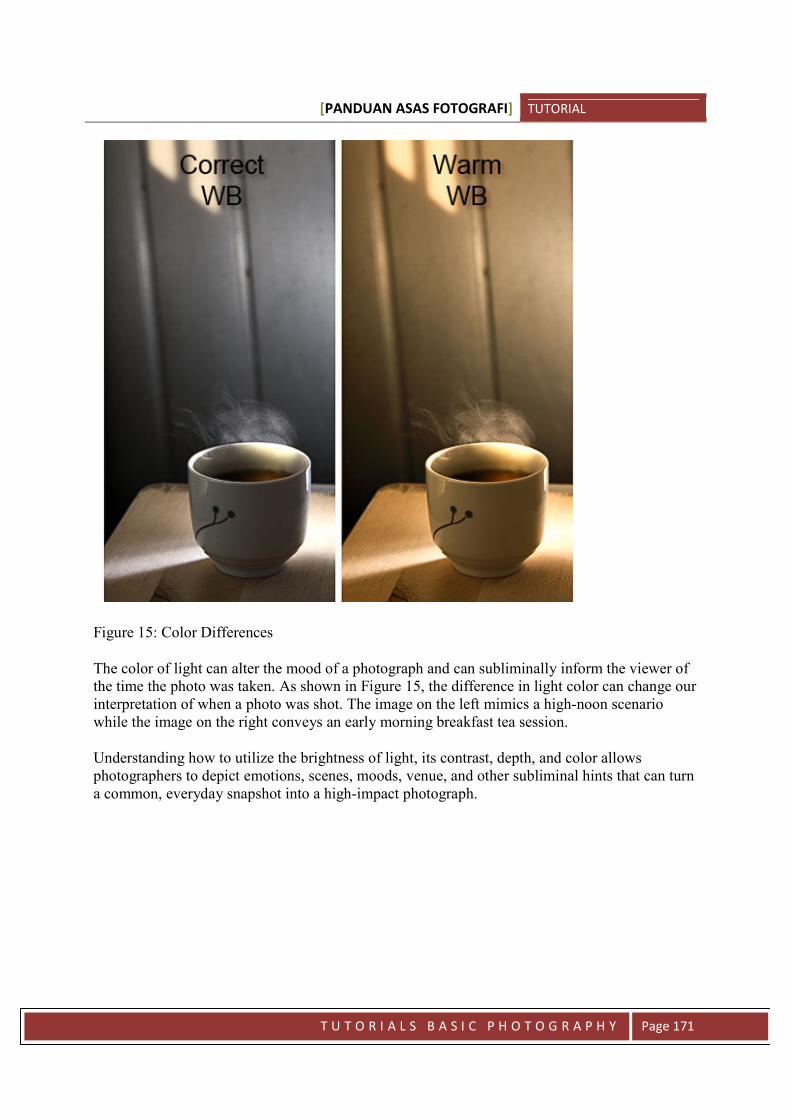
[PANDUAN ASAS FOTOGRAFI] TUTORIAL
T U T O R I A L S B A S I C P H O T O G R A P H Y Page 171
Figure 15: Color Differences
The color of light can alter the mood of a photograph and can subliminally inform the viewer ofthe time the photo was taken. As shown in Figure 15, the difference in light color can change ourinterpretation of when a photo was shot. The image on the left mimics a high-noon scenariowhile the image on the right conveys an early morning breakfast tea session.
Understanding how to utilize the brightness of light, its contrast, depth, and color allowsphotographers to depict emotions, scenes, moods, venue, and other subliminal hints that can turna common, everyday snapshot into a high-impact photograph.

[PANDUAN ASAS FOTOGRAFI] TUTORIAL
T U T O R I A L S B A S I C P H O T O G R A P H Y Page 172
Lesson 19
BASIC DIGITAL DARKROOMWORKFLOW
The advent of digital photography has spiked the interest of digital image processing. Back in thefilm days, majority of amateur photographers’ workflow stops as soon as the roll of film isdropped off to the processing lab. Not too many photographers ventured into the art of thedarkroom, developing their own negatives, manipulating the print, and adding special toning andeffects to their final prints. The darkroom was a mysterious place ventured only by the hard-corephotographers during the film era.
Fast-forward to the current digital era, the final images taken with a digital camera are open toimage adjustments that’s accessible even to the most basic user as most manufacturers includebasic software that allow the user to make changes to their images. While most basic softwareare capable of performing basic adjustments such as brightening up an image, cropping, andadding more color saturation to images, most of the bundled software do not offer muchflexibility and precise tuning.
What is a workflow?
We’re concentrating on the digital darkroom workflow for this article, it is important tounderstand that there is no single workflow that will work for everyone and you should develop aworkflow that will fit your needs and whatever your hardware is capable of.
A professional wedding photographer may have a different workflow than a press photographer,and a parent taking photos of their children will have a differently suited workflow as well.There’s no right or wrong workflow, but this article series will help shed some light on thedifferent aspects that virtually all photographers should take into consideration when creatingtheir own personal workflow. Take the bits and pieces from this article that you feel that suityour needs and leave out those that you think that are overkill.
A workflow is a structured work process that a photographer should follow every time aphotograph file is transferred from camera to the computer. Having a structured workflow hasseveral benefits including:
Organizes the photo library
Facilitates easier photo searches
Safekeeping digital files
[PANDUAN ASAS FOTOGRAFI] TUTORIAL
T U T O R I A L S B A S I C P H O T O G R A P H Y Page 173
Consistent image editing sequence
Consistent results for intended output device (for web viewing or print)
If you’re just starting with digital photography, you’re actually are in a better position to developyour own workflow than a photographer who has amassed thousands of images withoutdeveloping a workflow and attempts to create one later on. A beginner will have a smaller libraryof files to organize and is less tedious to develop, fine-tune, and customize a workflow.
Requirements
Naturally, you’ll be required to invest on some items in order to develop your own workflow,below is a list of basic hardware and software that you should invest in if you plan to develop aworkflow (in no particular order):
Software
Computer Memory card reader CD/DVD Burner / Extra external hard disk Monitor calibration device
Hardware
Software for adding metadata and keywords Software for image editing
Computer
Obviously, a computer is required in order to view, edit, and sort your images outside thecamera. The camera only has a relatively small screen that is not ideal for scrutinizing detailsaccurately. In addition, if you wish to upload your images to the internet, share your imagesusing a CD or with prints, you’ll need your own computer to be able to personally control yourresults, otherwise, you’ll be leaving all creative inputs to your photo lab to make.
Memory Card Reader
The photos you’ve taken with your camera are stored inside your memory card, and you’ll needa way to transfer those photos into your computer. Virtually all cameras allow you to connect thecamera directly to your computer for image transfer, however, this is often a slow process andrequires you to carry your camera just for file transfer, in addition, using the camera for filetransfer unnecessarily shortens the battery life of your camera.
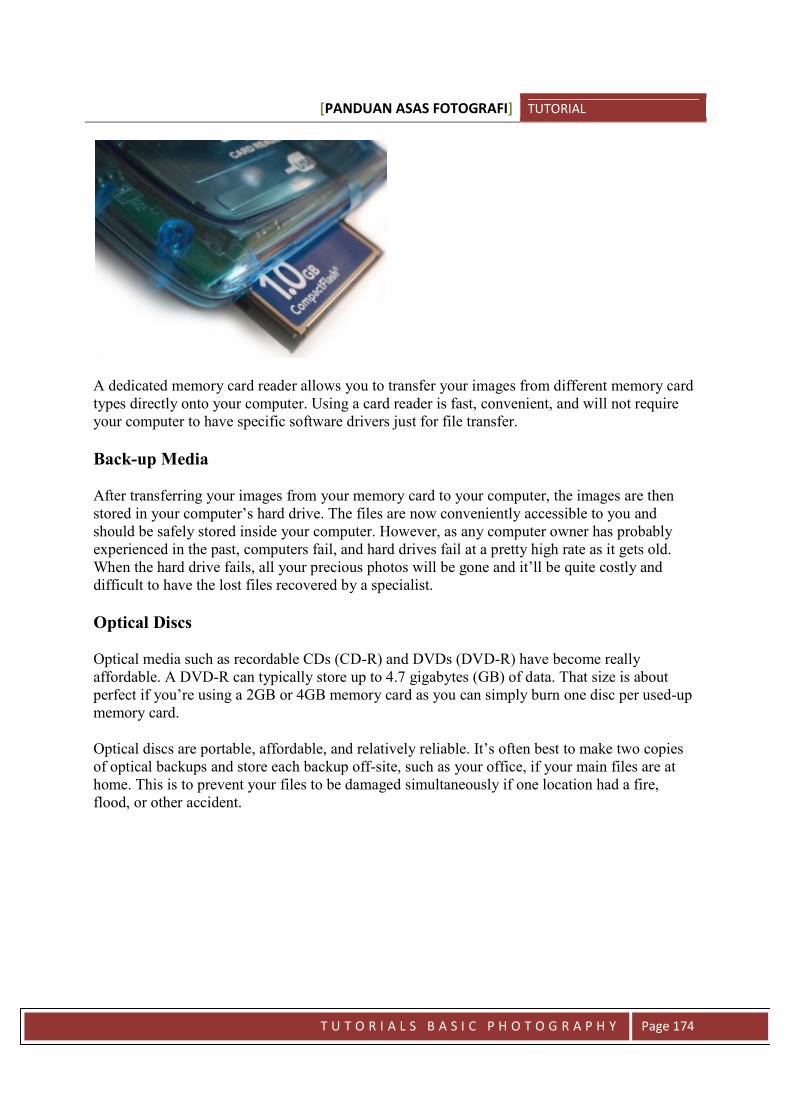
[PANDUAN ASAS FOTOGRAFI] TUTORIAL
T U T O R I A L S B A S I C P H O T O G R A P H Y Page 174
A dedicated memory card reader allows you to transfer your images from different memory cardtypes directly onto your computer. Using a card reader is fast, convenient, and will not requireyour computer to have specific software drivers just for file transfer.
Back-up Media
After transferring your images from your memory card to your computer, the images are thenstored in your computer’s hard drive. The files are now conveniently accessible to you andshould be safely stored inside your computer. However, as any computer owner has probablyexperienced in the past, computers fail, and hard drives fail at a pretty high rate as it gets old.When the hard drive fails, all your precious photos will be gone and it’ll be quite costly anddifficult to have the lost files recovered by a specialist.
Optical Discs
Optical media such as recordable CDs (CD-R) and DVDs (DVD-R) have become reallyaffordable. A DVD-R can typically store up to 4.7 gigabytes (GB) of data. That size is aboutperfect if you’re using a 2GB or 4GB memory card as you can simply burn one disc per used-upmemory card.
Optical discs are portable, affordable, and relatively reliable. It’s often best to make two copiesof optical backups and store each backup off-site, such as your office, if your main files are athome. This is to prevent your files to be damaged simultaneously if one location had a fire,flood, or other accident.
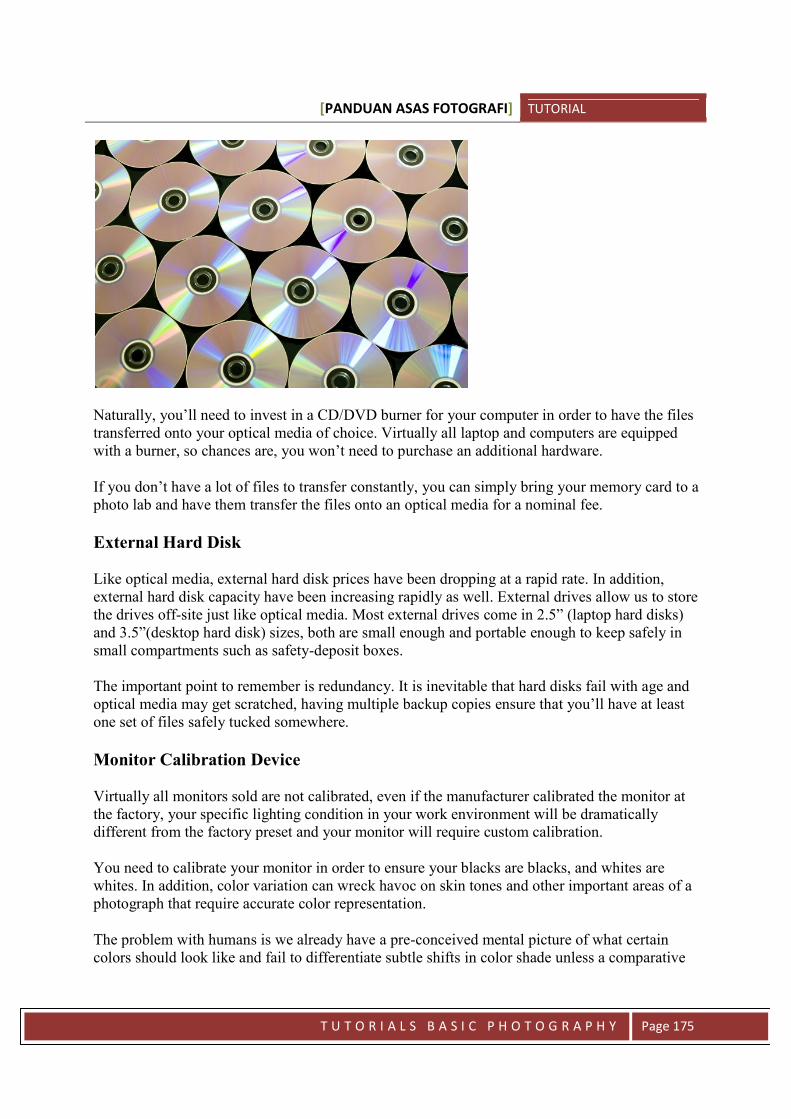
[PANDUAN ASAS FOTOGRAFI] TUTORIAL
T U T O R I A L S B A S I C P H O T O G R A P H Y Page 175
Naturally, you’ll need to invest in a CD/DVD burner for your computer in order to have the filestransferred onto your optical media of choice. Virtually all laptop and computers are equippedwith a burner, so chances are, you won’t need to purchase an additional hardware.
If you don’t have a lot of files to transfer constantly, you can simply bring your memory card to aphoto lab and have them transfer the files onto an optical media for a nominal fee.
External Hard Disk
Like optical media, external hard disk prices have been dropping at a rapid rate. In addition,external hard disk capacity have been increasing rapidly as well. External drives allow us to storethe drives off-site just like optical media. Most external drives come in 2.5” (laptop hard disks)and 3.5”(desktop hard disk) sizes, both are small enough and portable enough to keep safely insmall compartments such as safety-deposit boxes.
The important point to remember is redundancy. It is inevitable that hard disks fail with age andoptical media may get scratched, having multiple backup copies ensure that you’ll have at leastone set of files safely tucked somewhere.
Monitor Calibration Device
Virtually all monitors sold are not calibrated, even if the manufacturer calibrated the monitor atthe factory, your specific lighting condition in your work environment will be dramaticallydifferent from the factory preset and your monitor will require custom calibration.
You need to calibrate your monitor in order to ensure your blacks are blacks, and whites arewhites. In addition, color variation can wreck havoc on skin tones and other important areas of aphotograph that require accurate color representation.
The problem with humans is we already have a pre-conceived mental picture of what certaincolors should look like and fail to differentiate subtle shifts in color shade unless a comparative

[PANDUAN ASAS FOTOGRAFI] TUTORIAL
T U T O R I A L S B A S I C P H O T O G R A P H Y Page 176
shade is present in the photo. A monitor calibration device is your first step to getting your colorsaccurately as you’ve seen it in real life. Without an accurate display, any image editing will bepointless as you’re editing without a baseline gauge of what the colors should really look like.
Software for Cataloging
As you take more photos, you’ll eventually reach the point where you’ll need to find a photo thatyou’ve taken a long time ago to print, sell, or share. When you only have a few hundred photosin your collection, finding the photo you need will not be too difficult, however, once you’vecollected hundreds of thousands of photos, it’ll be next to impossible to find the photo you needwithout spending hours scrolling through individual photographs and folder.
Using a cataloging software allows you to add keywords, metadata, and arrange your photos in away where it can be searched easily by using key phrases. Just think of how your local librarysorts and arranges their book library with index cards and using a computer database.
A cataloging software is basically a simple database software that adds tiny bits of text info toyour photographs to facilitate easier searching.
For example, if you added “San Francisco Trip” to a set of five photographs, even if you have amillion photographs in your library, typing “San Francisco” in your cataloging software will pullthose five photographs in a jiffy.
I can’t emphasize it enough, but start cataloging your photographs in detail at an early stage, theless photographs you have right now, the easier it is to maintain and update your photo library.
Lastly, choose your keywords carefully and wisely, it will be pointless if you tag all your son’sphoto as “son” if you don’t add specific keywords such as “birthday”or “graduation”.
Software for Editing
There are many photo editing software available, but professionals and serious enthusiasts oftenuse products from Apple and Adobe mainly. The software that comes with your camera,especially with more advanced camera models, are often flexible enough for most editingpurposes, however, it is recommended to invest in an industry-standard software as it is easier tofind support, tutorials, and classes if ever you want to improve your skills down the road.Popular image editing software include products from Adobe such as Lightroom, PhotoshopElements, and Photoshop. Apple Aperture is widely used by Mac users, while Corel Paint ShopPro is an excellent and affordable alternative to Adobe Photoshop as well.
In our next article, we’ll begin our journey to create a digital photography workflow, startingfrom transferring our images from our memory card to our computer.

[PANDUAN ASAS FOTOGRAFI] TUTORIAL
T U T O R I A L S B A S I C P H O T O G R A P H Y Page 177
Lesson 20
DIGITAL WORKFLOW IMAGEACQUISITION
We’ve discussed the importance of developing a workflow for dealing with our image files oncewe venture into digital photography. Let us now discuss the basic sequence to get started indeveloping a workflow that will suit our personal needs.
Note that the steps below are general guidelines and you should be able to customize your ownworkflow based on they types of photographs you work with. It is assumed that you’ve alreadycaptured the images into your digital cameras and already own a computer and associatedhardware to transfer images from your memory card to the computer. Organizing Folders Beforewe even begin transferring files, we must plan how we are going to arrange our folder structurein our computer.
By default, most computers will have a “Pictures” folder created by the operating system. Whilethis is often convenient for most users, it is not the recommended place to store your images inthe long run. It’s preferred to have another drive available separate from where your operationsystem is installed, whether it is another physical hard drive installed in your computer, anexternal hard drive, or a partition. The reason for this is if you need to reformat your hard drivethat contains the operating system, upgrading operating systems, or the inevitable crash of youroperating system, your data files will not be affected if they are stored in a different drive. Inyour separate hard drive, think of a “structure” you want to store your images in. For example, ifyou’re a portrait photographer, you may want to start off with a “year” folder, then “month”folder, then the name of your subject/client. If you shoot birthdays often, it might be good tohave the same year/month folder categories, separated by the name of the celebrants. If youtravel very often, then a year >> country >> city folder structure might be best for you. Theimportant point to remember is to store your files in a way where you will have an idea on whatthe content of that folder is without opening any of the files.
Once you establish a structure you’re comfortable with, it’s time to transfer the files.
File Transfer
You can simply drag and drop your files from your memory card (assuming it’s alreadyconnected to your computer using a card reader) into the folders you’ve created or you can use acataloging software to import your images into your computer.

[PANDUAN ASAS FOTOGRAFI] TUTORIAL
T U T O R I A L S B A S I C P H O T O G R A P H Y Page 178
Renaming files
Files should be renamed with the same reasoning as the folder naming structure. The filename ofyour image should at least tell you a little about the image before you open the file. In addition,by using a set of filename format, your files will be stored in a sequentially sortable format,which facilitates easier file searching even before using keywords and search strings.
There are many applications available in the market that enable you to rename your files afterbeing transferred to your computer. Some can be downloaded for free such as Google Picasa(http://picasa.google.com), and FastStone Image Viewer (http://www.faststone.org), you can alsopurchase stand-alone, dedicated workflow products such as ACDSee (http://www.acdsee.com)and Adobe Lightroom (http://www.adobe.com/products/photoshoplightroom) that are designedto help you develop your entire workflow along with other features, or you can usesupplementary software that is packaged with your image editing software such as Adobe Bridge(which is included with Adobe Photoshop). You can rename your files just like you did withyour folders.
Instead of working with the typical IMG_1234.jpg file name that your camera created, you canhave your application rename it to year_month_date_event_location_0001.jpg,year_month_date_event_location_0002.jpg, and so forth. You’ll reap the benefits of organizingand renaming your files once you need to find one specific photo in your vast collection ofimages the future.
Backup Copies
Before even thinking of editing or opening your photographs, create duplicate copies of yourimages immediately. As mentioned in our previous article, files can get damaged or altered quiteeasily, and without a back-up, the affected file will be gone forever with no easy way to recoverthe file. Creating a backup copy is rather simple, and as mentioned previously, you can backupyour photos using another hard drive, online, or with optical media such as DVDs, preferably allthree. Storage cost is getting more and more affordable and it’s prudent to have more than onebackup and having one backup being stored off-site in case fire/flood/theft occurs in your mainwork location.
Adding Keywords and Metadata
After securing your file copies, it’s time to organize and sort your files using a catalogingsoftware. There are many ways to add data into your photograph to help searching and archiving,and there are many small details that can add value to your image file’s embedded information,but before dwelling into specifics, we can quickly and easily add general keywords and metadatato our images at this stage of our workflow.
General keywords such as copyright information, photographer’s details, business details, andlocation of shoot are generic but important details to include in each photograph. Using these“catch-all” metadata allow you to label your photographs as your property as well as provide all
[PANDUAN ASAS FOTOGRAFI] TUTORIAL
T U T O R I A L S B A S I C P H O T O G R A P H Y Page 179
the necessary details in case you decide to distribute or sell your images to a client. It will alsosave your client a lot of time adding your information in their database in case they want tosearch and archive your photograph for future usage.
Evaluating Images
Now that we have added detailed information about our files and have backed them up safely,it’s time to sort and rate your images. This is a crucial step in your workflow as well asdeveloping your skill to edit and scrutinize your captured images towards picking the best ofyour images to keep and present.
With most cataloging software, you can view your images on a “filmstrip” or “thumbnail” viewwhere you can view several pictures at the same time. You can scroll through the images andapply ratings (often between one to five stars) and delete images that are unusable. This is a goodtime to add customized keywords to similar images. Most software allow you to select multiplefiles and enter keywords as a batch. For example, adding specific road names (i.e. 3rd Street) orvenue details (i.e. Ali’s Restaurant) to a specific group of photographs during your recent travel,to the more global keywords you’ve added earlier (i.e. MALAYSIA >> Kuala Lumpur >>Gombak). It is best to add as much useful keywords as possible at this stage. Details such as timeof capture, camera model, lens model, and capture settings (EXIF data) are often supplied byyour camera automatically, there’s no need to enter such details manually.
Finally, create sets or collections for your images. This is similar to grouping your files in foldersbut without physically transferring your images or creating duplicates to facilitate grouping.
Let’s say you traveled to New York recently and want to group all your photographs by citiesyou’ve visited, you can easily do so because of your previous keyword entries to differentiateone photograph from another. You simply search for a city, for example, “Brooklyn” and yourcataloging software will pull out all your images tagged with the “Brooklyn” keyword, just selectall the resulting photographs and add them to a collection or a set. All your future pictures thatyou may capture and tagged as “Brooklyn” will belong to this newly created set automatically, ifyour software can update in real-time. While the process of following a structured workflow mayseem tedious compared to just dumping all files into a “My Pictures” folder, there are countlessof distinct advantages for developing and using a structured workflow. A proper digitalworkflow allows you to work faster, get organized, be more critical to your images, and makes itsimple to retrieve files at any point in time.
So try to create your own digital workflow today and incorporate it every time you transfer yourimages from your camera to your PC. You’ll reap the benefits of being organized and structuredwhether you’re an amateur or a professional.
[PANDUAN ASAS FOTOGRAFI] TUTORIAL
T U T O R I A L S B A S I C P H O T O G R A P H Y Page 180
Lesson 21
DIGITAL WORKFLOW
(BASIC GLOBAL ADJUSMENTS)
Most digital photographs could use some level of enhancements as a camera may render slightlydifferent exposures, colors, contrast, or sharpness when viewed on the monitor as compared toviewing from the camera’s LCD screen. This article covers the basic global adjustments thattargets the overall appearance of the photograph, not specific areas-of-detail in a photograph.
Here we have our base image. The image is pretty balanced and neutral as it is, the basicchanges we are going to apply in the article just shows how global adjustments affect aphotograph and show how to use relatively standard image enhancing software to add moreimpact to the final photograph. Please be aware that this article is not a tutorial for any particularimage editing software, the article will merely show the usual global image adjustments appliedto most photographs to help you develop a more streamlined workflow.
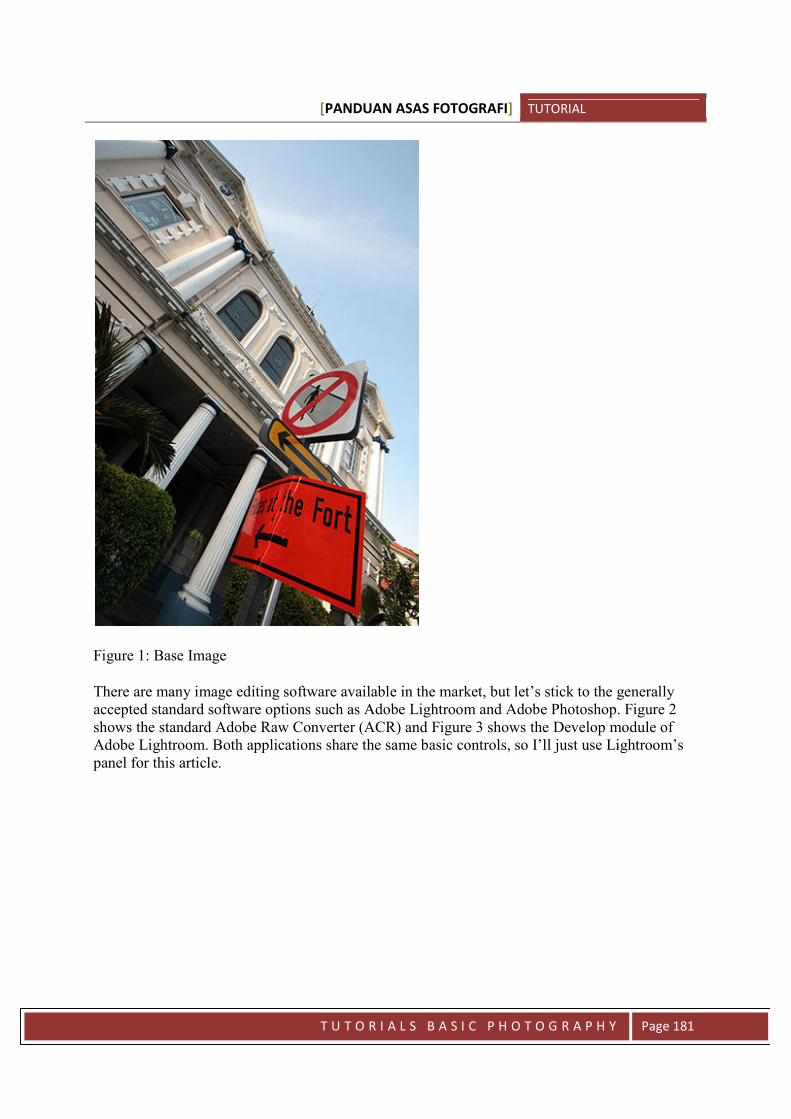
[PANDUAN ASAS FOTOGRAFI] TUTORIAL
T U T O R I A L S B A S I C P H O T O G R A P H Y Page 181
Figure 1: Base Image
There are many image editing software available in the market, but let’s stick to the generallyaccepted standard software options such as Adobe Lightroom and Adobe Photoshop. Figure 2shows the standard Adobe Raw Converter (ACR) and Figure 3 shows the Develop module ofAdobe Lightroom. Both applications share the same basic controls, so I’ll just use Lightroom’spanel for this article.
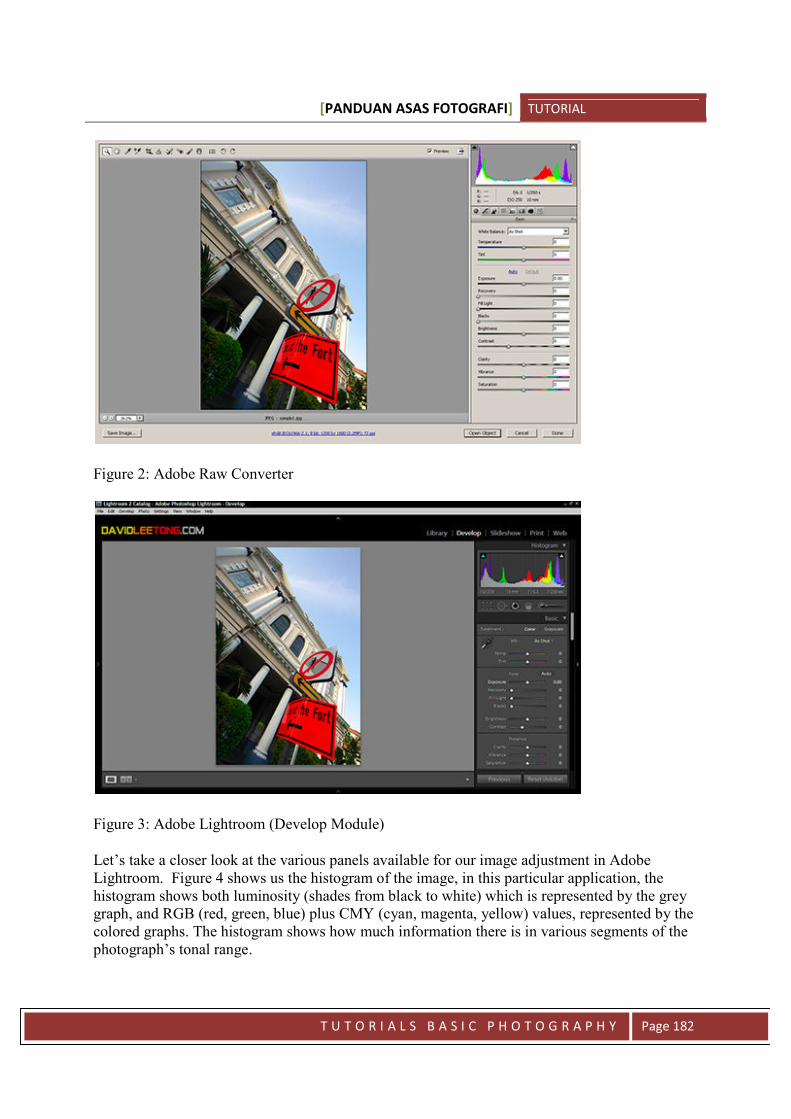
[PANDUAN ASAS FOTOGRAFI] TUTORIAL
T U T O R I A L S B A S I C P H O T O G R A P H Y Page 182
Figure 2: Adobe Raw Converter
Figure 3: Adobe Lightroom (Develop Module)
Let’s take a closer look at the various panels available for our image adjustment in AdobeLightroom. Figure 4 shows us the histogram of the image, in this particular application, thehistogram shows both luminosity (shades from black to white) which is represented by the greygraph, and RGB (red, green, blue) plus CMY (cyan, magenta, yellow) values, represented by thecolored graphs. The histogram shows how much information there is in various segments of thephotograph’s tonal range.
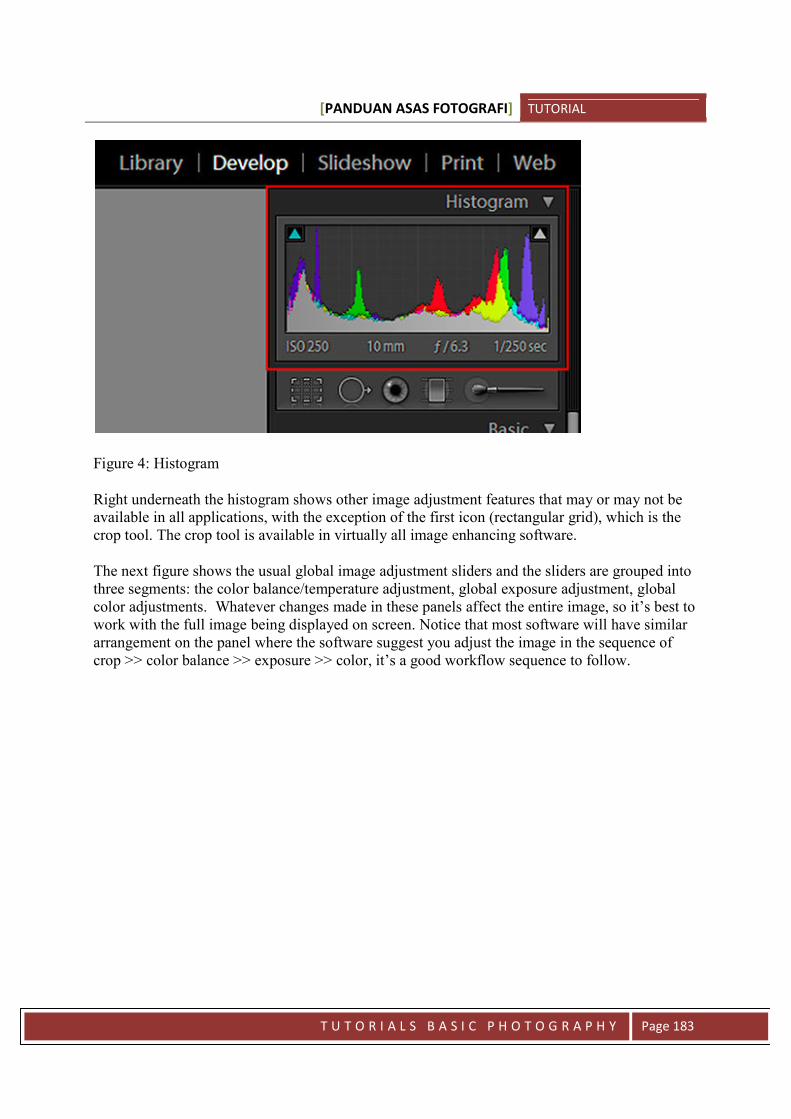
[PANDUAN ASAS FOTOGRAFI] TUTORIAL
T U T O R I A L S B A S I C P H O T O G R A P H Y Page 183
Figure 4: Histogram
Right underneath the histogram shows other image adjustment features that may or may not beavailable in all applications, with the exception of the first icon (rectangular grid), which is thecrop tool. The crop tool is available in virtually all image enhancing software.
The next figure shows the usual global image adjustment sliders and the sliders are grouped intothree segments: the color balance/temperature adjustment, global exposure adjustment, globalcolor adjustments. Whatever changes made in these panels affect the entire image, so it’s best towork with the full image being displayed on screen. Notice that most software will have similararrangement on the panel where the software suggest you adjust the image in the sequence ofcrop >> color balance >> exposure >> color, it’s a good workflow sequence to follow.
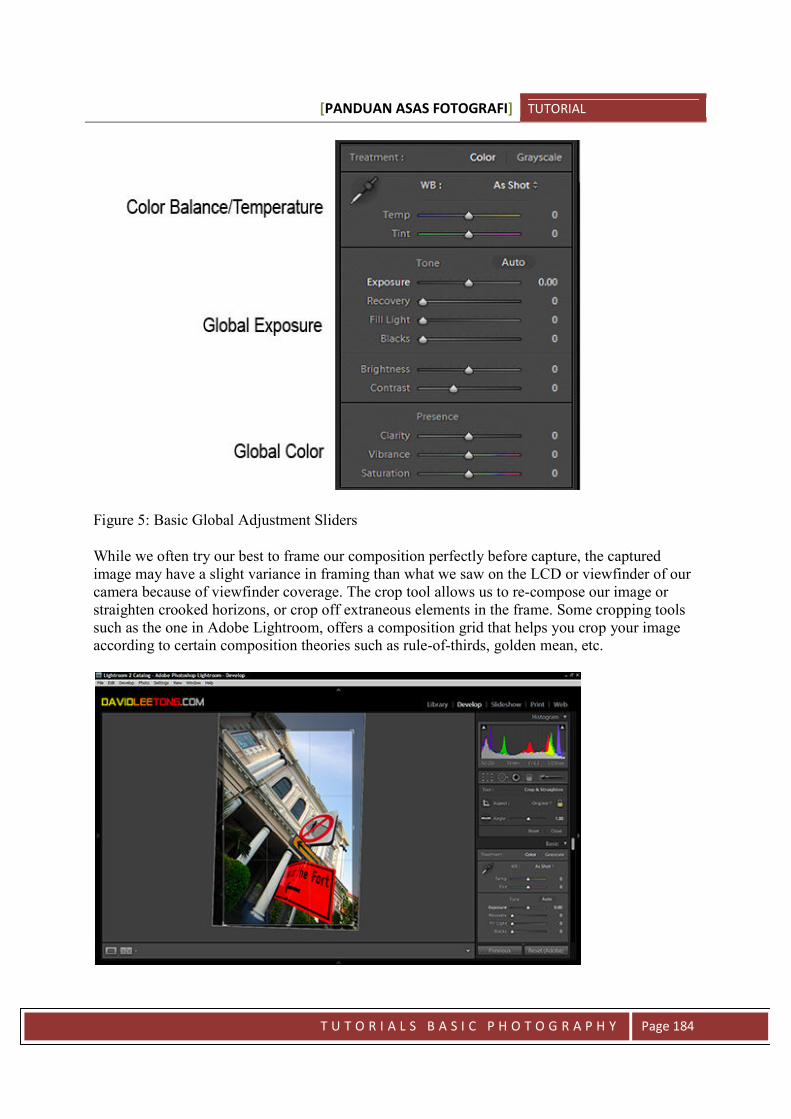
[PANDUAN ASAS FOTOGRAFI] TUTORIAL
T U T O R I A L S B A S I C P H O T O G R A P H Y Page 184
Figure 5: Basic Global Adjustment Sliders
While we often try our best to frame our composition perfectly before capture, the capturedimage may have a slight variance in framing than what we saw on the LCD or viewfinder of ourcamera because of viewfinder coverage. The crop tool allows us to re-compose our image orstraighten crooked horizons, or crop off extraneous elements in the frame. Some cropping toolssuch as the one in Adobe Lightroom, offers a composition grid that helps you crop your imageaccording to certain composition theories such as rule-of-thirds, golden mean, etc.
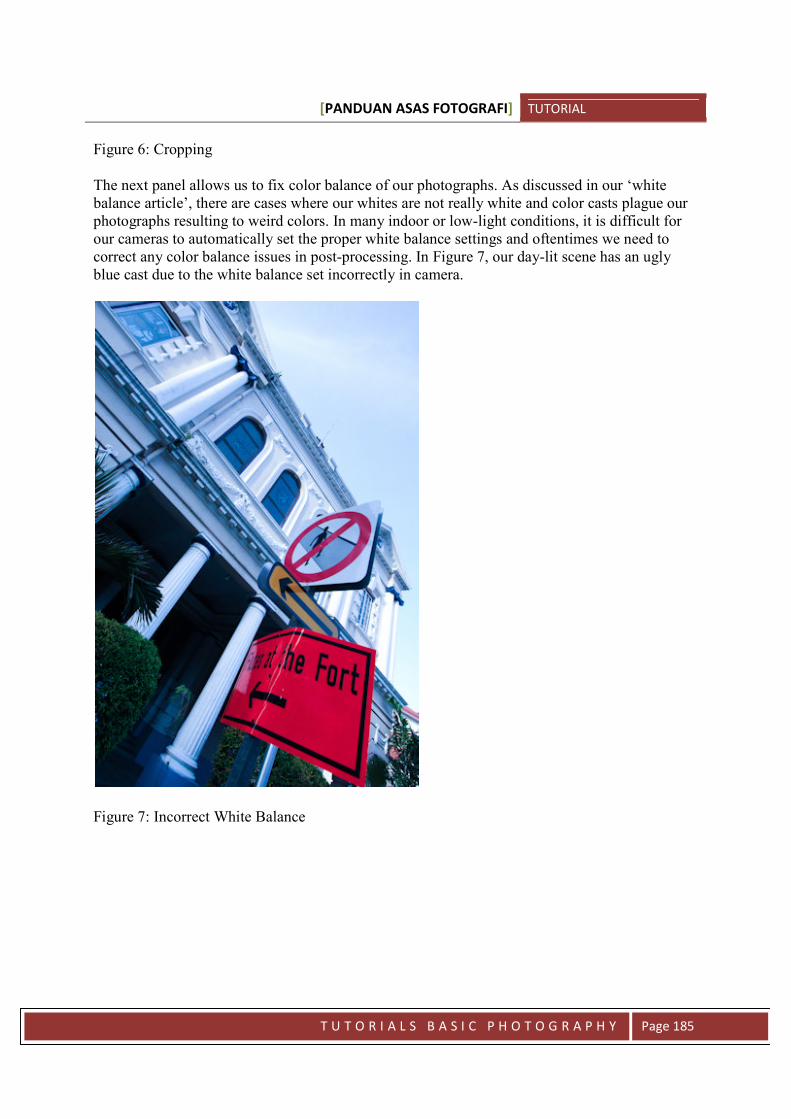
[PANDUAN ASAS FOTOGRAFI] TUTORIAL
T U T O R I A L S B A S I C P H O T O G R A P H Y Page 185
Figure 6: Cropping
The next panel allows us to fix color balance of our photographs. As discussed in our ‘whitebalance article’, there are cases where our whites are not really white and color casts plague ourphotographs resulting to weird colors. In many indoor or low-light conditions, it is difficult forour cameras to automatically set the proper white balance settings and oftentimes we need tocorrect any color balance issues in post-processing. In Figure 7, our day-lit scene has an uglyblue cast due to the white balance set incorrectly in camera.
Figure 7: Incorrect White Balance
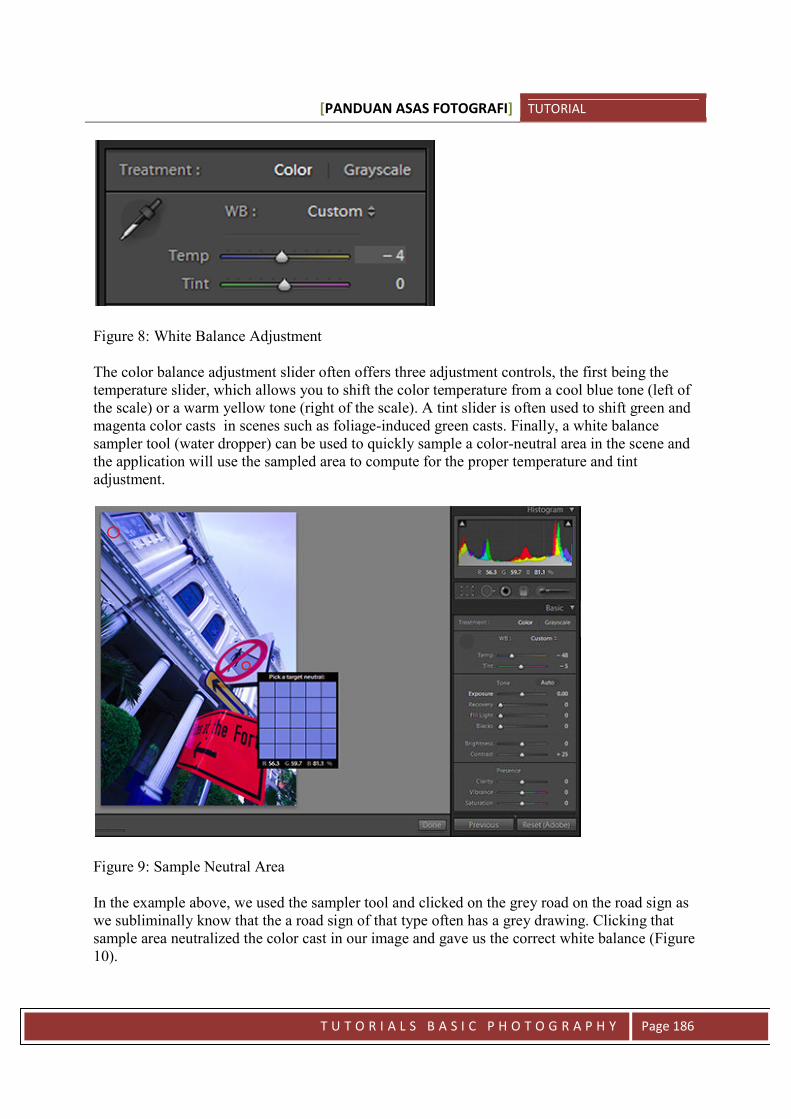
[PANDUAN ASAS FOTOGRAFI] TUTORIAL
T U T O R I A L S B A S I C P H O T O G R A P H Y Page 186
Figure 8: White Balance Adjustment
The color balance adjustment slider often offers three adjustment controls, the first being thetemperature slider, which allows you to shift the color temperature from a cool blue tone (left ofthe scale) or a warm yellow tone (right of the scale). A tint slider is often used to shift green andmagenta color casts in scenes such as foliage-induced green casts. Finally, a white balancesampler tool (water dropper) can be used to quickly sample a color-neutral area in the scene andthe application will use the sampled area to compute for the proper temperature and tintadjustment.
Figure 9: Sample Neutral Area
In the example above, we used the sampler tool and clicked on the grey road on the road sign aswe subliminally know that the a road sign of that type often has a grey drawing. Clicking thatsample area neutralized the color cast in our image and gave us the correct white balance (Figure10).
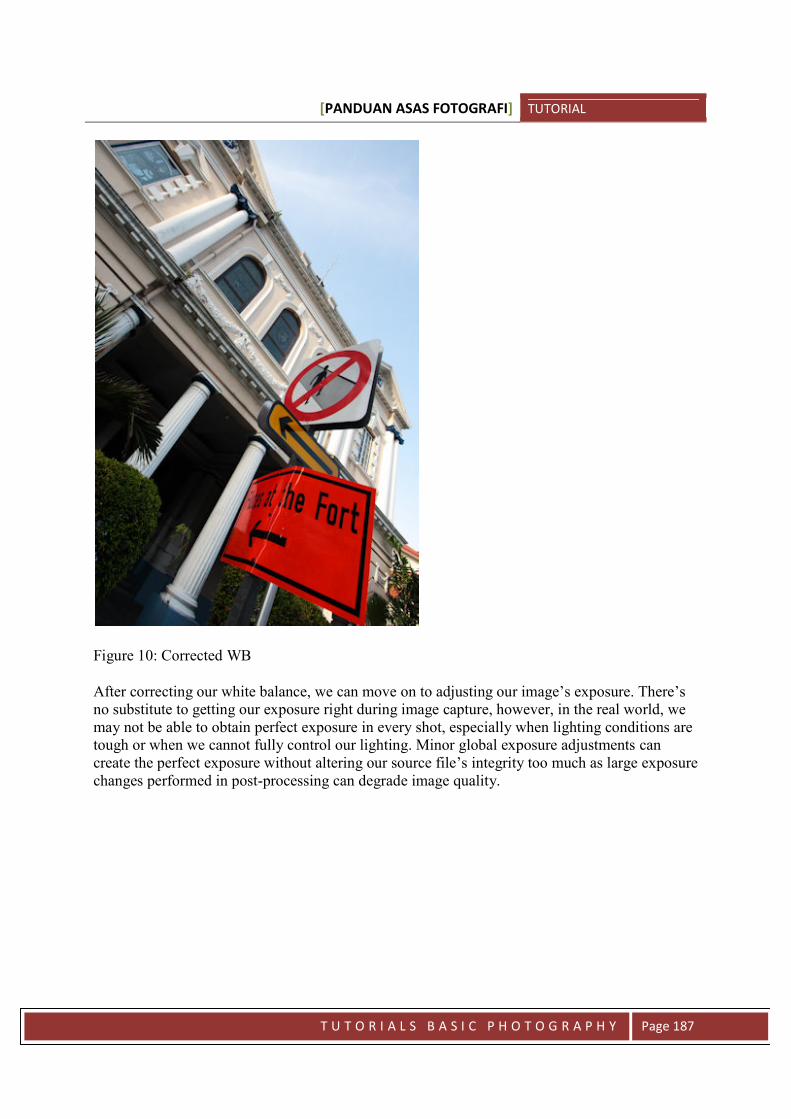
[PANDUAN ASAS FOTOGRAFI] TUTORIAL
T U T O R I A L S B A S I C P H O T O G R A P H Y Page 187
Figure 10: Corrected WB
After correcting our white balance, we can move on to adjusting our image’s exposure. There’sno substitute to getting our exposure right during image capture, however, in the real world, wemay not be able to obtain perfect exposure in every shot, especially when lighting conditions aretough or when we cannot fully control our lighting. Minor global exposure adjustments cancreate the perfect exposure without altering our source file’s integrity too much as large exposurechanges performed in post-processing can degrade image quality.
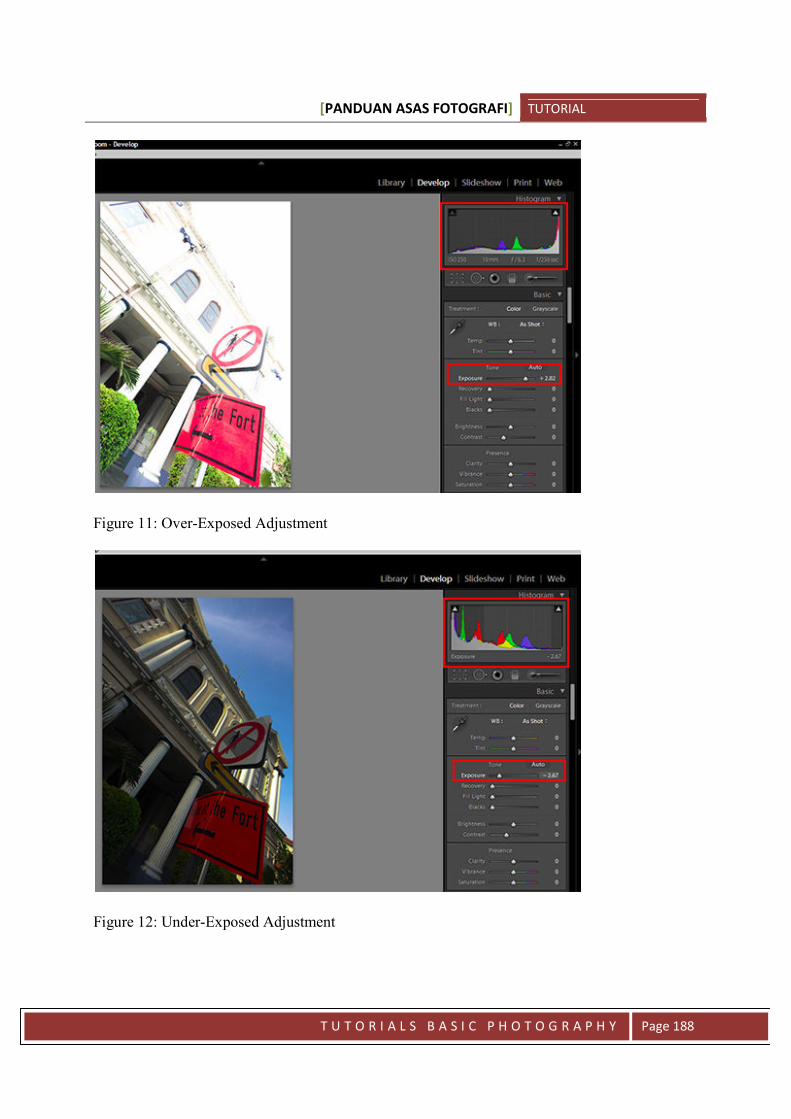
[PANDUAN ASAS FOTOGRAFI] TUTORIAL
T U T O R I A L S B A S I C P H O T O G R A P H Y Page 188
Figure 11: Over-Exposed Adjustment
Figure 12: Under-Exposed Adjustment
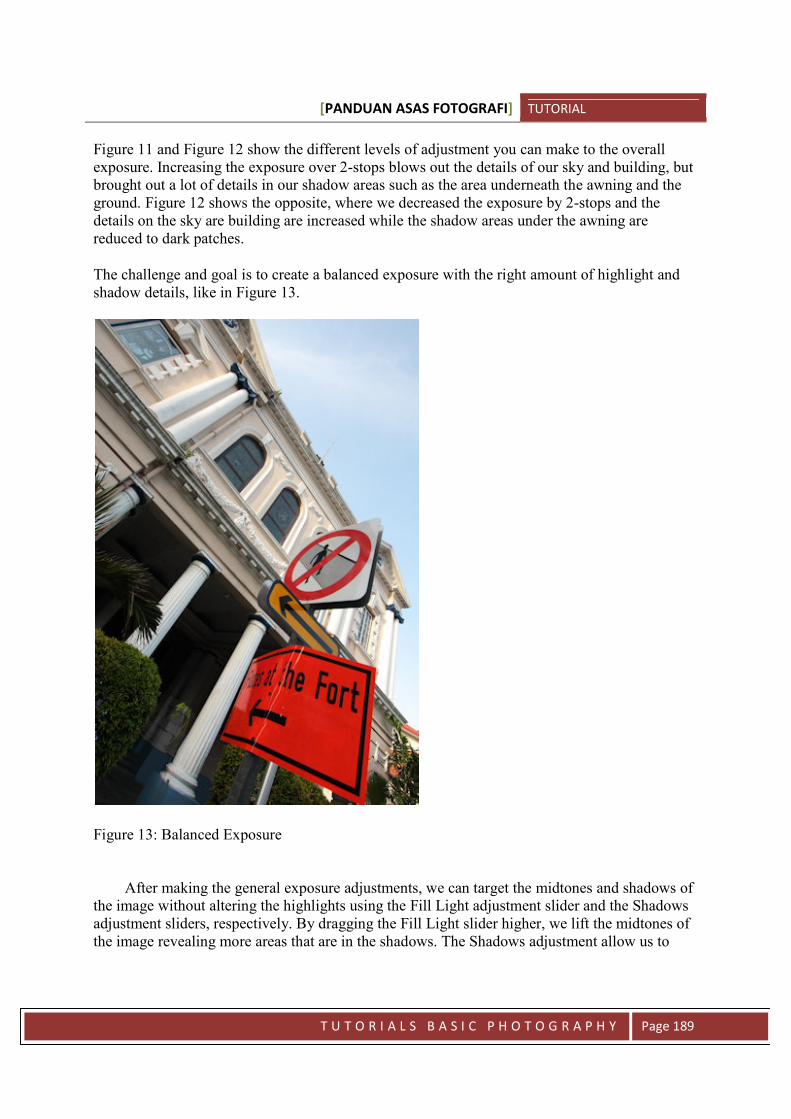
[PANDUAN ASAS FOTOGRAFI] TUTORIAL
T U T O R I A L S B A S I C P H O T O G R A P H Y Page 189
Figure 11 and Figure 12 show the different levels of adjustment you can make to the overallexposure. Increasing the exposure over 2-stops blows out the details of our sky and building, butbrought out a lot of details in our shadow areas such as the area underneath the awning and theground. Figure 12 shows the opposite, where we decreased the exposure by 2-stops and thedetails on the sky are building are increased while the shadow areas under the awning arereduced to dark patches.
The challenge and goal is to create a balanced exposure with the right amount of highlight andshadow details, like in Figure 13.
Figure 13: Balanced Exposure
After making the general exposure adjustments, we can target the midtones and shadows ofthe image without altering the highlights using the Fill Light adjustment slider and the Shadowsadjustment sliders, respectively. By dragging the Fill Light slider higher, we lift the midtones ofthe image revealing more areas that are in the shadows. The Shadows adjustment allow us to
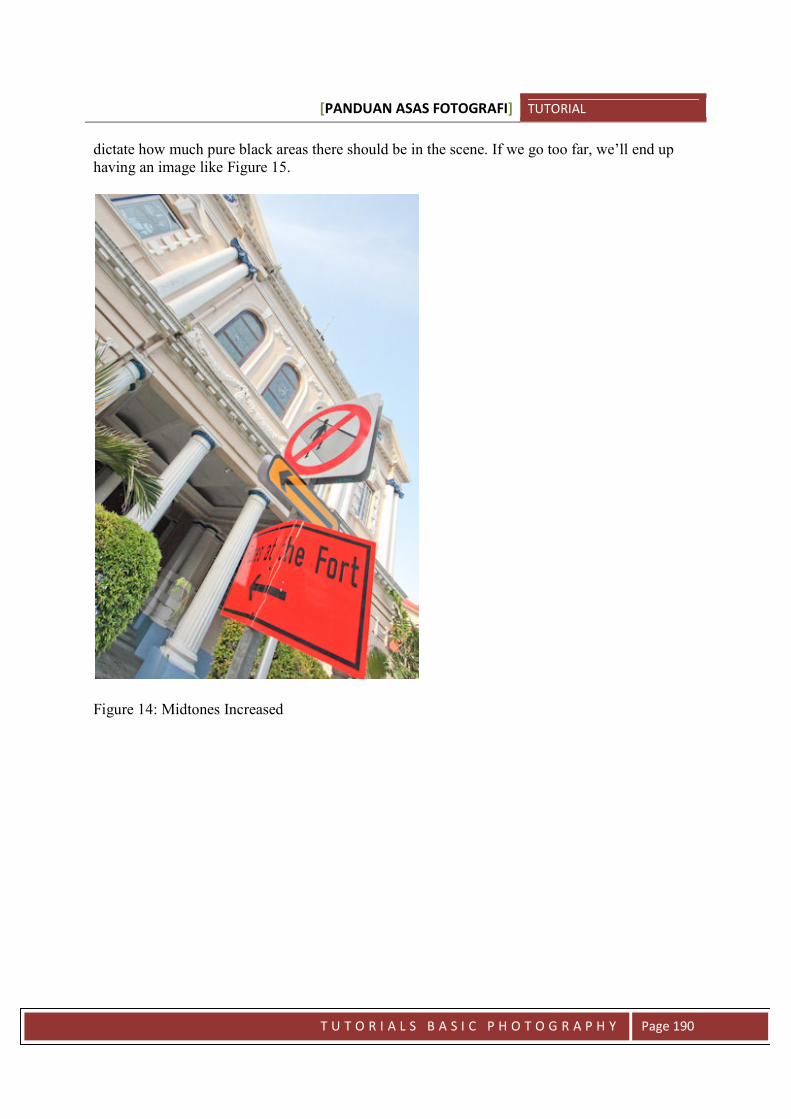
[PANDUAN ASAS FOTOGRAFI] TUTORIAL
T U T O R I A L S B A S I C P H O T O G R A P H Y Page 190
dictate how much pure black areas there should be in the scene. If we go too far, we’ll end uphaving an image like Figure 15.
Figure 14: Midtones Increased
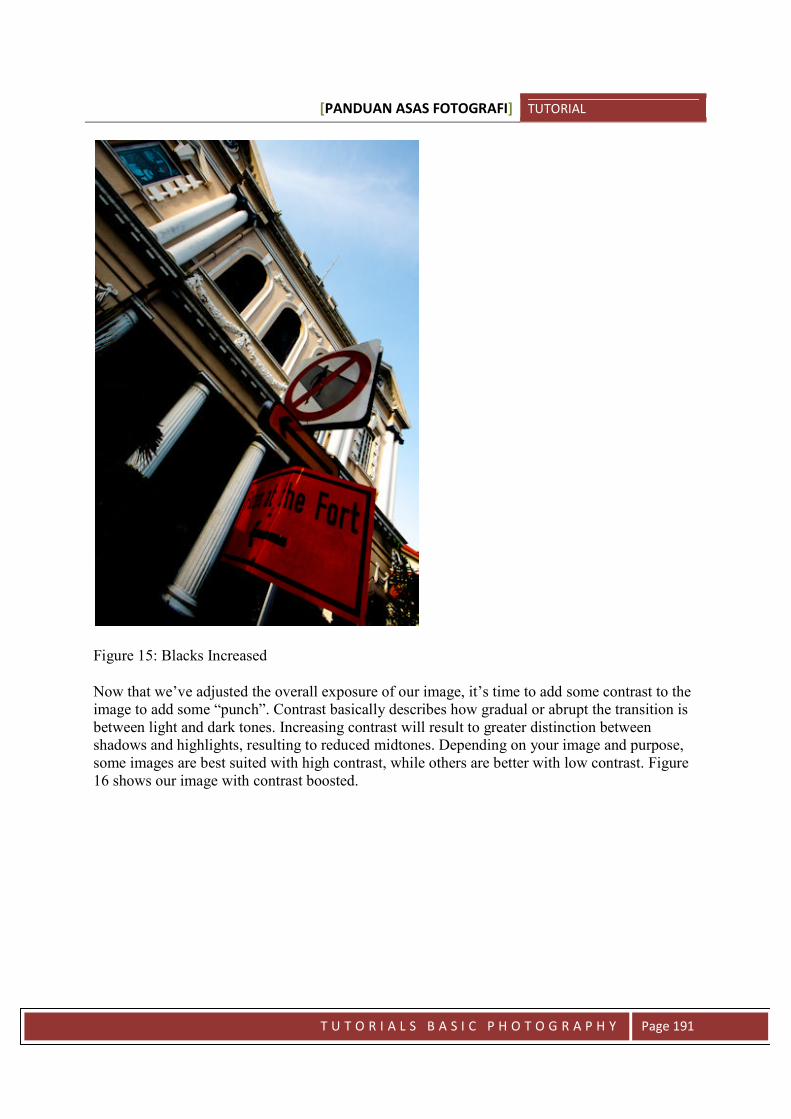
[PANDUAN ASAS FOTOGRAFI] TUTORIAL
T U T O R I A L S B A S I C P H O T O G R A P H Y Page 191
Figure 15: Blacks Increased
Now that we’ve adjusted the overall exposure of our image, it’s time to add some contrast to theimage to add some “punch”. Contrast basically describes how gradual or abrupt the transition isbetween light and dark tones. Increasing contrast will result to greater distinction betweenshadows and highlights, resulting to reduced midtones. Depending on your image and purpose,some images are best suited with high contrast, while others are better with low contrast. Figure16 shows our image with contrast boosted.
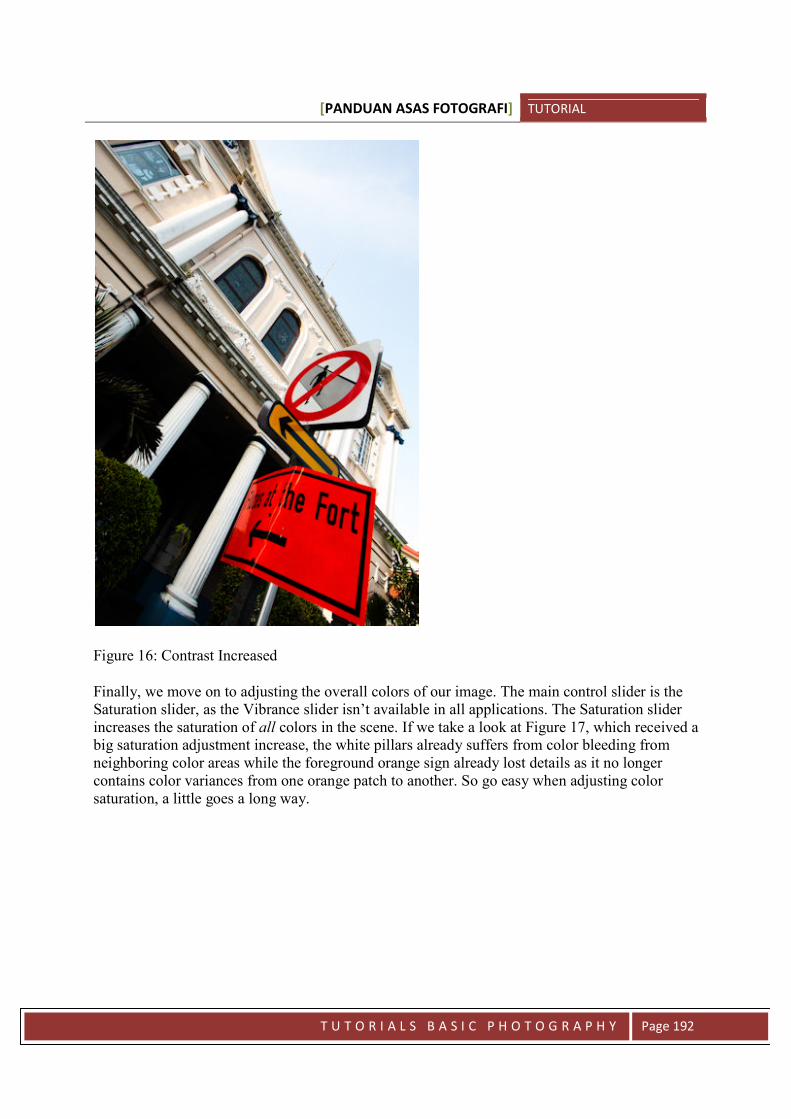
[PANDUAN ASAS FOTOGRAFI] TUTORIAL
T U T O R I A L S B A S I C P H O T O G R A P H Y Page 192
Figure 16: Contrast Increased
Finally, we move on to adjusting the overall colors of our image. The main control slider is theSaturation slider, as the Vibrance slider isn’t available in all applications. The Saturation sliderincreases the saturation of all colors in the scene. If we take a look at Figure 17, which received abig saturation adjustment increase, the white pillars already suffers from color bleeding fromneighboring color areas while the foreground orange sign already lost details as it no longercontains color variances from one orange patch to another. So go easy when adjusting colorsaturation, a little goes a long way.

[PANDUAN ASAS FOTOGRAFI] TUTORIAL
T U T O R I A L S B A S I C P H O T O G R A P H Y Page 193
Figure 17: Oversaturated Image
While we’re still talking about saturation, reducing saturation completely means taking out allthe color information of the scene, the result is a greyscale image with no color information.
Figure 18: Saturation Removed Completely
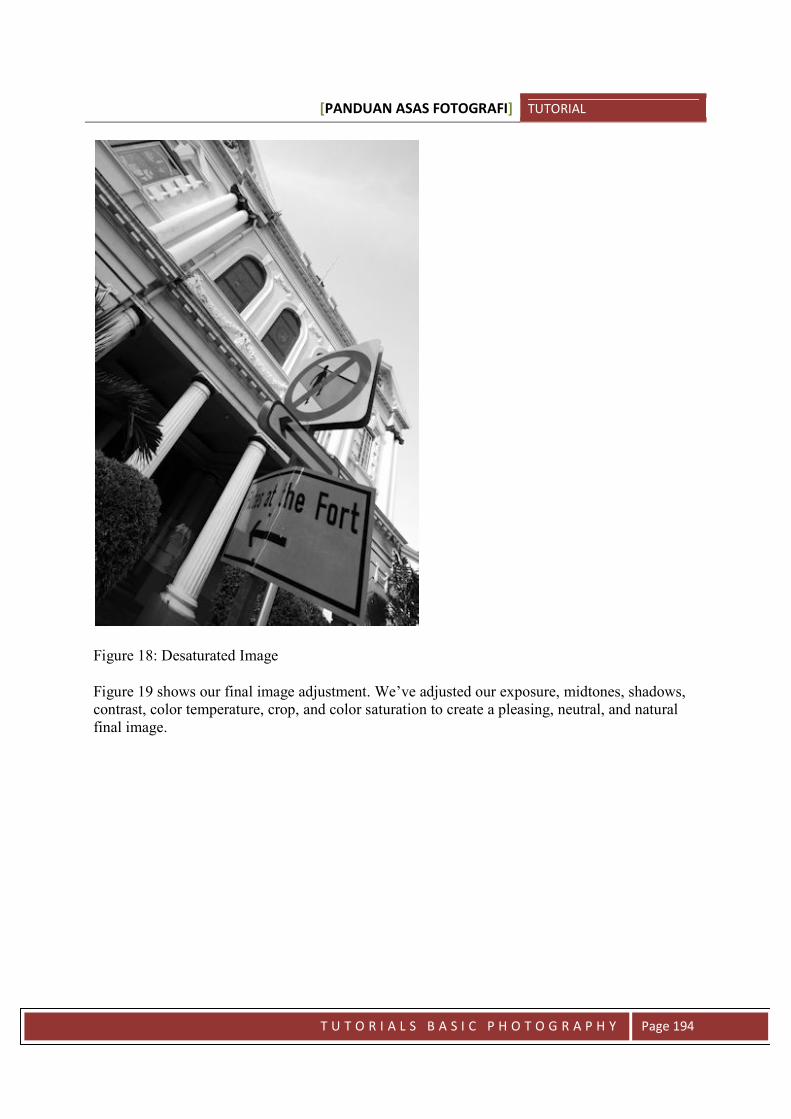
[PANDUAN ASAS FOTOGRAFI] TUTORIAL
T U T O R I A L S B A S I C P H O T O G R A P H Y Page 194
Figure 18: Desaturated Image
Figure 19 shows our final image adjustment. We’ve adjusted our exposure, midtones, shadows,contrast, color temperature, crop, and color saturation to create a pleasing, neutral, and naturalfinal image.

[PANDUAN ASAS FOTOGRAFI] TUTORIAL
T U T O R I A L S B A S I C P H O T O G R A P H Y Page 195
Practice adjusting all the global adjustment sliders slowly and see how each adjustment affectsyour image and histogram. Eventually, you’ll find a general look and feel that you’recomfortable with with your images and you’ll be able to balance out the various globaladjustment settings with ease.
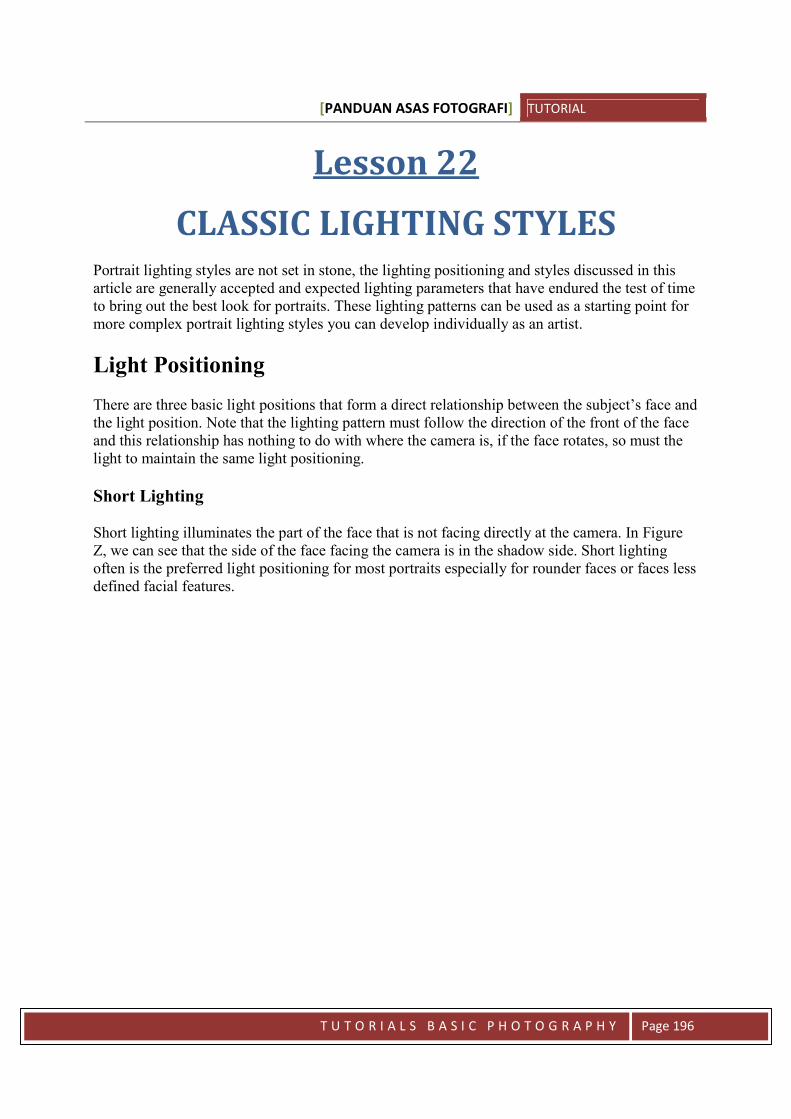
[PANDUAN ASAS FOTOGRAFI] TUTORIAL
T U T O R I A L S B A S I C P H O T O G R A P H Y Page 196
Lesson 22
CLASSIC LIGHTING STYLESPortrait lighting styles are not set in stone, the lighting positioning and styles discussed in thisarticle are generally accepted and expected lighting parameters that have endured the test of timeto bring out the best look for portraits. These lighting patterns can be used as a starting point formore complex portrait lighting styles you can develop individually as an artist.
Light Positioning
There are three basic light positions that form a direct relationship between the subject’s face andthe light position. Note that the lighting pattern must follow the direction of the front of the faceand this relationship has nothing to do with where the camera is, if the face rotates, so must thelight to maintain the same light positioning.
Short Lighting
Short lighting illuminates the part of the face that is not facing directly at the camera. In FigureZ, we can see that the side of the face facing the camera is in the shadow side. Short lightingoften is the preferred light positioning for most portraits especially for rounder faces or faces lessdefined facial features.

[PANDUAN ASAS FOTOGRAFI] TUTORIAL
T U T O R I A L S B A S I C P H O T O G R A P H Y Page 197
Putting the shadow side of the face closer to the camera narrows down the face and works wellfor majority of subjects except those with long or thin faces.
Broad Lighting
Broad lighting is the opposite of short lighting where the lit portion of the face faces the front ofthe camera. Showing the lit portion of the face directly at the camera broadens the face as itilluminates majority of the subject’s face instead of hiding it in the shadows.
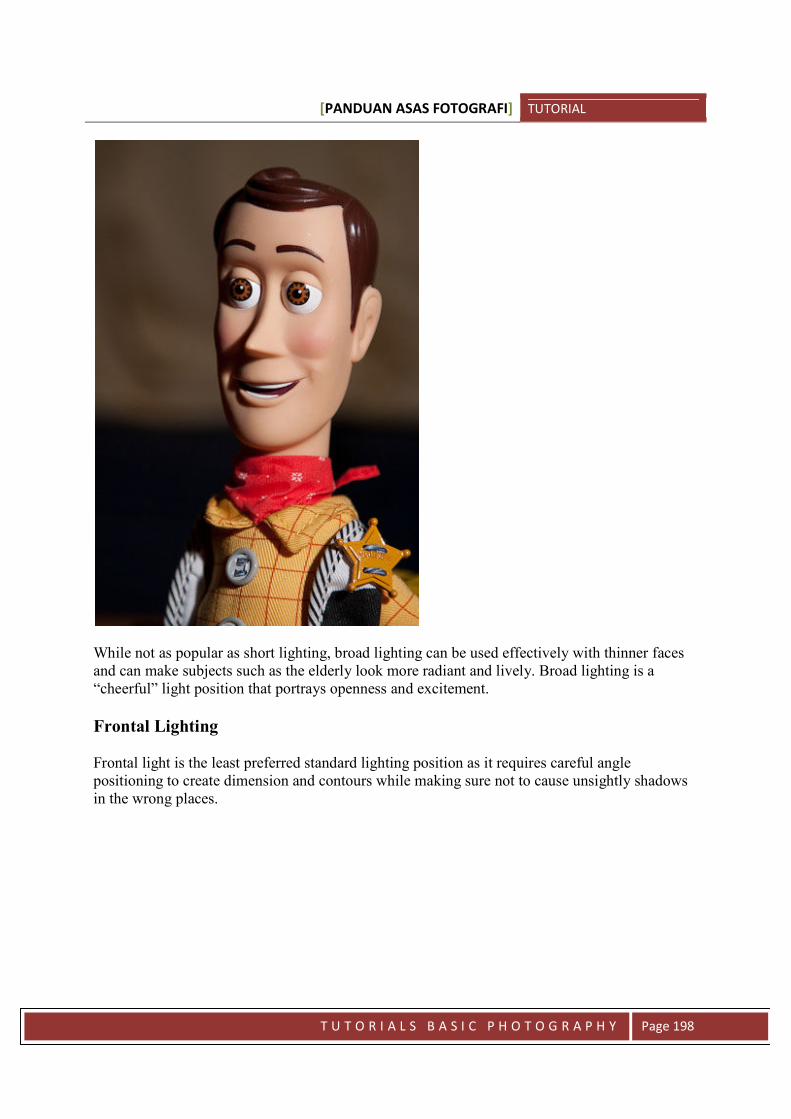
[PANDUAN ASAS FOTOGRAFI] TUTORIAL
T U T O R I A L S B A S I C P H O T O G R A P H Y Page 198
While not as popular as short lighting, broad lighting can be used effectively with thinner facesand can make subjects such as the elderly look more radiant and lively. Broad lighting is a“cheerful” light position that portrays openness and excitement.
Frontal Lighting
Frontal light is the least preferred standard lighting position as it requires careful anglepositioning to create dimension and contours while making sure not to cause unsightly shadowsin the wrong places.
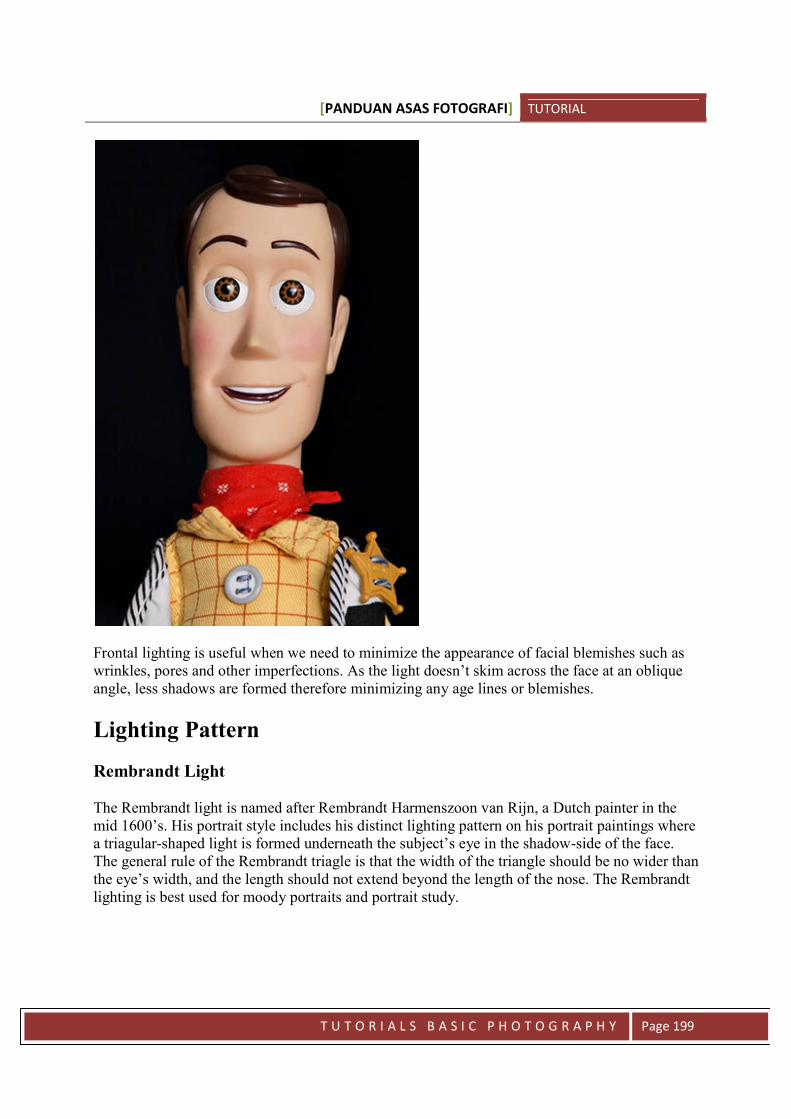
[PANDUAN ASAS FOTOGRAFI] TUTORIAL
T U T O R I A L S B A S I C P H O T O G R A P H Y Page 199
Frontal lighting is useful when we need to minimize the appearance of facial blemishes such aswrinkles, pores and other imperfections. As the light doesn’t skim across the face at an obliqueangle, less shadows are formed therefore minimizing any age lines or blemishes.
Lighting Pattern
Rembrandt Light
The Rembrandt light is named after Rembrandt Harmenszoon van Rijn, a Dutch painter in themid 1600’s. His portrait style includes his distinct lighting pattern on his portrait paintings wherea triagular-shaped light is formed underneath the subject’s eye in the shadow-side of the face.The general rule of the Rembrandt triagle is that the width of the triangle should be no wider thanthe eye’s width, and the length should not extend beyond the length of the nose. The Rembrandtlighting is best used for moody portraits and portrait study.

[PANDUAN ASAS FOTOGRAFI] TUTORIAL
T U T O R I A L S B A S I C P H O T O G R A P H Y Page 200
Going over or under this “rule” would often turn a Rembrandt into a loop light or a butterfly light(discussed below).
Loop Light
The loop light is best identified by the looping shadow created under and to the side of thesubject’s nose. This is the most common lighting pattern used as it suits almost all facial formsregardless of gender or age.
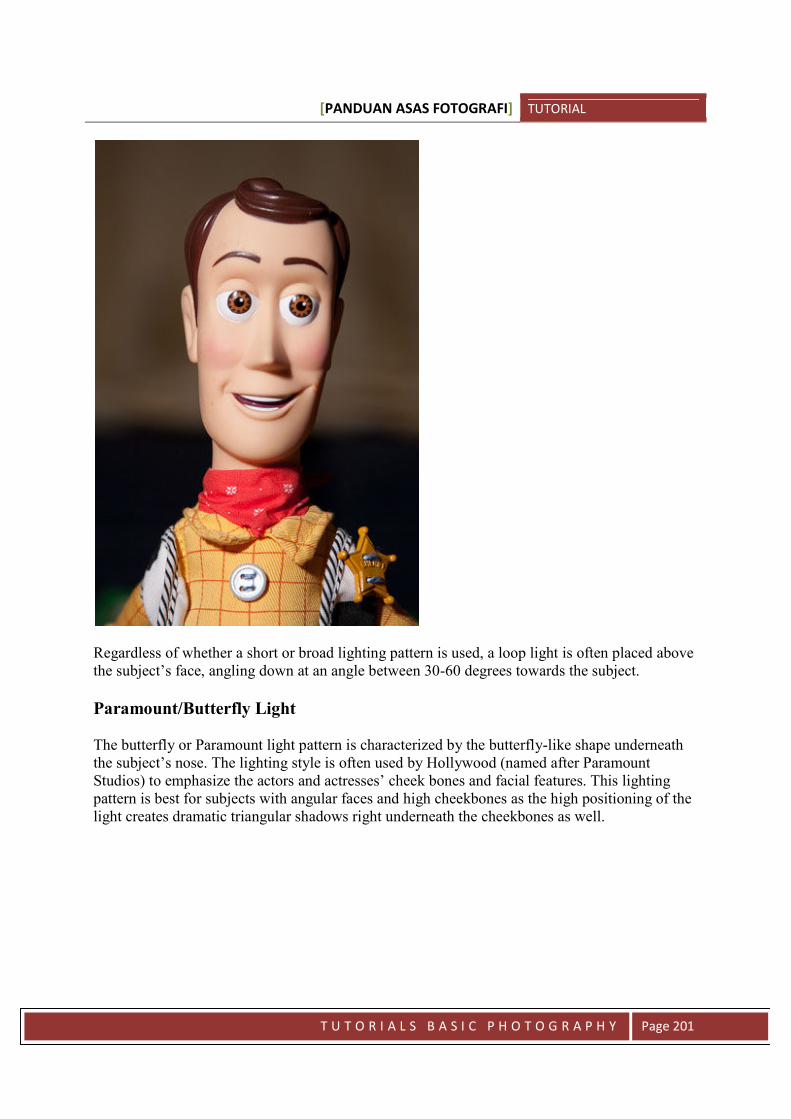
[PANDUAN ASAS FOTOGRAFI] TUTORIAL
T U T O R I A L S B A S I C P H O T O G R A P H Y Page 201
Regardless of whether a short or broad lighting pattern is used, a loop light is often placed abovethe subject’s face, angling down at an angle between 30-60 degrees towards the subject.
Paramount/Butterfly Light
The butterfly or Paramount light pattern is characterized by the butterfly-like shape underneaththe subject’s nose. The lighting style is often used by Hollywood (named after ParamountStudios) to emphasize the actors and actresses’ cheek bones and facial features. This lightingpattern is best for subjects with angular faces and high cheekbones as the high positioning of thelight creates dramatic triangular shadows right underneath the cheekbones as well.
[PANDUAN ASAS FOTOGRAFI] TUTORIAL
T U T O R I A L S B A S I C P H O T O G R A P H Y Page 202
This light pattern is created by placing the light directly above the subject’s head angleddownwards at an angle between 30-60 degrees on the same axis as the subject’s nose.
It is a very frontal light and creates vertical shadows due to the high angle of the light. Anglingthe light very slightly off-center would create better lateral shadows that makes this lightingpattern more versatile than an on-axis light.
Split Light
The split light is mainly a side lit light pattern and creates a distinct highlight-to-shadowtransition as the light crosses the bridge of the nose. The split light creates a very dramatic andmoody image best suited for male subjects as skin imperfections and facial hair tends to be morepronounced with such high-contrast lighting.
[PANDUAN ASAS FOTOGRAFI] TUTORIAL
T U T O R I A L S B A S I C P H O T O G R A P H Y Page 203
The light is mainly positioned 90-degrees to the side of the subject or slightly behind thesubject’s head at roughly the same height as the subject.
Key Points
Light Height
The height positioning of the light causes direct changes to how the face of the subject ispresented. Varying the height of the light changes the appearance of the subject’s eye socket,nose length, chin depth, and catchlight positioning (the reflected appearance of the light source inthe subject’s eyes).
Positioning the light at the same level as the subject’s face creates flat lighting in most cases withthe exception of the split light.

[PANDUAN ASAS FOTOGRAFI] TUTORIAL
T U T O R I A L S B A S I C P H O T O G R A P H Y Page 204
By increasing the light by a couple of feet, the angular features of the brow, cheekbones, nose,and chin becomes more apparent and elongates the face depending on the height of the light.

[PANDUAN ASAS FOTOGRAFI] TUTORIAL
T U T O R I A L S B A S I C P H O T O G R A P H Y Page 205
Subject Positioning in Available Light Situations
In all of our examples above, we made the assumption of being able to move our lightsource indifferent places while the subject’s position remains constant. In available light situations whereour key light cannot be moved physically (the sun’s position or window position, for example),the reverse applies and the subject and camera has to move to match the light source’s direction.
The height of the light will almost always be at a higher angle than the subject unless the sun isabout to rise or set. We can also change the angle of the light by changing the angle of the face ofthe subject and camera. So basically, instead of moving the light around, we move the subjectaround so that we can dictate where the highlights and shadows are on our subjects.
Summary
The key to understanding lighting pattern isn’t just about knowing where to place the light.Merely knowing the light patterns discussed will not be very useful if a photographer fails toanalyze the subject first. Understanding what lighting pattern best suited for a subject’s facial

[PANDUAN ASAS FOTOGRAFI] TUTORIAL
T U T O R I A L S B A S I C P H O T O G R A P H Y Page 206
features differentiates a run-of-the-mill portrait versus creating a portrait that conveys emotions,character, and clear representation of the subject’s personality. By carefully watching where theshadows fall, where the catchlight appears, and how the elements shape and form the subject’sface, you can develop a consistent lighting style that best suits your subjects’ facial shapes.
[PANDUAN ASAS FOTOGRAFI] TUTORIAL
T U T O R I A L S B A S I C P H O T O G R A P H Y Page 207
Lesson 23
BASIC POTRAIT LIGHTINGWhile there are no hard statistics to track the kind of photographs people take, it’s safe to assumethat bulk of the photos we take are portraits. Whether the portraits taken are snapshots, formallyposed, group shots, or self-taken, portraits are probably the main reason why we purchased ourcameras. The portrait helps us remember those who are important, valuable, admire, andinfluence our personal lives. While the subject and moment captured is often the most importantelement of a portrait, knowing how to use light, posing, and composition to our advantage willtransform a snapshot to a polished portrait that will convey not only who is in the photo, butwhat the photographer saw and felt when the photograph was taken.
Snapshot versus Portraits
The line between a snapshot and a portrait is a thin one, and neither one is better than the other ifwe based the photo on the intent of the photographer. A snapshot portrait is not automatically aninferior photo, a snapshot simply means the photograph was a captured moment without pre-planning or setup. A portrait, on the other hand, is a photograph where some level of planningwas made prior to the capture of the person’s photograph. An example of a “planned” photowould range from small details such as moving the subject to a better light location, applyingmake-up or combing hair before the shot, or more elaborate preparation such as using lights orlight modifiers, and so forth. In this series of articles, we will concentrate on lighting. We willdiscuss the basic lighting patterns and how it affects the subjects to how to utilize and controlavailable light to replicate some basic light patterns to create a solid portrait.
Direction of Light
The direction of light can enhance, highlight, or conceal a person’s features in both positive andnegative manner. The light can come from any angle from three dimensions and each shift willresult to a different effect on our subject. Let’s tackle the simple and common angles and seehow each light appears.
Frontal
Frontal light is most commonly seen when an on-camera flash is fired directly at the subject. Thelight is on the same axis as the lens, that means the highlight would be in front of the subject andthe shadows would fall off behind the subject.
[PANDUAN ASAS FOTOGRAFI] TUTORIAL
T U T O R I A L S B A S I C P H O T O G R A P H Y Page 208
Figure 1: Frontal Light
Frontal flash is often avoided as the light hits the subject’s face with identical intensity, makingthe subject’s facial features flat as no shadows are formed around the nose, cheeks, chin, andother facial contours. The lack of shadows is commonly known as “flat” lighting as it lacks depthand reveals very little texture and contour.
Side Lighting
Side lighting is the most common form of “angled” light, where the light is coming from adifferent axis from the lens. Side lighting reveals forms, shadows, contours, and creates contrastbetween highlight and shadows.
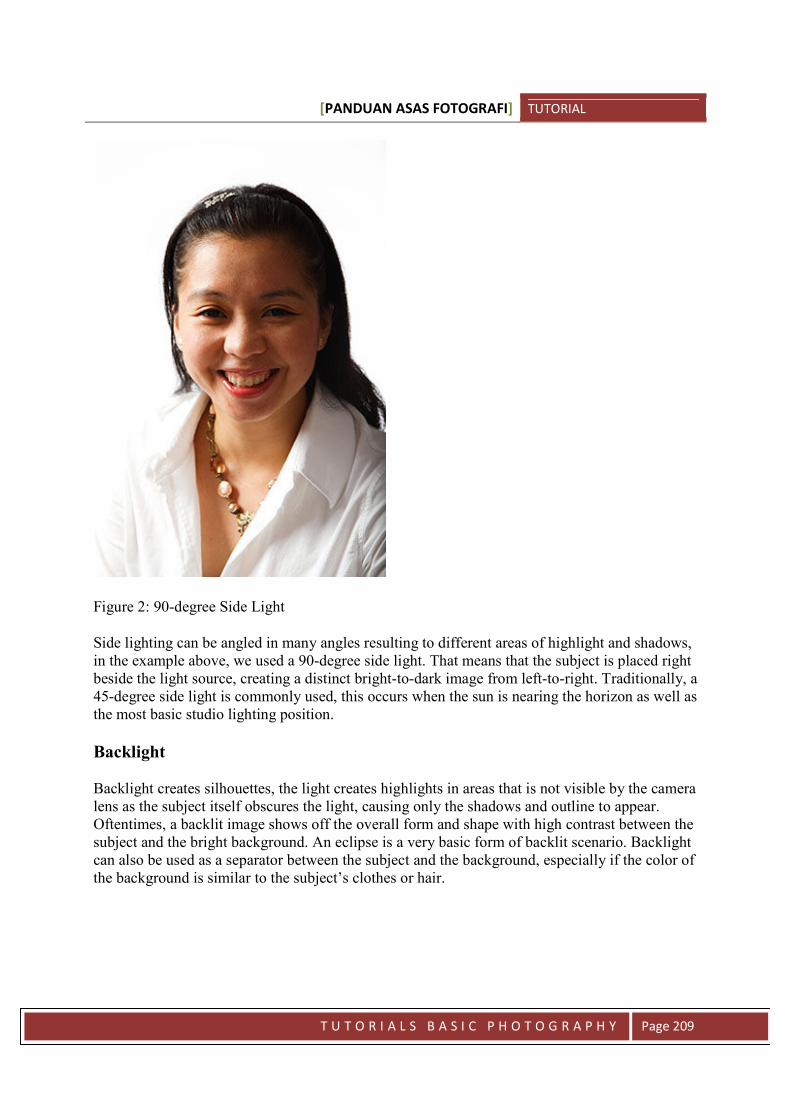
[PANDUAN ASAS FOTOGRAFI] TUTORIAL
T U T O R I A L S B A S I C P H O T O G R A P H Y Page 209
Figure 2: 90-degree Side Light
Side lighting can be angled in many angles resulting to different areas of highlight and shadows,in the example above, we used a 90-degree side light. That means that the subject is placed rightbeside the light source, creating a distinct bright-to-dark image from left-to-right. Traditionally, a45-degree side light is commonly used, this occurs when the sun is nearing the horizon as well asthe most basic studio lighting position.
Backlight
Backlight creates silhouettes, the light creates highlights in areas that is not visible by the cameralens as the subject itself obscures the light, causing only the shadows and outline to appear.Oftentimes, a backlit image shows off the overall form and shape with high contrast between thesubject and the bright background. An eclipse is a very basic form of backlit scenario. Backlightcan also be used as a separator between the subject and the background, especially if the color ofthe background is similar to the subject’s clothes or hair.

[PANDUAN ASAS FOTOGRAFI] TUTORIAL
T U T O R I A L S B A S I C P H O T O G R A P H Y Page 210
Standard Lighting for Portraits
The standard lighting for portraits, assuming we only have a single light source (such as the sun),is to position the subject so that the light will illuminate the face at a 45-degree angle, slightlyabove the subject. This basic lighting setup works for most faces as the angle of the lightprovides shadows that allows facial patterns to appear distinct from one another. The shadowsaround the nose, eyelids, lips, and chin areas gives the photo depth and dimension. The standardlighting setup can be controlled further by adding auxiliary light sources creating what is calledthe basic studio portrait light. This standard three-light setup consists of a key light, the filllight, and the back light. The key light is the main light. This is the light that will illuminatemost of the subject and will be responsible for the overall exposure of the photograph. All otherlights that a photographer may use will be based on the exposure of the key light.
Figure 3 : Key Light Only
A single key light positioned at the right angle will produce a nice lighting pattern that showsboth highlights and shadows distinctively and creates a three-dimensional feel to the image. Thesecond light is the fill light. The fill light’s responsibility is to lift the shadows and reducecontrast created by the key light. The brighter the fill, the lesser the contrast of the overall
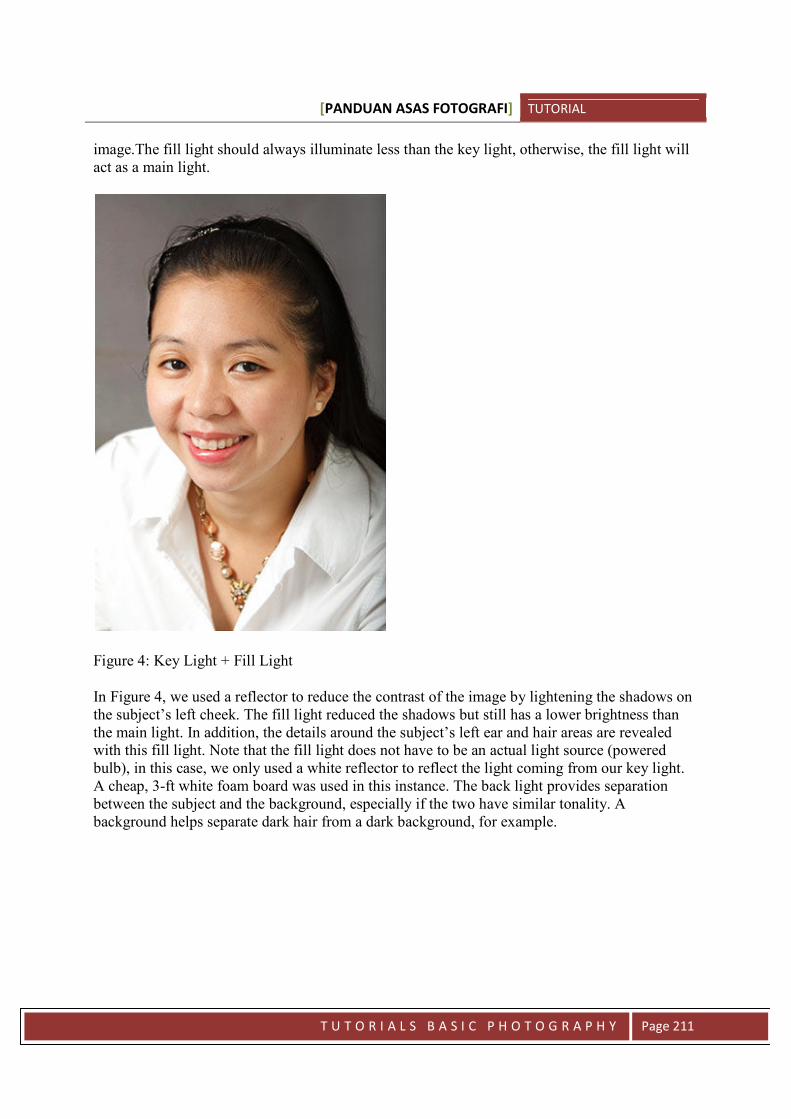
[PANDUAN ASAS FOTOGRAFI] TUTORIAL
T U T O R I A L S B A S I C P H O T O G R A P H Y Page 211
image.The fill light should always illuminate less than the key light, otherwise, the fill light willact as a main light.
Figure 4: Key Light + Fill Light
In Figure 4, we used a reflector to reduce the contrast of the image by lightening the shadows onthe subject’s left cheek. The fill light reduced the shadows but still has a lower brightness thanthe main light. In addition, the details around the subject’s left ear and hair areas are revealedwith this fill light. Note that the fill light does not have to be an actual light source (poweredbulb), in this case, we only used a white reflector to reflect the light coming from our key light.A cheap, 3-ft white foam board was used in this instance. The back light provides separationbetween the subject and the background, especially if the two have similar tonality. Abackground helps separate dark hair from a dark background, for example.
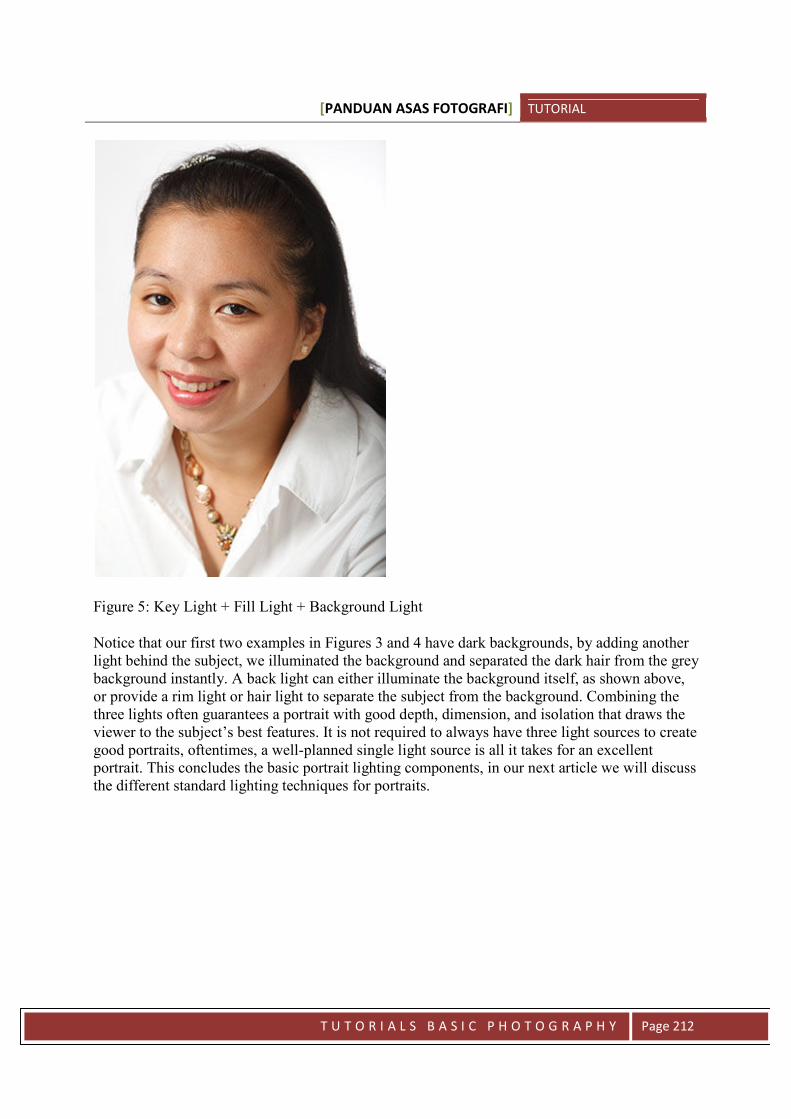
[PANDUAN ASAS FOTOGRAFI] TUTORIAL
T U T O R I A L S B A S I C P H O T O G R A P H Y Page 212
Figure 5: Key Light + Fill Light + Background Light
Notice that our first two examples in Figures 3 and 4 have dark backgrounds, by adding anotherlight behind the subject, we illuminated the background and separated the dark hair from the greybackground instantly. A back light can either illuminate the background itself, as shown above,or provide a rim light or hair light to separate the subject from the background. Combining thethree lights often guarantees a portrait with good depth, dimension, and isolation that draws theviewer to the subject’s best features. It is not required to always have three light sources to creategood portraits, oftentimes, a well-planned single light source is all it takes for an excellentportrait. This concludes the basic portrait lighting components, in our next article we will discussthe different standard lighting techniques for portraits.
[PANDUAN ASAS FOTOGRAFI] TUTORIAL
T U T O R I A L S B A S I C P H O T O G R A P H Y Page 213
Lesson 24
BASICS OF COMPOSITIONComposition is defined as the arrangement and combination of elements within a confined framesuch as a canvass, a photograph to create a complete image. Composition can include factorssuch as design, order, structure, texture, form, and other elements brought together in one frame.
In photography, composition is probably the biggest influential factor in creating eye-catchingworks of art. The ability of a photographer to include or exclude certain elements in a scene,arrange the subject’s position, change vantage points, and other compositional techniquesseparate a random snapshot from an actively composed photograph.
While human eyes can interpret three-dimensions with relative ease, the ability of our eyes todecode distance, depth, texture, and patterns are not easily tranlated on a two-dimensionalphotographic image.
It is the task of the photographer to simulate and recreate three-dimensions into a two-dimensionmedium, and understanding the basic forms of composition is paramount in order to achieve thisgoal.
Alignment
Alignment can be interpreted as how the internal items of the frame line up to the physical edgesof the photograph itself. A camera often has a horizonally placed rectangular frame with thelength being longer than the height. Most beginners instinctively hold the camera as the camera’sform dictates, however, many vantage point are better suited if the camera was tilted at certainangles or when the camera is held vertically.
Alignment can mean from ensuring that horizon of the subject lined up to the edges of the imageframe, or making sure that subjects are lined up against each other within the frame.
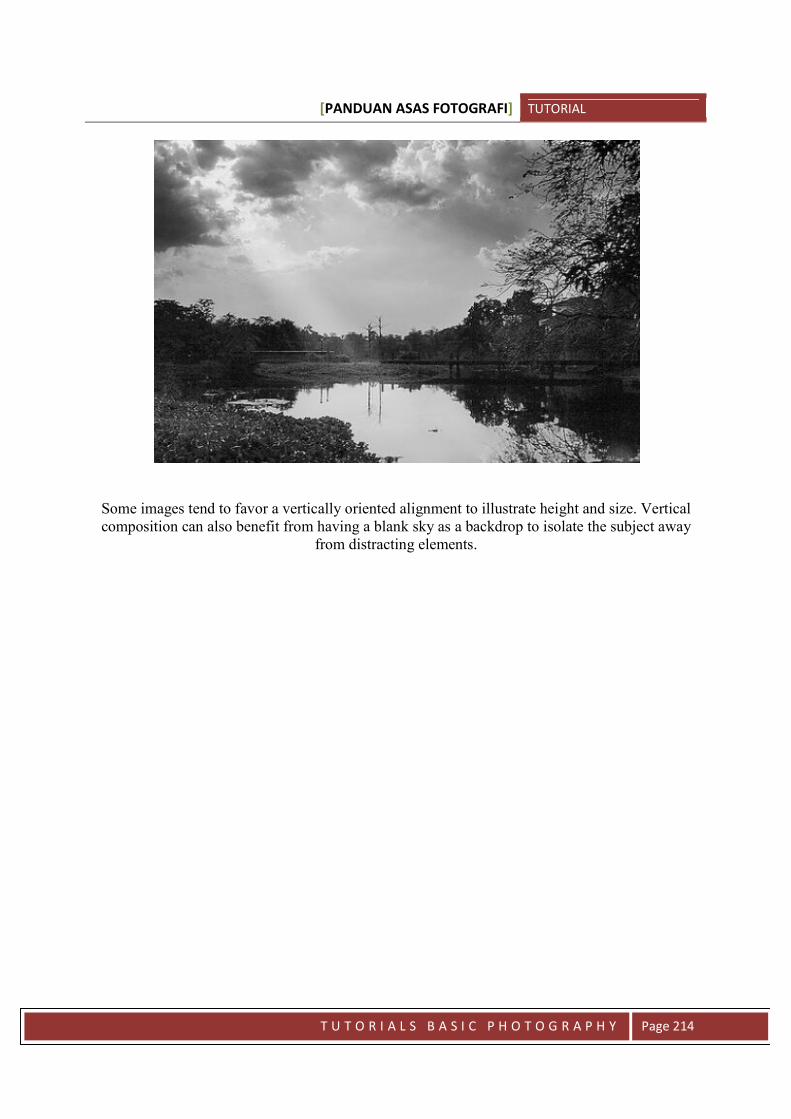
[PANDUAN ASAS FOTOGRAFI] TUTORIAL
T U T O R I A L S B A S I C P H O T O G R A P H Y Page 214
Some images tend to favor a vertically oriented alignment to illustrate height and size. Verticalcomposition can also benefit from having a blank sky as a backdrop to isolate the subject away
from distracting elements.
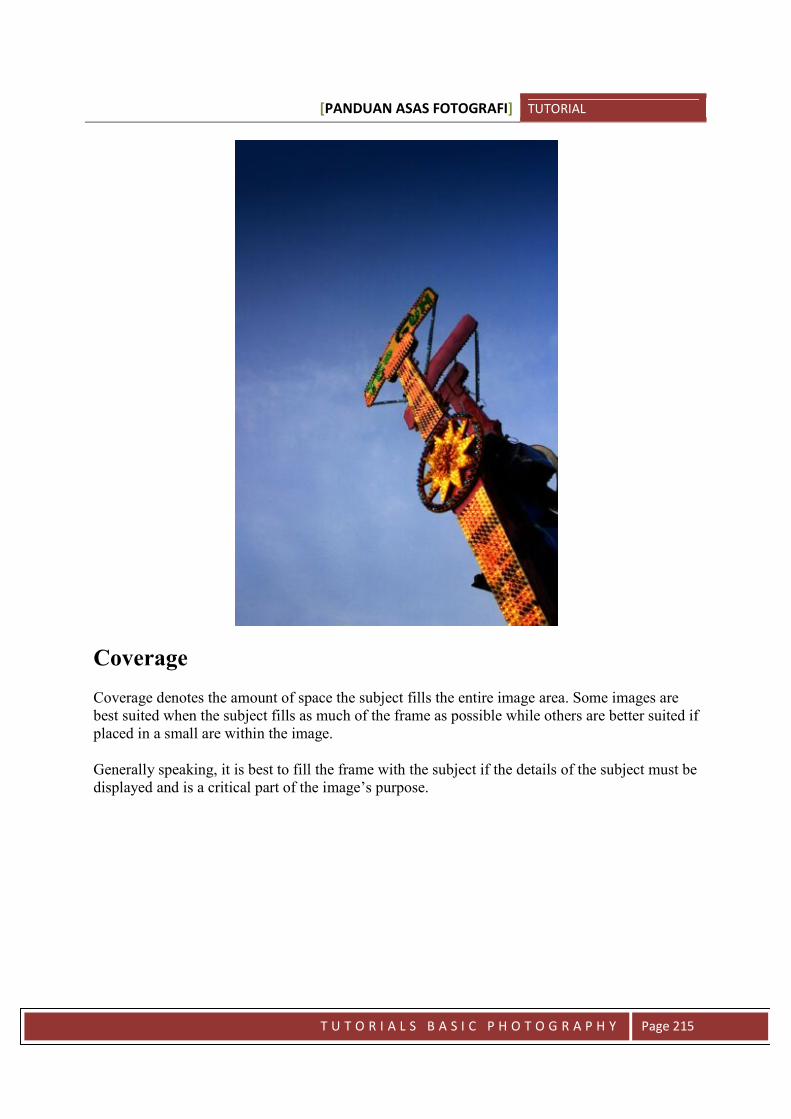
[PANDUAN ASAS FOTOGRAFI] TUTORIAL
T U T O R I A L S B A S I C P H O T O G R A P H Y Page 215
Coverage
Coverage denotes the amount of space the subject fills the entire image area. Some images arebest suited when the subject fills as much of the frame as possible while others are better suited ifplaced in a small are within the image.
Generally speaking, it is best to fill the frame with the subject if the details of the subject must bedisplayed and is a critical part of the image’s purpose.
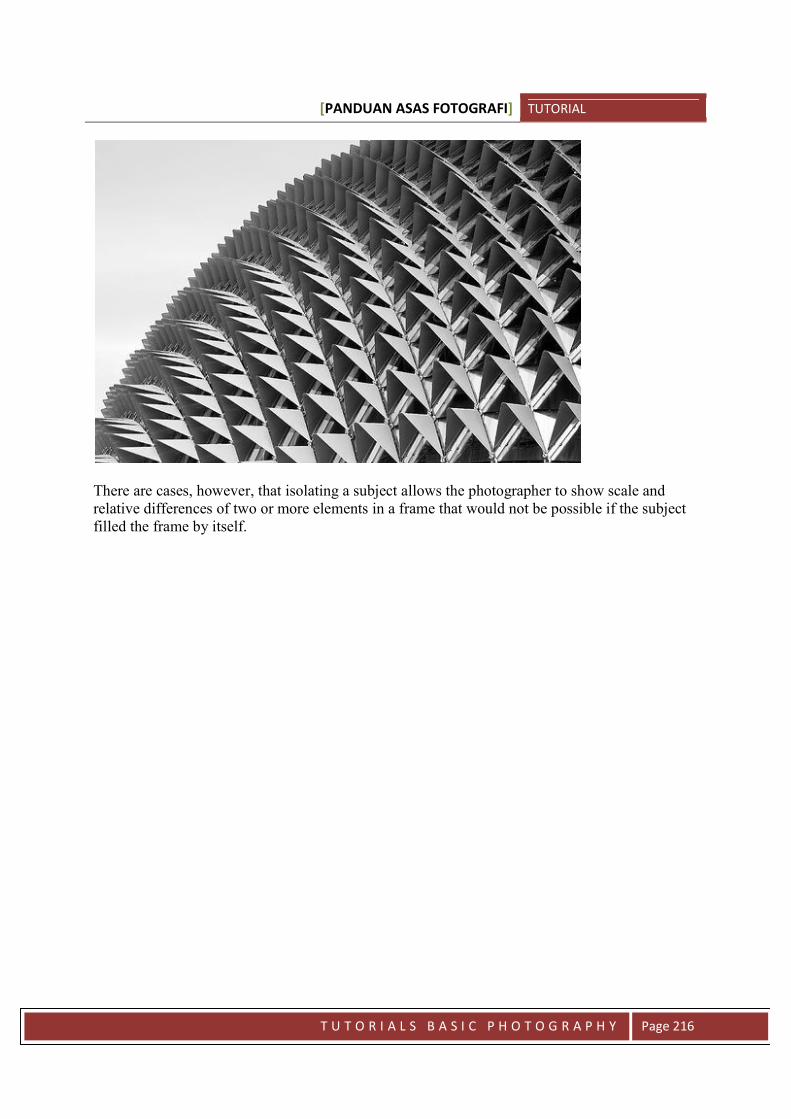
[PANDUAN ASAS FOTOGRAFI] TUTORIAL
T U T O R I A L S B A S I C P H O T O G R A P H Y Page 216
There are cases, however, that isolating a subject allows the photographer to show scale andrelative differences of two or more elements in a frame that would not be possible if the subjectfilled the frame by itself.

[PANDUAN ASAS FOTOGRAFI] TUTORIAL
T U T O R I A L S B A S I C P H O T O G R A P H Y Page 217
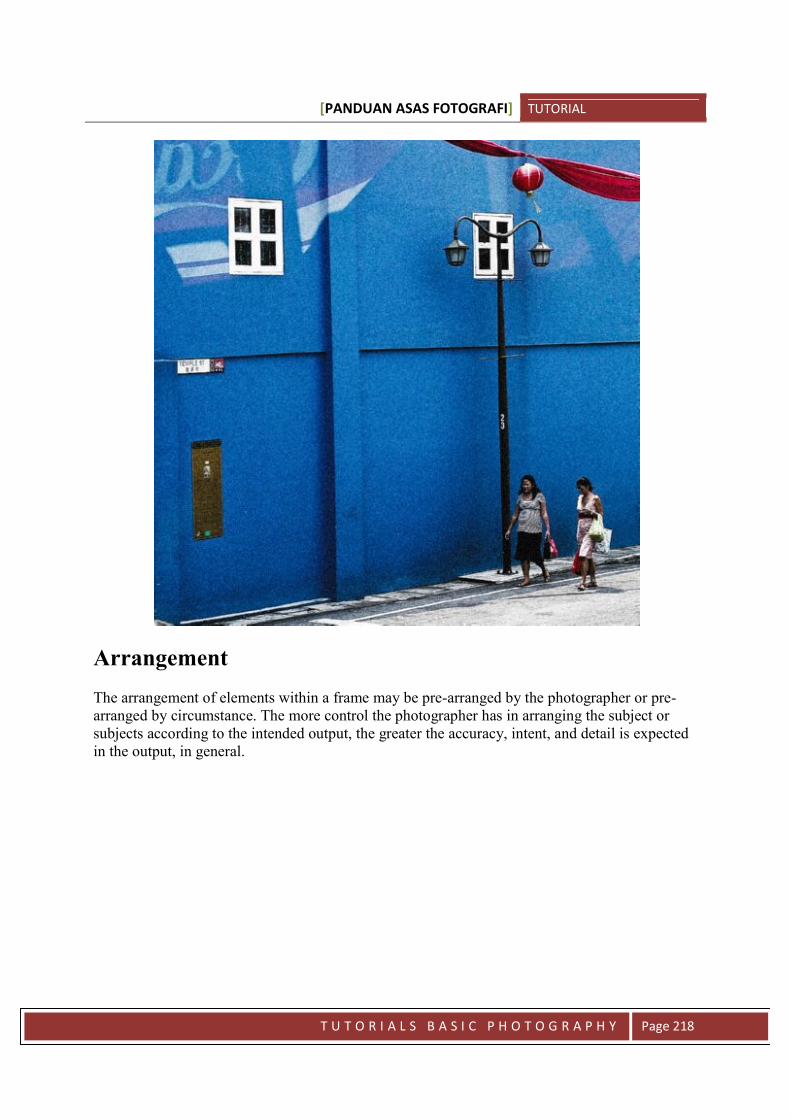
[PANDUAN ASAS FOTOGRAFI] TUTORIAL
T U T O R I A L S B A S I C P H O T O G R A P H Y Page 218
Arrangement
The arrangement of elements within a frame may be pre-arranged by the photographer or pre-arranged by circumstance. The more control the photographer has in arranging the subject orsubjects according to the intended output, the greater the accuracy, intent, and detail is expectedin the output, in general.
[PANDUAN ASAS FOTOGRAFI] TUTORIAL
T U T O R I A L S B A S I C P H O T O G R A P H Y Page 219
On the other hand, in many outdoor or impromptu photographs, the subjects or elements may befixed and immovable, in such cases, the photographer will have to be the one to physically movethe camera’s position to compose the photograph to fit the intended subject in the frame.
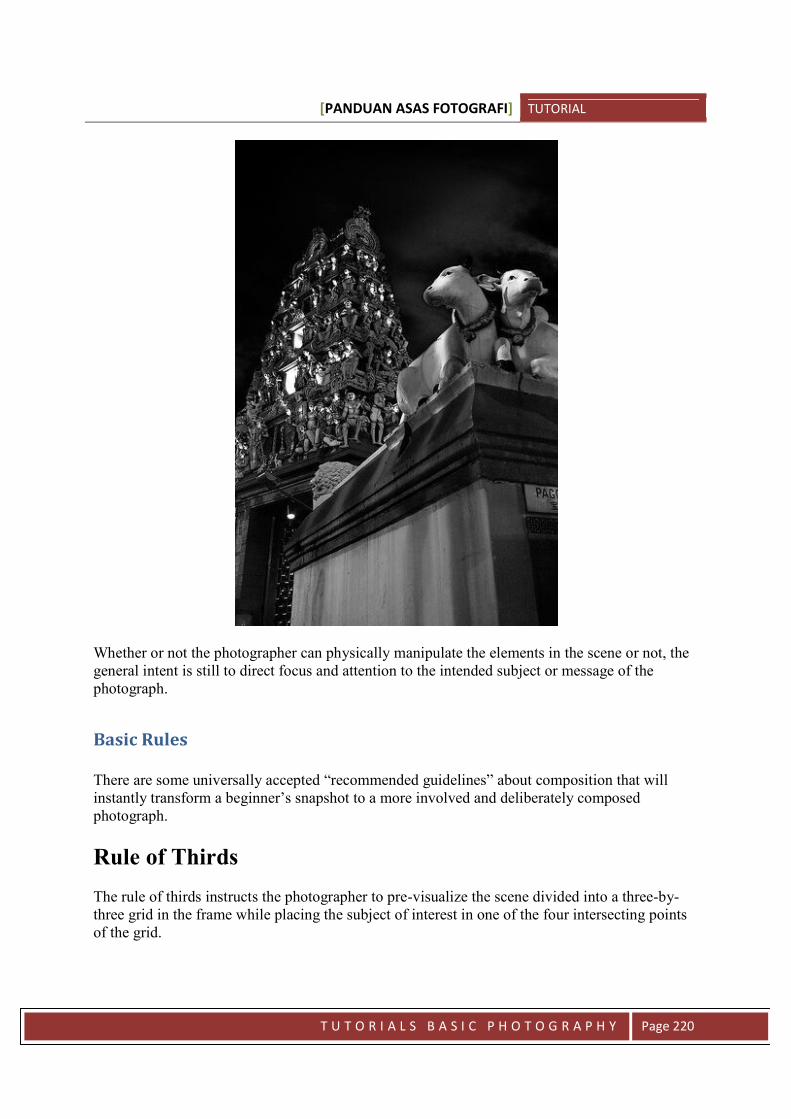
[PANDUAN ASAS FOTOGRAFI] TUTORIAL
T U T O R I A L S B A S I C P H O T O G R A P H Y Page 220
Whether or not the photographer can physically manipulate the elements in the scene or not, thegeneral intent is still to direct focus and attention to the intended subject or message of thephotograph.
Basic Rules
There are some universally accepted “recommended guidelines” about composition that willinstantly transform a beginner’s snapshot to a more involved and deliberately composedphotograph.
Rule of Thirds
The rule of thirds instructs the photographer to pre-visualize the scene divided into a three-by-three grid in the frame while placing the subject of interest in one of the four intersecting pointsof the grid.
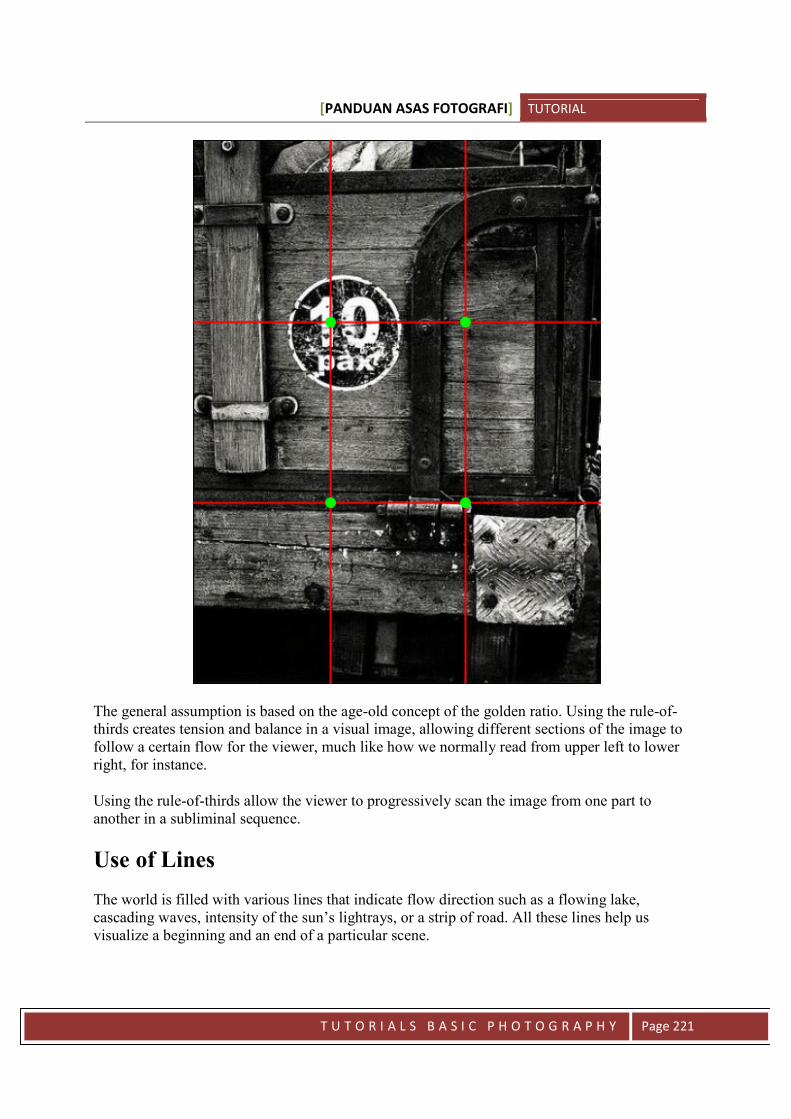
[PANDUAN ASAS FOTOGRAFI] TUTORIAL
T U T O R I A L S B A S I C P H O T O G R A P H Y Page 221
The general assumption is based on the age-old concept of the golden ratio. Using the rule-of-thirds creates tension and balance in a visual image, allowing different sections of the image tofollow a certain flow for the viewer, much like how we normally read from upper left to lowerright, for instance.
Using the rule-of-thirds allow the viewer to progressively scan the image from one part toanother in a subliminal sequence.
Use of Lines
The world is filled with various lines that indicate flow direction such as a flowing lake,cascading waves, intensity of the sun’s lightrays, or a strip of road. All these lines help usvisualize a beginning and an end of a particular scene.
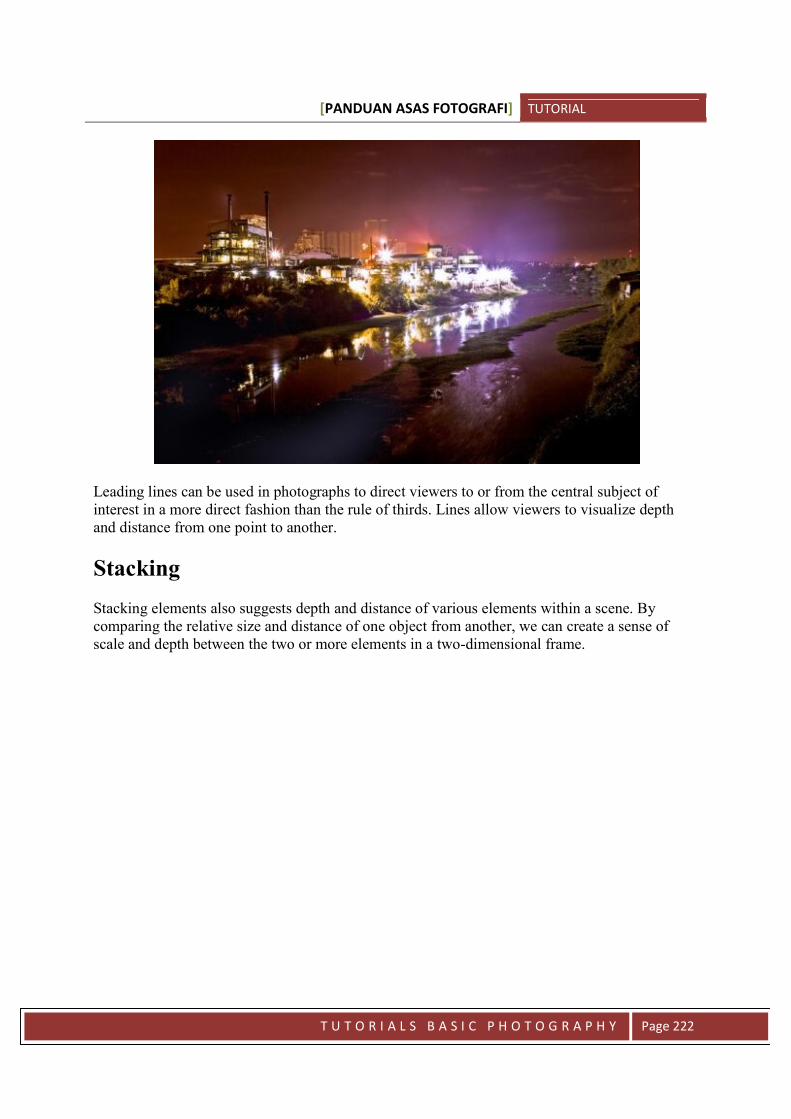
[PANDUAN ASAS FOTOGRAFI] TUTORIAL
T U T O R I A L S B A S I C P H O T O G R A P H Y Page 222
Leading lines can be used in photographs to direct viewers to or from the central subject ofinterest in a more direct fashion than the rule of thirds. Lines allow viewers to visualize depthand distance from one point to another.
Stacking
Stacking elements also suggests depth and distance of various elements within a scene. Bycomparing the relative size and distance of one object from another, we can create a sense ofscale and depth between the two or more elements in a two-dimensional frame.

[PANDUAN ASAS FOTOGRAFI] TUTORIAL
T U T O R I A L S B A S I C P H O T O G R A P H Y Page 223
Secondary Frames
Placing your subject in an actual frame that is contained by the edges of the photograph itself caneffectively direct the viewer’s attention to the subject in a very deliberate manner. A secondaryframe can be a door arch, a stream of light, a window, or gaps between buildings, for instance.
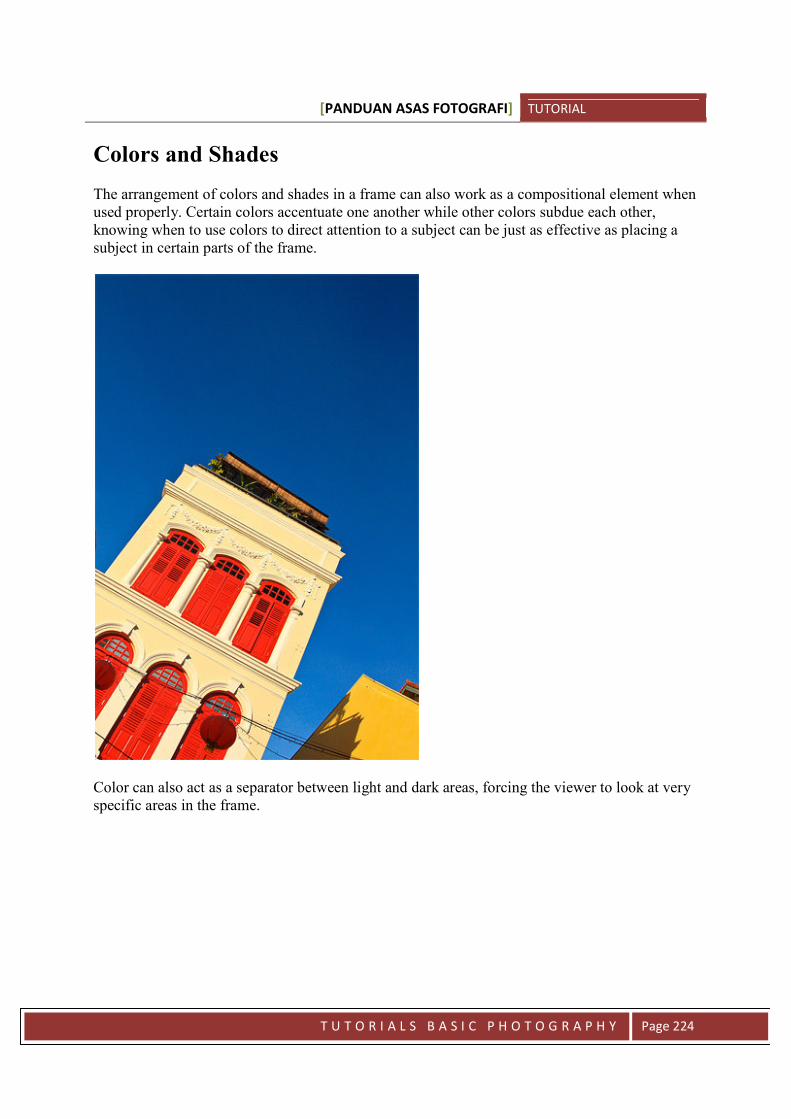
[PANDUAN ASAS FOTOGRAFI] TUTORIAL
T U T O R I A L S B A S I C P H O T O G R A P H Y Page 224
Colors and Shades
The arrangement of colors and shades in a frame can also work as a compositional element whenused properly. Certain colors accentuate one another while other colors subdue each other,knowing when to use colors to direct attention to a subject can be just as effective as placing asubject in certain parts of the frame.
Color can also act as a separator between light and dark areas, forcing the viewer to look at veryspecific areas in the frame.
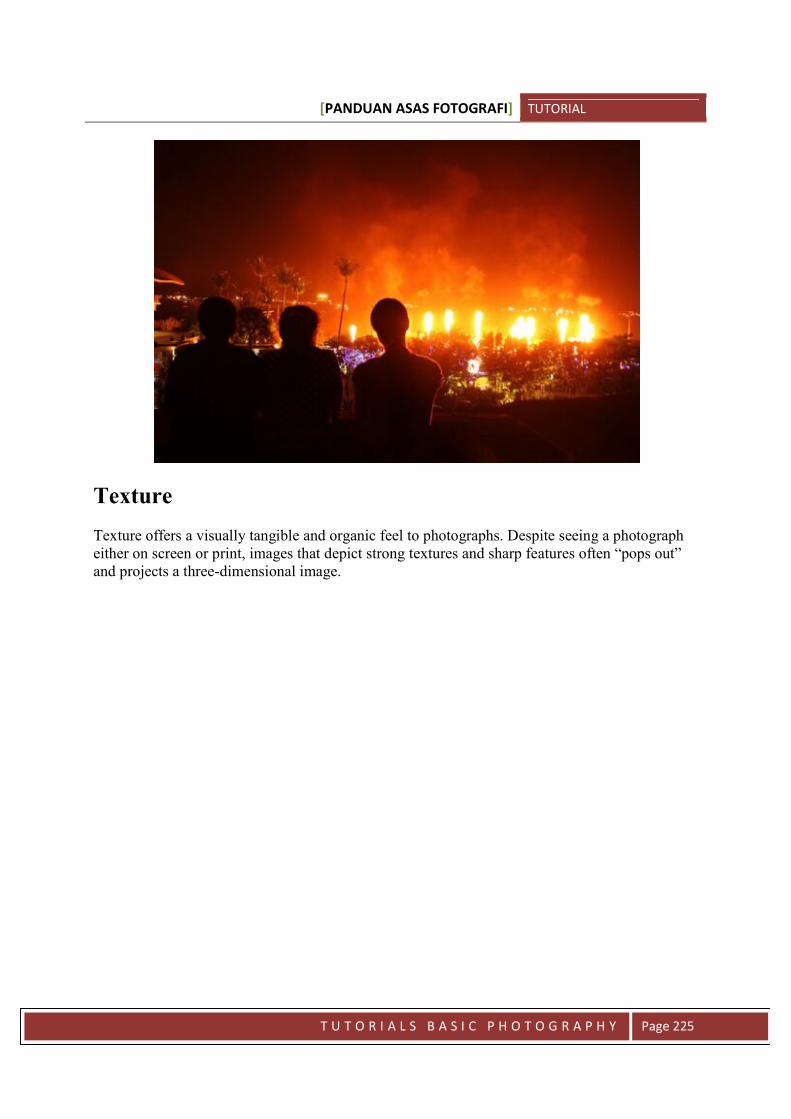
[PANDUAN ASAS FOTOGRAFI] TUTORIAL
T U T O R I A L S B A S I C P H O T O G R A P H Y Page 225
Texture
Texture offers a visually tangible and organic feel to photographs. Despite seeing a photographeither on screen or print, images that depict strong textures and sharp features often “pops out”and projects a three-dimensional image.
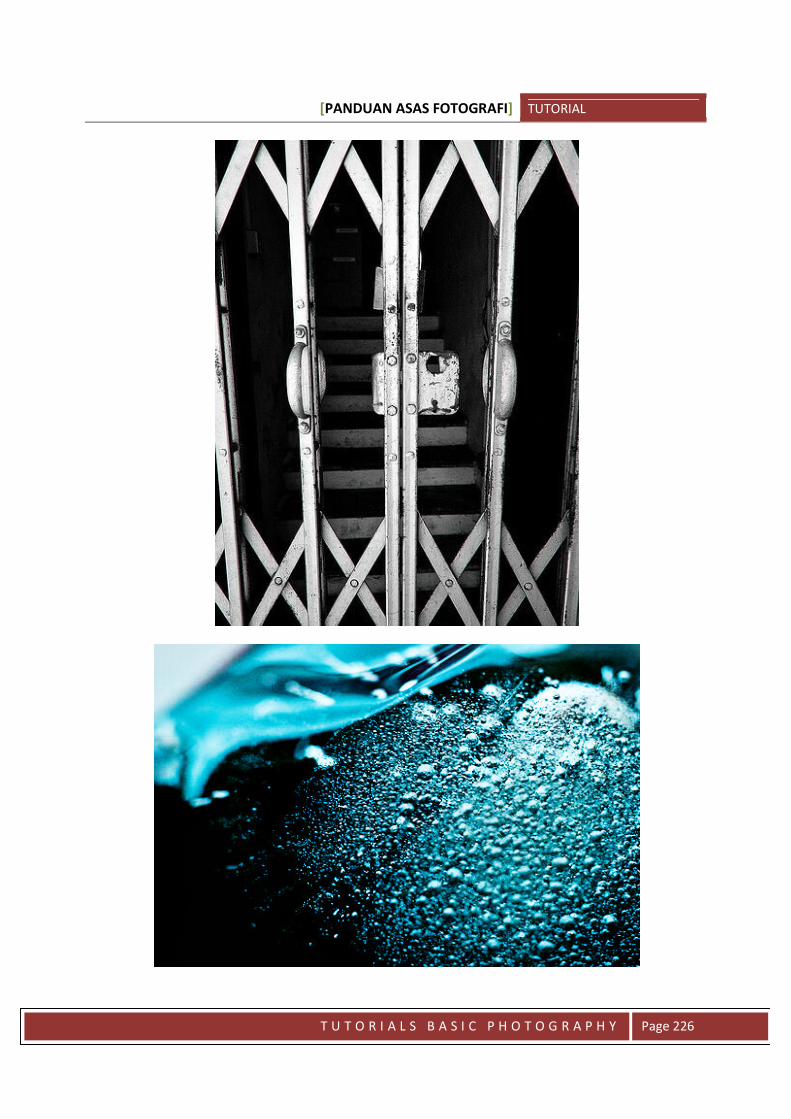
[PANDUAN ASAS FOTOGRAFI] TUTORIAL
T U T O R I A L S B A S I C P H O T O G R A P H Y Page 226
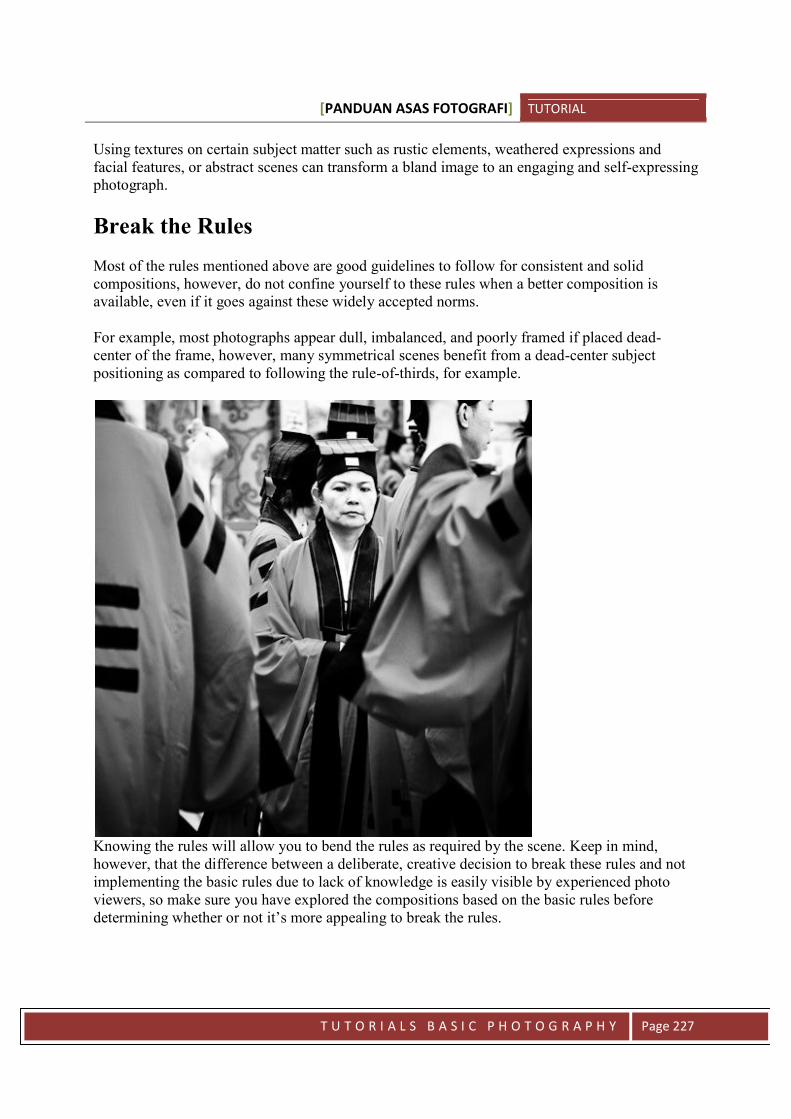
[PANDUAN ASAS FOTOGRAFI] TUTORIAL
T U T O R I A L S B A S I C P H O T O G R A P H Y Page 227
Using textures on certain subject matter such as rustic elements, weathered expressions andfacial features, or abstract scenes can transform a bland image to an engaging and self-expressingphotograph.
Break the Rules
Most of the rules mentioned above are good guidelines to follow for consistent and solidcompositions, however, do not confine yourself to these rules when a better composition isavailable, even if it goes against these widely accepted norms.
For example, most photographs appear dull, imbalanced, and poorly framed if placed dead-center of the frame, however, many symmetrical scenes benefit from a dead-center subjectpositioning as compared to following the rule-of-thirds, for example.
Knowing the rules will allow you to bend the rules as required by the scene. Keep in mind,however, that the difference between a deliberate, creative decision to break these rules and notimplementing the basic rules due to lack of knowledge is easily visible by experienced photoviewers, so make sure you have explored the compositions based on the basic rules beforedetermining whether or not it’s more appealing to break the rules.
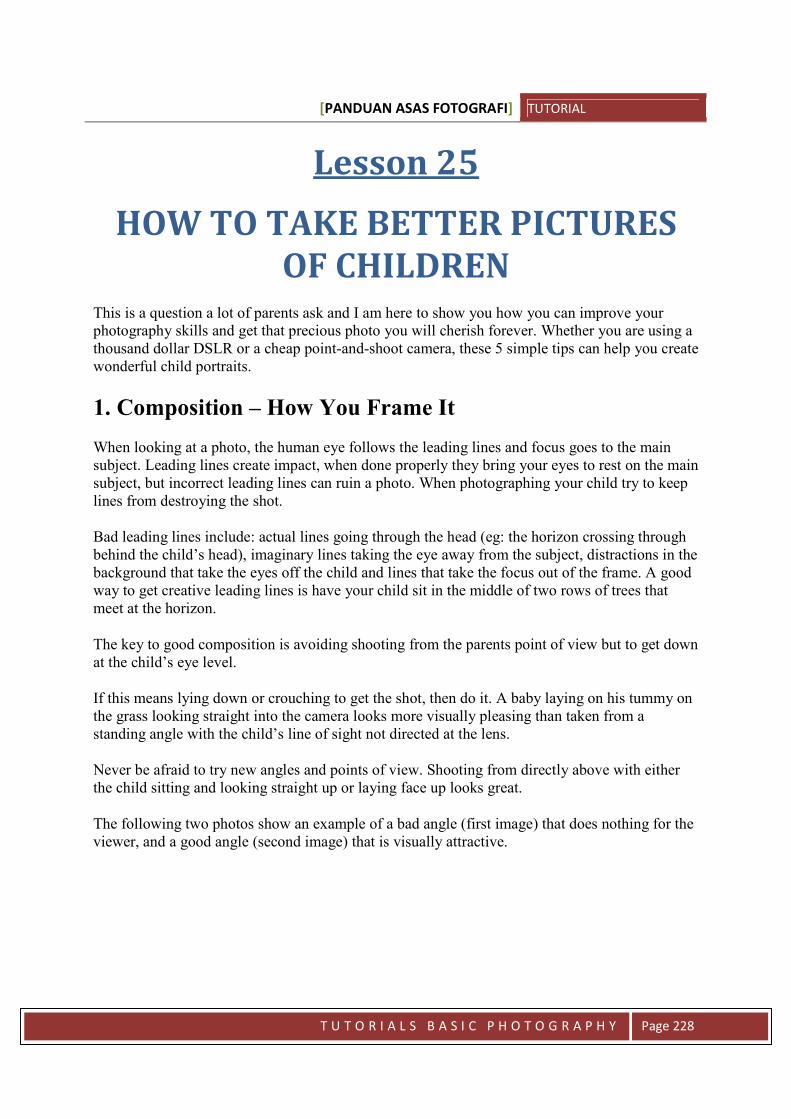
[PANDUAN ASAS FOTOGRAFI] TUTORIAL
T U T O R I A L S B A S I C P H O T O G R A P H Y Page 228
Lesson 25
HOW TO TAKE BETTER PICTURESOF CHILDREN
This is a question a lot of parents ask and I am here to show you how you can improve yourphotography skills and get that precious photo you will cherish forever. Whether you are using athousand dollar DSLR or a cheap point-and-shoot camera, these 5 simple tips can help you createwonderful child portraits.
1. Composition – How You Frame It
When looking at a photo, the human eye follows the leading lines and focus goes to the mainsubject. Leading lines create impact, when done properly they bring your eyes to rest on the mainsubject, but incorrect leading lines can ruin a photo. When photographing your child try to keeplines from destroying the shot.
Bad leading lines include: actual lines going through the head (eg: the horizon crossing throughbehind the child’s head), imaginary lines taking the eye away from the subject, distractions in thebackground that take the eyes off the child and lines that take the focus out of the frame. A goodway to get creative leading lines is have your child sit in the middle of two rows of trees thatmeet at the horizon.
The key to good composition is avoiding shooting from the parents point of view but to get downat the child’s eye level.
If this means lying down or crouching to get the shot, then do it. A baby laying on his tummy onthe grass looking straight into the camera looks more visually pleasing than taken from astanding angle with the child’s line of sight not directed at the lens.
Never be afraid to try new angles and points of view. Shooting from directly above with eitherthe child sitting and looking straight up or laying face up looks great.
The following two photos show an example of a bad angle (first image) that does nothing for theviewer, and a good angle (second image) that is visually attractive.
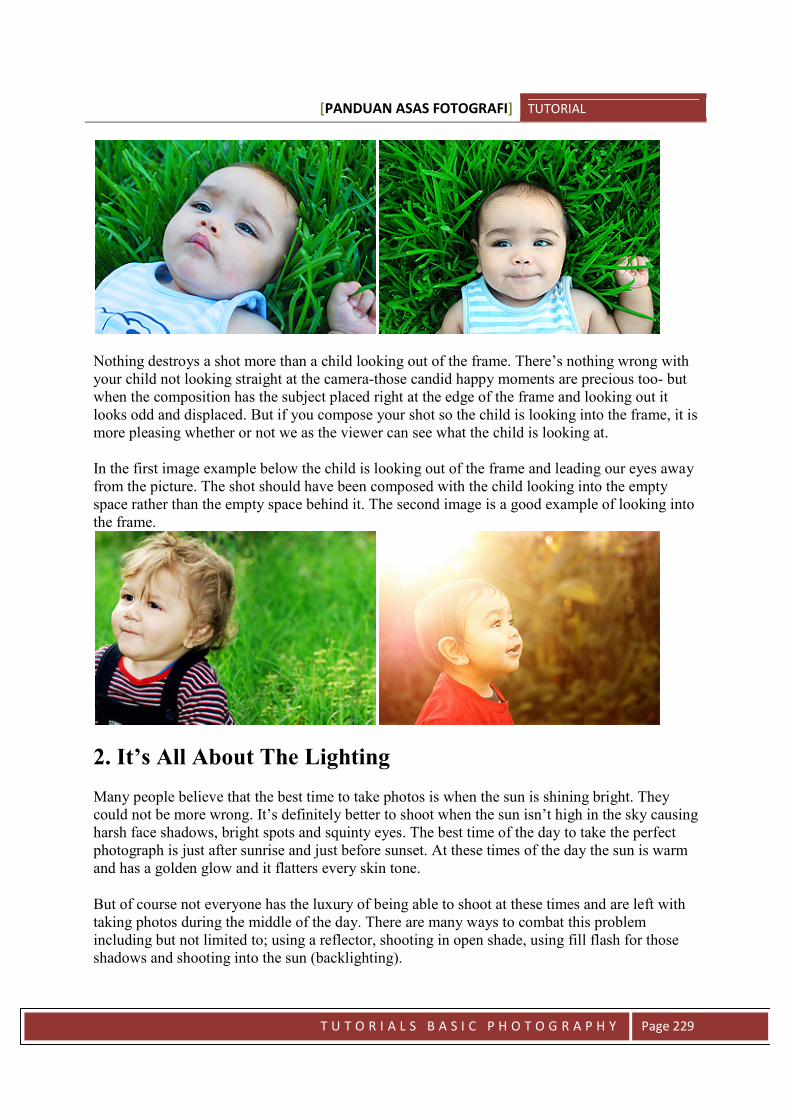
[PANDUAN ASAS FOTOGRAFI] TUTORIAL
T U T O R I A L S B A S I C P H O T O G R A P H Y Page 229
Nothing destroys a shot more than a child looking out of the frame. There’s nothing wrong withyour child not looking straight at the camera-those candid happy moments are precious too- butwhen the composition has the subject placed right at the edge of the frame and looking out itlooks odd and displaced. But if you compose your shot so the child is looking into the frame, it ismore pleasing whether or not we as the viewer can see what the child is looking at.
In the first image example below the child is looking out of the frame and leading our eyes awayfrom the picture. The shot should have been composed with the child looking into the emptyspace rather than the empty space behind it. The second image is a good example of looking intothe frame.
2. It’s All About The Lighting
Many people believe that the best time to take photos is when the sun is shining bright. Theycould not be more wrong. It’s definitely better to shoot when the sun isn’t high in the sky causingharsh face shadows, bright spots and squinty eyes. The best time of the day to take the perfectphotograph is just after sunrise and just before sunset. At these times of the day the sun is warmand has a golden glow and it flatters every skin tone.
But of course not everyone has the luxury of being able to shoot at these times and are left withtaking photos during the middle of the day. There are many ways to combat this problemincluding but not limited to; using a reflector, shooting in open shade, using fill flash for thoseshadows and shooting into the sun (backlighting).
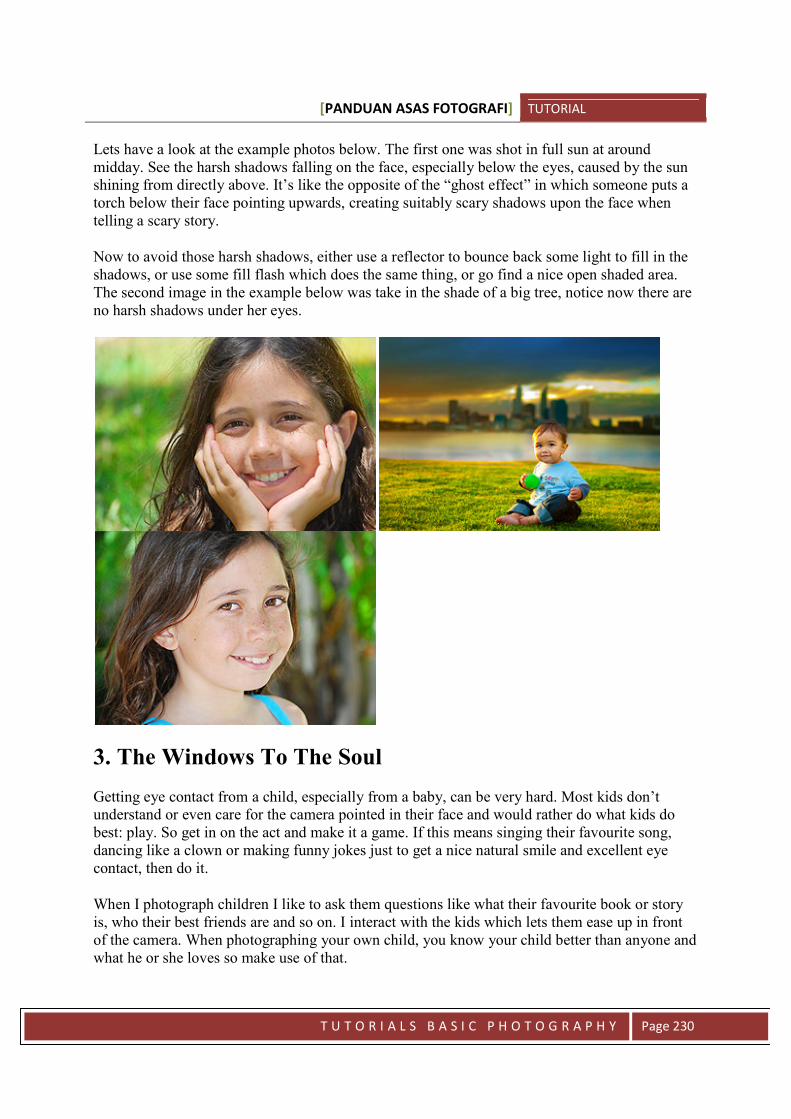
[PANDUAN ASAS FOTOGRAFI] TUTORIAL
T U T O R I A L S B A S I C P H O T O G R A P H Y Page 230
Lets have a look at the example photos below. The first one was shot in full sun at aroundmidday. See the harsh shadows falling on the face, especially below the eyes, caused by the sunshining from directly above. It’s like the opposite of the “ghost effect” in which someone puts atorch below their face pointing upwards, creating suitably scary shadows upon the face whentelling a scary story.
Now to avoid those harsh shadows, either use a reflector to bounce back some light to fill in theshadows, or use some fill flash which does the same thing, or go find a nice open shaded area.The second image in the example below was take in the shade of a big tree, notice now there areno harsh shadows under her eyes.
3. The Windows To The Soul
Getting eye contact from a child, especially from a baby, can be very hard. Most kids don’tunderstand or even care for the camera pointed in their face and would rather do what kids dobest: play. So get in on the act and make it a game. If this means singing their favourite song,dancing like a clown or making funny jokes just to get a nice natural smile and excellent eyecontact, then do it.
When I photograph children I like to ask them questions like what their favourite book or storyis, who their best friends are and so on. I interact with the kids which lets them ease up in frontof the camera. When photographing your own child, you know your child better than anyone andwhat he or she loves so make use of that.
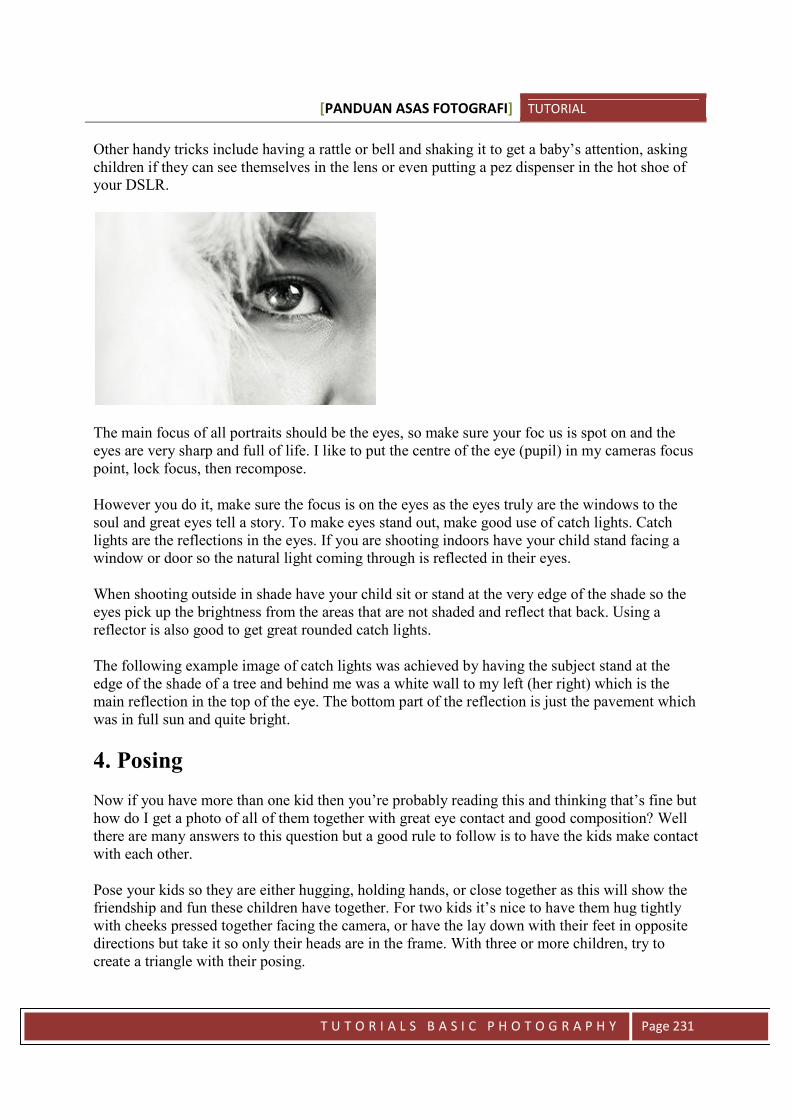
[PANDUAN ASAS FOTOGRAFI] TUTORIAL
T U T O R I A L S B A S I C P H O T O G R A P H Y Page 231
Other handy tricks include having a rattle or bell and shaking it to get a baby’s attention, askingchildren if they can see themselves in the lens or even putting a pez dispenser in the hot shoe ofyour DSLR.
The main focus of all portraits should be the eyes, so make sure your foc us is spot on and theeyes are very sharp and full of life. I like to put the centre of the eye (pupil) in my cameras focuspoint, lock focus, then recompose.
However you do it, make sure the focus is on the eyes as the eyes truly are the windows to thesoul and great eyes tell a story. To make eyes stand out, make good use of catch lights. Catchlights are the reflections in the eyes. If you are shooting indoors have your child stand facing awindow or door so the natural light coming through is reflected in their eyes.
When shooting outside in shade have your child sit or stand at the very edge of the shade so theeyes pick up the brightness from the areas that are not shaded and reflect that back. Using areflector is also good to get great rounded catch lights.
The following example image of catch lights was achieved by having the subject stand at theedge of the shade of a tree and behind me was a white wall to my left (her right) which is themain reflection in the top of the eye. The bottom part of the reflection is just the pavement whichwas in full sun and quite bright.
4. Posing
Now if you have more than one kid then you’re probably reading this and thinking that’s fine buthow do I get a photo of all of them together with great eye contact and good composition? Wellthere are many answers to this question but a good rule to follow is to have the kids make contactwith each other.
Pose your kids so they are either hugging, holding hands, or close together as this will show thefriendship and fun these children have together. For two kids it’s nice to have them hug tightlywith cheeks pressed together facing the camera, or have the lay down with their feet in oppositedirections but take it so only their heads are in the frame. With three or more children, try tocreate a triangle with their posing.
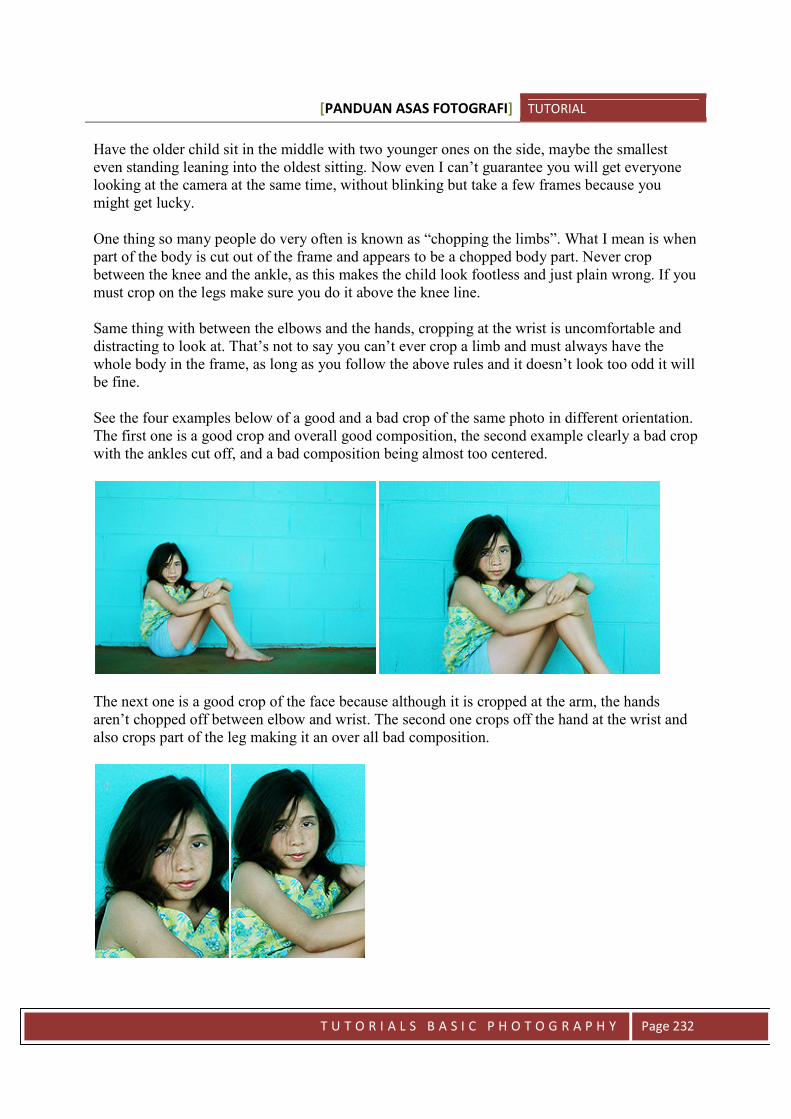
[PANDUAN ASAS FOTOGRAFI] TUTORIAL
T U T O R I A L S B A S I C P H O T O G R A P H Y Page 232
Have the older child sit in the middle with two younger ones on the side, maybe the smallesteven standing leaning into the oldest sitting. Now even I can’t guarantee you will get everyonelooking at the camera at the same time, without blinking but take a few frames because youmight get lucky.
One thing so many people do very often is known as “chopping the limbs”. What I mean is whenpart of the body is cut out of the frame and appears to be a chopped body part. Never cropbetween the knee and the ankle, as this makes the child look footless and just plain wrong. If youmust crop on the legs make sure you do it above the knee line.
Same thing with between the elbows and the hands, cropping at the wrist is uncomfortable anddistracting to look at. That’s not to say you can’t ever crop a limb and must always have thewhole body in the frame, as long as you follow the above rules and it doesn’t look too odd it willbe fine.
See the four examples below of a good and a bad crop of the same photo in different orientation.The first one is a good crop and overall good composition, the second example clearly a bad cropwith the ankles cut off, and a bad composition being almost too centered.
The next one is a good crop of the face because although it is cropped at the arm, the handsaren’t chopped off between elbow and wrist. The second one crops off the hand at the wrist andalso crops part of the leg making it an over all bad composition.
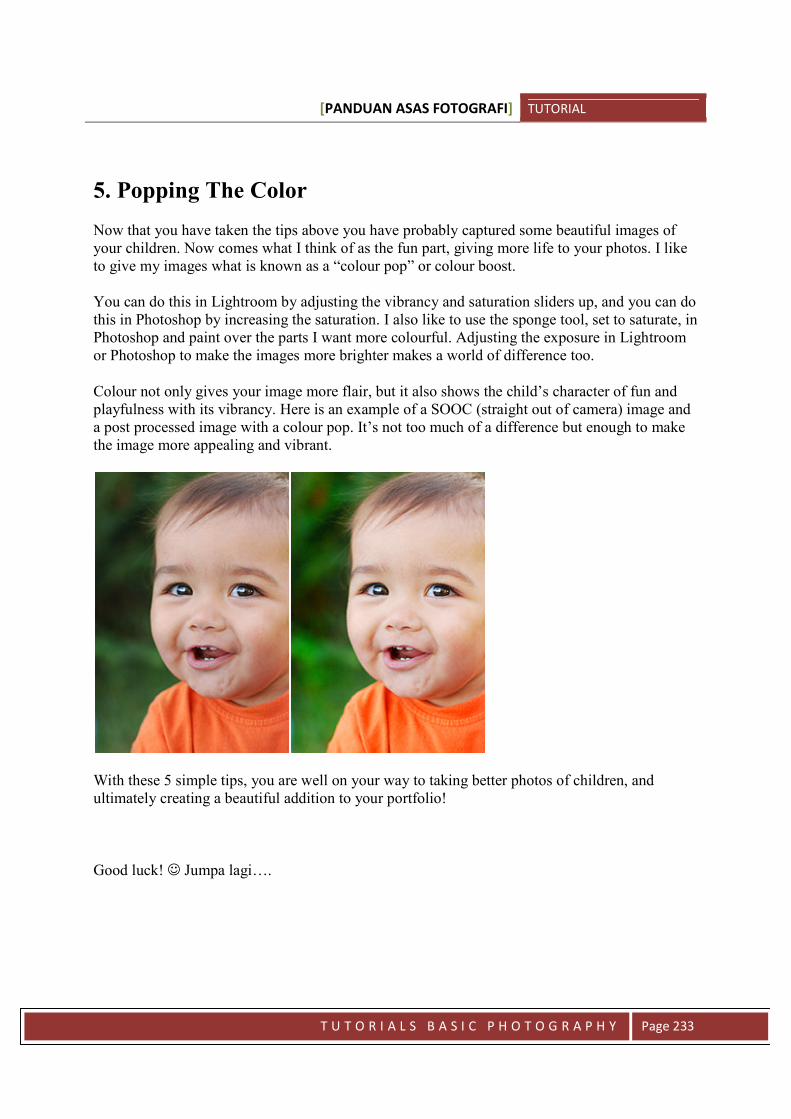
[PANDUAN ASAS FOTOGRAFI] TUTORIAL
T U T O R I A L S B A S I C P H O T O G R A P H Y Page 233
5. Popping The Color
Now that you have taken the tips above you have probably captured some beautiful images ofyour children. Now comes what I think of as the fun part, giving more life to your photos. I liketo give my images what is known as a “colour pop” or colour boost.
You can do this in Lightroom by adjusting the vibrancy and saturation sliders up, and you can dothis in Photoshop by increasing the saturation. I also like to use the sponge tool, set to saturate, inPhotoshop and paint over the parts I want more colourful. Adjusting the exposure in Lightroomor Photoshop to make the images more brighter makes a world of difference too.
Colour not only gives your image more flair, but it also shows the child’s character of fun andplayfulness with its vibrancy. Here is an example of a SOOC (straight out of camera) image anda post processed image with a colour pop. It’s not too much of a difference but enough to makethe image more appealing and vibrant.
With these 5 simple tips, you are well on your way to taking better photos of children, andultimately creating a beautiful addition to your portfolio!
Good luck! Jumpa lagi….
[PANDUAN ASAS FOTOGRAFI] TUTORIAL
T U T O R I A L S B A S I C P H O T O G R A P H Y Page 234

[PANDUAN ASAS FOTOGRAFI] TUTORIAL
T U T O R I A L S B A S I C P H O T O G R A P H Y Page 235
www.ilhampersona.com
www.wirasutra.com