poster pemasangan panel depan!h10032. · setelah lampu nyala berhenti berkedip, penyelarasan telah...
TRANSCRIPT
hp
psc
130
0 se
ries
all-i
n-on
e1 3 42
5 6 7
98 10
11 12
ww
w.h
p.co
m/s
uppo
rt C
opyr
ight
Hew
lett-
Pack
ard
Com
pany
200
3
Windows 98, 2000, ME, XP
a b c
a b
c
a b c ed
a
b
Windows PC
a b
hp psc1100p r int e r sca nn er co pie r
a
b
Turunkan pintu akses print carriage. Print carriage bergerak ke tengah.
Tekan tombol Nyala/Lanjutkan untuk menyalakan HP PSC. Tunggu sampai perangkat berhenti memulai.
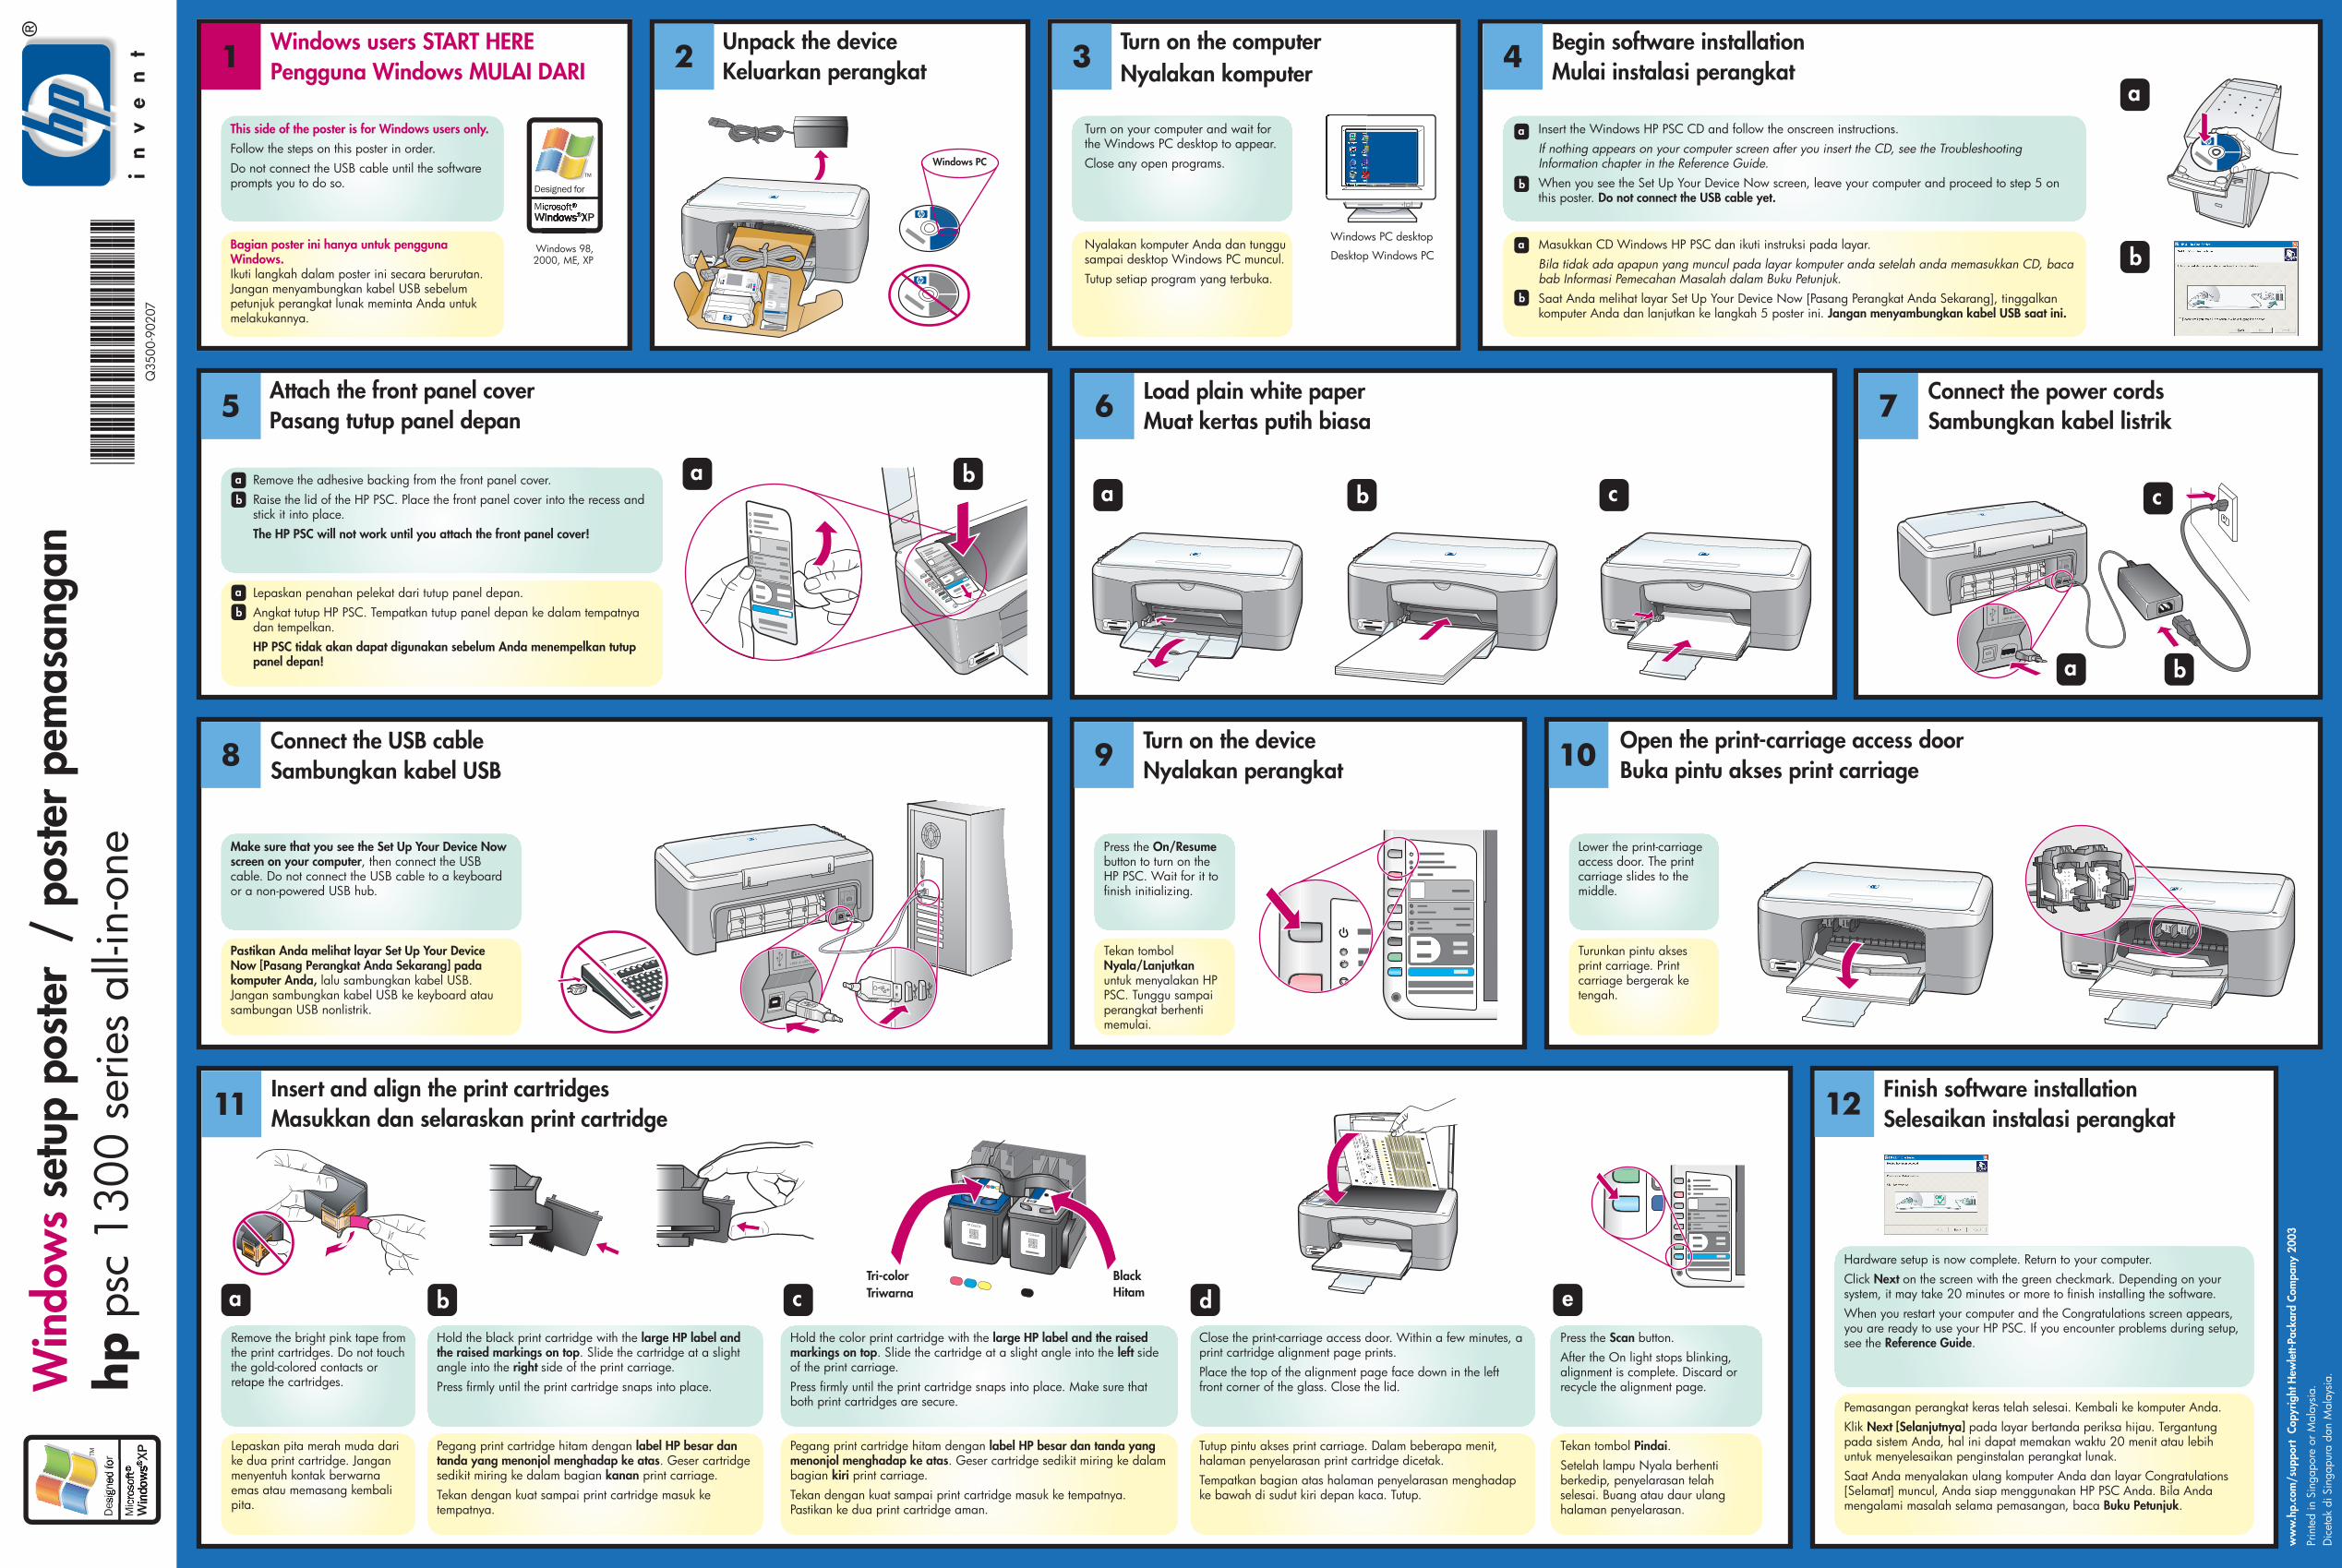
Lepaskan penahan pelekat dari tutup panel depan. Angkat tutup HP PSC. Tempatkan tutup panel depan ke dalam tempatnya dan tempelkan. HP PSC tidak akan dapat digunakan sebelum Anda menempelkan tutup panel depan!
/ po
ster
pem
asan
gan
Bagian poster ini hanya untuk pengguna Windows. Ikuti langkah dalam poster ini secara berurutan. Jangan menyambungkan kabel USB sebelum petunjuk perangkat lunak meminta Anda untuk melakukannya.
Nyalakan komputer Anda dan tunggu sampai desktop Windows PC muncul.Tutup setiap program yang terbuka.
Desktop Windows PC
Pengguna Windows MULAI DARI Nyalakan komputer Mulai instalasi perangkat Keluarkan perangkat
Pasang tutup panel depan Muat kertas putih biasa Sambungkan kabel listrik
Nyalakan perangkatSambungkan kabel USB Buka pintu akses print carriage
Masukkan dan selaraskan print cartridge
Masukkan CD Windows HP PSC dan ikuti instruksi pada layar. Bila tidak ada apapun yang muncul pada layar komputer anda setelah anda memasukkan CD, baca bab Informasi Pemecahan Masalah dalam Buku Petunjuk.Saat Anda melihat layar Set Up Your Device Now [Pasang Perangkat Anda Sekarang], tinggalkan komputer Anda dan lanjutkan ke langkah 5 poster ini. Jangan menyambungkan kabel USB saat ini.
Pastikan Anda melihat layar Set Up Your Device Now [Pasang Perangkat Anda Sekarang] pada komputer Anda, lalu sambungkan kabel USB. Jangan sambungkan kabel USB ke keyboard atau sambungan USB nonlistrik.
Dic
etak
di S
inga
pura
dan
Mal
aysia
.
Lepaskan pita merah muda dari ke dua print cartridge. Jangan menyentuh kontak berwarna emas atau memasang kembali pita.
Pegang print cartridge hitam dengan label HP besar dan tanda yang menonjol menghadap ke atas. Geser cartridge sedikit miring ke dalam bagian kanan print carriage.Tekan dengan kuat sampai print cartridge masuk ke tempatnya.
Tutup pintu akses print carriage. Dalam beberapa menit, halaman penyelarasan print cartridge dicetak.Tempatkan bagian atas halaman penyelarasan menghadap ke bawah di sudut kiri depan kaca. Tutup.
Pegang print cartridge hitam dengan label HP besar dan tanda yang menonjol menghadap ke atas. Geser cartridge sedikit miring ke dalam bagian kiri print carriage.Tekan dengan kuat sampai print cartridge masuk ke tempatnya. Pastikan ke dua print cartridge aman.
Tekan tombol Pindai. Setelah lampu Nyala berhenti berkedip, penyelarasan telah selesai. Buang atau daur ulang halaman penyelarasan.
Selesaikan instalasi perangkat
Pemasangan perangkat keras telah selesai. Kembali ke komputer Anda. Klik Next [Selanjutnya] pada layar bertanda periksa hijau. Tergantung pada sistem Anda, hal ini dapat memakan waktu 20 menit atau lebih untuk menyelesaikan penginstalan perangkat lunak. Saat Anda menyalakan ulang komputer Anda dan layar Congratulations [Selamat] muncul, Anda siap menggunakan HP PSC Anda. Bila Anda mengalami masalah selama pemasangan, baca Buku Petunjuk.
a
b
Triwarna Hitam
a
b
Windows PC desktop
Remove the bright pink tape from the print cartridges. Do not touch the gold-colored contacts or retape the cartridges.
Lower the print-carriage access door. The print carriage slides to the middle.
Hold the black print cartridge with the large HP label and the raised markings on top. Slide the cartridge at a slight angle into the right side of the print carriage.Press firmly until the print cartridge snaps into place.
Close the print-carriage access door. Within a few minutes, a print cartridge alignment page prints. Place the top of the alignment page face down in the left front corner of the glass. Close the lid.
This side of the poster is for Windows users only.
Follow the steps on this poster in order. Do not connect the USB cable until the software prompts you to do so.
Turn on your computer and wait for the Windows PC desktop to appear. Close any open programs.
Remove the adhesive backing from the front panel cover. Raise the lid of the HP PSC. Place the front panel cover into the recess and stick it into place.The HP PSC will not work until you attach the front panel cover!
Press the On/Resume button to turn on the HP PSC. Wait for it to finish initializing.
Hold the color print cartridge with the large HP label and the raised markings on top. Slide the cartridge at a slight angle into the left side of the print carriage.Press firmly until the print cartridge snaps into place. Make sure that both print cartridges are secure.
Press the Scan button. After the On light stops blinking, alignment is complete. Discard or recycle the alignment page.W
indo
ws
setu
p po
ster
Windows users START HERE Turn on the computer Begin software installationUnpack the device
Attach the front panel cover Load plain white paper Connect the power cords
Turn on the deviceConnect the USB cable Open the print-carriage access door
Insert and align the print cartridges
Insert the Windows HP PSC CD and follow the onscreen instructions.If nothing appears on your computer screen after you insert the CD, see the Troubleshooting Information chapter in the Reference Guide.When you see the Set Up Your Device Now screen, leave your computer and proceed to step 5 on this poster. Do not connect the USB cable yet.
Make sure that you see the Set Up Your Device Now screen on your computer, then connect the USB cable. Do not connect the USB cable to a keyboard or a non-powered USB hub.
Prin
ted
in S
inga
pore
or M
alay
sia.
Finish software installation
Hardware setup is now complete. Return to your computer.Click Next on the screen with the green checkmark. Depending on your system, it may take 20 minutes or more to finish installing the software. When you restart your computer and the Congratulations screen appears, you are ready to use your HP PSC. If you encounter problems during setup, see the Reference Guide.
a
b
Tri-color Black
*Q
35
00
-9
02
07
**
Q3
50
0-
90
20
7*
Q35
00-9
0207
hp
psc
130
0 se
ries
all-i
n-on
eM
acin
tosh
OS
9, O
S X
1 43
8
6 75
109
2
www.hp.com/support
Copyright Hewlett-Packard Company 2003
a b
c
a b c
a b c
d fe
hp_all-in-one_installer
a bMacintosh
Macintosh OS 9, OS X
hp psc1100p r inte r sca nn er co pie r
a b
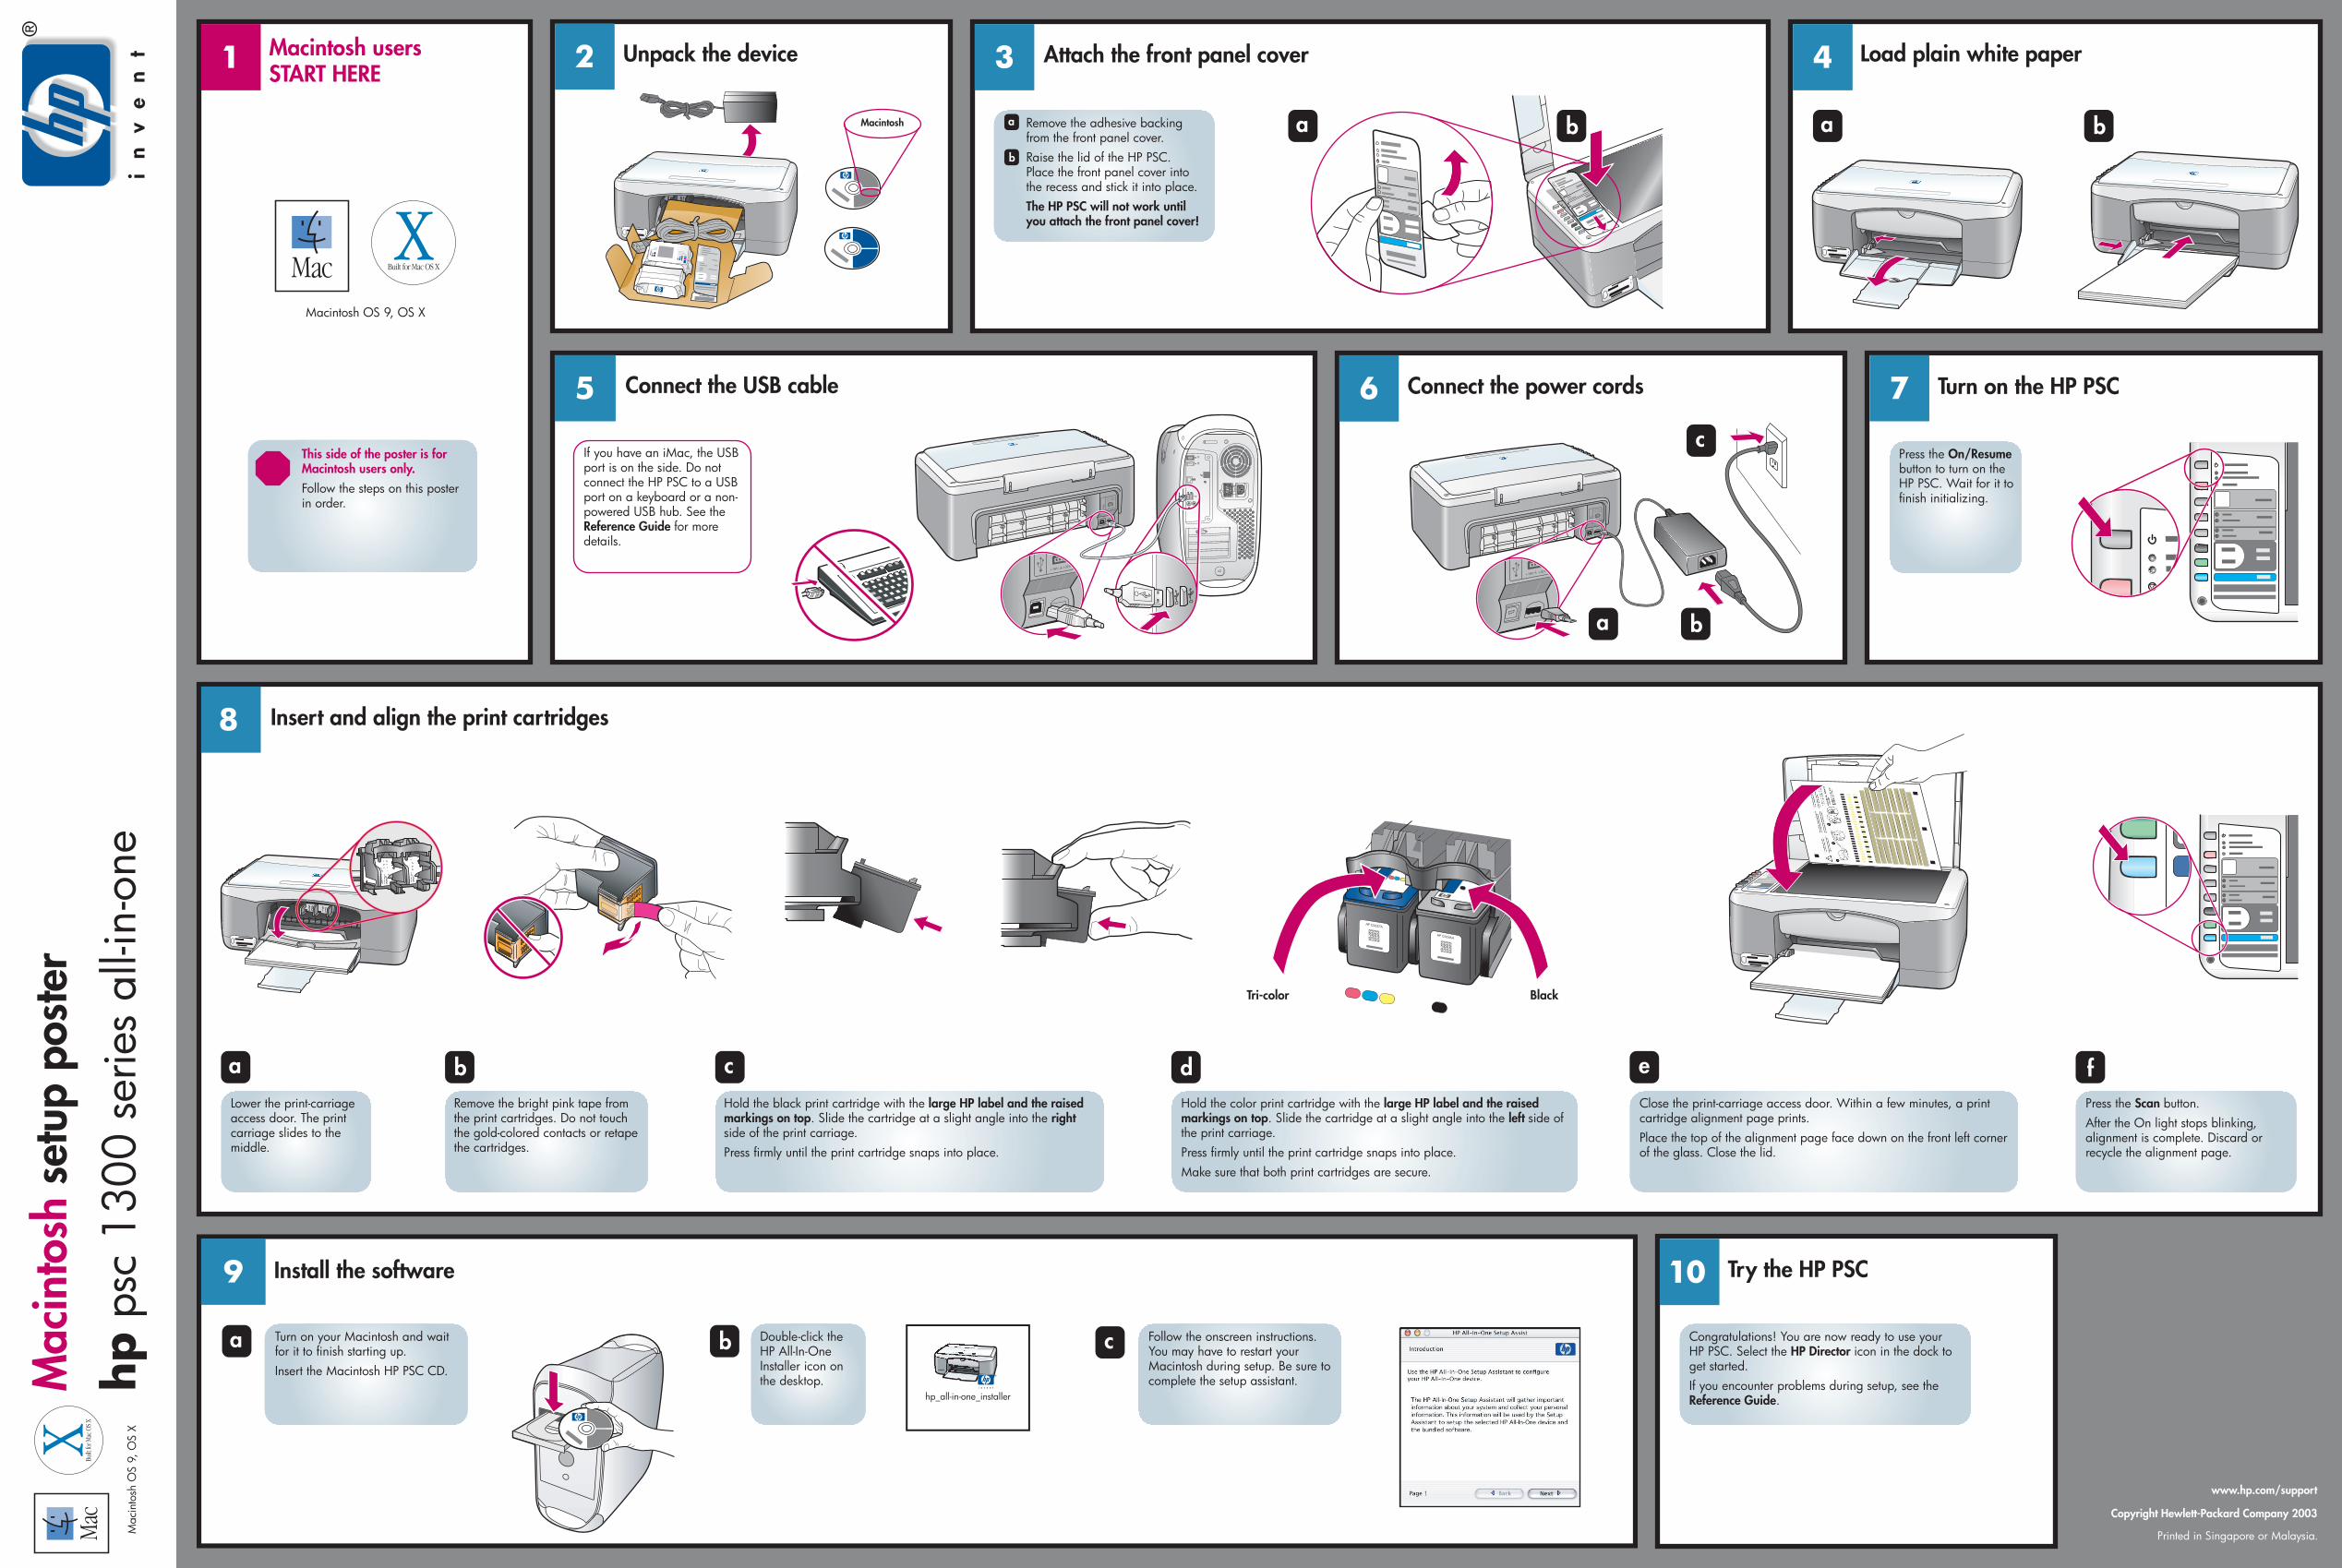
This side of the poster is for Macintosh users only.
Follow the steps on this poster in order.
Congratulations! You are now ready to use your HP PSC. Select the HP Director icon in the dock to get started.If you encounter problems during setup, see the Reference Guide.
Press the On/Resume button to turn on the HP PSC. Wait for it to finish initializing.
Remove the bright pink tape from the print cartridges. Do not touch the gold-colored contacts or retape the cartridges.
Hold the black print cartridge with the large HP label and the raised markings on top. Slide the cartridge at a slight angle into the right side of the print carriage. Press firmly until the print cartridge snaps into place.
Close the print-carriage access door. Within a few minutes, a print cartridge alignment page prints.Place the top of the alignment page face down on the front left corner of the glass. Close the lid.
Hold the color print cartridge with the large HP label and the raised markings on top. Slide the cartridge at a slight angle into the left side of the print carriage.Press firmly until the print cartridge snaps into place. Make sure that both print cartridges are secure.
Press the Scan button. After the On light stops blinking, alignment is complete. Discard or recycle the alignment page.
Lower the print-carriage access door. The print carriage slides to the middle.
Mac
into
sh s
etup
pos
ter
Printed in Singapore or Malaysia.
Turn on your Macintosh and wait for it to finish starting up.Insert the Macintosh HP PSC CD.
Double-click the HP All-In-One Installer icon on the desktop.
Follow the onscreen instructions. You may have to restart your Macintosh during setup. Be sure to complete the setup assistant.
If you have an iMac, the USB port is on the side. Do not connect the HP PSC to a USB port on a keyboard or a non-powered USB hub. See the Reference Guide for more details.
Macintosh users START HERE
Attach the front panel cover Load plain white paper
Connect the USB cable Connect the power cords Turn on the HP PSC
Insert and align the print cartridges
Install the software Try the HP PSC
Unpack the device
Remove the adhesive backing from the front panel cover. Raise the lid of the HP PSC. Place the front panel cover into the recess and stick it into place.The HP PSC will not work until you attach the front panel cover!
a
b
Tri-color Black