microsoft publisher 2013 / 2016 -...
TRANSCRIPT

SINOPSISMicrsoft Publisher dalah program yang mudah digunakan dan fleksibel untuk membuat News Letter, Brosur, Kad Perniagaan, Poskad, Dan Risalah, untuk cetak, e-mel, dan Web.
Dalam kursus ini, kita akan melihat cara membuat penerbitan dari awal atau menggunakan salah satu daripada ratusan perniagaan dan reka bentuk peribadi yang terdapat di Penerbit. Kursus ini direka untuk orang yang perlu belajar bagaimana menggunakan Penerbit menggunakan Microsoft untuk membuat, membuang dan mengedit penerbitan..
OBJEKTIFa) Pendedahan kepada penggunaan perisian Microsoft Office Publisher dalam menghasilkan grafik dan teks bagi penyediaan penerbitan; b) Memberi pengetahuan dan kefahaman kepada peserta mengenai Master Pages, Styles dan seterusnya menerbitkan ke web; dan c) Memberi kemahiran reka bentuk laporan bagi penghasilan penerbitan yang berkualiti
HUBUNGI KAMIPN. MAZURA BINTI MUSTAFA06-270 1177 / 019-683 [email protected]
UNIT LATIHAN, BAHAGIAN DASAR DAN PENTADBIRANPUSAT PERKHIDMATAN PENGETAHUAN DAN KOMUNIKASI06-270 1098 Faks : 06-270 1037
NEWSLETTER FLYERS
BUSINESS CARDADDRESS BOOK
CALENDAR
ENVELOPE
MICROSOFT PUBLISHER2013 / 2016
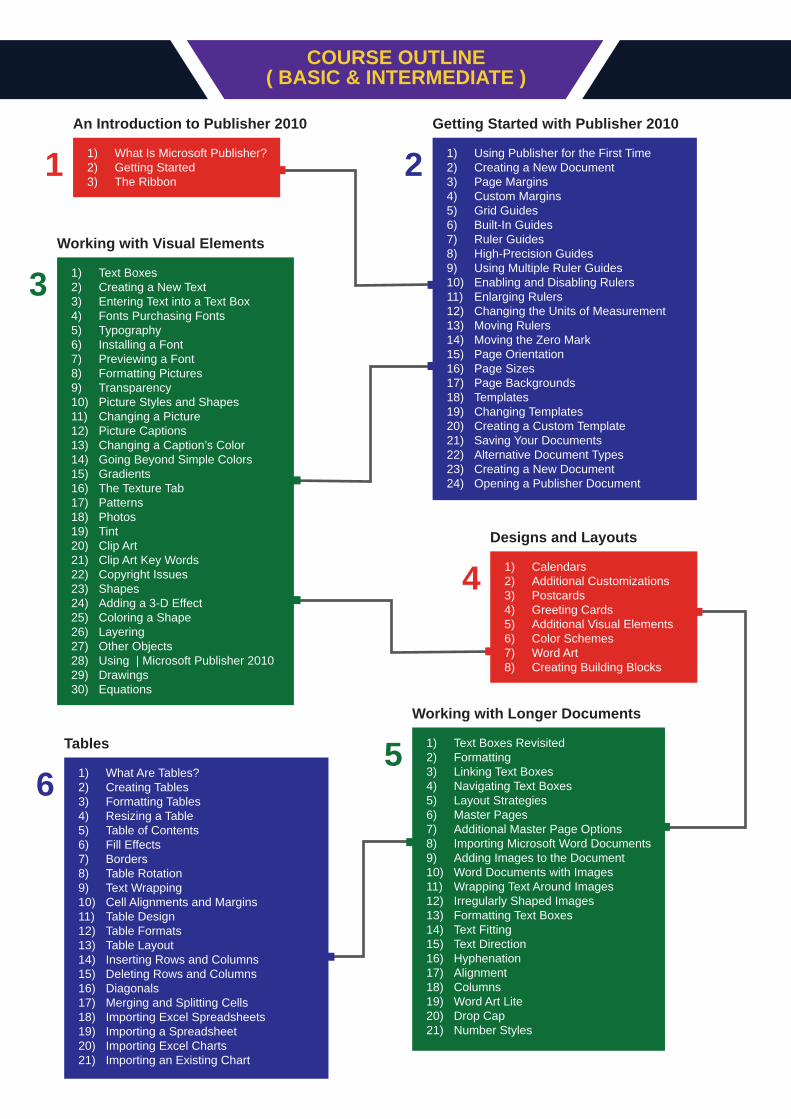
COURSE OUTLINE( BASIC & INTERMEDIATE )
An Introduction to Publisher 2010
1) What Is Microsoft Publisher? 2) Getting Started 3) The Ribbon
1Getting Started with Publisher 2010
1) Using Publisher for the First Time 2) Creating a New Document 3) Page Margins 4) Custom Margins 5) Grid Guides 6) Built-In Guides 7) Ruler Guides 8) High-Precision Guides 9) Using Multiple Ruler Guides 10) Enabling and Disabling Rulers 11) Enlarging Rulers 12) Changing the Units of Measurement 13) Moving Rulers 14) Moving the Zero Mark 15) Page Orientation 16) Page Sizes 17) Page Backgrounds 18) Templates 19) Changing Templates 20) Creating a Custom Template 21) Saving Your Documents 22) Alternative Document Types 23) Creating a New Document 24) Opening a Publisher Document
2
Working with Visual Elements
1) Text Boxes 2) Creating a New Text3) Entering Text into a Text Box 4) Fonts Purchasing Fonts 5) Typography 6) Installing a Font 7) Previewing a Font 8) Formatting Pictures 9) Transparency 10) Picture Styles and Shapes 11) Changing a Picture 12) Picture Captions 13) Changing a Caption’s Color 14) Going Beyond Simple Colors 15) Gradients 16) The Texture Tab17) Patterns 18) Photos 19) Tint 20) Clip Art 21) Clip Art Key Words 22) Copyright Issues 23) Shapes 24) Adding a 3-D Effect 25) Coloring a Shape 26) Layering 27) Other Objects 28) Using | Microsoft Publisher 201029) Drawings 30) Equations
3
Designs and Layouts
1) Calendars 2) Additional Customizations 3) Postcards 4) Greeting Cards 5) Additional Visual Elements 6) Color Schemes 7) Word Art 8) Creating Building Blocks
4
Working with Longer Documents
1) Text Boxes Revisited 2) Formatting 3) Linking Text Boxes 4) Navigating Text Boxes 5) Layout Strategies 6) Master Pages 7) Additional Master Page Options 8) Importing Microsoft Word Documents 9) Adding Images to the Document 10) Word Documents with Images 11) Wrapping Text Around Images 12) Irregularly Shaped Images 13) Formatting Text Boxes 14) Text Fitting 15) Text Direction 16) Hyphenation 17) Alignment 18) Columns 19) Word Art Lite 20) Drop Cap 21) Number Styles
5Tables
1) What Are Tables? 2) Creating Tables 3) Formatting Tables 4) Resizing a Table 5) Table of Contents 6) Fill Effects 7) Borders 8) Table Rotation 9) Text Wrapping 10) Cell Alignments and Margins 11) Table Design 12) Table Formats 13) Table Layout 14) Inserting Rows and Columns 15) Deleting Rows and Columns 16) Diagonals 17) Merging and Splitting Cells 18) Importing Excel Spreadsheets 19) Importing a Spreadsheet 20) Importing Excel Charts 21) Importing an Existing Chart
6
COURSE OUTLINE( BASIC & INTERMEDIATE )
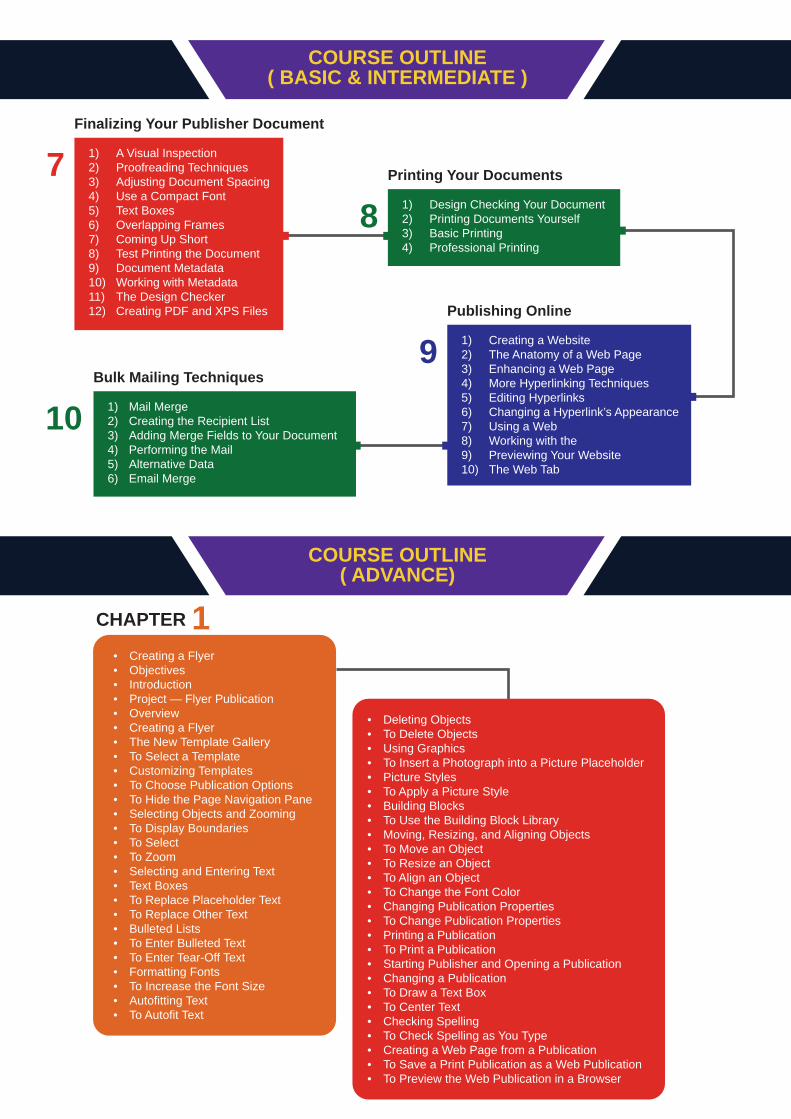
COURSE OUTLINE( ADVANCE)
Finalizing Your Publisher Document
1) A Visual Inspection 2) Proofreading Techniques 3) Adjusting Document Spacing 4) Use a Compact Font 5) Text Boxes 6) Overlapping Frames 7) Coming Up Short 8) Test Printing the Document 9) Document Metadata 10) Working with Metadata 11) The Design Checker 12) Creating PDF and XPS Files
7
Publishing Online
1) Creating a Website 2) The Anatomy of a Web Page 3) Enhancing a Web Page 4) More Hyperlinking Techniques 5) Editing Hyperlinks 6) Changing a Hyperlink’s Appearance 7) Using a Web 8) Working with the 9) Previewing Your Website 10) The Web Tab
9Bulk Mailing Techniques
1) Mail Merge 2) Creating the Recipient List 3) Adding Merge Fields to Your Document 4) Performing the Mail 5) Alternative Data 6) Email Merge
10
Printing Your Documents
1) Design Checking Your Document 2) Printing Documents Yourself 3) Basic Printing 4) Professional Printing
8
• Creating a Flyer• Objectives• Introduction• Project — Flyer Publication• Overview• Creating a Flyer• The New Template Gallery• To Select a Template• Customizing Templates• To Choose Publication Options• To Hide the Page Navigation Pane• Selecting Objects and Zooming• To Display Boundaries• To Select• To Zoom• Selecting and Entering Text• Text Boxes• To Replace Placeholder Text• To Replace Other Text• Bulleted Lists• To Enter Bulleted Text• To Enter Tear-Off Text• Formatting Fonts• To Increase the Font Size• Autofitting Text• To Autofit Text
• Deleting Objects• To Delete Objects• Using Graphics• To Insert a Photograph into a Picture Placeholder• Picture Styles• To Apply a Picture Style• Building Blocks• To Use the Building Block Library• Moving, Resizing, and Aligning Objects• To Move an Object• To Resize an Object• To Align an Object• To Change the Font Color• Changing Publication Properties• To Change Publication Properties• Printing a Publication• To Print a Publication• Starting Publisher and Opening a Publication• Changing a Publication• To Draw a Text Box• To Center Text• Checking Spelling• To Check Spelling as You Type• Creating a Web Page from a Publication • To Save a Print Publication as a Web Publication • To Preview the Web Publication in a Browser
CHAPTER 1
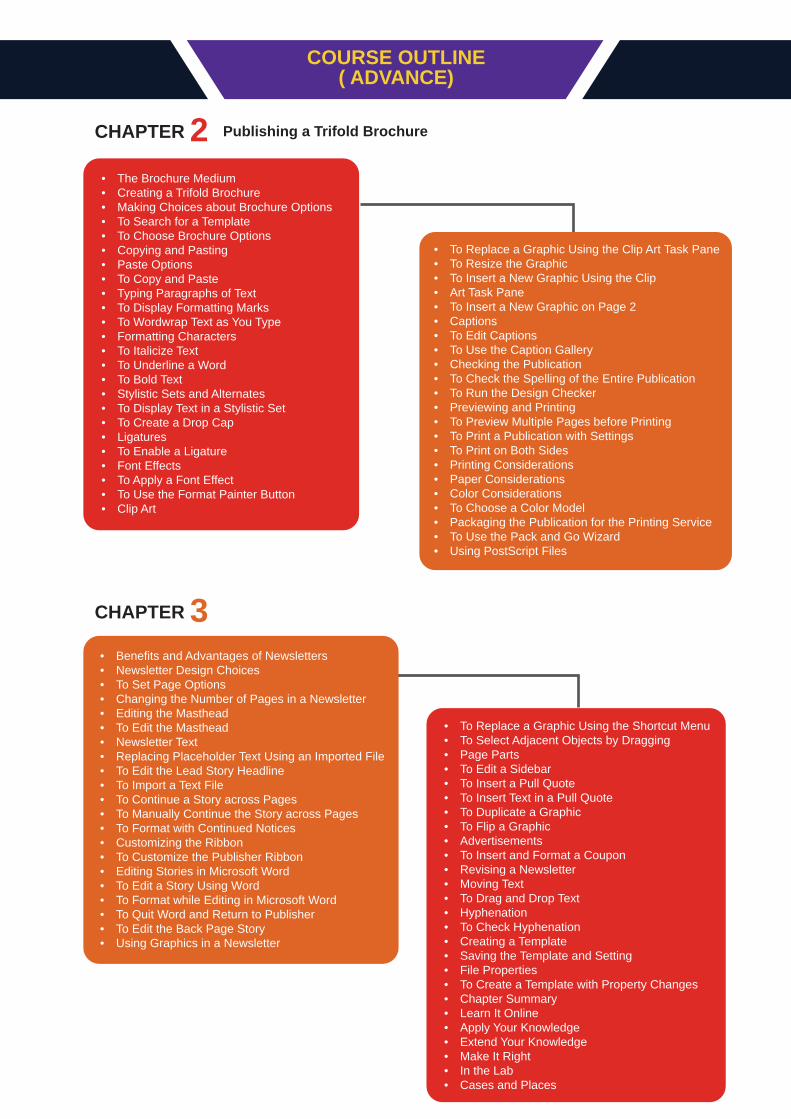
COURSE OUTLINE( ADVANCE)
• To Replace a Graphic Using the Clip Art Task Pane• To Resize the Graphic• To Insert a New Graphic Using the Clip• Art Task Pane• To Insert a New Graphic on Page 2• Captions• To Edit Captions• To Use the Caption Gallery• Checking the Publication• To Check the Spelling of the Entire Publication• To Run the Design Checker• Previewing and Printing• To Preview Multiple Pages before Printing• To Print a Publication with Settings• To Print on Both Sides• Printing Considerations• Paper Considerations• Color Considerations• To Choose a Color Model• Packaging the Publication for the Printing Service• To Use the Pack and Go Wizard• Using PostScript Files
CHAPTER
• The Brochure Medium• Creating a Trifold Brochure• Making Choices about Brochure Options• To Search for a Template• To Choose Brochure Options• Copying and Pasting• Paste Options• To Copy and Paste• Typing Paragraphs of Text• To Display Formatting Marks• To Wordwrap Text as You Type• Formatting Characters• To Italicize Text• To Underline a Word• To Bold Text• Stylistic Sets and Alternates• To Display Text in a Stylistic Set• To Create a Drop Cap• Ligatures• To Enable a Ligature• Font Effects• To Apply a Font Effect• To Use the Format Painter Button• Clip Art
Publishing a Trifold Brochure
• Benefits and Advantages of Newsletters• Newsletter Design Choices• To Set Page Options• Changing the Number of Pages in a Newsletter• Editing the Masthead• To Edit the Masthead• Newsletter Text• Replacing Placeholder Text Using an Imported File• To Edit the Lead Story Headline• To Import a Text File• To Continue a Story across Pages• To Manually Continue the Story across Pages• To Format with Continued Notices• Customizing the Ribbon• To Customize the Publisher Ribbon• Editing Stories in Microsoft Word• To Edit a Story Using Word• To Format while Editing in Microsoft Word• To Quit Word and Return to Publisher• To Edit the Back Page Story• Using Graphics in a Newsletter
• To Replace a Graphic Using the Shortcut Menu• To Select Adjacent Objects by Dragging• Page Parts• To Edit a Sidebar• To Insert a Pull Quote• To Insert Text in a Pull Quote• To Duplicate a Graphic• To Flip a Graphic• Advertisements• To Insert and Format a Coupon• Revising a Newsletter• Moving Text• To Drag and Drop Text• Hyphenation• To Check Hyphenation• Creating a Template• Saving the Template and Setting• File Properties• To Create a Template with Property Changes• Chapter Summary• Learn It Online• Apply Your Knowledge• Extend Your Knowledge• Make It Right• In the Lab• Cases and Places
2
CHAPTER 3