emmy sherina ismail hashim bahagian perkhidmatan...
TRANSCRIPT
Emmy Sherina Ismail Hashim
Bahagian Perkhidmatan Forensik Struktur
Cawangan Kejuruteraan Awam dan Struktur (CKAS)
Kandungan
Proses Pembaikan
Keperluan Bahan
Pelbagai Bahan Pembaikan
Kaedah Pembaikan
PEMBAIKAN / PEMULIHAN
Untuk memulihkan sebahagian atau keseluruhan struktur yang rosak kepada tahap khidmat rekabentuk dan untuk meningkatkan ketahanlasakan.
PENGUKUHAN (STRENGTHENING)
Untuk menaik taraf struktur kepada tahap khidmat rekabentuk yang lebih tinggi – meningkatkan keupayaan menanggung beban.
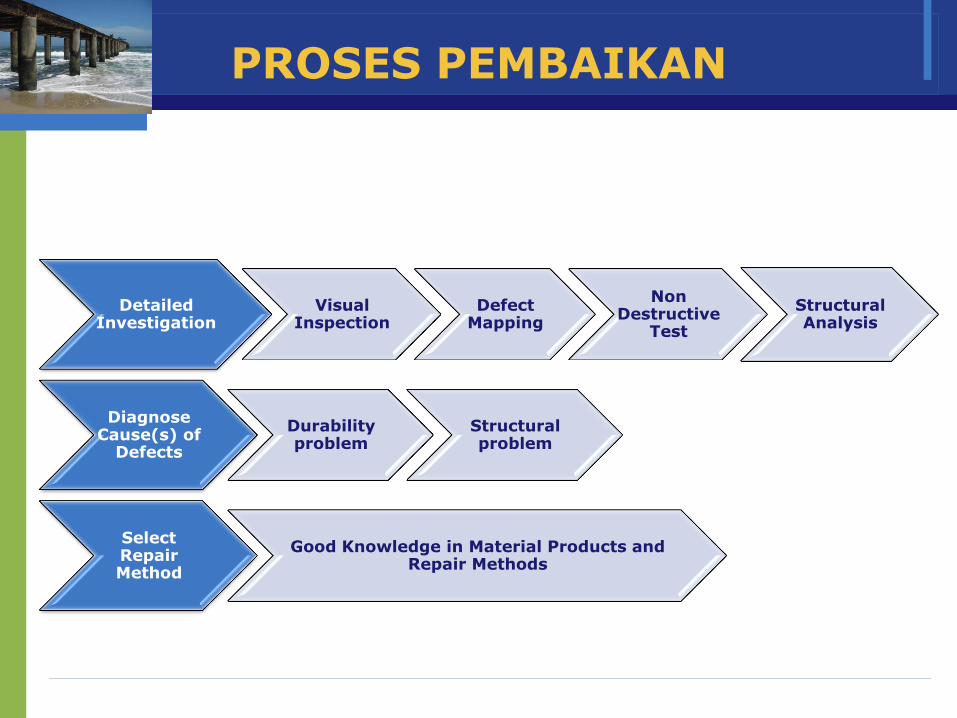
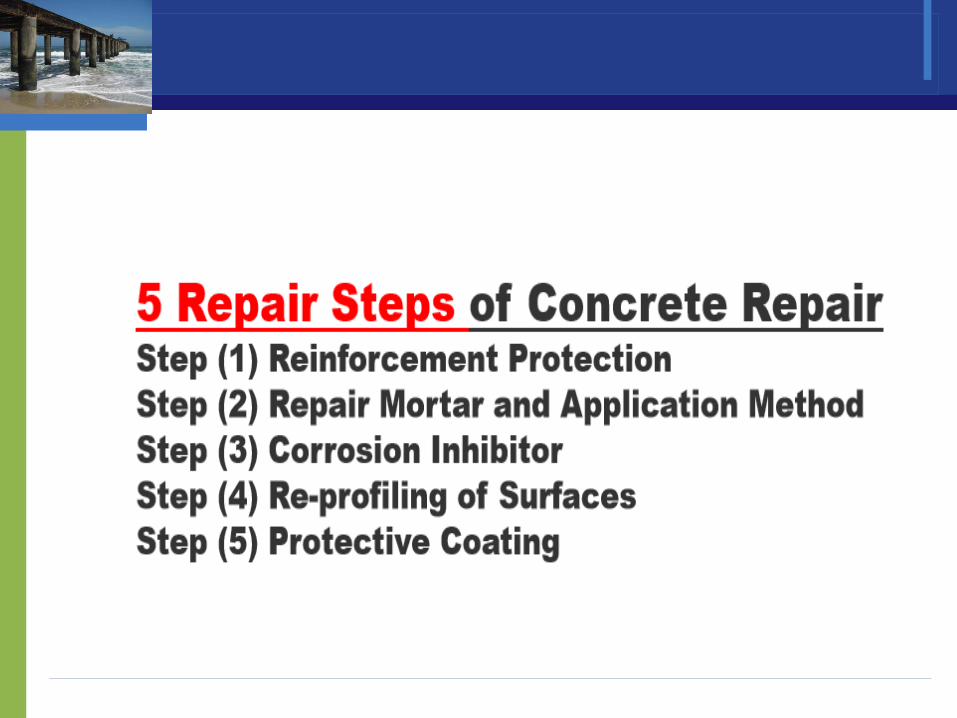
PROSES PEMBAIKAN
Detailed Investigation
Visual Inspection
Defect Mapping
Non Destructive
Test
Structural Analysis
Diagnose Cause(s) of
Defects
Durability problem
Structural problem
Select Repair Method
Good Knowledge in Material Products and Repair Methods
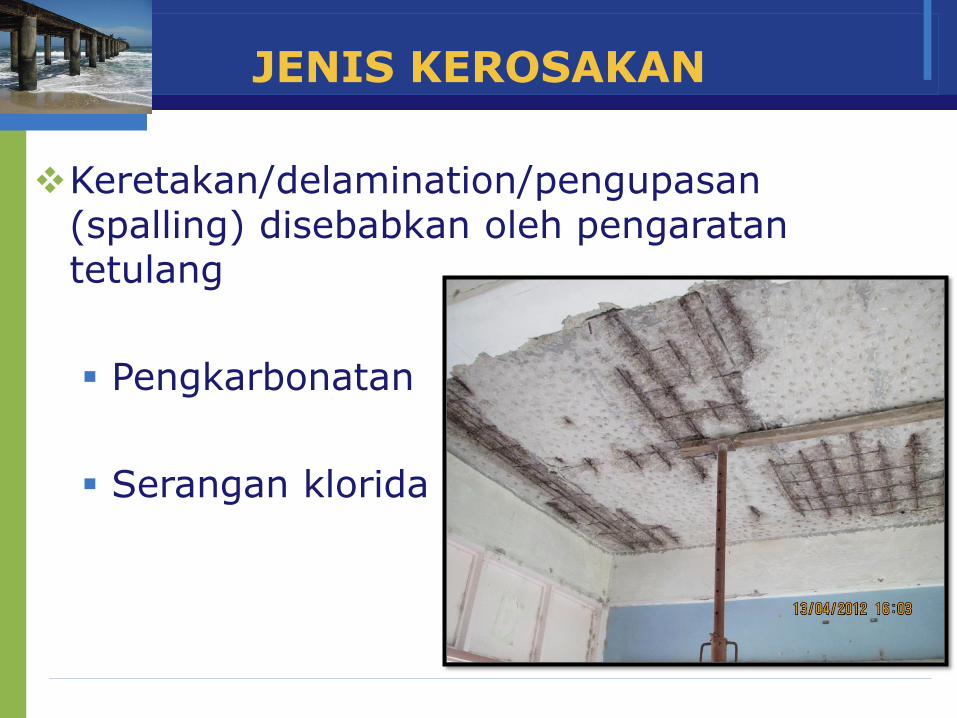
JENIS KEROSAKAN
Keretakan/delamination/pengupasan (spalling) disebabkan oleh pengaratan tetulang
Pengkarbonatan
Serangan klorida
JENIS KEROSAKAN
Keretakan disebabkan oleh pergerakan hakiki
pengecutan (shrinkage)
rayapan (creep)
penghidratan (hydration)
perubahan suhu
JENIS KEROSAKAN
Kemerosotan Bahan
serangan asid
serangan sulfate
JENIS KEROSAKAN
Keretakan disebabkan oleh kerosakan struktur
penambahan beban
kekurangan dalam rekabentuk & spesifikasi
mutu kerja yang tidak baik
pergerakan pada asas struktur
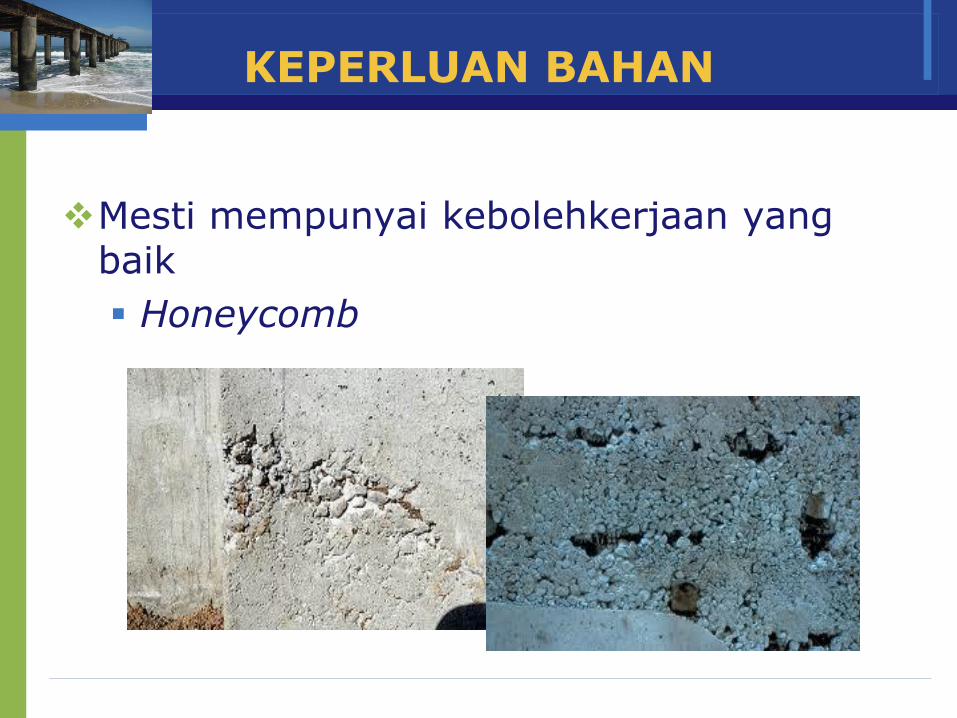
KEPERLUAN BAHAN
Mesti mempunyai kebolehkerjaan yang baik
Honeycomb
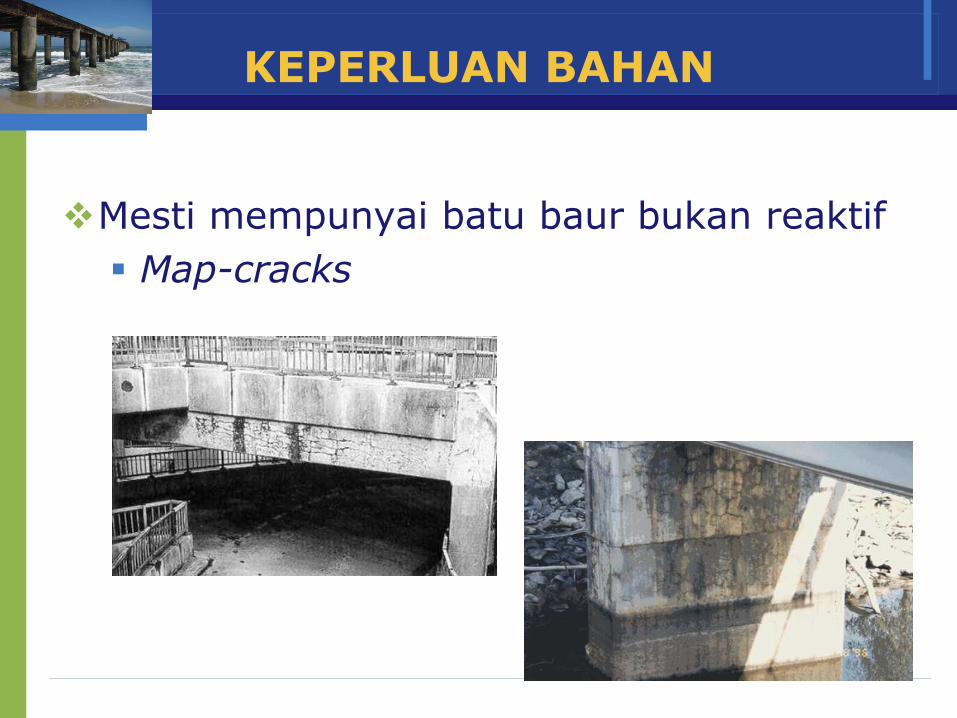
KEPERLUAN BAHAN
Mesti mempunyai batu baur bukan reaktif
Map-cracks
KEPERLUAN BAHAN
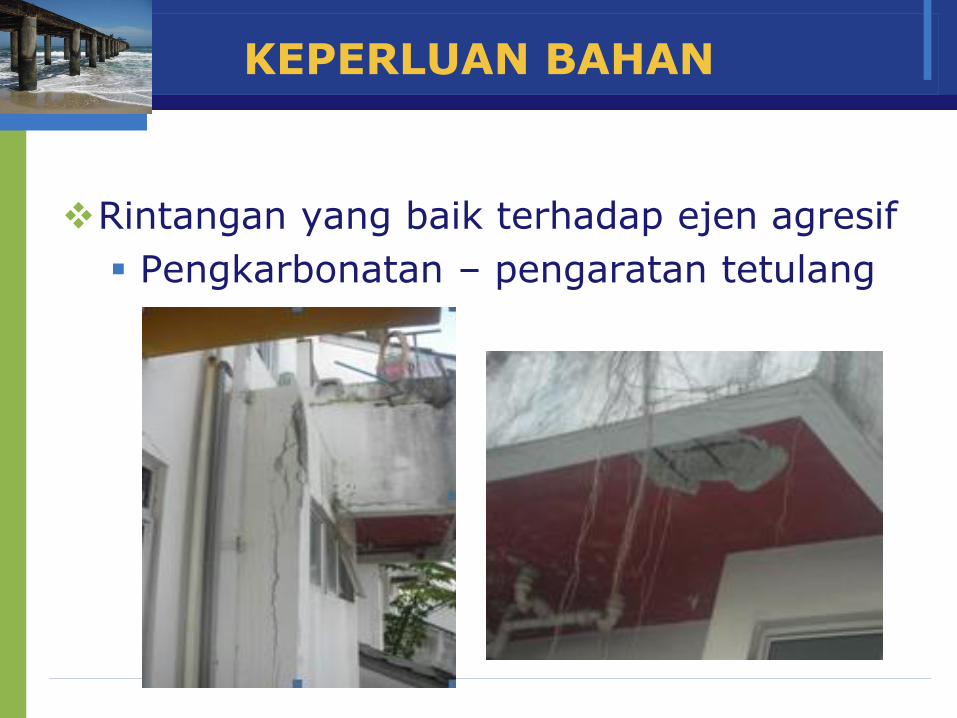
Rintangan yang baik terhadap ejen agresif
Pengkarbonatan – pengaratan tetulang
KEPERLUAN BAHAN
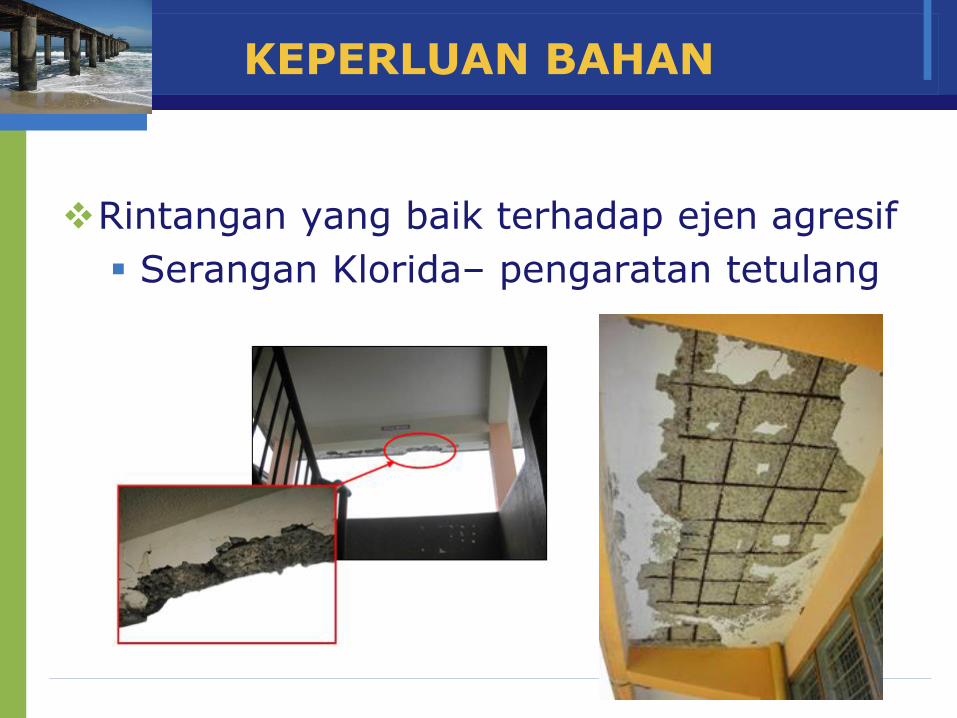
Rintangan yang baik terhadap ejen agresif
Serangan Klorida– pengaratan tetulang
KEPERLUAN BAHAN
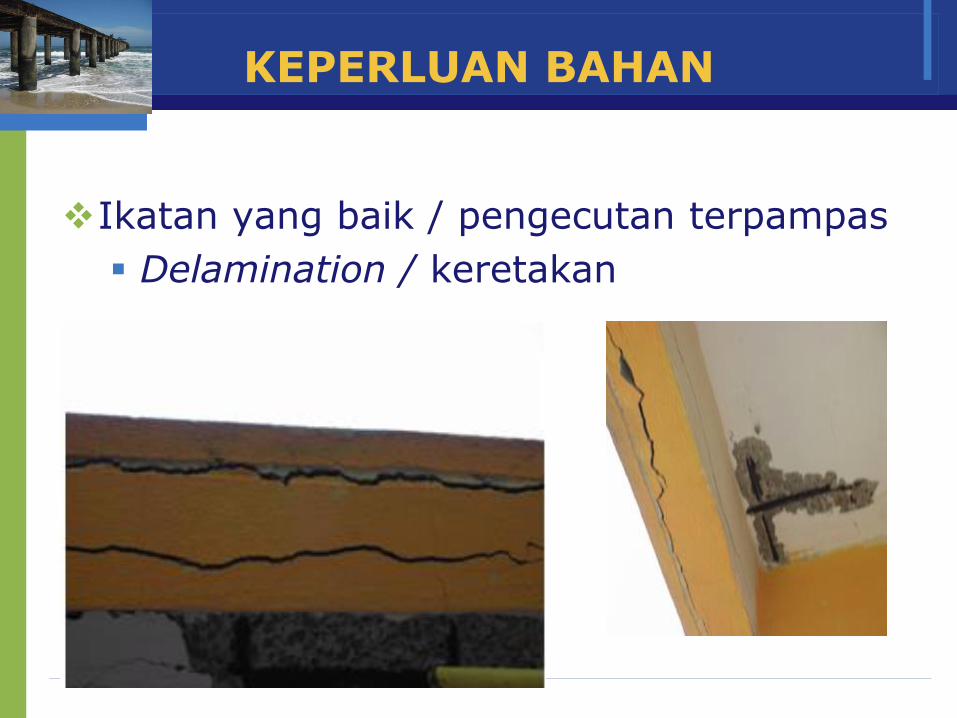
Ikatan yang baik / pengecutan terpampas
Delamination / keretakan
PELBAGAI BAHAN PEMBAIKAN
Kriteria Pemilihan Bahan
Memahami keadaan khidmat
Memahami keadaan dedahan
Teknik pemasangan
Sifat bahan dalam pengawetan dan keadaan plastik
PELBAGAI BAHAN PEMBAIKAN
Prestasi Keperluan Bahan Pembaikan
Ikatan yang baik untuk substrat konkrit
bersifat rencam (compositely)
Kekuatan
Sekurang-kurangnya kekuatan seperti konkrit yang sedia ada
Pengecutan yang rendah
Mengurangkan tekanan dalaman dan keretakan

PELBAGAI BAHAN PEMBAIKAN
Prestasi Keperluan Bahan Pembaikan
Kebolehtelapan yang rendah
meningkatkan ketahanlasakan
Nisbah air-simen yang rendah
Meningkatkan ketahanlasakan
Kebolehkerjaan yang baik
Kebolehkerjaan di dalam ruang yang kecil
PELBAGAI BAHAN PEMBAIKAN
Prestasi Keperluan Bahan Pembaikan
Pengembangan dan keanjalan
sesuai dengan konkrit sedia ada
Warna dan tekstur
adunan sama dengan konkrit sedia ada
PELBAGAI BAHAN PEMBAIKAN
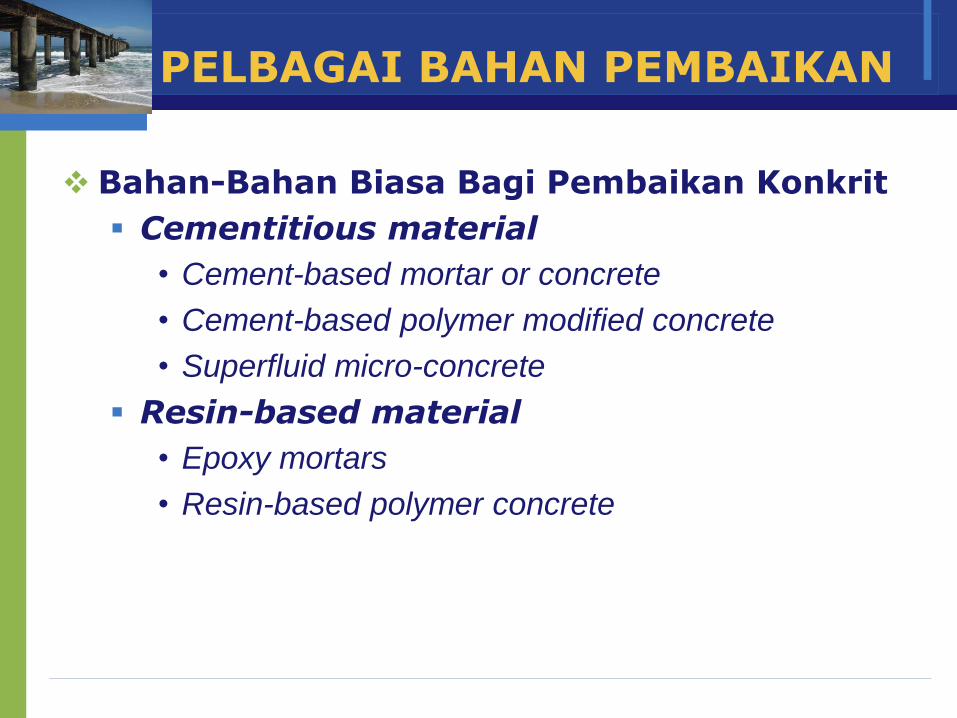
Bahan-Bahan Biasa Bagi Pembaikan Konkrit
Cementitious material
• Cement-based mortar or concrete
• Cement-based polymer modified concrete
• Superfluid micro-concrete
Resin-based material
• Epoxy mortars
• Resin-based polymer concrete
Repair Materials – The Choice
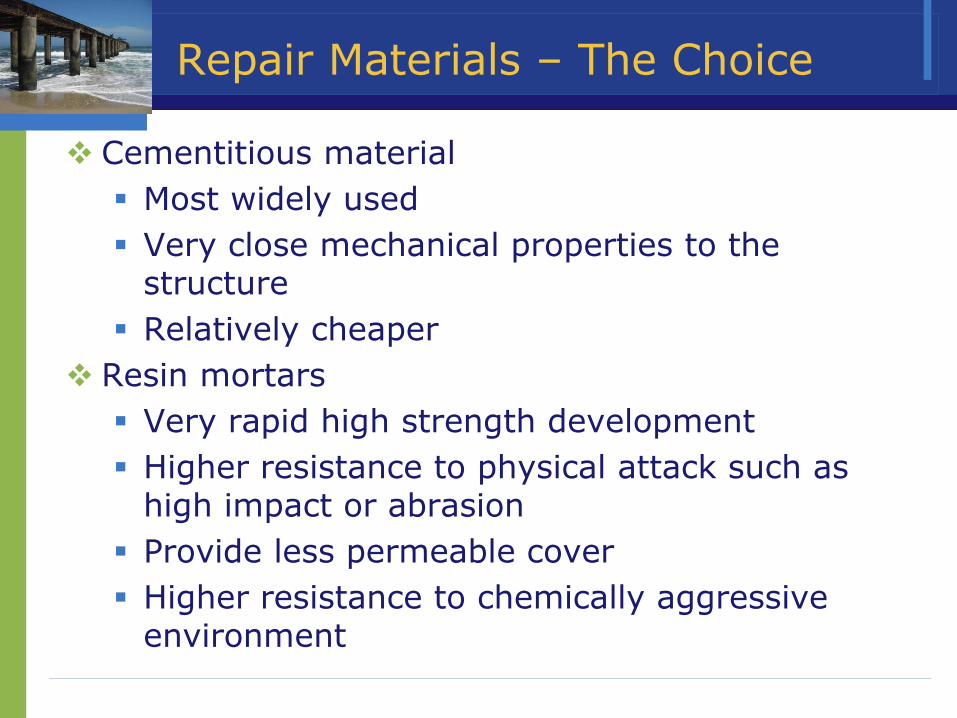
Cementitious material
Most widely used
Very close mechanical properties to the structure
Relatively cheaper
Resin mortars
Very rapid high strength development
Higher resistance to physical attack such as high impact or abrasion
Provide less permeable cover
Higher resistance to chemically aggressive environment
Cement-Based Mortar or Concrete
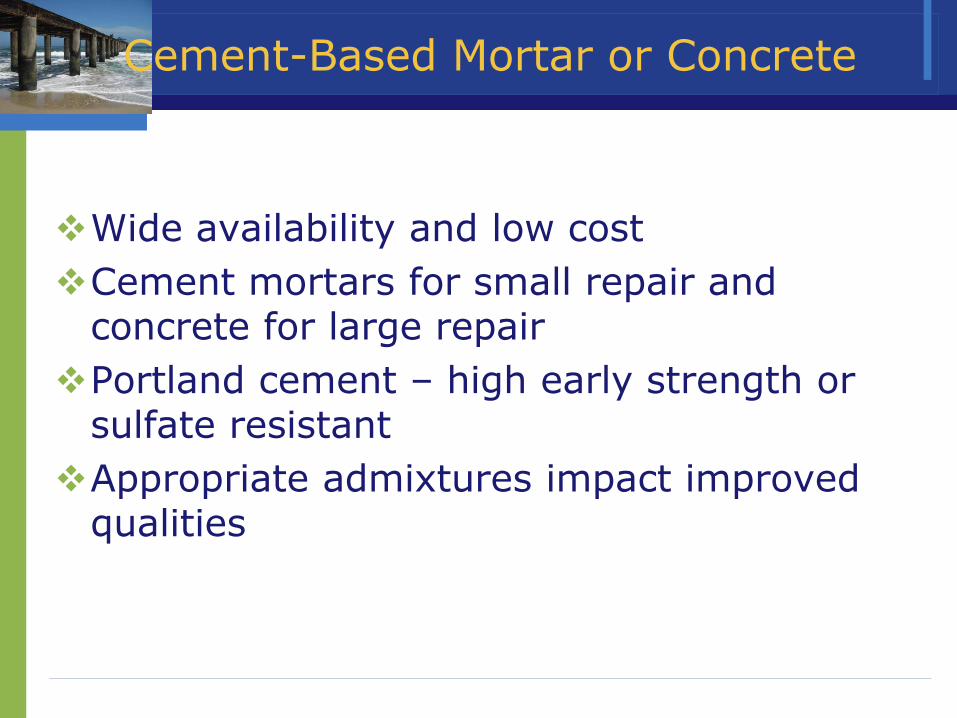
Wide availability and low cost
Cement mortars for small repair and concrete for large repair
Portland cement – high early strength or sulfate resistant
Appropriate admixtures impact improved qualities
Epoxy Mortars
Excellent bond properties
High strength and rapid strength development
Fast cure
Excellent chemical resistance
Insensitivity to moisture or a wet environment
High resistance to impact and abrasion
Application for Epoxy Products
Pressure grouting
Low-viscosity resins to fill fine cracks
Concrete repair
An epoxy resin is mixed with filler aggregates
Providing doweling action
Repair of deck joints and concrete surfaces
High resilience and strength under bearing pads
Adhesion between fresh and old concrete
Cement-Based Polymer Concrete
Polymer mixed with a cement-based mortar
Emulsion
small, spherical plastic particles, disperses throughout the cement paste
Concrete mix are blocked
Reducing permeability and shrinkage and improving chemical resistance, flexural strength, adhesion and resistance to abrasion
Superfluid Microconcrete
Specialist formulator product
High strength, polymer modified, free flowing cementitious material
Pre-packed
Factory controlled quality
Main used – Formwork repair
Fluid cement grouts mixed with small aggregate (10mm)
Contain no metallic expansion system
Self compacting
Shrinkage compensated in both liquid and cured states

KAEDAH PEMBAIKAN
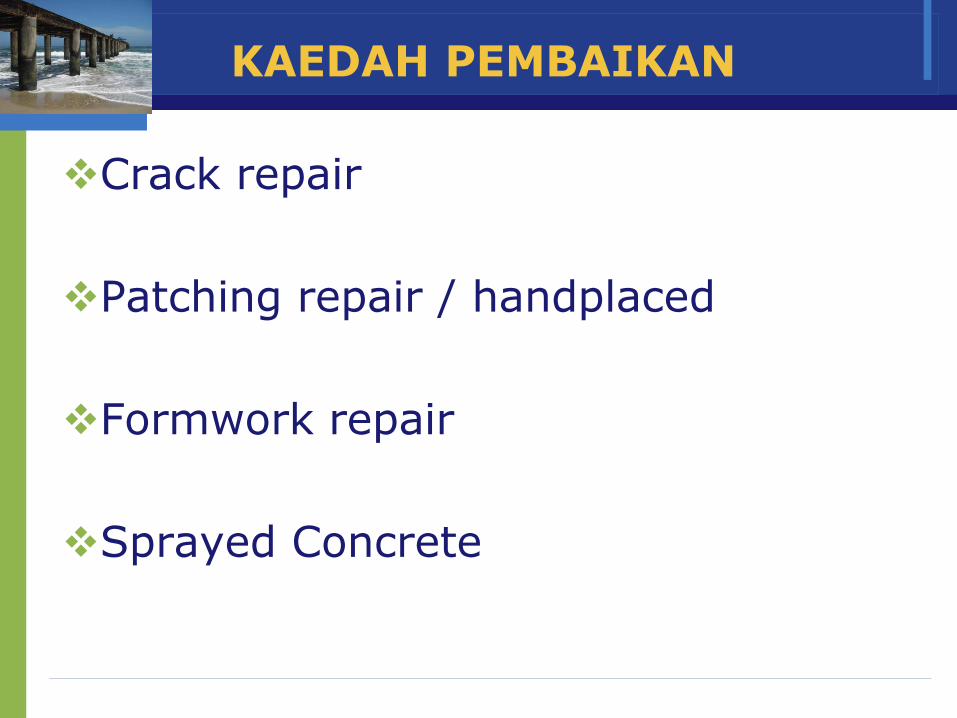
KAEDAH PEMBAIKAN
Crack repair
Patching repair / handplaced
Formwork repair
Sprayed Concrete
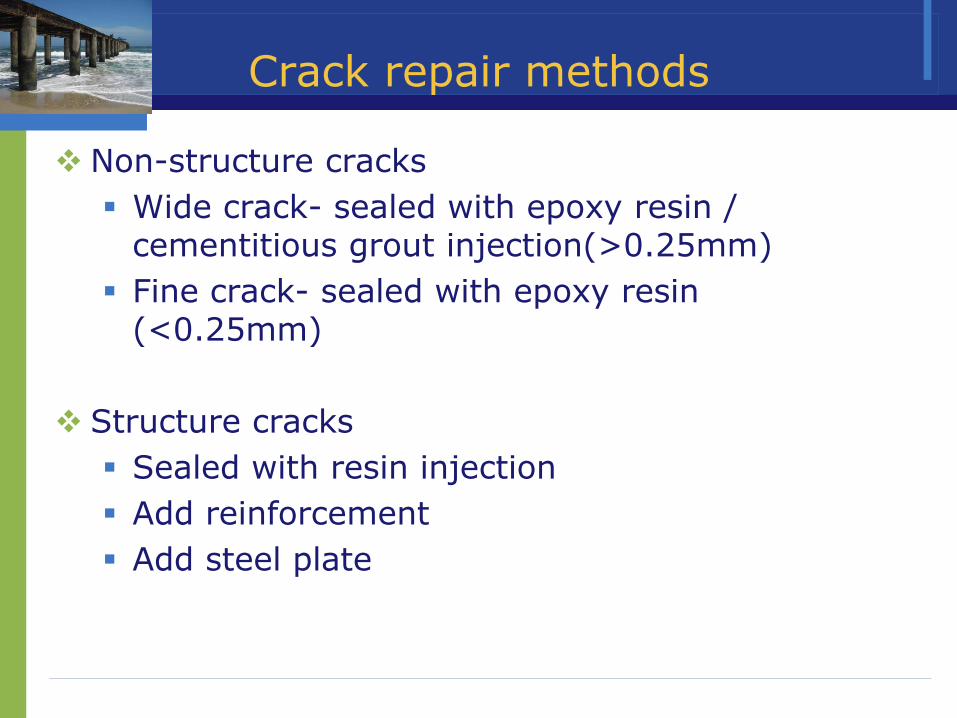
Crack repair methods
Non-structure cracks
Wide crack- sealed with epoxy resin / cementitious grout injection(>0.25mm)
Fine crack- sealed with epoxy resin (<0.25mm)
Structure cracks
Sealed with resin injection
Add reinforcement
Add steel plate
Crack repair methods
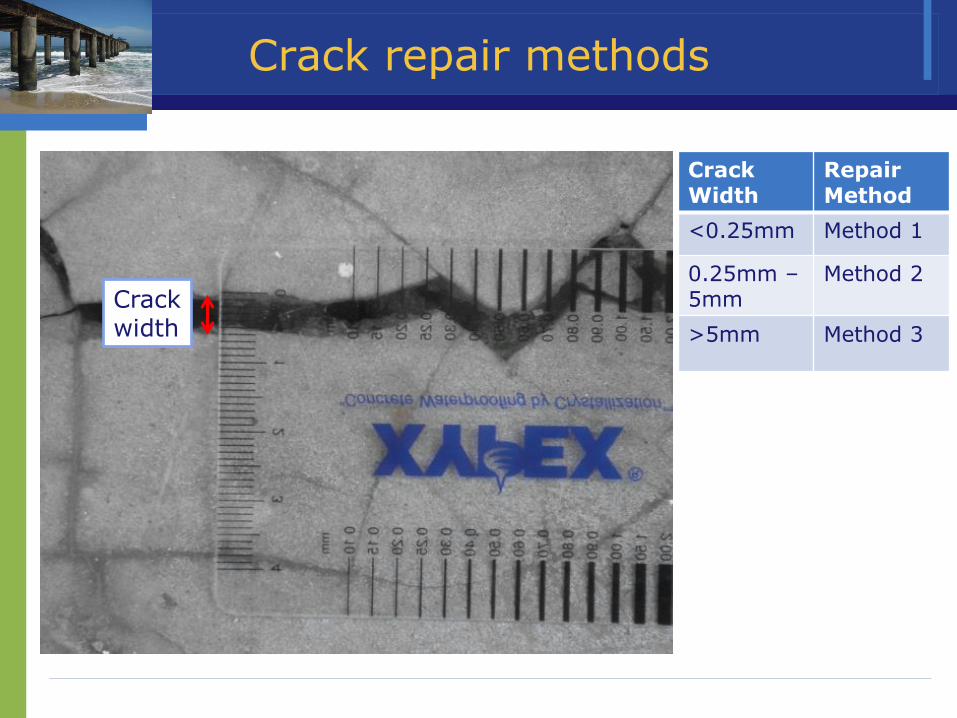
Crack width
Crack Width
Repair Method
<0.25mm Method 1
0.25mm – 5mm
Method 2
>5mm Method 3
Crack repair methods
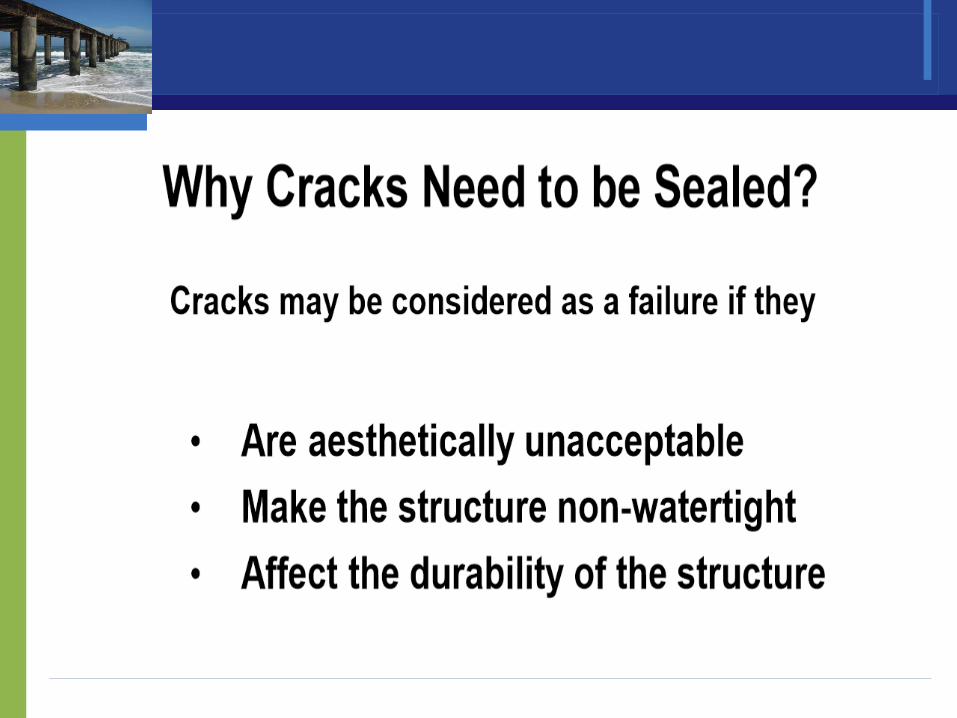
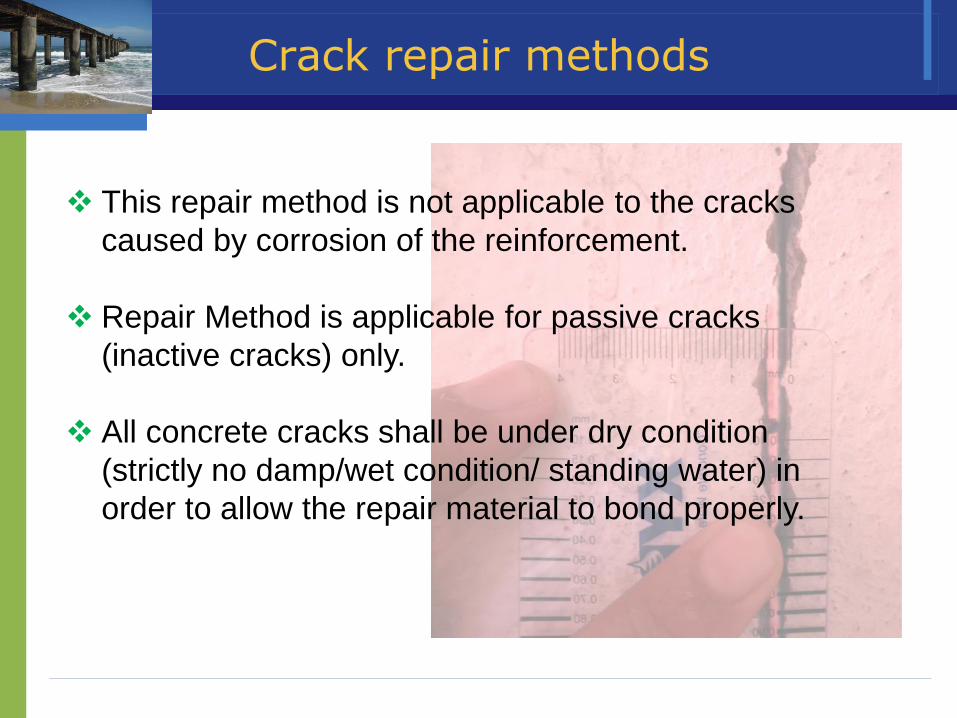
This repair method is not applicable to the cracks
caused by corrosion of the reinforcement.
Repair Method is applicable for passive cracks
(inactive cracks) only.
All concrete cracks shall be under dry condition
(strictly no damp/wet condition/ standing water) in
order to allow the repair material to bond properly.
Crack repair methods
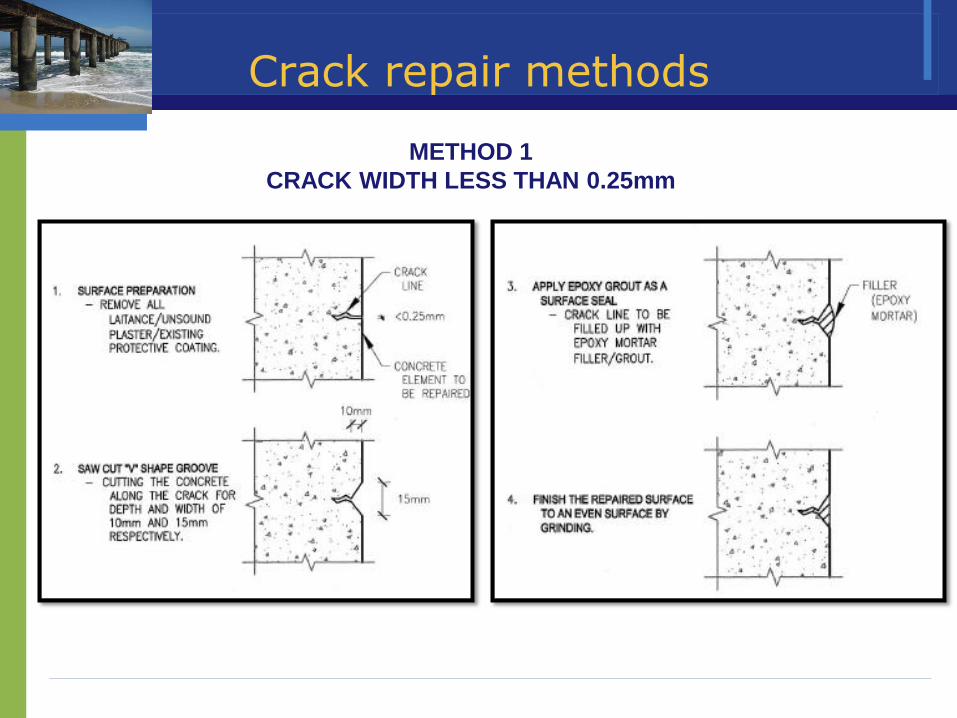
METHOD 1
CRACK WIDTH LESS THAN 0.25mm
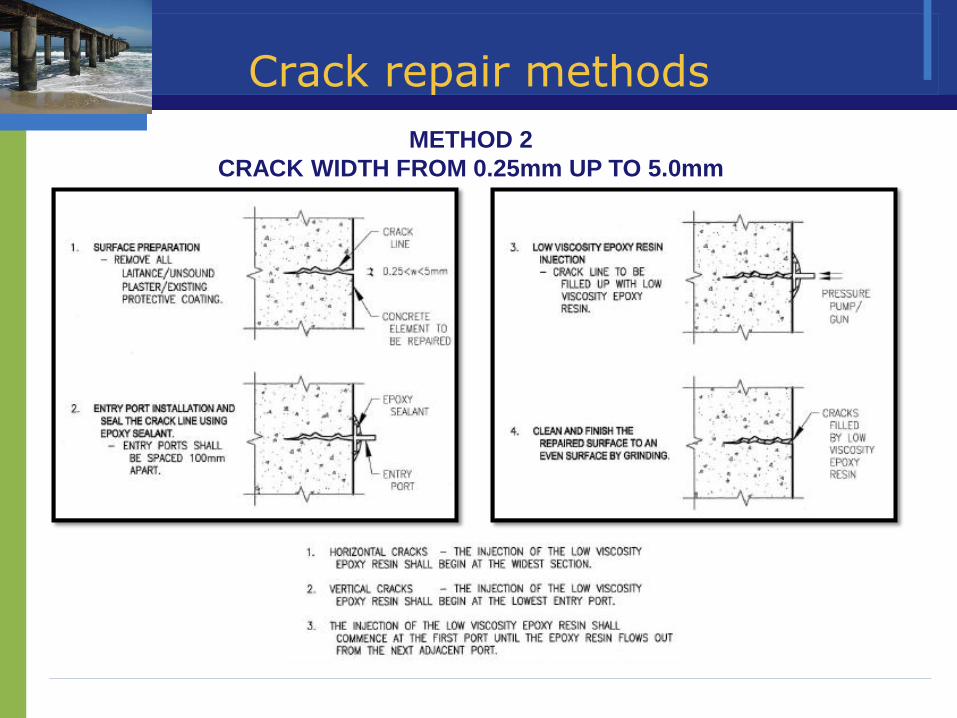
Crack repair methods
METHOD 2
CRACK WIDTH FROM 0.25mm UP TO 5.0mm

Crack repair methods
METHOD 3
CRACK WIDTH MORE THAN 5.0mm
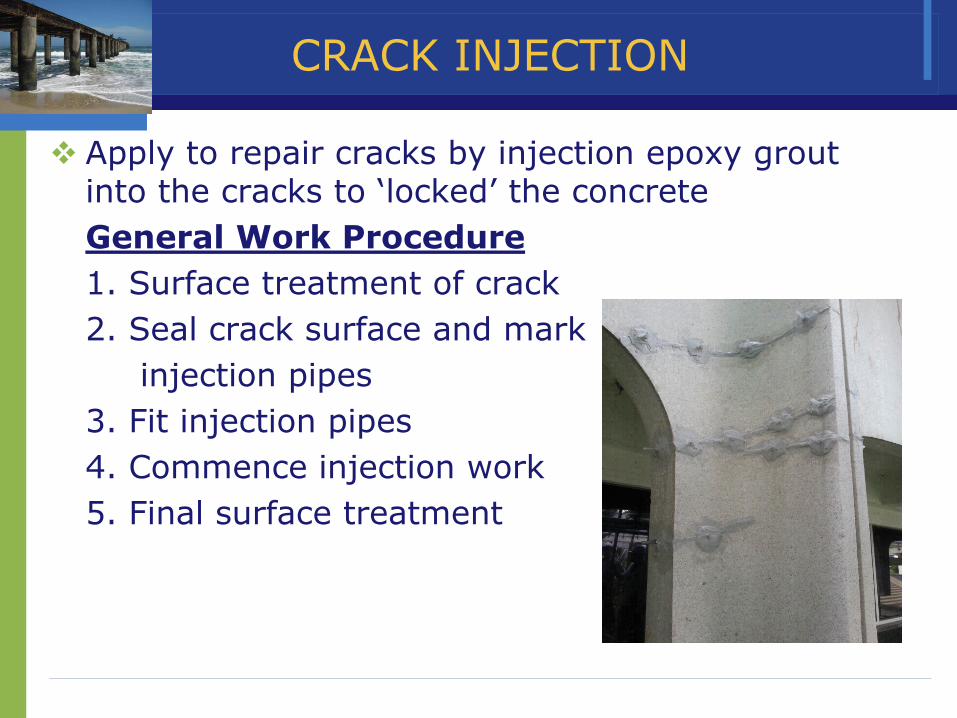
CRACK INJECTION
Apply to repair cracks by injection epoxy grout into the cracks to ‘locked’ the concrete
General Work Procedure
1. Surface treatment of crack
2. Seal crack surface and mark
injection pipes
3. Fit injection pipes
4. Commence injection work
5. Final surface treatment
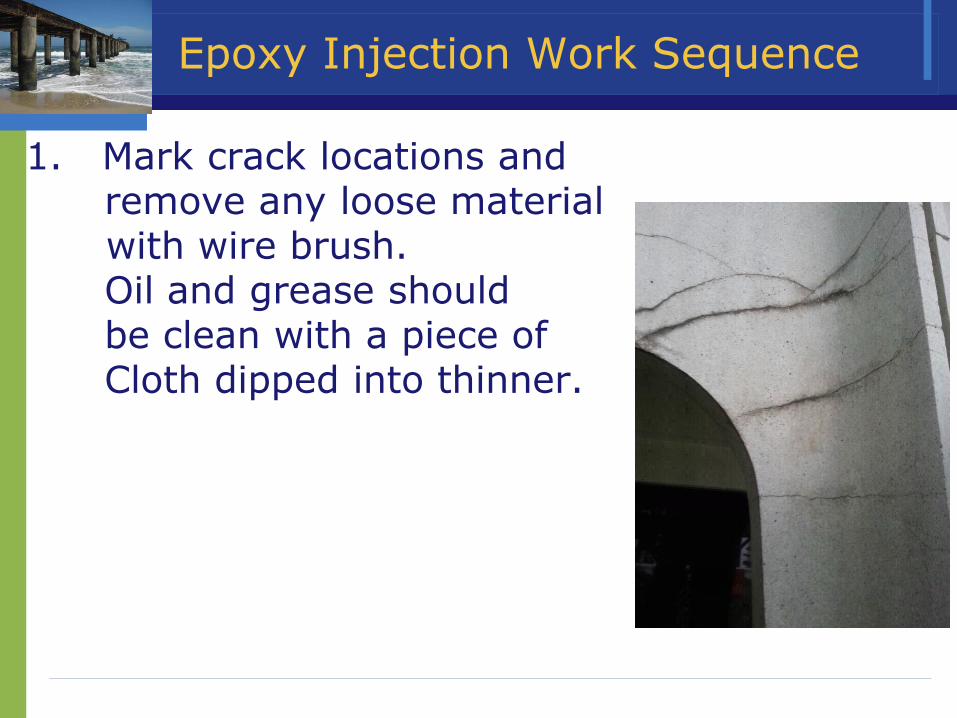
Epoxy Injection Work Sequence
1. Mark crack locations and remove any loose material with wire brush. Oil and grease should be clean with a piece of Cloth dipped into thinner.
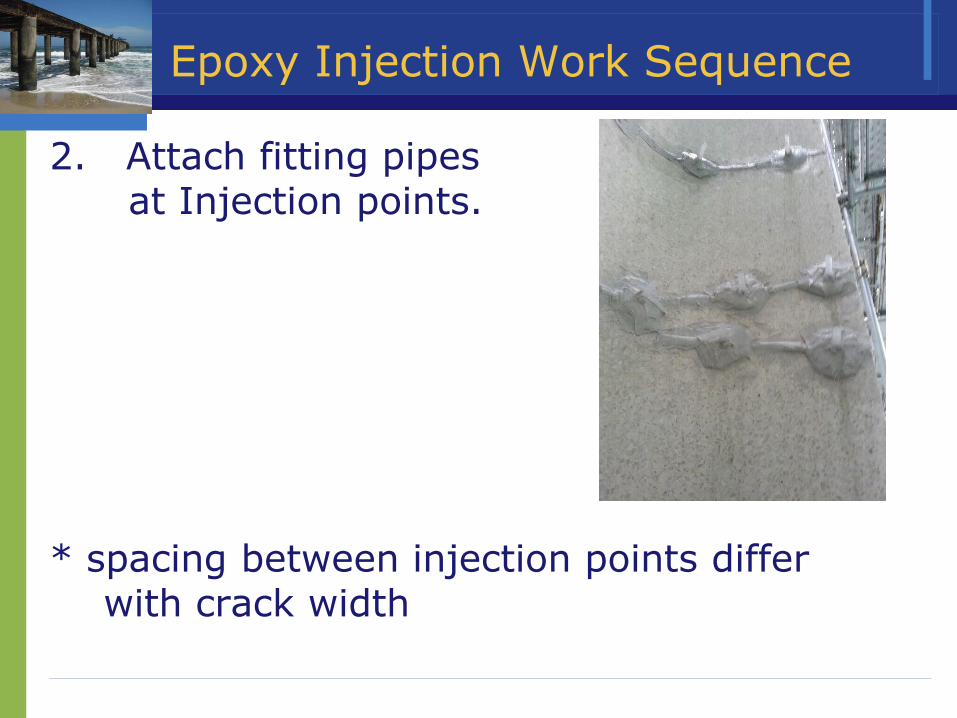
Epoxy Injection Work Sequence
2. Attach fitting pipes at Injection points. * spacing between injection points differ
with crack width
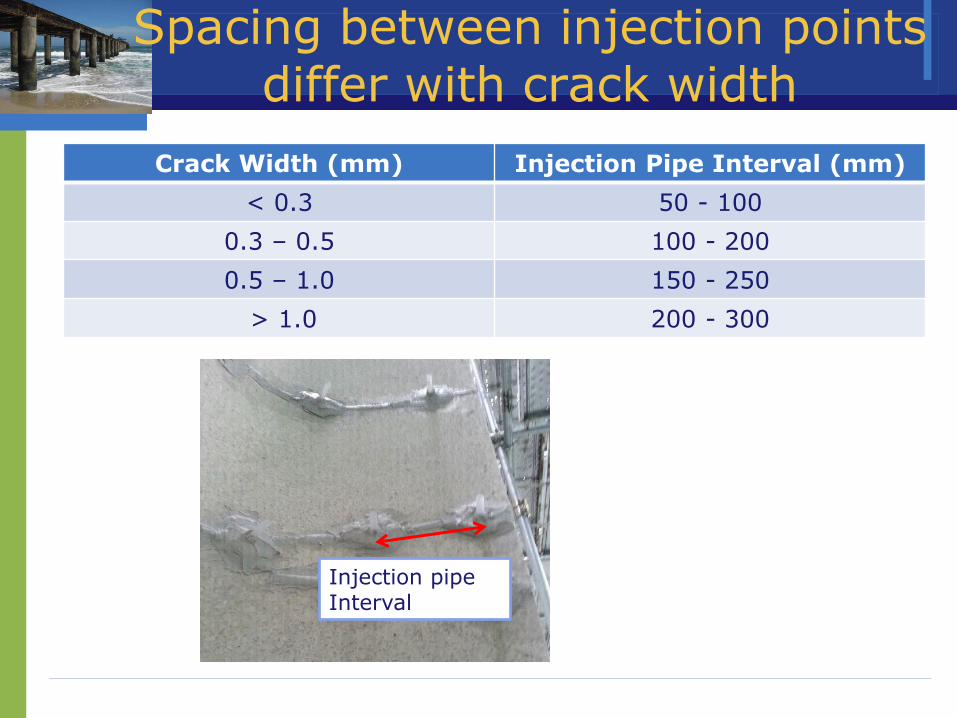
Spacing between injection points differ with crack width
Crack Width (mm) Injection Pipe Interval (mm)
< 0.3 50 - 100
0.3 – 0.5 100 - 200
0.5 – 1.0 150 - 250
> 1.0 200 - 300
Injection pipe Interval
Epoxy Injection Work Sequence
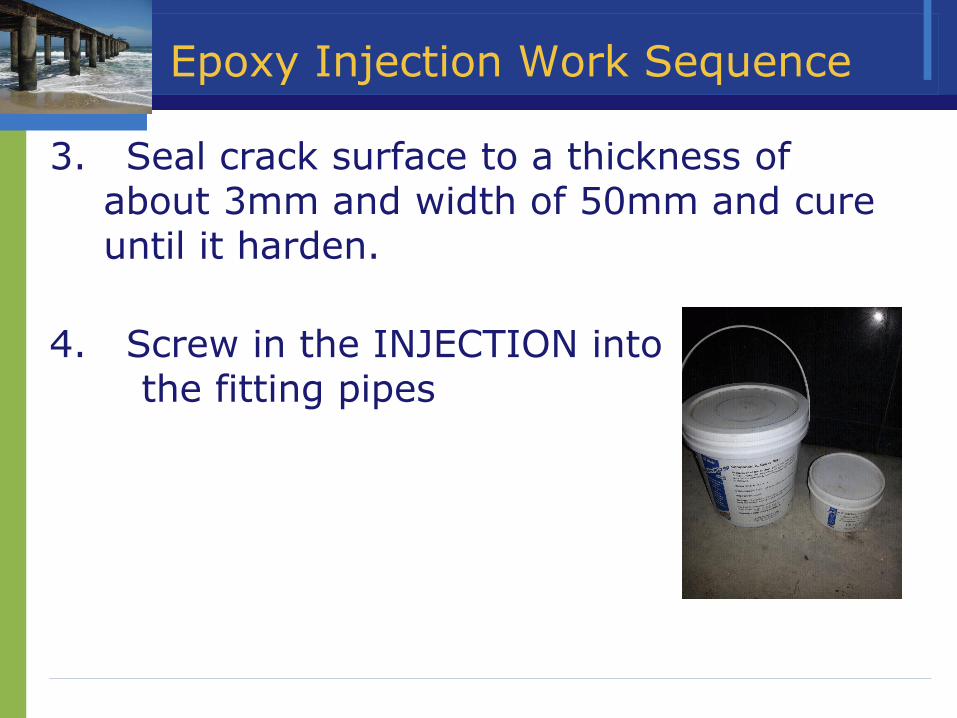
3. Seal crack surface to a thickness of about 3mm and width of 50mm and cure until it harden.
4. Screw in the INJECTION into the fitting pipes
Epoxy Injection Work Sequence
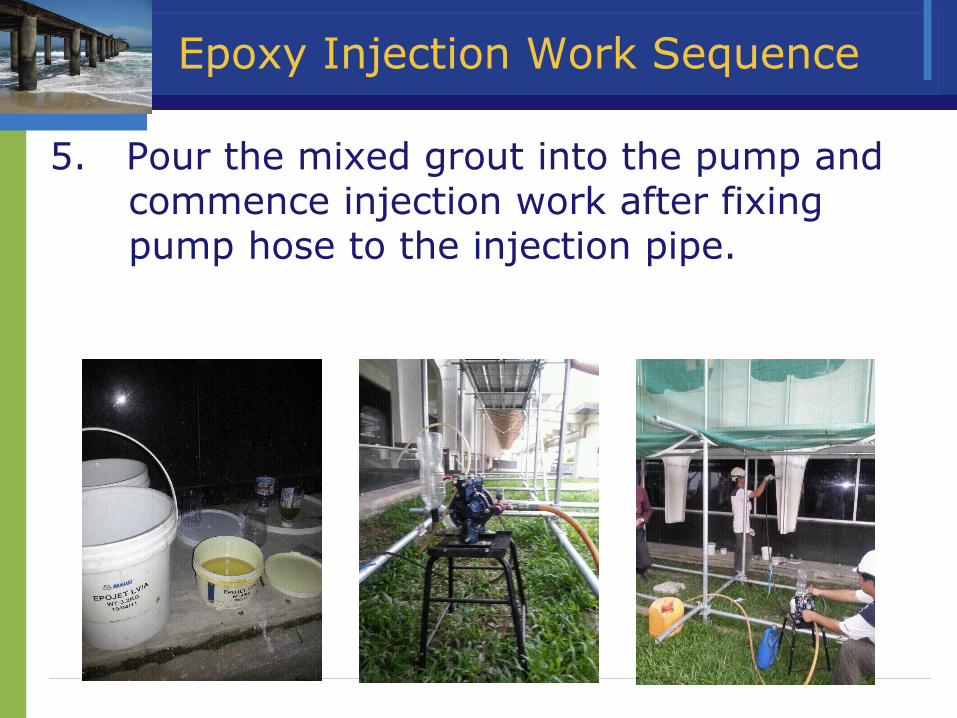
5. Pour the mixed grout into the pump and commence injection work after fixing pump hose to the injection pipe.
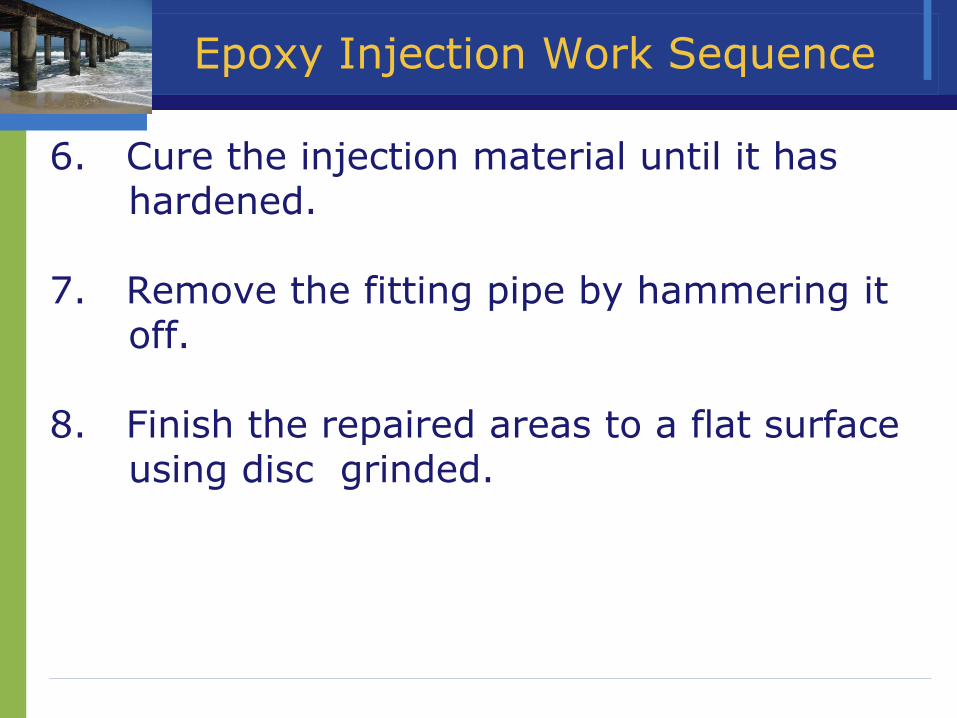
Epoxy Injection Work Sequence
6. Cure the injection material until it has hardened. 7. Remove the fitting pipe by hammering it off. 8. Finish the repaired areas to a flat surface using disc grinded.
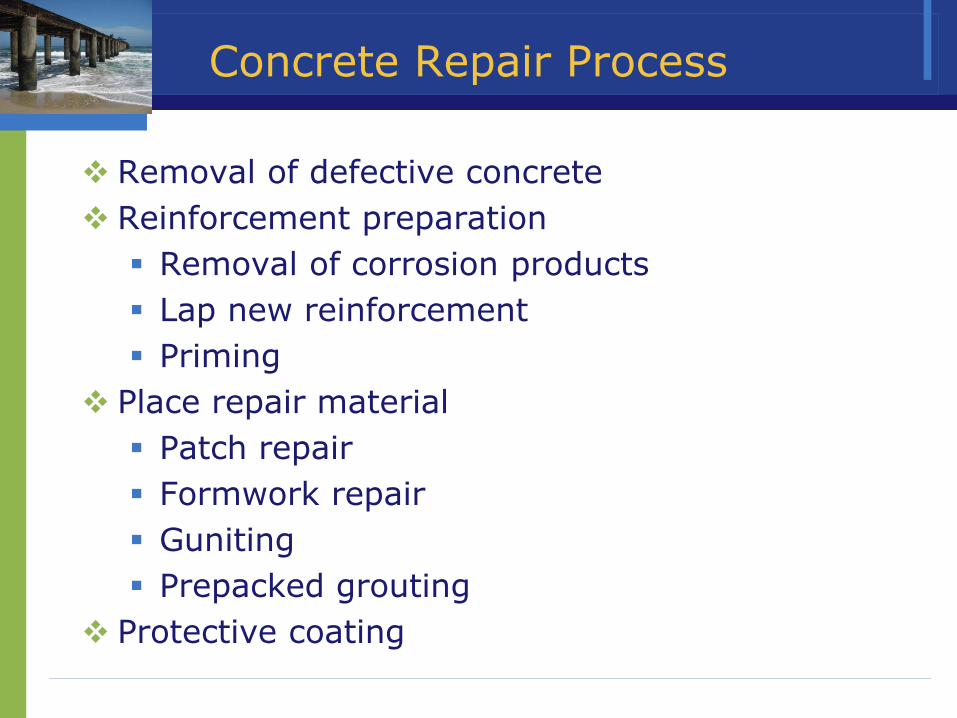
Concrete Repair Process
Removal of defective concrete
Reinforcement preparation
Removal of corrosion products
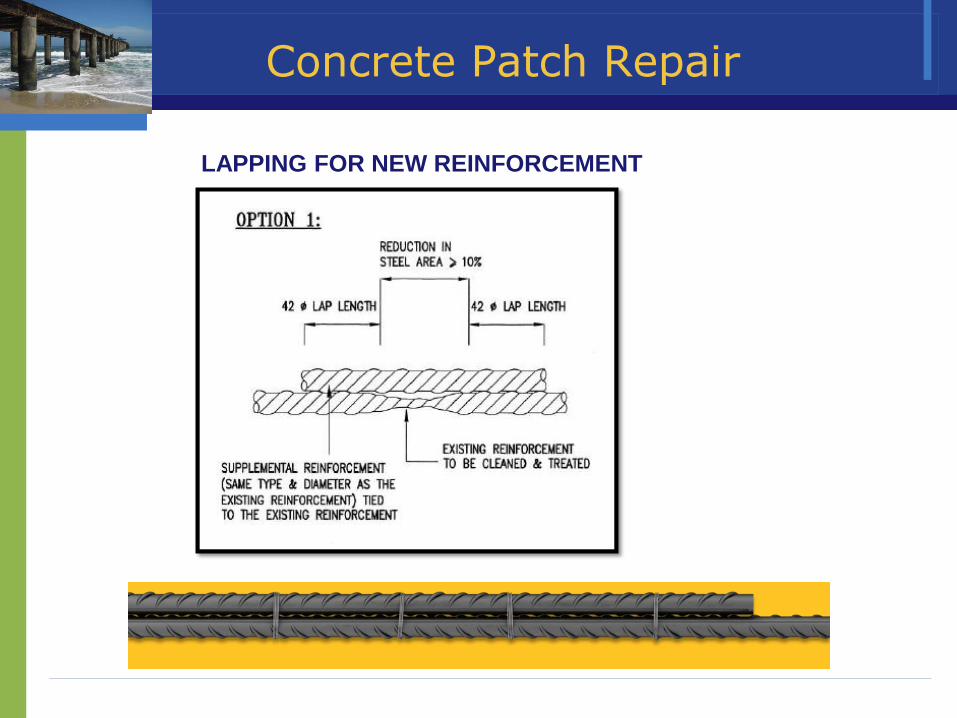
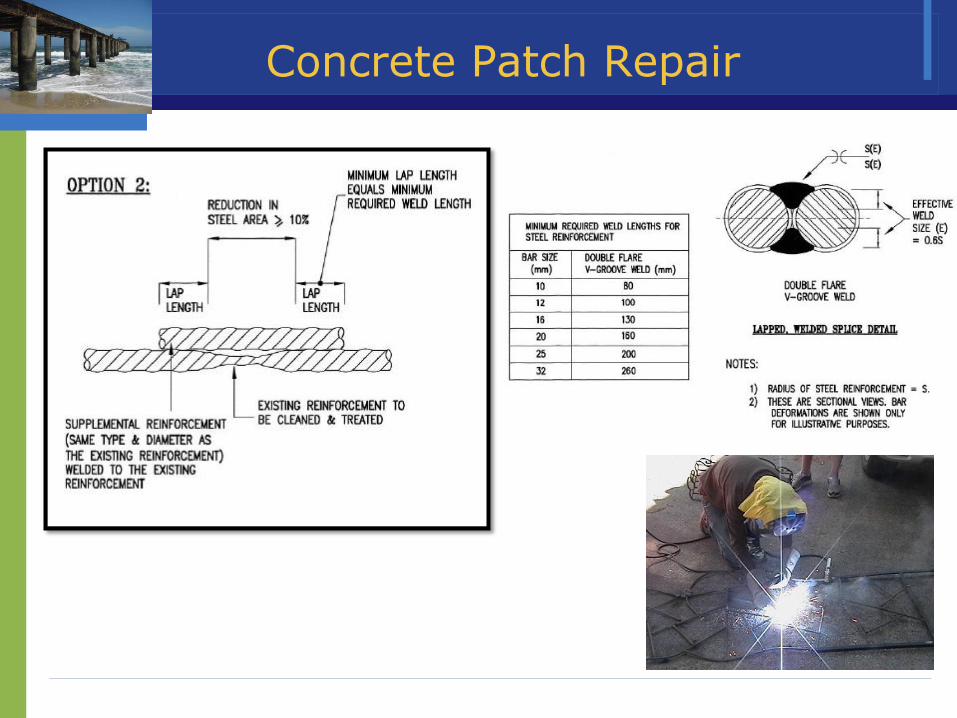
Lap new reinforcement
Priming
Place repair material
Patch repair
Formwork repair
Guniting
Prepacked grouting
Protective coating
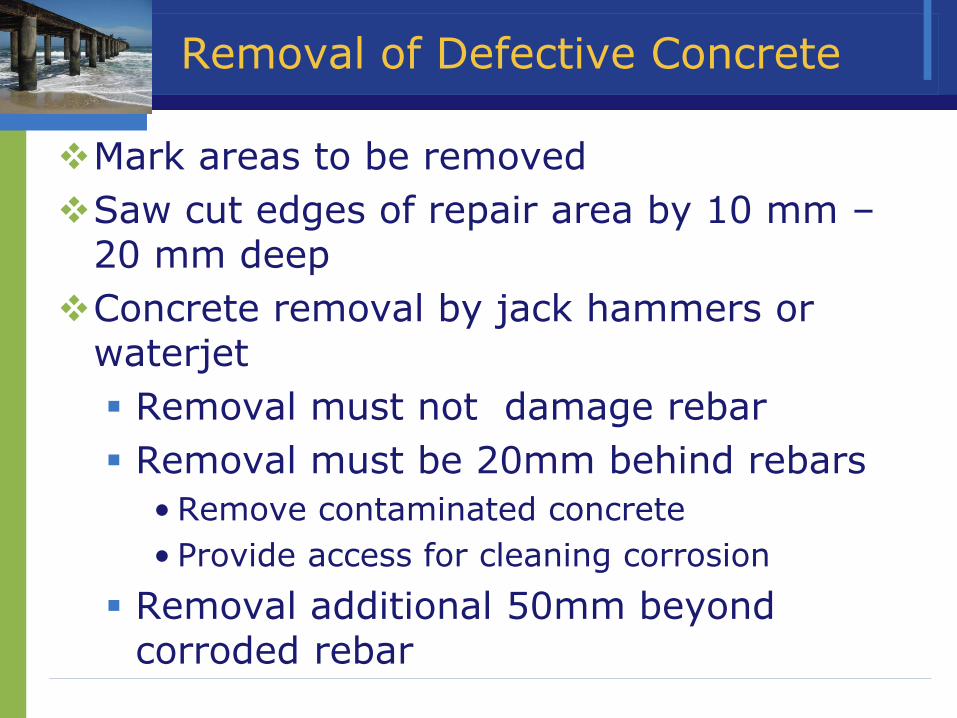
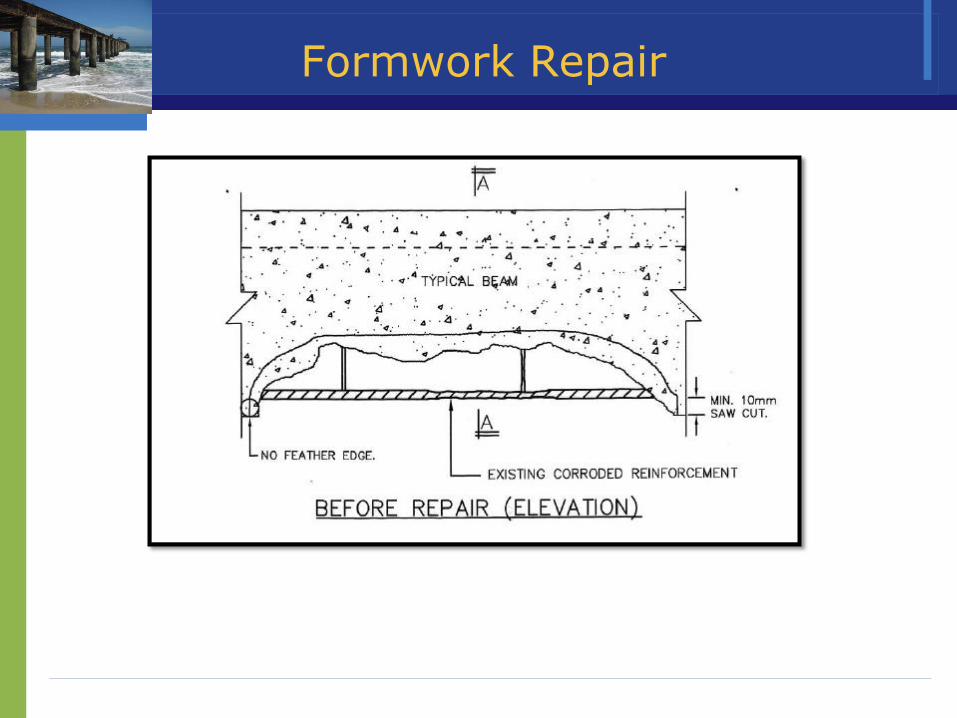
Removal of Defective Concrete
Mark areas to be removed
Saw cut edges of repair area by 10 mm – 20 mm deep
Concrete removal by jack hammers or waterjet
Removal must not damage rebar
Removal must be 20mm behind rebars
• Remove contaminated concrete
• Provide access for cleaning corrosion
Removal additional 50mm beyond corroded rebar
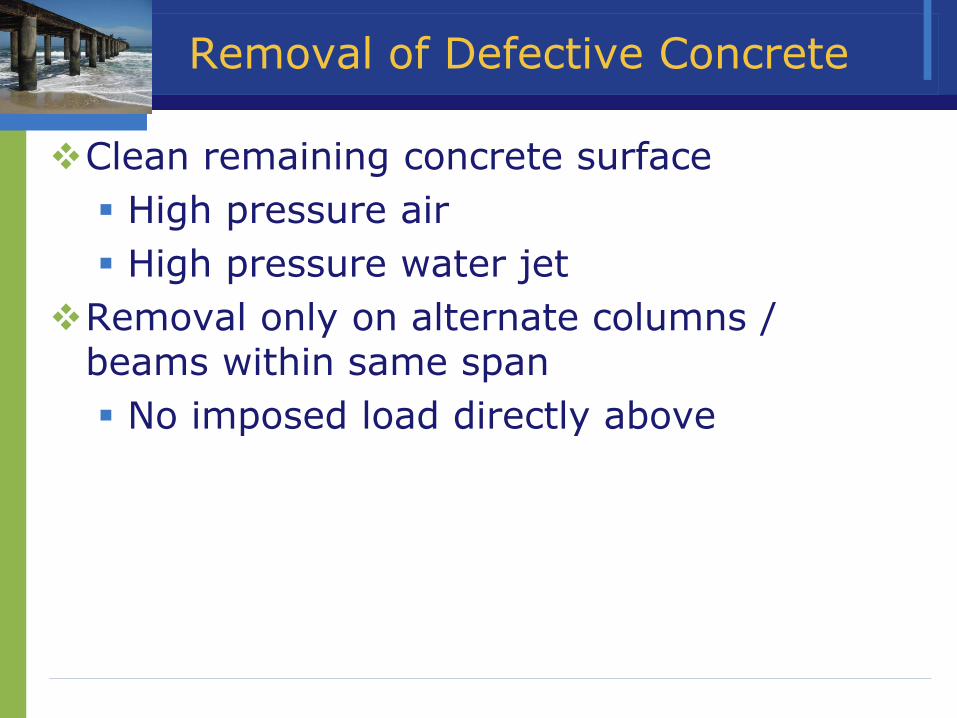
Removal of Defective Concrete
Clean remaining concrete surface
High pressure air
High pressure water jet
Removal only on alternate columns / beams within same span
No imposed load directly above
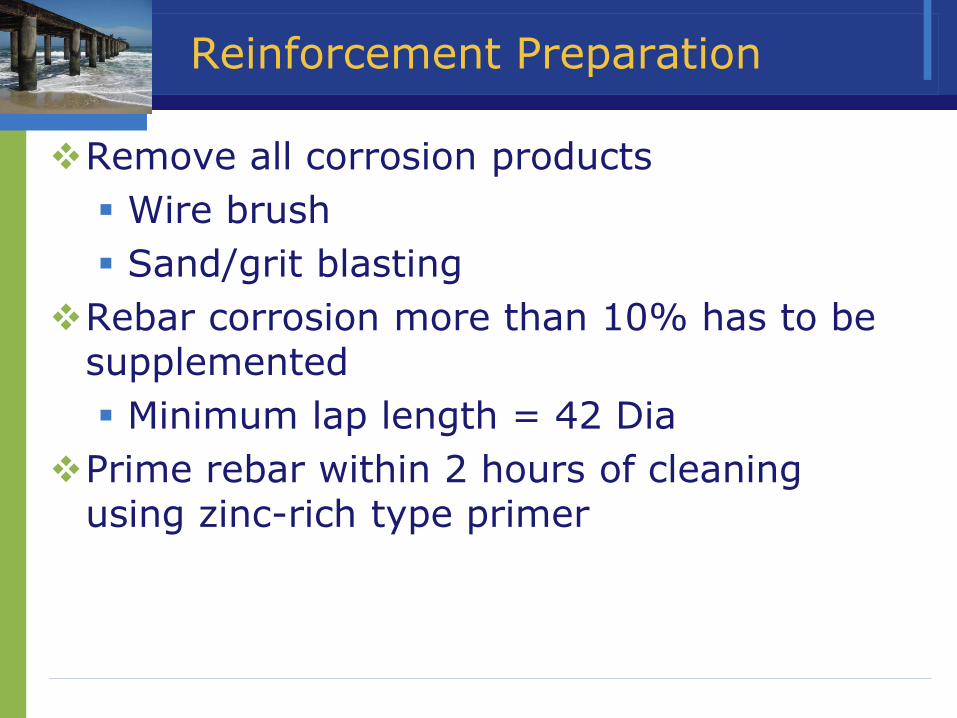
Reinforcement Preparation
Remove all corrosion products
Wire brush
Sand/grit blasting
Rebar corrosion more than 10% has to be supplemented
Minimum lap length = 42 Dia
Prime rebar within 2 hours of cleaning using zinc-rich type primer
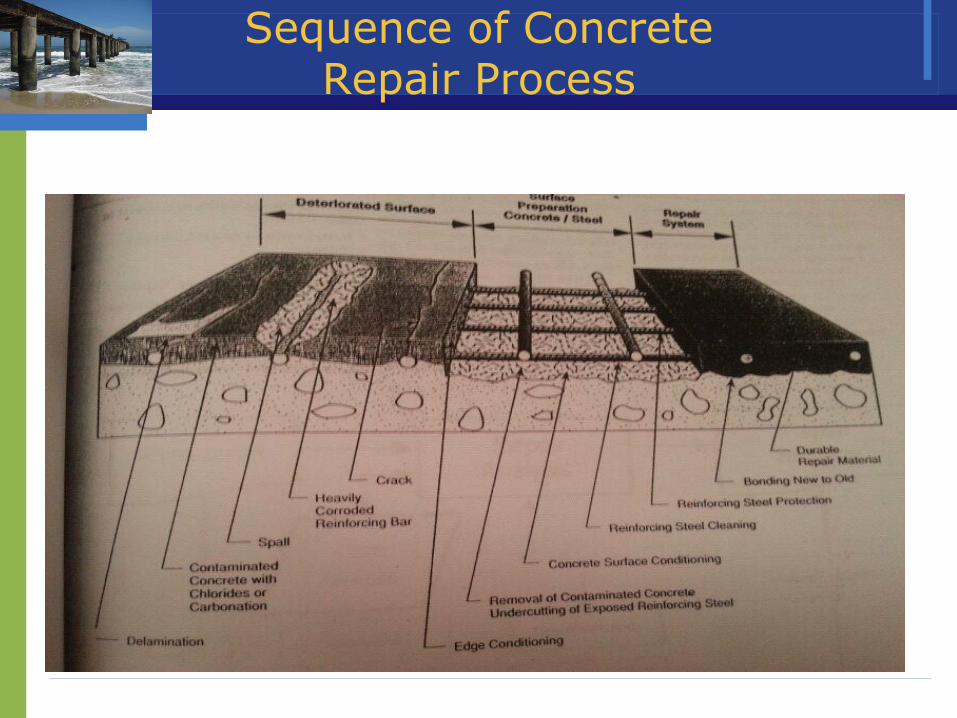
Sequence of Concrete Repair Process
Application Criteria for Patching
Inactive defects due to honeycomb, spalling, cavity etc.
Spalling/ defective area not more than 0.5m2
Localised / small defect
Causes
Poor workmanship
Minimal carbonation
Inadequate cover
Concrete Patch Repair
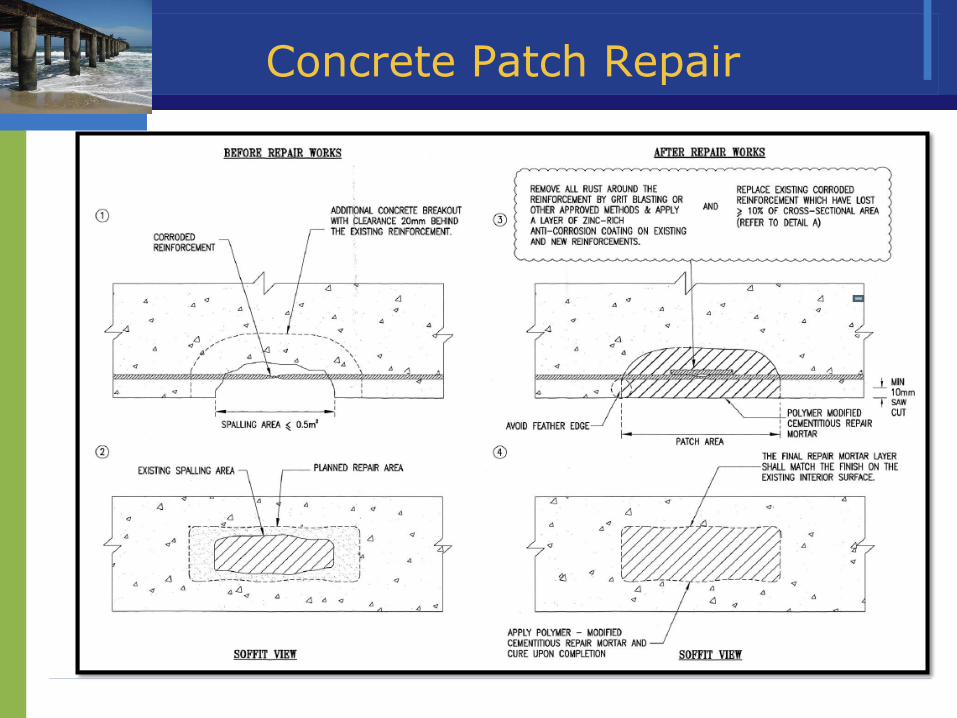
Concrete Patch Repair
Concrete Patch Repair
LAPPING FOR NEW REINFORCEMENT
Concrete Patch Repair
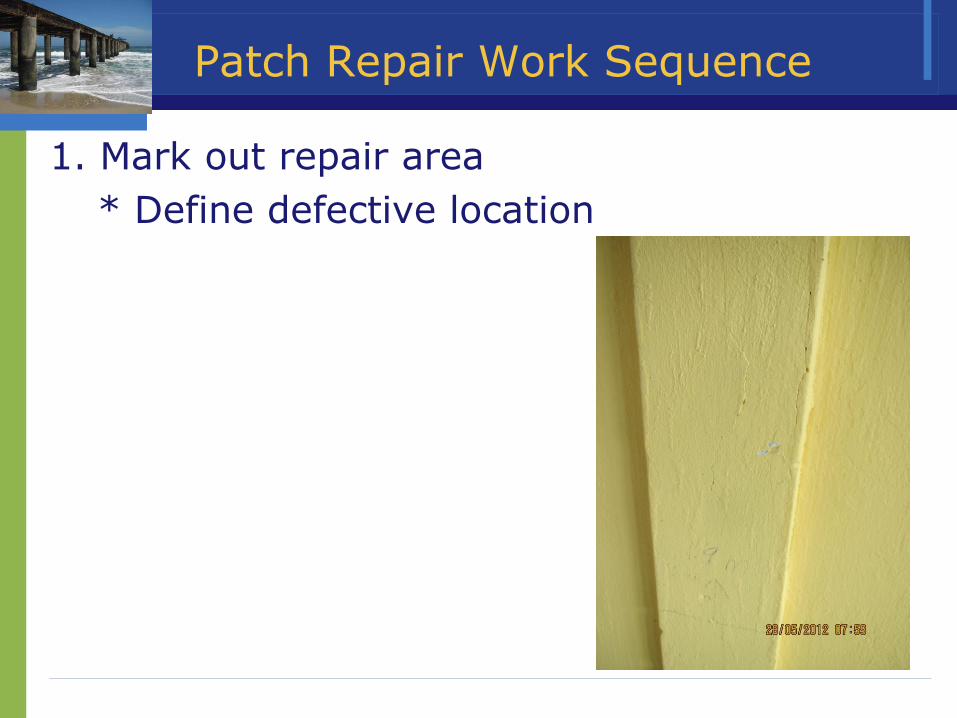
Patch Repair Work Sequence
1. Mark out repair area
* Define defective location
Patch Repair Work Sequence
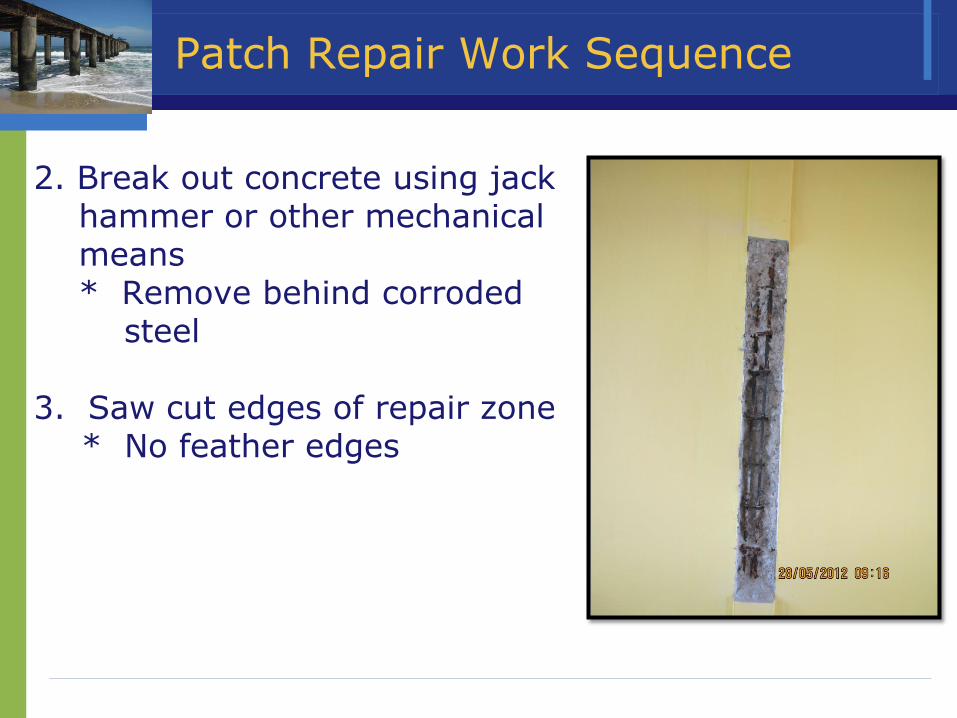
2. Break out concrete using jack hammer or other mechanical means * Remove behind corroded steel 3. Saw cut edges of repair zone
* No feather edges
Patch Repair Work Sequence
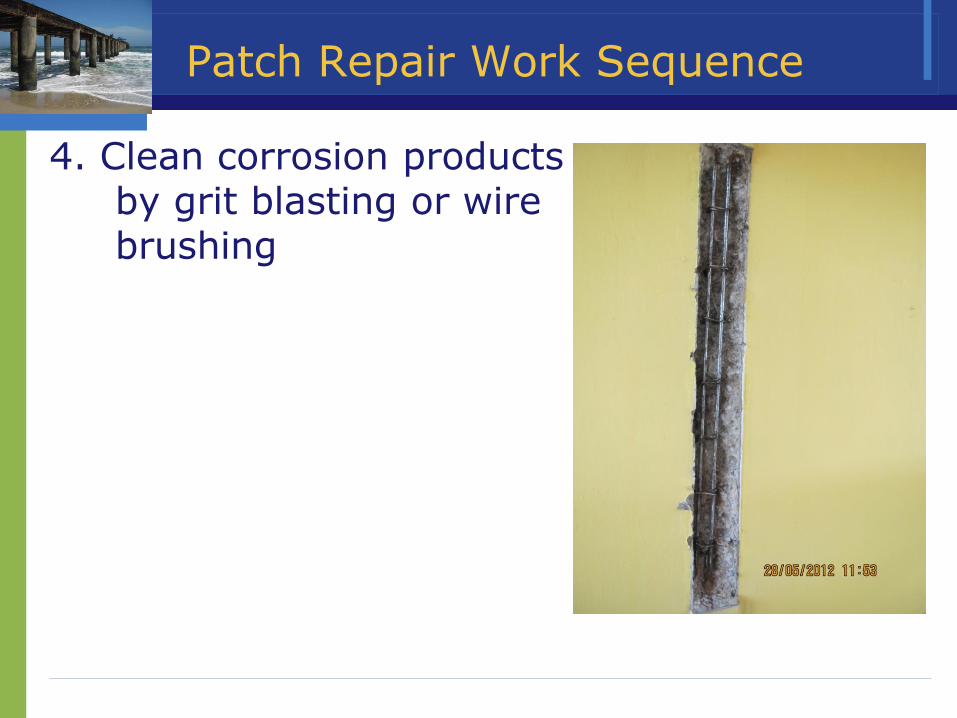
4. Clean corrosion products by grit blasting or wire brushing
Patch Repair Work Sequence
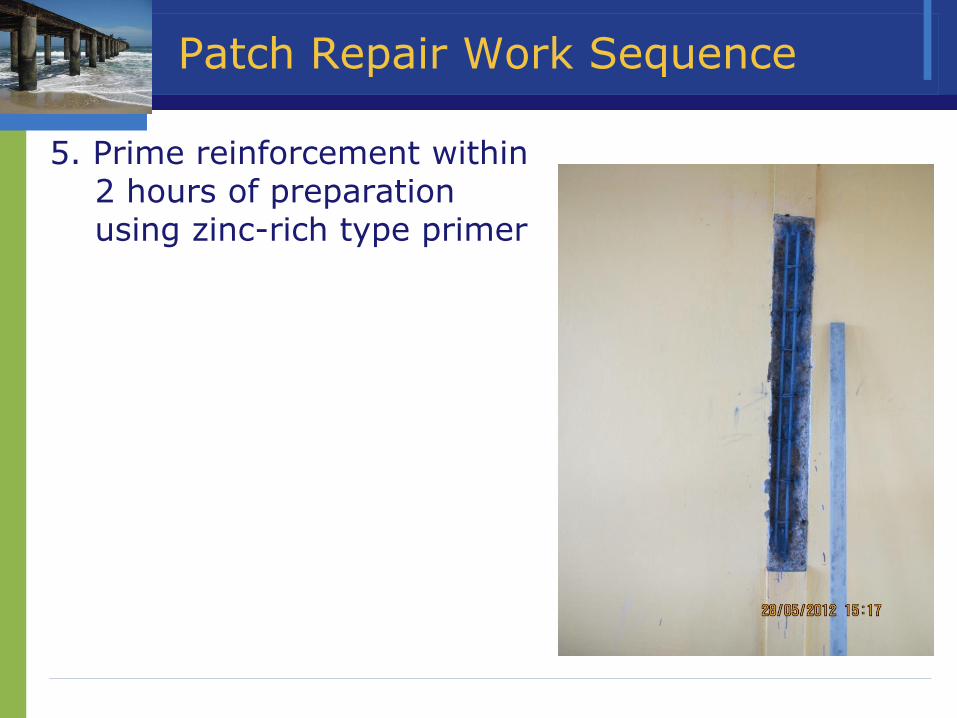
5. Prime reinforcement within 2 hours of preparation using zinc-rich type primer
Patch Repair Work Sequence
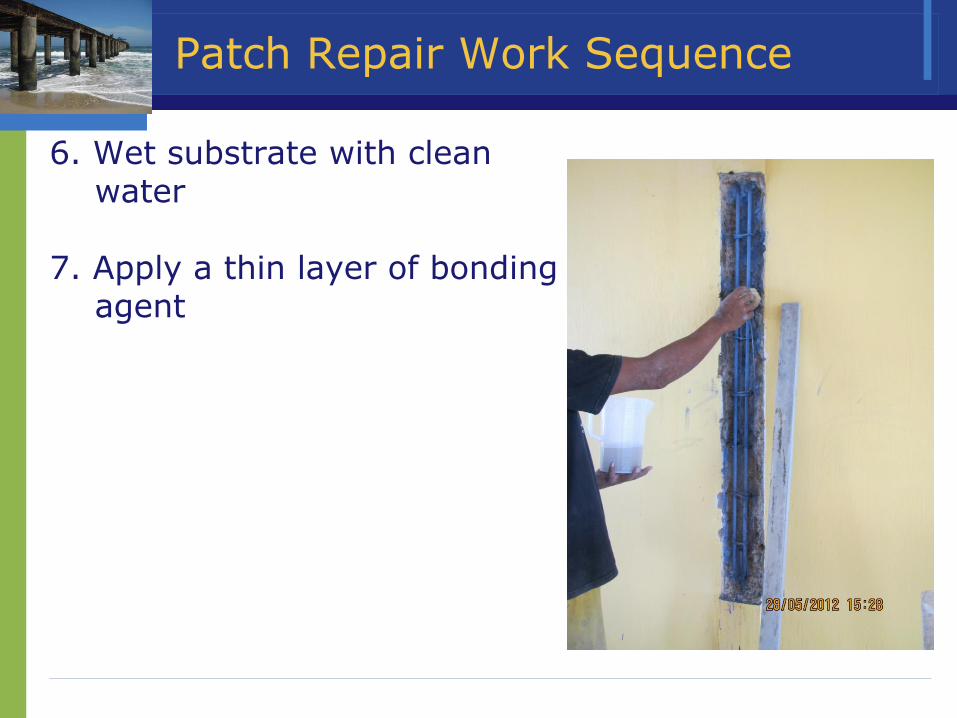
6. Wet substrate with clean water 7. Apply a thin layer of bonding agent

Patch Repair Work Sequence
8. Hand applied repair mortar in layers of about 10 mm each
Patch Repair Work Sequence
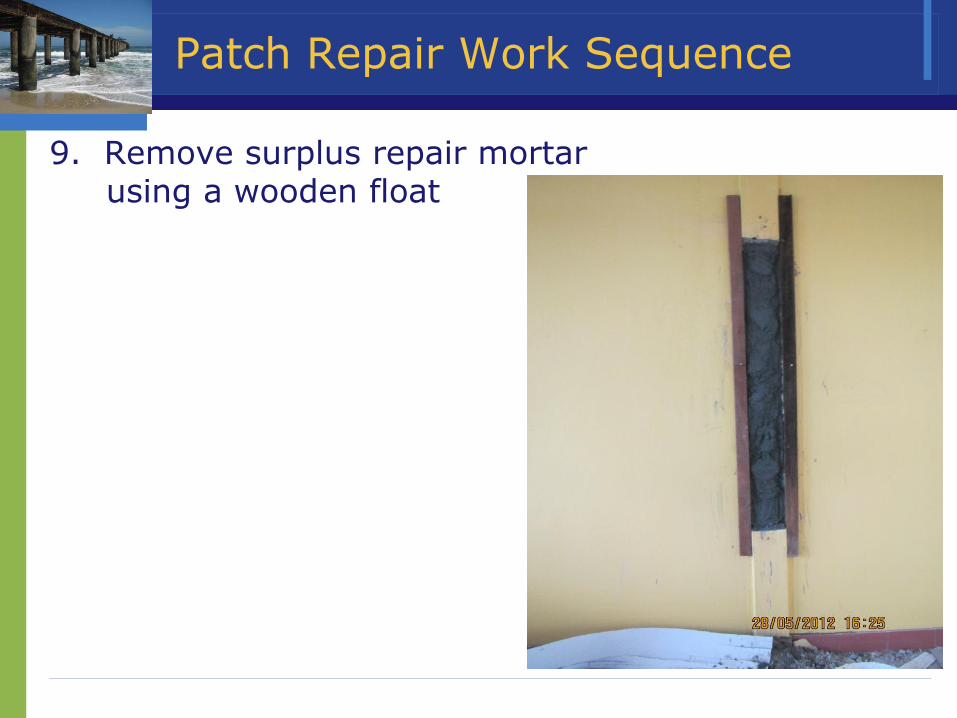
9. Remove surplus repair mortar using a wooden float
Patch Repair Work Sequence
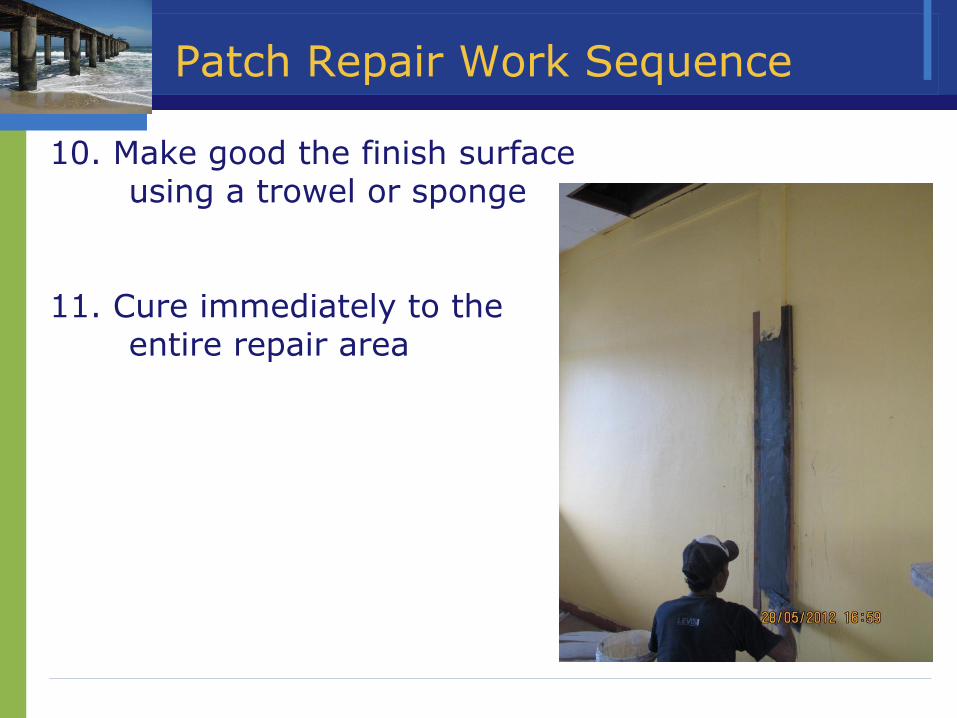
10. Make good the finish surface using a trowel or sponge 11. Cure immediately to the entire repair area
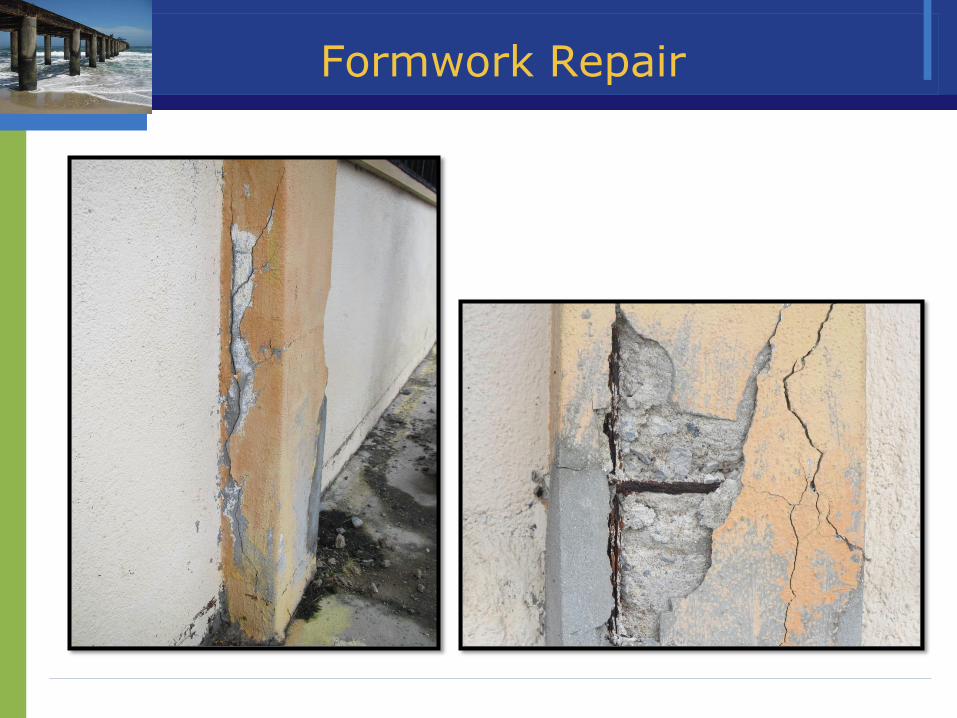
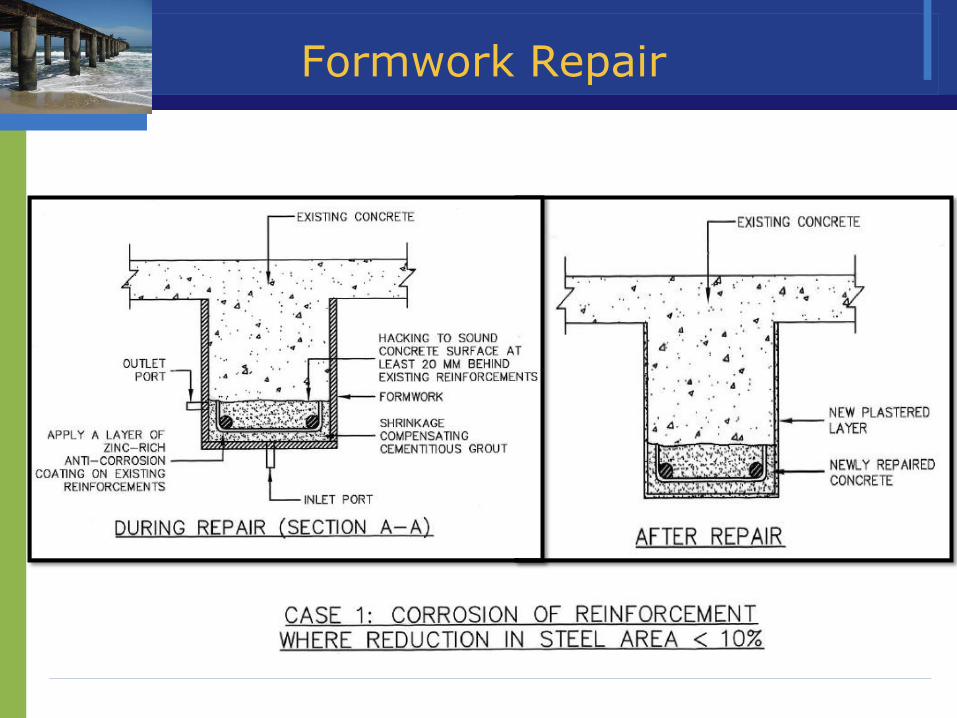
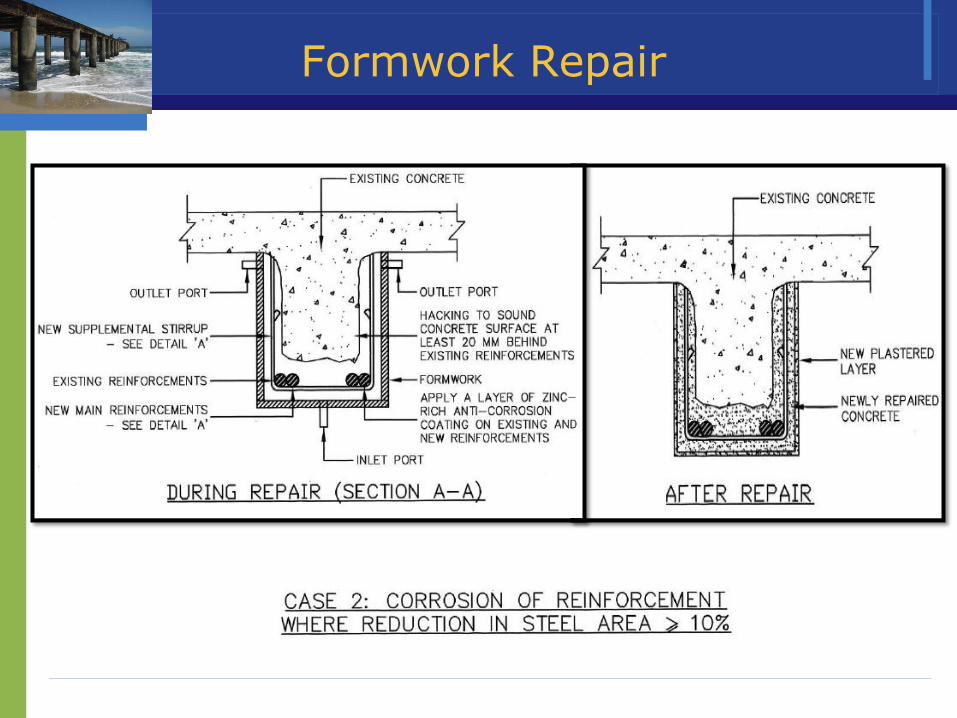
Application Criteria for Formwork Repair
Cracks / delaminations / spalling resulting form corrosion of rebar
Chloride ingress and carbonation
Adraded concrete surface with loss of cement matrix
Material deterioration due to sulfate or acid attack
Large repair area
Formwork Repair Material
Specialist formulator’s Micro-Concrete
Free-flowing
Self compacting
• Advantageous as space is confined
High strength
• Rapid strength development
Shrinkage compensated
Abraded concrete surface with loss of cement matrix
Prepacked
• Factory controlled quality
• Only add water at site
Formwork Repair
Formwork Repair
Formwork Repair
Formwork Repair
Formwork Repair
Formwork Repair
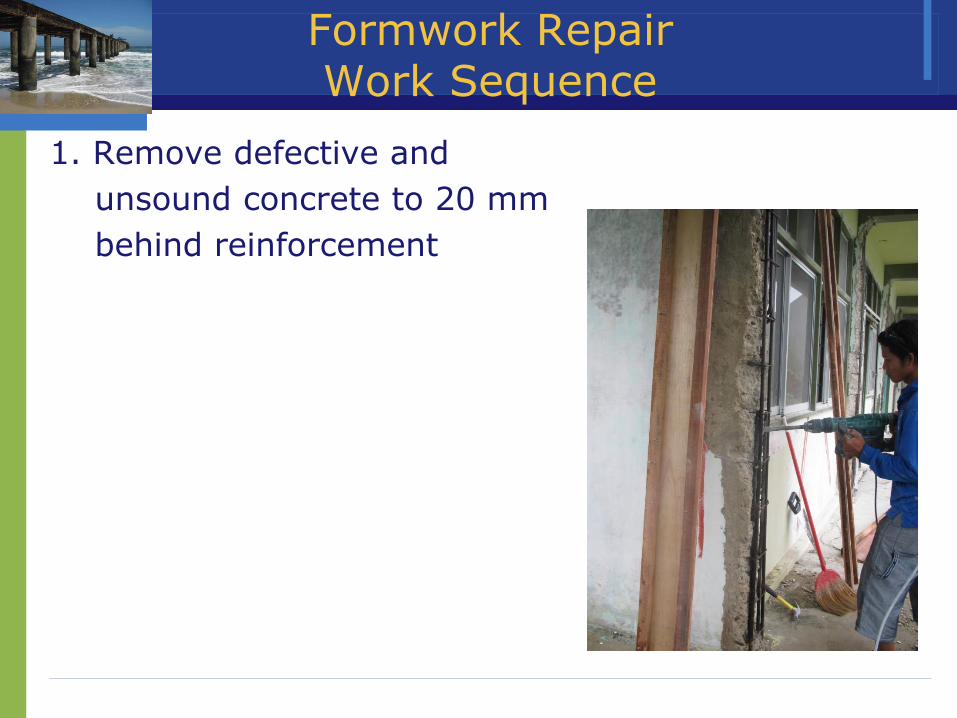
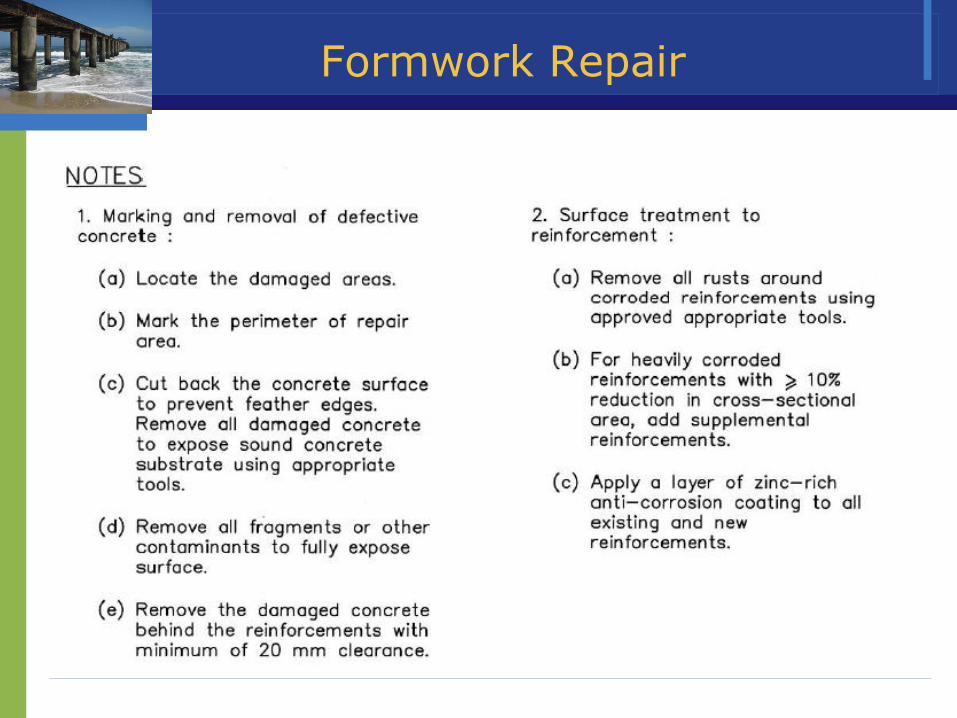
Formwork Repair Work Sequence
1. Remove defective and
unsound concrete to 20 mm
behind reinforcement

Formwork Repair Work Sequence
2. Clean corrosion products
by grit blasting or wire
brushing
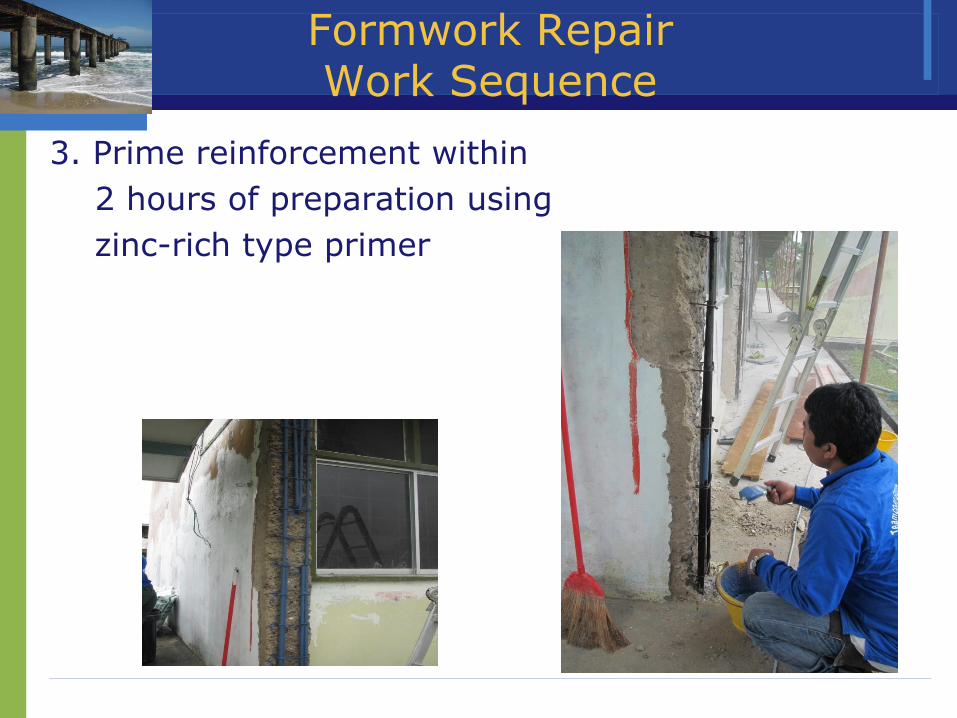
Formwork Repair Work Sequence
3. Prime reinforcement within
2 hours of preparation using
zinc-rich type primer
Formwork Repair Work Sequence
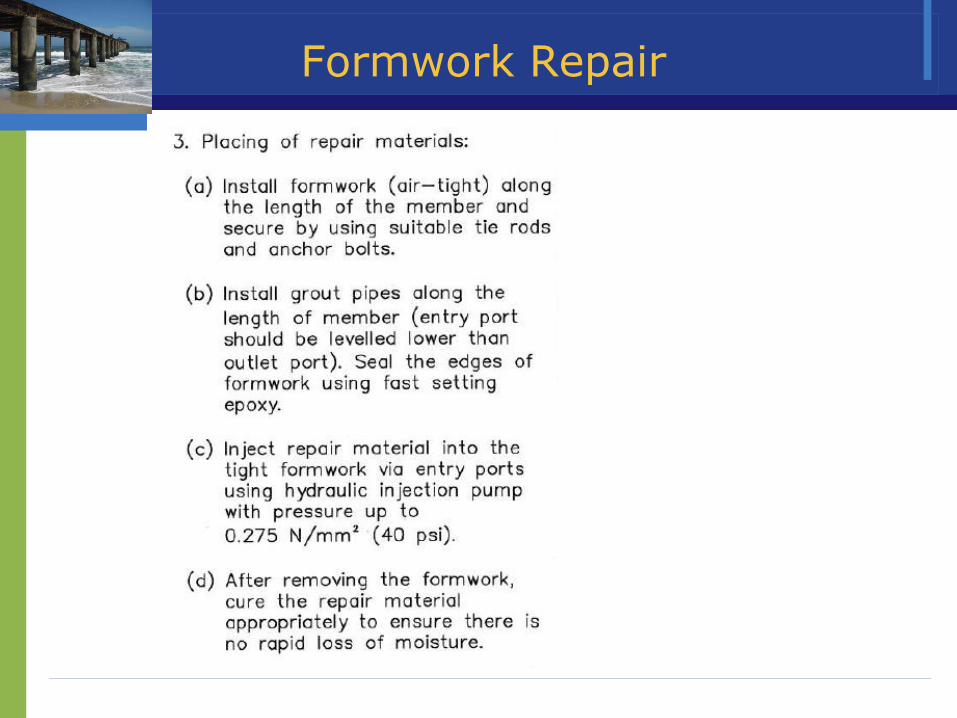
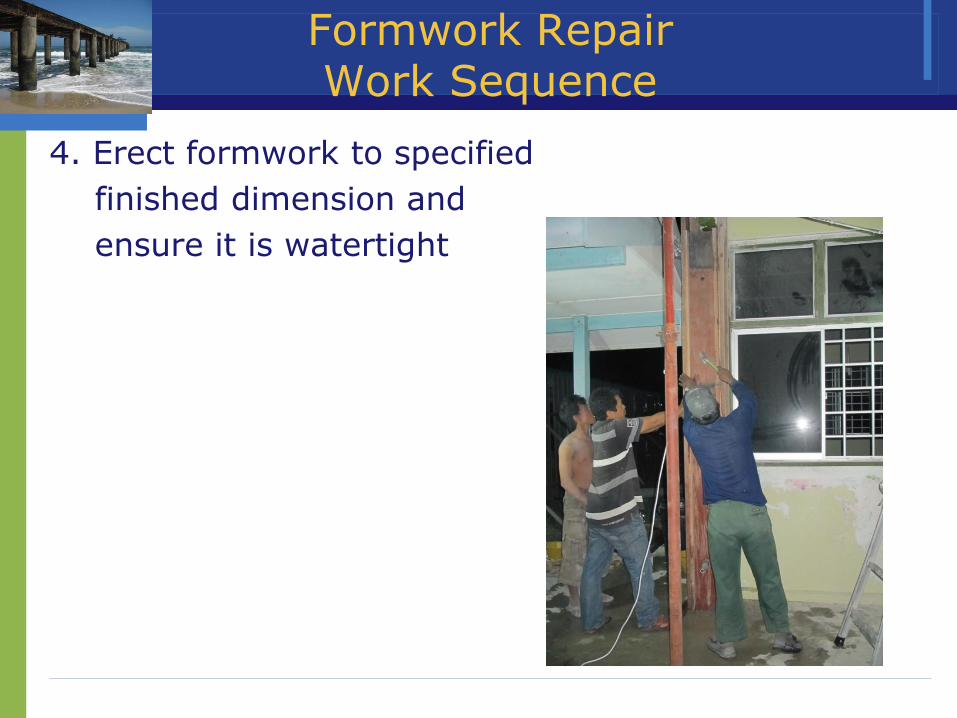
4. Erect formwork to specified
finished dimension and
ensure it is watertight
Formwork Repair Work Sequence
5. Mix grout – high strength, polymer modified,
prepackaged free flowing cementitious material – superfluid microconcretes
Formwork Repair Work Sequence
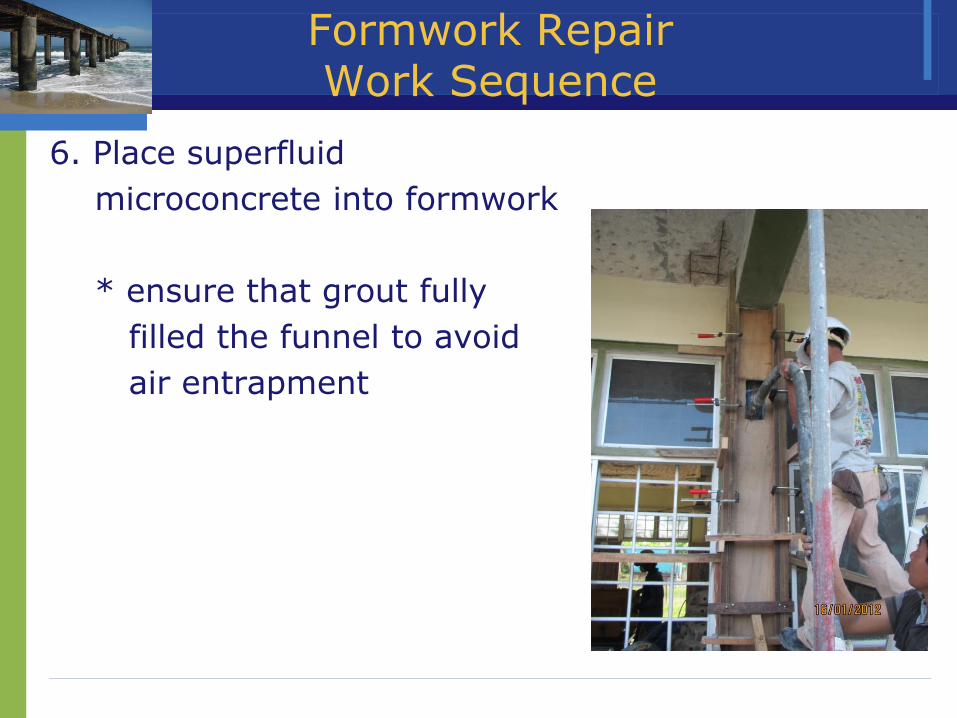
6. Place superfluid
microconcrete into formwork
* ensure that grout fully
filled the funnel to avoid
air entrapment
Formwork Repair Work Sequence
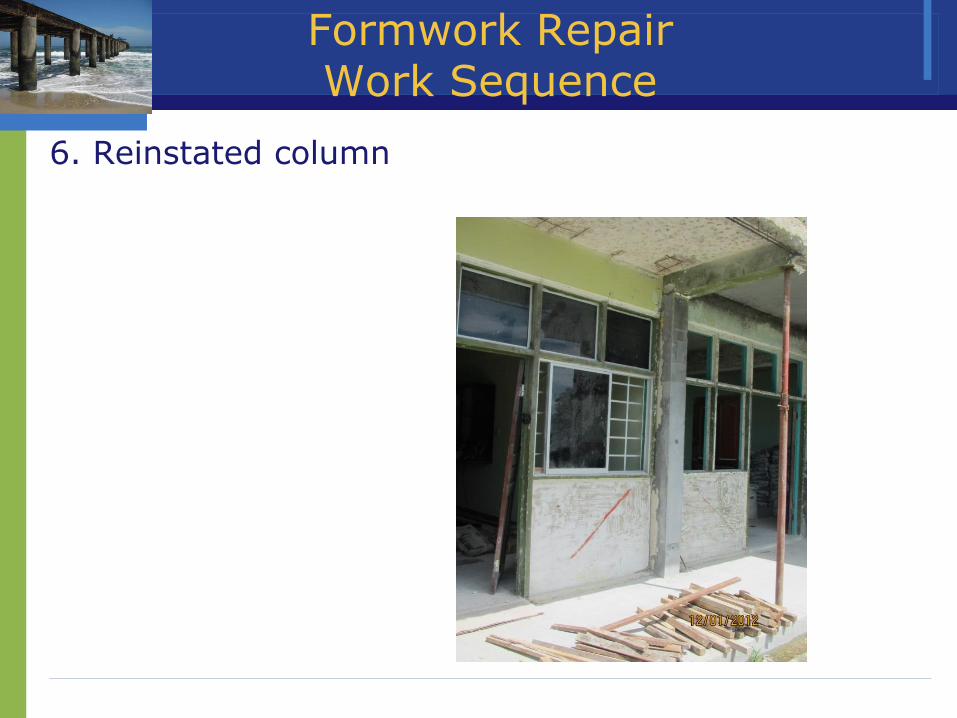
6. Reinstated column
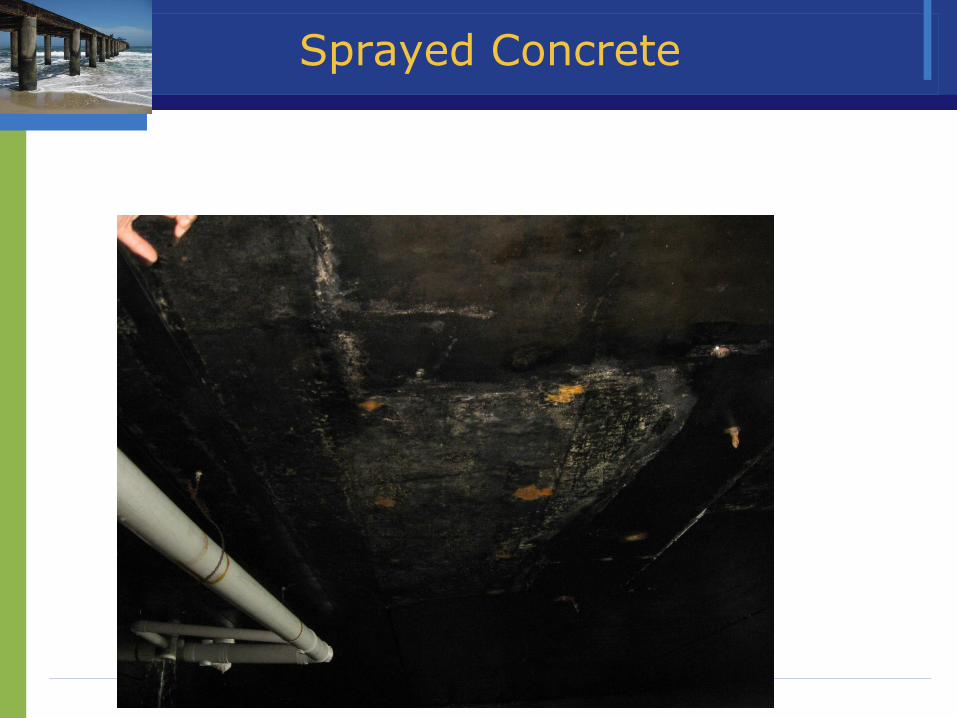
Sprayed Concrete
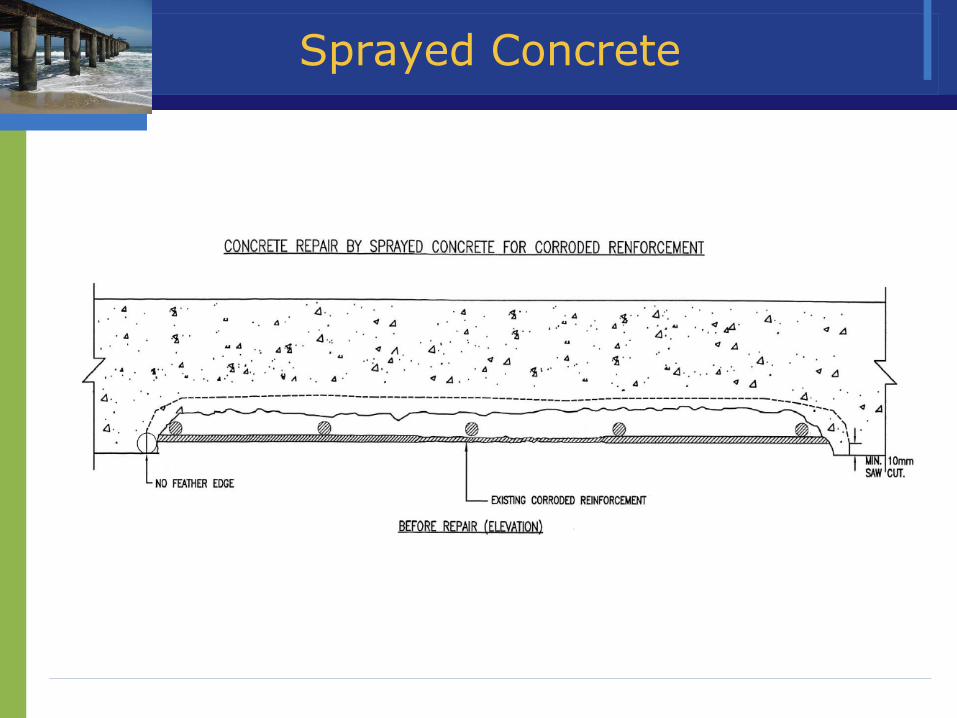
Sprayed Concrete
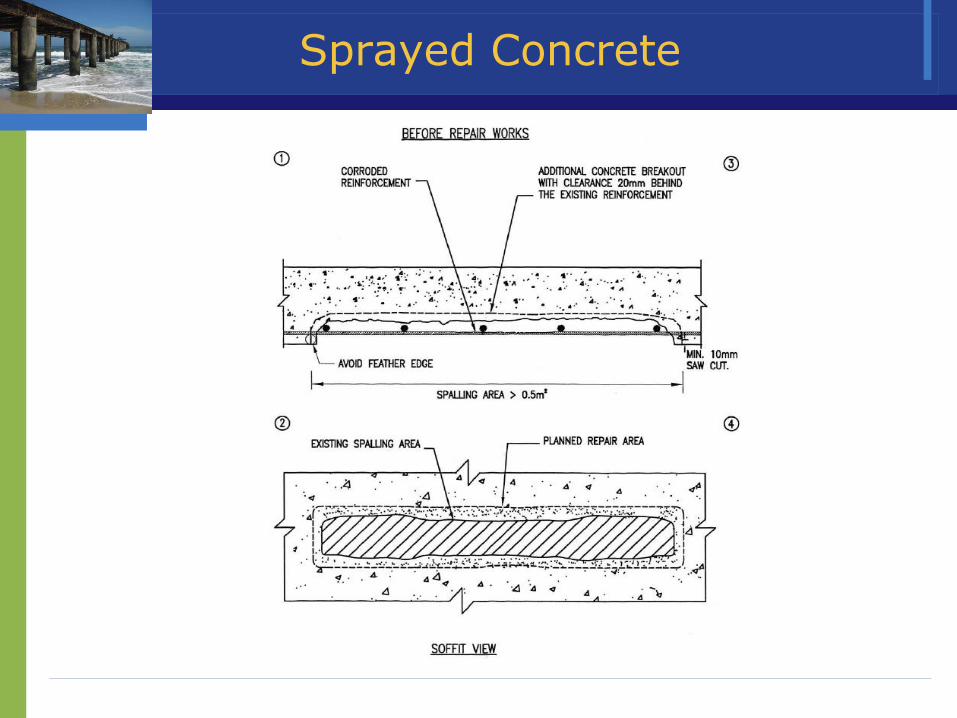
Sprayed Concrete
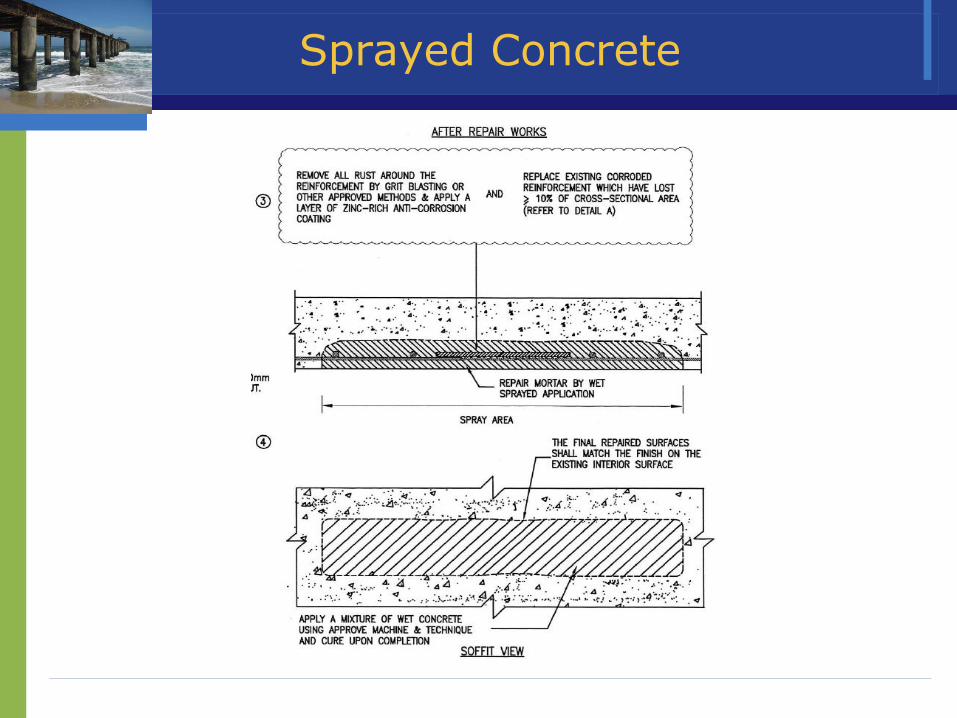
Sprayed Concrete
Sprayed Concrete Work Sequence
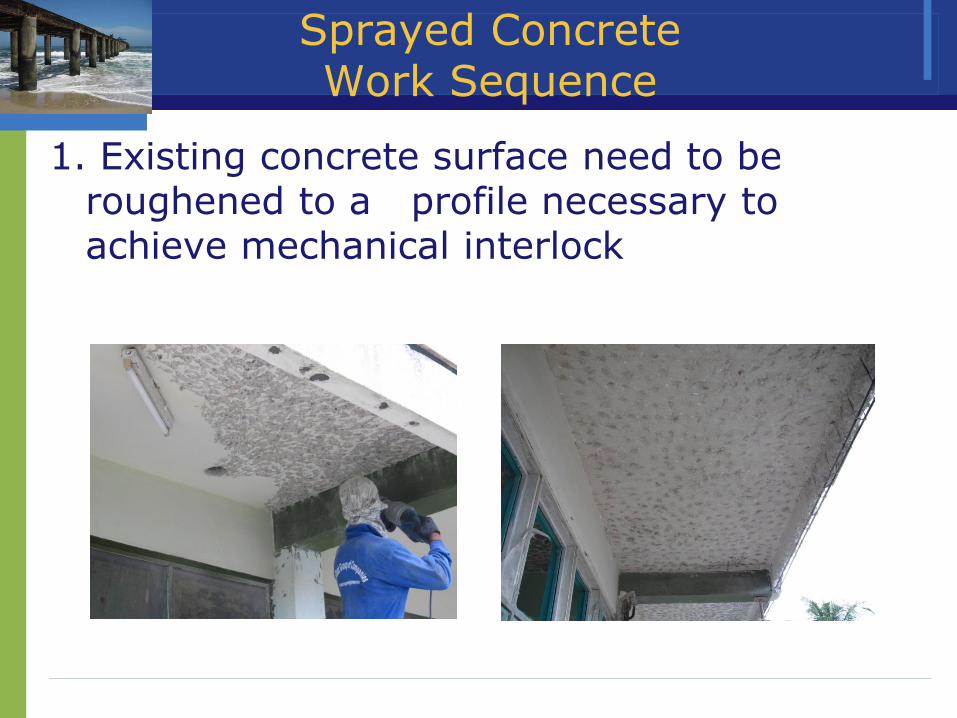
1. Existing concrete surface need to be roughened to a profile necessary to achieve mechanical interlock
Sprayed Concrete Work Sequence
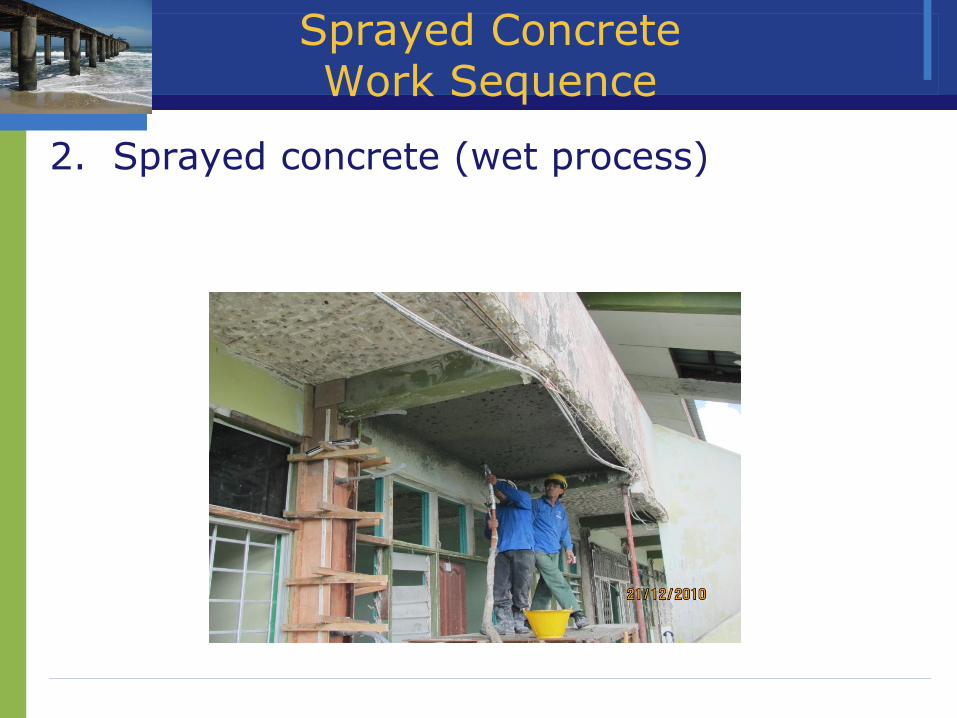
2. Sprayed concrete (wet process)
Sprayed Concrete Work Sequence
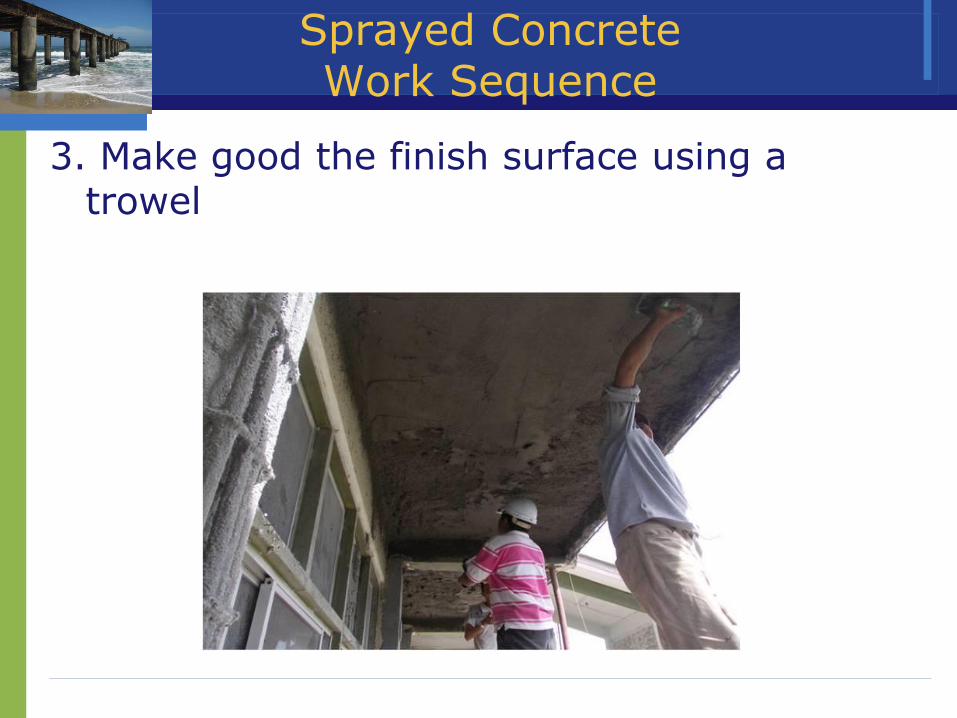
3. Make good the finish surface using a trowel
Sprayed Concrete Work Sequence
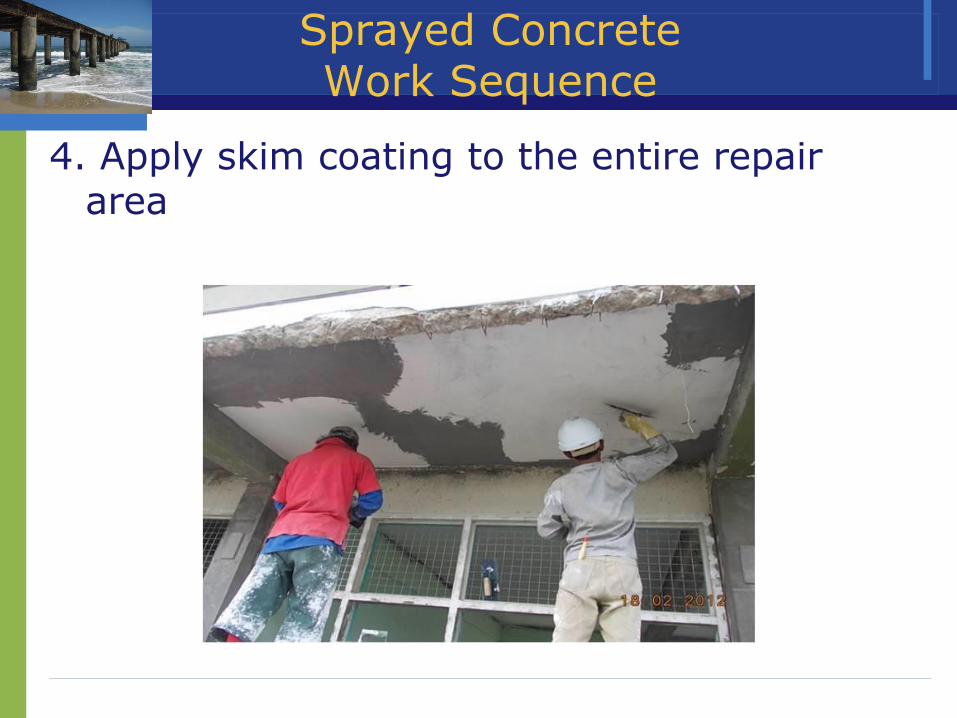
4. Apply skim coating to the entire repair area
Sprayed Concrete Work Sequence
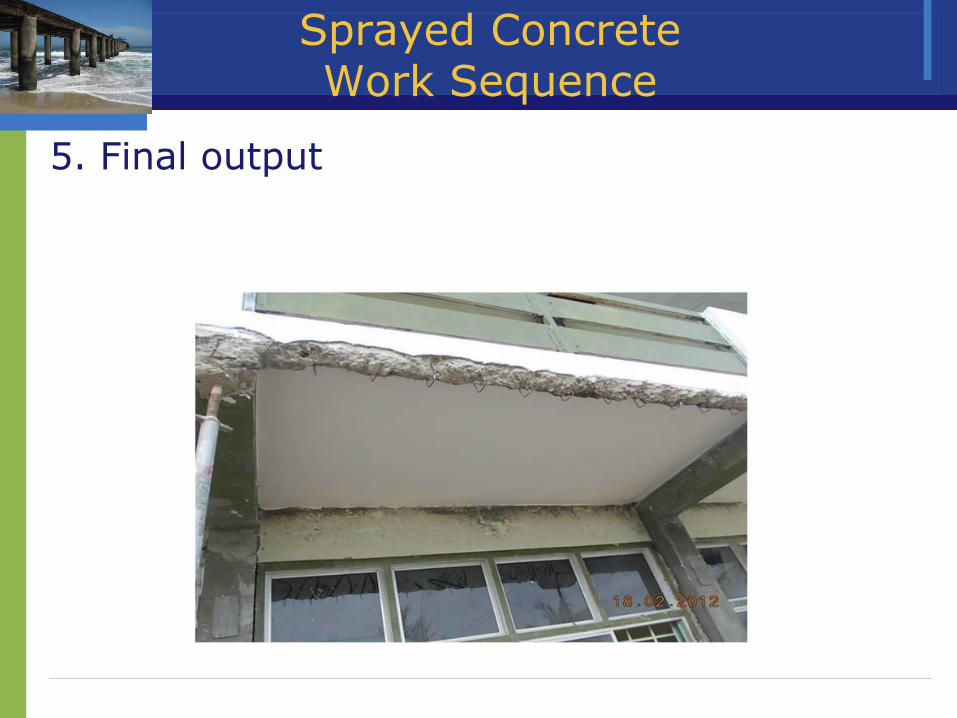
5. Final output

TERIMA KASIH