panduan pengguna gs290 - altehandys.dealtehandys.de/downloads/man-lg-gs290.pdf · pad kekunci,...
TRANSCRIPT
Panduan Pengguna
GS290
P/NO : MMBB0370964(1.0) WR www.lg.com
Bahasa Melayu简 体 中 文 E N G L I S H
Panduan P
engguna G
S2
90
GS290_MYS_Cover.indd 1GS290_MYS_Cover.indd 1 2010-04-21 10:02:192010-04-21 10:02:19
Bluetooth QD ID B016078
GS290_MYS_Cover.indd 2GS290_MYS_Cover.indd 2 2010-04-21 10:02:212010-04-21 10:02:21
PANDUAN PENGGUNA GS290Sesetengah daripada kandungan dalam manual ini mungkin berbeza daripada telefon anda bergantung kepada perisian telefon atau pembekal khidmat anda.
2
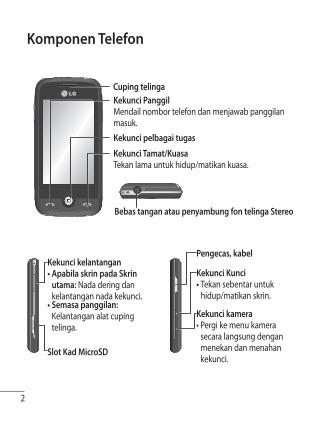
Cuping telinga
Slot Kad MicroSD
Kekunci PanggilMendail nombor telefon dan menjawab panggilan masuk.Kekunci pelbagai tugas
Kekunci Tamat/KuasaTekan lama untuk hidup/matikan kuasa.
Kekunci kelantangan• Apabila skrin pada Skrin
utama: Nada dering dan kelantangan nada kekunci.
• Semasa panggilan: Kelantangan alat cuping telinga.
Bebas tangan atau penyambung fon telinga Stereo
Komponen Telefon
Kekunci Kunci• Tekan sebentar untuk
hidup/matikan skrin.
Kekunci kamera• Pergi ke menu kamera
secara langsung dengan menekan dan menahan kekunci.
Pengecas, kabel
3
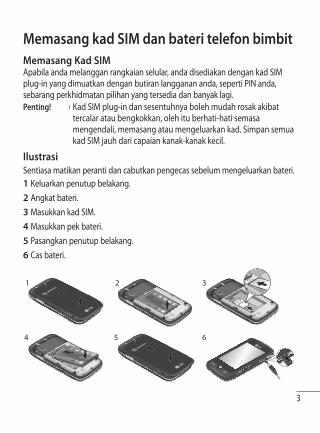
Memasang kad SIM dan bateri telefon bimbitMemasang Kad SIMApabila anda melanggan rangkaian selular, anda disediakan dengan kad SIM plug-in yang dimuatkan dengan butiran langganan anda, seperti PIN anda, sebarang perkhidmatan pilihan yang tersedia dan banyak lagi.Penting! › Kad SIM plug-in dan sesentuhnya boleh mudah rosak akibat
tercalar atau bengkokkan, oleh itu berhati-hati semasa mengendali, memasang atau mengeluarkan kad. Simpan semua kad SIM jauh dari capaian kanak-kanak kecil.
IlustrasiSentiasa matikan peranti dan cabutkan pengecas sebelum mengeluarkan bateri.
Keluarkan penutup belakang.Angkat bateri.Masukkan kad SIM.Masukkan pek bateri.Pasangkan penutup belakang.Cas bateri.
1 2 3 4 5 6
1 2 3
64 5
4
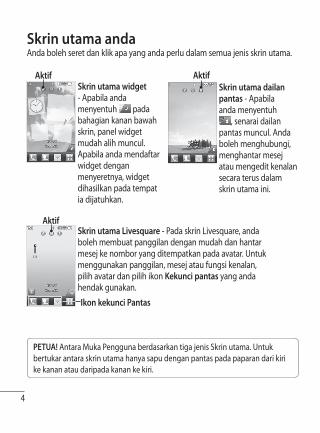
Anda boleh seret dan klik apa yang anda perlu dalam semua jenis skrin utama.Skrin utama anda
Skrin utama widget - Apabila anda menyentuh pada bahagian kanan bawah skrin, panel widget mudah alih muncul. Apabila anda mendaftar widget dengan menyeretnya, widget dihasilkan pada tempat ia dijatuhkan.
Aktif
Skrin utama Livesquare - Pada skrin Livesquare, anda boleh membuat panggilan dengan mudah dan hantar mesej ke nombor yang ditempatkan pada avatar. Untuk menggunakan panggilan, mesej atau fungsi kenalan, pilih avatar dan pilih ikon Kekunci pantas yang anda hendak gunakan.
Aktif
Ikon kekunci Pantas
Skrin utama dailan pantas - Apabila anda menyentuh
, senarai dailan pantas muncul. Anda boleh menghubungi, menghantar mesej atau mengedit kenalan secara terus dalam skrin utama ini.
Aktif
PETUA! Antara Muka Pengguna berdasarkan tiga jenis Skrin utama. Untuk bertukar antara skrin utama hanya sapu dengan pantas pada paparan dari kiri ke kanan atau daripada kanan ke kiri.
5
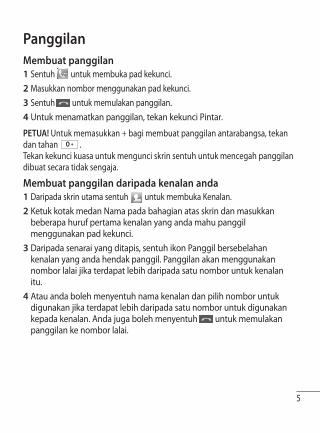
PanggilanMembuat panggilan
Sentuh untuk membuka pad kekunci.Masukkan nombor menggunakan pad kekunci. Sentuh untuk memulakan panggilan.Untuk menamatkan panggilan, tekan kekunci Pintar.
PETUA! Untuk memasukkan + bagi membuat panggilan antarabangsa, tekan dan tahan . Tekan kekunci kuasa untuk mengunci skrin sentuh untuk mencegah panggilan dibuat secara tidak sengaja.
Membuat panggilan daripada kenalan andaDaripada skrin utama sentuh untuk membuka Kenalan.Ketuk kotak medan Nama pada bahagian atas skrin dan masukkan beberapa huruf pertama kenalan yang anda mahu panggil menggunakan pad kekunci.Daripada senarai yang ditapis, sentuh ikon Panggil bersebelahan kenalan yang anda hendak panggil. Panggilan akan menggunakan nombor lalai jika terdapat lebih daripada satu nombor untuk kenalan itu.Atau anda boleh menyentuh nama kenalan dan pilih nombor untuk digunakan jika terdapat lebih daripada satu nombor untuk digunakan kepada kenalan. Anda juga boleh menyentuh untuk memulakan panggilan ke nombor lalai.
1 2 3 4
1 2
3
4
6
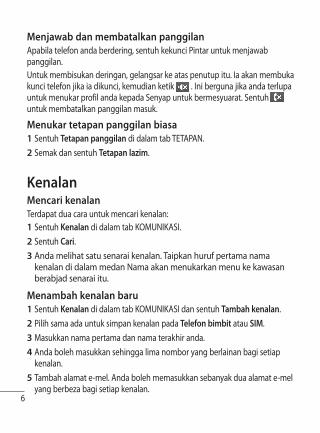
Menjawab dan membatalkan panggilanApabila telefon anda berdering, sentuh kekunci Pintar untuk menjawab panggilan.Untuk membisukan deringan, gelangsar ke atas penutup itu. Ia akan membuka kunci telefon jika ia dikunci, kemudian ketik . Ini berguna jika anda terlupa untuk menukar profil anda kepada Senyap untuk bermesyuarat. Sentuh untuk membatalkan panggilan masuk.
Menukar tetapan panggilan biasaSentuh Tetapan panggilan di dalam tab TETAPAN.Semak dan sentuh Tetapan lazim.
KenalanMencari kenalanTerdapat dua cara untuk mencari kenalan:
Sentuh Kenalan di dalam tab KOMUNIKASI. Sentuh Cari.Anda melihat satu senarai kenalan. Taipkan huruf pertama nama kenalan di dalam medan Nama akan menukarkan menu ke kawasan berabjad senarai itu.
Menambah kenalan baruSentuh Kenalan di dalam tab KOMUNIKASI dan sentuh Tambah kenalan.Pilih sama ada untuk simpan kenalan pada Telefon bimbit atau SIM.Masukkan nama pertama dan nama terakhir anda.Anda boleh masukkan sehingga lima nombor yang berlainan bagi setiap kenalan. Tambah alamat e-mel. Anda boleh memasukkan sebanyak dua alamat e-mel yang berbeza bagi setiap kenalan.
1 2
1 2 3
1 2 3 4
5
7
Peruntukkan kenalan ke satu atau lebih banyak kumpulan. Sentuh Simpan untuk menyimpan kenalan.
Menukar tetapan kenalan andaAnda boleh menyesuaikan tetapan kenalan anda supaya Kenalan anda serasi dengan keutamaan anda.Sentuh Kenalan di dalam tab KOMUNIKASI dan sentuh Tetapan.
MesejGS290 anda menggabungkan SMS dan MMS ke dalam menu intuitif dan menu mudah-untuk-digunakan.
Menghantar mesejSentuh mesej di dalam tab KOMUNIKASI. Dan sentuh Mesej baru untuk mula menggubah mesej baru.Sentuh Masukkan untuk menambah imej, video, bunyi, templat dan sebagainya.Sentuh Penerima di bahagian bawah skrin untuk memasukkan penerima. Kemudian masukkan nombor atau sentuh untuk memilih kenalan. Anda juga boleh menambah berbilang kenalan.Sentuh Hantar apabila bersedia
AMARAN: Jika imej, video atau bunyi ditambah pada SMS ia akan secara automatik ditukar kepada MMS dan anda akan di caj dengan sepatutnya.
Memasukkan teksTerdapat lima cara untuk memasukkan teks: Pad kekunci, Papan kekunci, Skrin tulisan tangan, Kotak tulisan tangan, Dua Kotak Tulisan tangan.Anda boleh pilih kaedah input anda dengan mengetuk dan Kaedah input.
6 7
1
2
3
4
8
Sentuh untuk menghidupkan mod T9. Ikon ini hanya ditunjukkan kepada anda apabila anda memilih Pad kekunci sebagai kaedah input.Sentuh untuk memilih bahasa tulisan.Sentuh untuk menukar antara nombor, simbol dan input teks. Gunakan kekunci Shift untuk menukar antara input huruf kecil dan huruf besar.
Pengecaman tulisan tanganDalam mod Tulisan tangan, anda hanya menulis pada skrin dan GS290 anda akan menukar tulisan tangan anda ke dalam mesej anda. Pilih Skrin Tulisan Tangan atau Kotak Tulisan Tangan mengikut paparan anda yang diutamakan.
Menetapkan e-mel andaSentuh E-mel dalam tab KOMUNIKASI. Jika akaun e-mel tidak disediakan, mulakan wizard penyediaan e-mel dan selesaikannya.Anda boleh menyemak dan mengedit tetapan dengan memilih . Anda juga boleh semak tetapan tambahan yang mana dibuat secara automatik semasa anda membuat akaun.
Menukar tetapan e-mel andaSentuh E-mel di dalam tab KOMUNIKASI. Sentuh dan pilih Tetapan e-mel
Menukar tetapan mesej teks andaSentuh Pemesejan di dalam tab KOMUNIKASI dan sentuh Tetapan. Pilih Mesej teks.Pusat mesej teks - Masukkan butiran pusat mesej anda.Laporan penghantaran - Luncurkan suis sebelah kiri untuk terima pengesahan bahawa mesej anda telah dihantar.Tempoh kesahan - Pilih berapa lama mesej anda akan disimpan dalam pusat mesej.
1 2
9
Jenis mesej - Tukar teks anda menjadi Teks, Suara, Faks, X.400 atau E-mel.Pengekodan aksara -Pilih cara aksara anda akan dikodkan. Ini akan menjejaskan saiz mesej anda dan juga caj data.Hantar teks panjang sebagai - Pilih untuk menghantar mesej panjang sebagai Berbilang SMS atau sebagai MMS.
Untuk e-mel Tolak masuk Semak e-mel Tolak: Sentuh Permainan & Aplikasi di dalam Hiburan dan sentuh Aplikasi.*Perhatian: Bergantung pada wilayah atau pengendali SIM, pengguna mungkin tidak dapat menggunakan e-mel tolak dan akses WAP (atau MMS) secara serentak.
Menukar tetapan mesej multimedia andaSentuh mesej di dalam tab KOMUNIKASI. Semak dan pilih Tetapan dan Mesej multimedia. Mod dapat kembali -Pilih antara Rangkaian utama atau Rangkaian perayauan. Jika anda kemudiannya memilih Manual anda akan menerima hanya pemberitahuan MMS dan anda boleh menentukan sama untuk memuat turun dengan penuh.Laporan penghantaran - Pilih untuk meminta dan/atau benarkan laporan penghantaran.Baca balasan - Pilih untuk meminta dan/atau benarkan balasan.Keutamaan - Pilih tahap keutamaan MMS anda.Tempoh kesahan - Pilih berapa lama mesej anda disimpan di pusat mesej.Tempoh slaid - Pilih berapa lama slaid anda muncul pada skrin.Mod penciptaan - Pilih mod mesej anda.Masa penghantaran - Pilih tempoh masa menunggu sebelum mesej dihantar.Pusat mesej berbilang - Pilih satu daripada senarai atau tambah pusat mesej baru.
10
Perkhidmatan rangkaian sosial (SNS)GS290 anda mempunyai SNS yang membenarkan anda menikmati dan menguruskan rangkaian sosial anda. PERHATIAN: Kos tambahan akan dikenakan apabila menyambung dan menggunakan perkhidmatan dalam talian. Semak caj data dengan pembekal rangkaian anda.Sentuh menu Rangkaian sosial dan pilih tapak. PETUA! Facebook adalah aplikasi asal yang dipra muatkan di dalam telefon anda dan kemudahan untuk mengakses. Twitter adalah aplikasi java berdasarkan teknologi Java. Akses aplikasi yang lain ke perkhidmatan WAP (Protokol Aplikasi Wayarles).PERHATIAN: Ciri SNS adalah aplikasi intensif data. Kos tambahan akan dikenakan apabila menyambung dan menggunakan perkhidmatan dalam talian. Semak caj data dengan pembekal rangkaian anda.
Facebook (SNS Berterusan)Laman utama: Log masuk dan anda akan melihat status rakan-rakan anda yang dikemas kini. Input komen anda mengenai status baru atau untuk memeriksa yang lain. Profil: Anda boleh memilih kemas kini Latar > Status dan tulis status semasa. Lihat butiran maklumat anda dan muat naik foto dengan menyentuh Album > Foto Yang Dimuat Naik. Rakan-Rakan: Cari rakan-rakan anda di dalam facebook dengan memilih tap Carian.Mesej: Anda boleh melihat folder Peti Masuk/Dihantar, dan tulis mesej SN.PETUA! Menggunakan Widget Suapan FacebookSeret widget suapan facebook daripada dulang widget dan sentuh OK.Jika widget facebook didaftarkan pada skrin utama, ia akan menunjukkan 3 suapan terkini daripada laman SN anda. Anda juga boleh mengakses aplikasi facebook secara terus dengan menyentuh widget suapan.
11
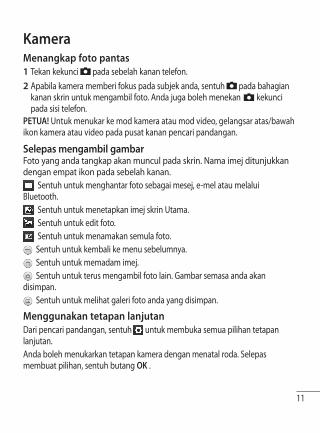
KameraMenangkap foto pantas
Tekan kekunci pada sebelah kanan telefon.Apabila kamera memberi fokus pada subjek anda, sentuh pada bahagian kanan skrin untuk mengambil foto. Anda juga boleh menekan kekunci pada sisi telefon.
PETUA! Untuk menukar ke mod kamera atau mod video, gelangsar atas/bawah ikon kamera atau video pada pusat kanan pencari pandangan.
Selepas mengambil gambarFoto yang anda tangkap akan muncul pada skrin. Nama imej ditunjukkan dengan empat ikon pada sebelah kanan.
Sentuh untuk menghantar foto sebagai mesej, e-mel atau melalui Bluetooth.
Sentuh untuk menetapkan imej skrin Utama. Sentuh untuk edit foto. Sentuh untuk menamakan semula foto. Sentuh untuk kembali ke menu sebelumnya. Sentuh untuk memadam imej. Sentuh untuk terus mengambil foto lain. Gambar semasa anda akan
disimpan. Sentuh untuk melihat galeri foto anda yang disimpan.
Menggunakan tetapan lanjutanDari pencari pandangan, sentuh untuk membuka semua pilihan tetapan lanjutan.Anda boleh menukarkan tetapan kamera dengan menatal roda. Selepas membuat pilihan, sentuh butang OK .
1 2
12
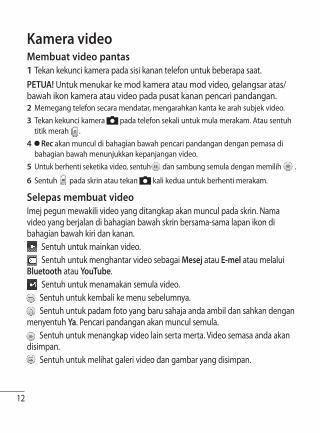
Kamera videoMembuat video pantas
Tekan kekunci kamera pada sisi kanan telefon untuk beberapa saat.PETUA! Untuk menukar ke mod kamera atau mod video, gelangsar atas/bawah ikon kamera atau video pada pusat kanan pencari pandangan.
Memegang telefon secara mendatar, mengarahkan kanta ke arah subjek video.Tekan kekunci kamera pada telefon sekali untuk mula merakam. Atau sentuh titik merah .
Rec akan muncul di bahagian bawah pencari pandangan dengan pemasa di bahagian bawah menunjukkan kepanjangan video.Untuk berhenti seketika video, sentuh dan sambung semula dengan memilih .
Sentuh pada skrin atau tekan kali kedua untuk berhenti merakam.
Selepas membuat videoImej pegun mewakili video yang ditangkap akan muncul pada skrin. Nama video yang berjalan di bahagian bawah skrin bersama-sama lapan ikon di bahagian bawah kiri dan kanan.
Sentuh untuk mainkan video. Sentuh untuk menghantar video sebagai Mesej atau E-mel atau melalui
Bluetooth atau YouTube. Sentuh untuk menamakan semula video. Sentuh untuk kembali ke menu sebelumnya. Sentuh untuk padam foto yang baru sahaja anda ambil dan sahkan dengan
menyentuh Ya. Pencari pandangan akan muncul semula. Sentuh untuk menangkap video lain serta merta. Video semasa anda akan
disimpan. Sentuh untuk melihat galeri video dan gambar yang disimpan.
1
2 3
4
5
6
13
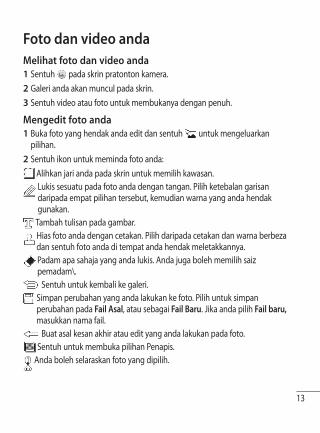
Foto dan video andaMelihat foto dan video anda
Sentuh pada skrin pratonton kamera.Galeri anda akan muncul pada skrin.Sentuh video atau foto untuk membukanya dengan penuh.
Mengedit foto andaBuka foto yang hendak anda edit dan sentuh untuk mengeluarkan pilihan.Sentuh ikon untuk meminda foto anda:
Alihkan jari anda pada skrin untuk memilih kawasan. Lukis sesuatu pada foto anda dengan tangan. Pilih ketebalan garisan daripada empat pilihan tersebut, kemudian warna yang anda hendak gunakan.
Tambah tulisan pada gambar. Hias foto anda dengan cetakan. Pilih daripada cetakan dan warna berbeza
dan sentuh foto anda di tempat anda hendak meletakkannya. Padam apa sahaja yang anda lukis. Anda juga boleh memilih saiz
pemadam\. Sentuh untuk kembali ke galeri.
Simpan perubahan yang anda lakukan ke foto. Pilih untuk simpan perubahan pada Fail Asal, atau sebagai Fail Baru. Jika anda pilih Fail baru, masukkan nama fail.
Buat asal kesan akhir atau edit yang anda lakukan pada foto. Sentuh untuk membuka pilihan Penapis.
Anda boleh selaraskan foto yang dipilih.
1 2 3
1
2
14
MuzikUntuk mengakses pemain muzik, sentuh Muzik di dalam tab HIBURAN. Dari sini anda boleh mengakses sebilangan folder:Baru-baru ini dimainkan - Memainkan lagu yang anda mainkan baru-baru ini.Semua trek - Mengandungi semua lagu yang anda pada telefon anda kecuali muzik lalai yang dipramuat.Artis - Semak imbas koleksi muzik anda mengikut artis.Album - Menyemak imbas koleksi muzik anda dengan album.Genre - Semak imbas koleksi muzik anda mengikut genre.Senarai main - Mengandungi semua senarai main yang anda buat.Susun semula trek - Mainkan trek anda dalam susunan rawak.
Memindahkan muzik pada telefon andaCara termudah untuk memindahkan muzik pada telefon anda adalah melalui Bluetooth atau kabel data.Anda juga boleh menggunakan LG PC Suite melalui Untuk memindahkan muzik mengguna Bluetooth:
Pastikan kedua-dua peranti menghidupkan Bluetooth dan kelihatan pada satu sama lain.Pilih fail muzik pada peranti yang lain dan pilih untuk menghantarkannya melalui Bluetooth.Apabila fail dihantar, anda perlu menerimanya pada telefon anda dengan menyentuh Ya.Fail sepatutnya muncul dalam Muzik > Semua trek.
1
2
3
4
15
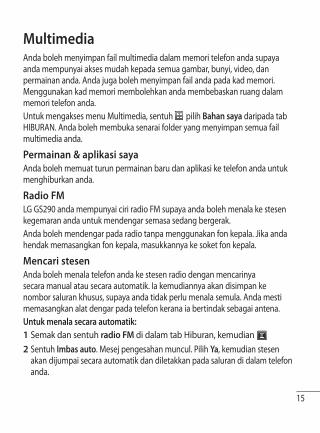
MultimediaAnda boleh menyimpan fail multimedia dalam memori telefon anda supaya anda mempunyai akses mudah kepada semua gambar, bunyi, video, dan permainan anda. Anda juga boleh menyimpan fail anda pada kad memori. Menggunakan kad memori membolehkan anda membebaskan ruang dalam memori telefon anda.Untuk mengakses menu Multimedia, sentuh pilih Bahan saya daripada tab HIBURAN. Anda boleh membuka senarai folder yang menyimpan semua fail multimedia anda.
Permainan & aplikasi saya Anda boleh memuat turun permainan baru dan aplikasi ke telefon anda untuk menghiburkan anda.
Radio FMLG GS290 anda mempunyai ciri radio FM supaya anda boleh menala ke stesen kegemaran anda untuk mendengar semasa sedang bergerak.Anda boleh mendengar pada radio tanpa menggunakan fon kepala. Jika anda hendak memasangkan fon kepala, masukkannya ke soket fon kepala.
Mencari stesenAnda boleh menala telefon anda ke stesen radio dengan mencarinya secara manual atau secara automatik. Ia kemudiannya akan disimpan ke nombor saluran khusus, supaya anda tidak perlu menala semula. Anda mesti memasangkan alat dengar pada telefon kerana ia bertindak sebagai antena.Untuk menala secara automatik:
Semak dan sentuh radio FM di dalam tab Hiburan, kemudian Sentuh Imbas auto. Mesej pengesahan muncul. Pilih Ya, kemudian stesen akan dijumpai secara automatik dan diletakkan pada saluran di dalam telefon anda.
1 2
16
PERHATIAN: Anda juga boleh menala ke stesen dengan menggunakan dan dipaparkan pada pusat skrin. Jika anda menekan dan menahan dan ,
stesen akan ditemui secara automatik.
PengaturMenambah peristiwa pada kalendar anda
Sentuh Pengatur dalam tab UTILITI dan pilih Kalendar.Pilih tarikh yang anda ingin tambah peristiwa kepadanya.Sentuh kemudian Tambah peristiwa..
Menetapkan penggera andaSentuh Penggera pada tab UTILITI. Penggera widget akan kelihatan di dalam senarai sebagai lalai dan anda tidak boleh memadamnya.Sentuh Tambah penggera.
Perakam suaraGunakan perakam suara anda untuk merakam memo suara atau fail audio yang lain.Sentuh Perakam suara pada tab UTILITI.
Menggunakan kalkulator andaSentuh Alat dalam tab UTILITI.Pilih Kalkulator.
Menukar unitSentuh Alat dalam tab UTILITI.Pilih Penukar unit.
1 2 3
1
2
1 2
1 2
17
PC SuiteAnda boleh menyelaraskan PC anda dengan telefon anda untuk memastikan semua butiran dan tarikh penting anda sepadan. Anda juga boleh sandarkan fail anda untuk menyenangkan anda.Memasang LG PC Suite pada komputer anda
Dari skrin Laman utama tekan dan pilih penyambungan pada tab TETAPAN.Pilih penyambungan USB dan klik PC Suite.Sambung telefon dan PC melalui kabel USB dan tunggu sebentar. Mesej panduan pemasangan akan dipaparkan.Ikuti arahan pada skrin untuk menyelesaikan wizard Pemasang LG PC Suite.Sebaik sahaja pemasangan selesai, ikon LG PC Suite akan muncul pada desktop anda.
Menyambung telefon dan PC andaDari skrin Laman utama tekan dan pilih penyambungan pada tab TETAPAN.Pilih Mod sambungan USB. Sentuh PC Suite.
Menggunakan telefon anda sebagai peranti Selaras MuzikTelefon anda boleh digunakan sebagai peranti Selaras Muzik kepada Fail Muzik Selaras sahaja.Selaras Muzik boleh dijalankan menggunakan Windows Media Player 10/11 dan menyokong kedua-dua Memori Telefon dan Kad Memori Luaran.1 Putuskan sambungan telefon anda dari PC anda 2 Dari Skrin utama pilih , kemudian pilih sambungkan pada tab TETAPAN. 3 Pilih mod sambungan USB.
1
2 3
4
5
1
2 3
18
4 Sentuh selaras Muzik. 5 Sambungkan telefon anda ke PC. Telefon anda akan membaca: Disambung.
AMARANJangan putuskan sambungan telefon anda semasa pemindahan.
Memindahkan muzik menggunakan Windows Media PlayerDaripada skrin utama pilih , kemudian semak pada penyambungan di dalam tab Tetapan.Pilih mod sambungan USB dan pilih Selaras muzik.Sambung telefon anda dan PC menggunakan kabel USB yang serasi.Apabila anda cuba untuk menyambung telefon ke PC anda, telefon anda akan membaca: “Selaras Muzik“ diikuti dengan Bersambung.PC akan menggesa anda untuk melancarkan perisian pengurusan muzik diutamakan.Pilih Window Media Player.Pergi ke Tab Selaras, kemudian seret dan jatuhkan muzik yang anda mahu pindahkan pada telefon anda ke dalam panel Senarai Selaras.Klik pada butang Mulakan selaras. Ini memulakan proses pindahan.
AMARANJangan putuskan sambungan telefon anda semasa pemindahan.
WebPenyemak imbas memberi anda dunia pantas, penuh warna permainan, muzik, berita, sukan, hiburan dan banyak lagi, terus kepada telefon mudah alih anda. Di mana sahaja anda berada dan apa sahaja yang anda minati.
Mengakses webSentuh Semak imbas dalam tab UTILITI.
1
2 3 4
5
6 7
8
1
19
Untuk pergi terus ke laman utama penyemak imbas, pilih Laman utama. Sebagai pilihan, pilih Masukkan alamat dan taipkan URL, diikuti dengan Sambungan.
PERHATIAN: Anda akan dikenakan kos tambahan dengan menyambung ke perkhidmatan ini dan memuat turun kandungan. Semak caj data dengan pembekal rangkaian anda.
Akses ke Perkhidmatan Google Anda boleh melancarkan perkhidmatan google dalam aplikasi ini. Sentuh Google dalam tab Utiliti.
Tetapan Memperibadikan profil andaAnda boleh menukar profil anda dengan pantas dengan menekan Skrin utama. Anda boleh memperibadikan setiap tetapan profil menggunakan tetapan menu.
Sentuh Profil dalam tab TETAPAN.Pilih profil yang mahu anda edit. Anda boleh menukar semua bunyi dan pilihan amaran yang tersedia di dalam senarai, termasuk Nada dering anda dan Kelantangan, Tetapan nada mesej dan banyak lagi.
Menukar tetapan skrin andaSentuh Tetapan skrin dalam tab TETAPAN.
Menukar tetapan telefon andaGunakan kebebasan menggunakan GS290 mengikut keutamaan anda.Daripada skrin utama pilih kemudian semak ke Tetapan telefon pada tab TETAPAN.
2
1 2 3

20
Menggunakan pengurus memoriDaripada skrin utama pilih kemudian semak ke Tetapan telefon pada tab TETAPAN. Pilih Maklumat memori.
Menukar tetapan penyambungan andaTetapan penyambungan telah ditetapkan oleh operator rangkaian anda, jadi anda boleh menikmati telefon baru anda serta merta. Untuk mengubah sebarang tetapan, gunakan menu ini:Sentuh penyambungan dalam tab TETAPAN.Menghantar dan menerima fail anda menggunakan BluetoothUntuk menghantar fail:
Buka fail yang anda hendak hantar, biasanya fail foto, video atau muzik.Pilih Hantar. Pilih Bluetooth.Jika anda sudah memasangkan peranti Bluetooth, GS290 anda tidak akan mencari peranti Bluetooth yang lain secara automatik. Jika tidak, GS290 anda akan mencari peranti di dayakan Bluetooth yang lain di dalam jarak.Pilih peranti yang anda mahu hantarkan fail tersebut.Fail anda akan dihantar.
Untuk menerima fail:Untuk menerima fail, Bluetooth anda perlulah HIDUP dan Kelihatan. Lihat Penukaran tetapan Bluetooth anda di bawah untuk maklumat lanjut.Mesej akan menggesa anda untuk menerima fail daripada penghantar. Sentuh Ya untuk menerima fail.Anda akan melihat di mana fail telah disimpan. Untuk fail imej, anda boleh pilih untuk Melihat fail atau Gunakan sebagai hias latar. Fail biasanya akan disimpan ke folder sewajarnya dalam Bahan saya.
1 2 3
4 5
1
2
3
21
Menukar tetapan Bluetooth anda:Sentuh Bluetooth dalam tab TETAPAN. Dan pilih dan pilih Tetapan.Pasangkan dengan peranti Bluetooth lainDengan memasangkan GS290 anda dan peranti lain, anda boleh menyediakan sambungan kod laluan yang dilindungi.
Semak bahawa Bluetooth anda HIDUP dan Kelihatan. Anda boleh mengubah kebolehlihatan anda dalam menu Tetapan.Sentuh Cari.GS290 anda akan mencari peranti. Apabila carian selesai, Muat semula akan muncul pada skrin.Pilih peranti yang anda hendak pasangankan dan masukkan kod laluan kemudian sentuh OK.Seterusnya telefon anda akan menyambung dengan peranti satu lagi, yang mana anda perlu memasukkan kod laluan yang sama padanya.Kod laluan sambungan Bluetooth terlindung anda kini sudah sedia.
1
2 3
4
5
6
Gerak isyarat kunci skrinGerak isyarat kunci skrin - tetapkan gerak isyarat ke aplikasi pintasan lanjutan 9. Gerak isyarat dalam Kunci skrin membolehkan pengguna membuka kunci telefon dan melaksanakan aplikasi ini secara terus semasa gerak isyarat itu muncul pada skrin. Untuk menyediakan ciri ini,1 Pilih Menu - Tetapan skrin - Gerak tangan skrin kunci2 Seret & letak gerak isyarat yang dikehendaki daripada bahagian bawah skrin
ke aplikasi yang anda hendak berikannya.
PETUA! Melukis? bentuk untuk ke gerak isyarat skrin Kunci di dalam skrin kunci.
22
Garis panduan untuk penggunaan selamat dan efi sienSila baca garis panduan yang mudah ini. Tidak mengikut garis panduan ini mungkin merbahaya atau tidak sah.
Terdedah kepada kuasa frekuensi radioMaklumat pendedahan gelombang radio dan Kadar penyerapan Khusus (SAR)Telefon mudah alih model GS290 telah direka bentuk untuk mematuhi keperluan keselamatan yang dikenakan bagi pendedahan pada gelombang radio. Keperluan ini adalah berdasarkan garis panduan saintifik yang memasukkan margin keselamatan yang direka bentuk untuk memastikan keselamatan semua pengguna tanpa mengira umur dan kesihatan.
• Garis panduan bagi pendedahan kepada gelombang radio menggunakan unit ukuran yang disebut sebagai Kadar Penyerapan Khusus, atau SAR. Ujian bagi SAR dijalankan menggunakan kaedah yang dipiawaikan dengan telefon memancarkan pada aras kuasa diperakui yang tertinggi dalam semua jalur frekuensi.
• Walaupun terdapat perbezaan antara tahap SAR pelbagai model telefon LG, ia semua direka bentuk untuk memenuhi garis panduan relevan bagi pendedahan kepada gelombang radio.
• Had SAR yang disyorkan oleh Suruhanjaya mengenai Perlindungan Sinaran Bukan-Ion (Commission on Non-Ionising Radiation Protection) (ICNIRP) Antarabangsa, iaitu 2W/kg dipuratakan ke atas sepuluh (10) gram tisu.
• Nilai SAR tertinggi untuk telefon model ini diuji oleh DASY4 untuk penggunaan di telinga 0.993 W/kg (10g) dan apabila diletakkan pada badan adalah 0.543 W/kg (10g).
• Maklumat data SAR bagi penduduk di negara/kawasan yang telah mengambil had SAR yang disyorkan oleh Institut Jurutera Elektrik dan Elektronik (Institute of Electrical and Electronics Engineers) (IEEE), iaitu 1.6W/kg dipuratakan ke atas satu (1) gram tisu.
23
Penjagaan dan penyelenggaraan produk AMARAN
Hanya gunakan bateri, pengecas dan aksesori yang diluluskan untuk digunakan bersama model tertentu telefon ini. Penggunaan sebarang jenis lain boleh mentaksahkan sebarang kelulusan atau waranti yang berkaitan dengan telefon dan mungkin berbahaya.
• Jangan buka bahagian-bahagian unit ini. Bawanya ke juruteknik perkhidmatan yang kelayakan apabila kerja pembaikan diperlukan.
• Jauhkan dari perkakas elektrik seperti TV, radio, dan komputer peribadi.• Unit ini hendaklah dijauhkan daripada sumber haba seperti radiator atau
dapur.• Jangan jatuhkan.• Jangan biarkan unit ini didedahkan pada getaran atau kejutan mekanikal.• Matikan telefon di tempat larangan telefon bimbit. Contohnya, jangan
gunakan telefon di dalam hospital kerana mungkin mengganggu peralatan hospital.
• Jangan kendalikan telefon dengan tangan yang lembap semasa telefon sedang dicas. Kemungkinan akan terjadi renjatan elektrik atau telefon akan rosak.
• Jangan cas telefon berhampiran dengan bahan yang mudah terbakar kerana telefon akan menjadi panas dan boleh menyebabkan bahaya kebakaran.
• Gunakan kain yang kering untuk membersihkan bahagian luar unit ini. Jangan gunakan pelarut seperti benzena, pencair atau alkohol.
• Jangan cas telefon di atas perabot yang lembut.• Telefon haruslah dicas di kawasan pengudaraan yang baik.• Jangan dedahkan unit ini kepada asap atau habuk yang berlebihan.• Jangan simpan telefon di sebelah kad kredit atau tiket pengangkutan; ia
boleh menjejaskan maklumat pada jalur magnetik.• Jangan ketik skrin dengan objek yang tajam; ia boleh merosakkan telefon.• Jangan dedahkan telefon kepada cecair atau kelembapan.• Guna aksesori seperti fon telinga dengan berhati-hati. Jangan sentuh antena
jika tidak diperlukan.
24
Pengendalian telefon yang efisyen Peranti elektronik• Jangan gunakan telefon mudah alih anda berhampiran kelengkapan
perubatan tanpa meminta kebenaran. Elakkan daripada meletakkan telefon di atas perentak jantung iaitu dalam poket dada anda.
• Sesetengah alat bantuan pendengaran mungkin diganggu oleh telefon mudah alih.
• Gangguan yang sedikit boleh menjejas TV, radio, PC, dan sebagainya.
Keselamatan di jalan rayaPeriksa undang-undang dan peraturan mengenai penggunaan telefon bimbit di kawasan-kawasan tempat anda memandu• Jangan gunakan telefon pegang tangan semasa memandu.• Beri perhatian penuh kepada pemanduan anda.• Gunakan kit bebas tangan, jika tersedia.• Keluar dari jalan raya dan letak kereta sebelum membuat atau menjawab
panggilan jika keadaan pemanduan memerlukan anda berbuat demikian.• Tenaga RF mungkin menjejaskan sesetengah sistem elektronik dalam
kenderaan anda seperti stereo kereta dan kelengkapan keselamatan.• Jika kenderaan anda dlengkapi dengan beg udara, jangan letakkan barang-
barang dengan kelengkapan wayarles yang dipasangkan atau mudah alih. Ia mungkin tidak berfungsi atau menyebabkan kecederaan serius disebabkan prestasi yang tidak betul.
• Jika anda mendengar muzik ketika bergerak dan berjalan, sila pastikan bahawa kelantangannya berada pada paras yang berpatutan agar anda sedar akan keadaan di sekeliling anda. Ini amat penting terutamanya ketika berada di jalan raya.
Elakkan kerosakan pada pendengaran andaKerosakan kepada pendengaran anda boleh berlaku jika anda terdedah kepada bunyi yang kuat untuk tempoh yang lama. Oleh itu kami menyarankan agar anda tidak menghidupkan atau meatikan telefon terlalu hampir dengan
25
telinga anda. Kami juga menyarankan bahawa kelantangan muzik dan panggilan ditetapkan pada paras yang berpatutan.
Kawasan letupanJangan gunakan telefon di mana peletupan sedang dijalankan. Patuhi sekatan dan ikuti peraturan dan undang-undang.
Suasana berpotensi letupan• Jangan gunakan telefon di tempat pengisian minyak.• Jangan gunakan berhampiran bahan bakar atau bahan kimia.• Jangan angkut atau simpan gas mudah terbakar, cecair atau bahan letupan
dalam petak kenderaan anda yang mengandungi telefon mudah alih dan aksesori anda.
Di dalam kapal terbangPeranti wayarles boleh menyebabkan gangguan di dalam pesawat.• Matikan telefon mudah alih anda sebelum menaiki apa-apa kapal terbang.• Jangan gunakannya apabila mendarat tanpa izin anak kapal.
Kanak-kanakSimpan telefon di tempat yang selamat dan jauh daripada kanak-kanak kecil. Ia termasuk bahagian kecil yang boleh menyebabkan bahaya tercekik jika ia ditanggalkan.
Panggilan kecemasanPanggilan kecemasan mungkin tidak tersedia di bawah semua rangkaian mudah alih. Oleh itu, anda tidak seharusnya bergantung pada mana-mana telefon untuk panggilan kecemasan. Semak dengan pembekal khidmat tempatan anda.
Maklumat dan penjagaan bateri • Anda tidak perlu menyahcas bateri sepenuhnya sebelum mengecasnya
semula. Tidak seperti sistem bateri yang lain, tiada kesan memori yang boleh menjejaskan prestasi bateri.
26
• Gunakan hanya bateri dan pengecas LG. Pengecas LG direka bentuk untuk memaksimumkan hayat bateri.
• Jangan buka atau litar pintaskan pek bateri.• Pastikan sentuhan logam pada bateri sentiasa bersih.• Gantikan bateri apabila ia tidak lagi memberi prestasi yang boleh diterima.
Pek bateri mungkin dicas beratus-ratus kali sehingga ia perlu digantikan. • Cas semula bateri jika ia tidak digunakan buat tempoh masa yang lama
untuk memaksimumkan kebolehgunaan.• Jangan dedahkan pengecas bateri kepada cahaya matahari langsung atau
gunakannya pada kelembapan yang tinggi, seperti di bilik air.• Jangan biarkan bateri di tempat yang panas atau sejuk, ini mungkin
menjejaskan prestasi bateri.• Terdapat risiko letupan jika bateri digantikan dengan jenis yang salah.• Lupuskan bateri yang telah digunakan mengikut arahan pengilang. Sila kitar
semula apabila boleh. Jangan lupuskan sebagai sampah rumah tangga.• Jika anda hendak menggantikan bateri, bawa ia ke pusat servis LG Electronics
atau penjual yang disahkan untuk mendapatkan bantuan.• Sentiasa tanggalkan pengecas dari soket dinding selepas telefon dicas
sepenuhnya untuk menjimatkan kuasa pengecas daripada penggunaan yang tidak diperlukan.
• Hayat bateri sebenar bergantung kepada skrol rangkaian, tetapan produk, corak penggunaan, keadaan bateri dan persekitaran.
27
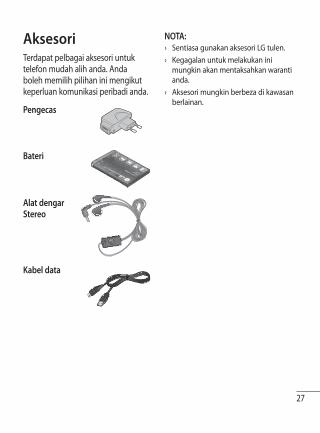
AksesoriTerdapat pelbagai aksesori untuk telefon mudah alih anda. Anda boleh memilih pilihan ini mengikut keperluan komunikasi peribadi anda.
Pengecas
Bateri
Alat dengar Stereo
Kabel data
NOTA: Sentiasa gunakan aksesori LG tulen.Kegagalan untuk melakukan ini mungkin akan mentaksahkan waranti anda.Aksesori mungkin berbeza di kawasan berlainan.
››
›
28
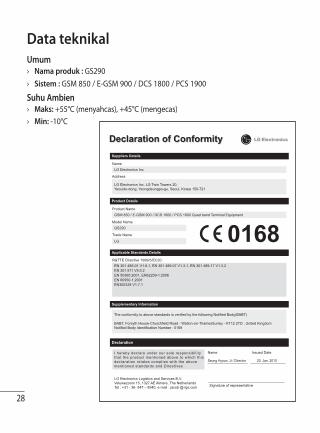
Data teknikalUmum
Nama produk : GS290Sistem : GSM 850 / E-GSM 900 / DCS 1800 / PCS 1900
Suhu AmbienMaks: +55°C (menyahcas), +45°C (mengecas)Min: -10°C
››
››
29
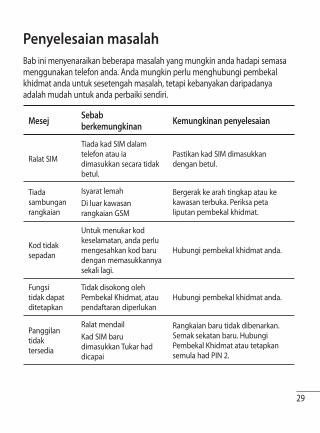
Penyelesaian masalahBab ini menyenaraikan beberapa masalah yang mungkin anda hadapi semasa menggunakan telefon anda. Anda mungkin perlu menghubungi pembekal khidmat anda untuk sesetengah masalah, tetapi kebanyakan daripadanya adalah mudah untuk anda perbaiki sendiri.
Mesej Sebab berkemungkinan Kemungkinan penyelesaian
Ralat SIM
Tiada kad SIM dalam telefon atau ia dimasukkan secara tidak betul.
Pastikan kad SIM dimasukkan dengan betul.
Tiada sambungan rangkaian
Isyarat lemahDi luar kawasan rangkaian GSM
Bergerak ke arah tingkap atau ke kawasan terbuka. Periksa peta liputan pembekal khidmat.
Kod tidak sepadan
Untuk menukar kod keselamatan, anda perlu mengesahkan kod baru dengan memasukkannya sekali lagi.
Hubungi pembekal khidmat anda.
Fungsi tidak dapat ditetapkan
Tidak disokong oleh Pembekal Khidmat, atau pendaftaran diperlukan
Hubungi pembekal khidmat anda.
Panggilan tidak tersedia
Ralat mendailKad SIM baru dimasukkan Tukar had dicapai
Rangkaian baru tidak dibenarkan. Semak sekatan baru. Hubungi Pembekal Khidmat atau tetapkan semula had PIN 2.
30
Mesej Sebab berkemungkinan Kemungkinan penyelesaian
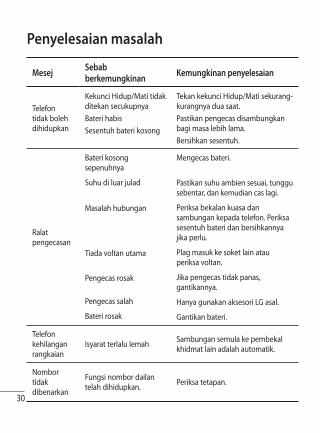
Telefon tidak boleh dihidupkan
Kekunci Hidup/Mati tidak ditekan secukupnyaBateri habis Sesentuh bateri kosong
Tekan kekunci Hidup/Mati sekurang-kurangnya dua saat. Pastikan pengecas disambungkan bagi masa lebih lama. Bersihkan sesentuh.
Ralat pengecasan
Bateri kosong sepenuhnya
Suhu di luar julad
Masalah hubungan
Tiada voltan utama
Pengecas rosak
Pengecas salah
Bateri rosak
Mengecas bateri.
Pastikan suhu ambien sesuai, tunggu sebentar, dan kemudian cas lagi.
Periksa bekalan kuasa dan sambungan kepada telefon. Periksa sesentuh bateri dan bersihkannya jika perlu.
Plag masuk ke soket lain atau periksa voltan.
Jika pengecas tidak panas, gantikannya.
Hanya gunakan aksesori LG asal.
Gantikan bateri.
Telefon kehilangan rangkaian
Isyarat terlalu lemah Sambungan semula ke pembekal khidmat lain adalah automatik.
Nombor tidak dibenarkan
Fungsi nombor dailan telah dihidupkan. Periksa tetapan.
Penyelesaian masalah
GS290 用户手册GS290 用户手册视话机软件或服务提供商而定,本手册中的部分内容可能与您的手机有所不同。
2
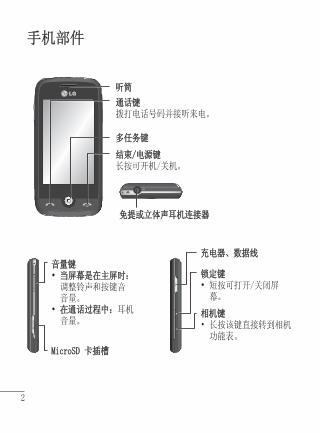
手机部件手机部件
听筒听筒
MicroSD 卡插槽MicroSD 卡插槽
通话键通话键拨打电话号码并接听来电。
多任务键多任务键
结束/电源键结束/电源键长按可开机/关机。
音量键音量键• • 当屏幕是在主屏时:当屏幕是在主屏时:
调整铃声和按键音音量。
• 在通话过程中• 在通话过程中::耳机音量。
锁定键锁定键• • 短按可打开/关闭屏
幕。
相机键相机键• 长按该键直接转到相机
功能表。
充电器、数据线充电器、数据线
免提或立体声耳机连接器免提或立体声耳机连接器

3
安装 SIM 卡和手机电池安装 SIM 卡和手机电池
安装 SIM 卡安装 SIM 卡当您预定了手机网络后,您将得到一个插入式 SIM 卡,该卡上载入了您的预定详细资料,如您的 PIN 码、任何可用的可选服务以及其他服务。
重要!重要! › 插入式 SIM 卡及其内容很容易因刮擦或弯折而损坏,因此,在处理、
插入或拔出卡时,请小心谨慎。 请将所有 SIM 卡置于儿童无法接
触的地方。
说明说明取出电池前,请始终关闭手机并断开与充电器的连接。
卸下后盖。
取出电池。
插入 SIM 卡。
插入电池。
盖上后盖。
充电。
1 2 3 4 5 6
1 2 3
64 5
4
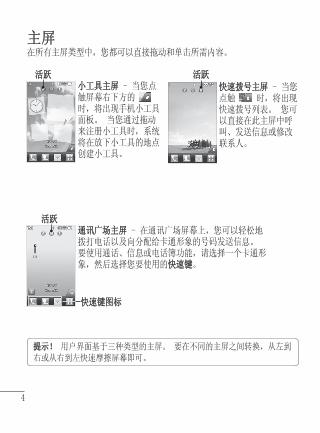
在所有主屏类型中,您都可以直接拖动和单击所需内容。主屏主屏
小工具主屏小工具主屏 - 当您点触屏幕右下方的 时,将出现手机小工具面板。 当您通过拖动来注册小工具时,系统将在放下小工具的地点创建小工具。
活跃活跃
通讯广场主屏 通讯广场主屏 - 在通讯广场屏幕上,您可以轻松地拨打电话以及向分配给卡通形象的号码发送信息。 要使用通话、信息或电话簿功能,请选择一个卡通形象,然后选择您要使用的快速键快速键。
快速键图标快速键图标
快速拨号主屏快速拨号主屏 - 当您点触 时,将出现快速拨号列表。 您可以直接在此主屏中呼叫、发送信息或修改联系人。
提示!提示! 用户界面基于三种类型的主屏。 要在不同的主屏之间转换,从左到右或从右到左快速摩擦屏幕即可。
活跃活跃
活跃活跃
5
通话通话拨打电话拨打电话点触 以打开键盘。
使用键盘输入号码。
点触 以开始通话。
要结束通话,请按智能键。提示! 提示! 要输入 + 以拨打国际电话,请长按 。 按电源键锁定触摸屏,避免意外拨出电话。
从电话簿拨打电话从电话簿拨打电话从主屏点触 以打开电话簿。
轻触屏幕顶部的“名称”字段框,然后使用键盘输入您要呼叫的联系人的前几个字母。
从过滤列表中点触您要呼叫的联系人旁边的通话图标。 如果该联系人有多个号码,则拨打默认号码。
或者,您可以点触联系人姓名,如果该联系人有多个号码可用,请选择您要使用的号码。 您也可以点触 以启动对默认号码的呼叫。
接听和拒接来电接听和拒接来电电话铃响起时,按 可接听电话。
要静音,可轻触 。 如果您在开会时忘记将情景模式更改为“静音”,这非常有帮助。 点触 拒绝来电。
更改常用通话设置更改常用通话设置点触“设置”选项卡中的通话设置通话设置。
滚动并点触常用设置常用设置。
1 2 3 4
1 2
3
4
1 2
6
电话簿电话簿正在搜索联系人正在搜索联系人有两种方式可搜索联系人:
点触“通信”选项卡中的电话簿电话簿。
点触搜索搜索。
您将看到一个联系人列表。 在“名称”字段中输入联系人姓名的首字母会使功能表跳转到列表的该字母区域。
添加新联系人添加新联系人点触“通信”选项卡中的电话簿电话簿,然后点触添加联系人添加联系人。
选择是将联系人保存到手机手机还是 USIM 卡USIM 卡。
输入姓氏和名字。
对同一个联系人,您 多可以输入 5 个不同的号码。
添加电子邮件地址。 每个联系人 多可输入两个不同的电子邮件地址。
将联系人分配到一个或多个群组。
点触保存保存以保存联系人。
更改电话簿设置更改电话簿设置您可以调整您的电话簿设置,使电话簿电话簿符合您的需要。
点触“通信”选项卡中的电话簿电话簿,然后点触设置设置。
信息信息GS290 将短信和彩信结合到一个直观易使用的功能表中。
发送信息发送信息点触通信通信选项卡中的信息信息。 然后,点触写信息写信息开始写新信息。
点触插入插入添加图像、视频、声音、模板等。
1 2 3
1 2 3 4 5 6 7
1 2
7
点触屏幕底部的收件人收件人以输入收件人。 然后,输入号码或点触 选择一个联系人。 您甚至可以添加多个联系人。
就绪后,请点触发送发送
警告警告:如果在短信中添加图像、视频或声音,则短信将自动转换为彩信,您需要支付相应费用。
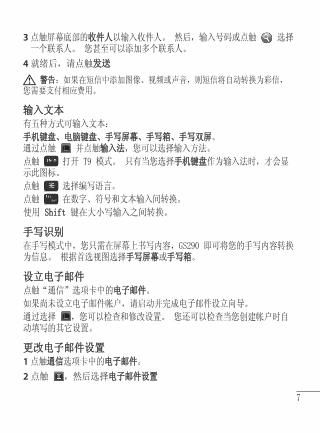
输入文本输入文本有五种方式可输入文本:
手机键盘、电脑键盘、手写屏幕、手写箱、手写双屏手机键盘、电脑键盘、手写屏幕、手写箱、手写双屏。通过点触 并点触输入法输入法,您可以选择输入方法。
点触 打开 T9 模式。 只有当您选择手机键盘手机键盘作为输入法时,才会显示此图标。
点触 选择编写语言。
点触 在数字、符号和文本输入间转换。
使用 ShiftShift 键在大小写输入之间转换。
手写识别手写识别在手写模式中,您只需在屏幕上书写内容,GS290 即可将您的手写内容转换为信息。 根据首选视图选择手写屏幕手写屏幕或手写箱手写箱。
设立电子邮件设立电子邮件点触“通信”选项卡中的电子邮件电子邮件。
如果尚未设立电子邮件帐户,请启动并完成电子邮件设立向导。
通过选择 ,您可以检查和修改设置。 您还可以检查当您创建帐户时自动填写的其它设置。
更改电子邮件设置更改电子邮件设置点触通信通信选项卡中的电子邮件电子邮件。
点触 ,然后选择电子邮件设置电子邮件设置
3
4
1 2
8
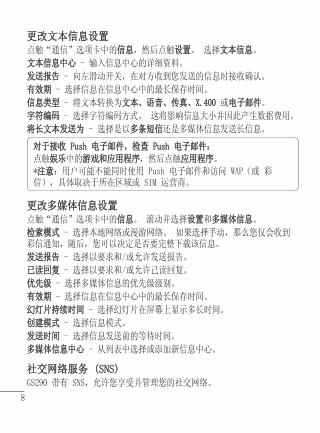
更改文本信息设置更改文本信息设置点触“通信”选项卡中的信息信息,然后点触设置设置。 选择文本信息文本信息。
文本信息中心 文本信息中心 - 输入信息中心的详细资料。
发送报告 发送报告 - 向左滑动开关,在对方收到您发送的信息时接收确认。
有效期有效期 - 选择信息在信息中心中的 长保存时间。
信息类型信息类型 - 将文本转换为文本、语音、传真、X.400文本、语音、传真、X.400 或电子邮件电子邮件。
字符编码字符编码 - 选择字符编码方式。 这将影响信息大小并因此产生数据费用。
将长文本发送为将长文本发送为 - 选择是以多条短信多条短信还是多媒体信息发送长信息。
对于接收 Push 电子邮件,检查 Push 电子邮件:对于接收 Push 电子邮件,检查 Push 电子邮件:
点触娱乐娱乐中的游戏和应用程序游戏和应用程序,然后点触应用程序应用程序。
*注意注意:用户可能不能同时使用 Push 电子邮件和访问 WAP(或 彩信),具体取决于所在区域或 SIM 运营商。
更改多媒体信息设置更改多媒体信息设置点触“通信”选项卡中的信息信息。 滚动并选择设置设置和多媒体信息多媒体信息。
检索模式检索模式 - 选择本地网络或漫游网络。 如果选择手动,那么您仅会收到彩信通知,随后,您可以决定是否要完整下载该信息。
发送报告发送报告 - 选择以要求和/或允许发送报告。
已读回复已读回复 - 选择以要求和/或允许已读回复。
优先级优先级 - 选择多媒体信息的优先级级别。
有效期有效期 - 选择信息在信息中心中的 长保存时间。
幻灯片持续时间幻灯片持续时间 - 选择幻灯片在屏幕上显示多长时间。
创建模式创建模式 - 选择信息模式。
发送时间发送时间 - 选择信息发送前的等待时间。
多媒体信息中心多媒体信息中心 - 从列表中选择或添加新信息中心。
社交网络服务 (SNS)社交网络服务 (SNS)GS290 带有 SNS,允许您享受并管理您的社交网络。
9
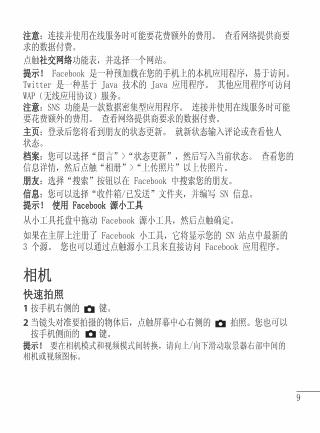
注意注意:连接并使用在线服务时可能要花费额外的费用。 查看网络提供商要求的数据付费。
点触社交网络社交网络功能表,并选择一个网站。
提示!提示! Facebook 是一种预加载在您的手机上的本机应用程序,易于访问。 Twitter 是一种基于 Java 技术的 Java 应用程序。 其他应用程序可访问 WAP(无线应用协议)服务。注意注意:SNS 功能是一款数据密集型应用程序。 连接并使用在线服务时可能要花费额外的费用。 查看网络提供商要求的数据付费。
主页主页:登录后您将看到朋友的状态更新。 就新状态输入评论或查看他人状态。
档案档案:您可以选择“留言”>“状态更新”,然后写入当前状态。 查看您的信息详情,然后点触“相册”>“上传照片”以上传照片。
朋友朋友:选择“搜索”按钮以在 Facebook 中搜索您的朋友。
信息信息:您可以选择“收件箱/已发送”文件夹,并编写 SN 信息。提示! 使用 Facebook 源小工具提示! 使用 Facebook 源小工具
从小工具托盘中拖动 Facebook 源小工具,然后点触确定。
如果在主屏上注册了 Facebook 小工具,它将显示您的 SN 站点中 新的 3 个源。 您也可以通过点触源小工具来直接访问 Facebook 应用程序。
相机相机快速拍照 快速拍照 按手机右侧的 键。
当镜头对准要拍摄的物体后,点触屏幕中心右侧的 拍照。您也可以按手机侧面的 键。
提示!提示! 要在相机模式和视频模式间转换,请向上/向下滑动取景器右部中间的相机或视频图标。
1 2
10
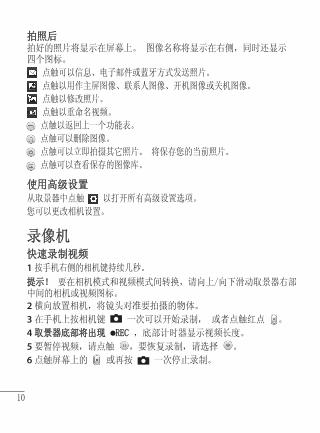
拍照后拍照后拍好的照片将显示在屏幕上。 图像名称将显示在右侧,同时还显示四个图标。
点触可以信息、电子邮件或蓝牙方式发送照片。
点触以用作主屏图像、联系人图像、开机图像或关机图像。
点触以修改照片。
点触以重命名视频。
点触以返回上一个功能表。
点触可以删除图像。
点触可以立即拍摄其它照片。 将保存您的当前照片。
点触可以查看保存的图像库。
使用高级设置使用高级设置从取景器中点触 以打开所有高级设置选项。
您可以更改相机设置。
录像机录像机快速录制视频快速录制视频按手机右侧的相机键持续几秒。
提示! 提示! 要在相机模式和视频模式间转换,请向上/向下滑动取景器右部中间的相机或视频图标。
横向放置相机,将镜头对准要拍摄的物体。
在手机上按相机键 一次可以开始录制, 或者点触红点 。
取景器底部将出现 取景器底部将出现 RECREC ,底部计时器显示视频长度。
要暂停视频,请点触 ,要恢复录制,请选择 。
点触屏幕上的 或再按 一次停止录制。
1
2 3 4 5 6
11
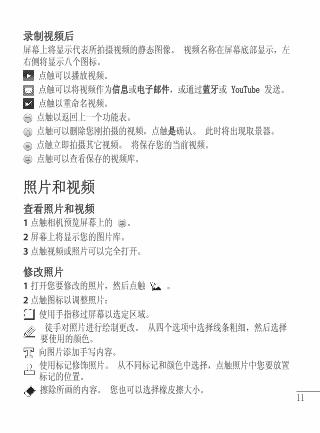
录制视频后录制视频后屏幕上将显示代表所拍摄视频的静态图像。 视频名称在屏幕底部显示,左右侧将显示八个图标。
点触可以播放视频。
点触可以将视频作为信息信息或电子邮件电子邮件,或通过蓝牙蓝牙或 YouTubeYouTube 发送。
点触以重命名视频。
点触以返回上一个功能表。
点触可以删除您刚拍摄的视频,点触是是确认。 此时将出现取景器。
点触立即拍摄其它视频。 将保存您的当前视频。
点触可以查看保存的视频库。
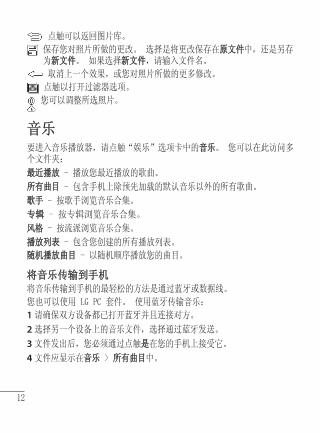
照片和视频照片和视频
查看照片和视频查看照片和视频点触相机预览屏幕上的 。
屏幕上将显示您的图片库。
点触视频或照片可以完全打开。
修改照片修改照片打开您要修改的照片,然后点触 。
点触图标以调整照片:
使用手指移过屏幕以选定区域。
徒手对照片进行绘制更改。 从四个选项中选择线条粗细,然后选择要使用的颜色。
向图片添加手写内容。
使用标记修饰照片。 从不同标记和颜色中选择,点触照片中您要放置标记的位置。
擦除所画的内容。 您也可以选择橡皮擦大小。
1 2 3
1 2
12
点触可以返回图片库。
保存您对照片所做的更改。 选择是将更改保存在原文件原文件中,还是另存为新文件新文件。 如果选择新文件新文件,请输入文件名。
取消上一个效果,或您对照片所做的更多修改。
点触以打开过滤器选项。
您可以调整所选照片。
音乐音乐要进入音乐播放器,请点触“娱乐”选项卡中的音乐音乐。 您可以在此访问多个文件夹:
近播放近播放 - 播放您 近播放的歌曲。
所有曲目所有曲目 - 包含手机上除预先加载的默认音乐以外的所有歌曲。
歌手歌手 - 按歌手浏览音乐合集。
专辑 专辑 - 按专辑浏览音乐合集。
风格风格 - 按流派浏览音乐合集。
播放列表播放列表 - 包含您创建的所有播放列表。
随机播放曲目随机播放曲目 - 以随机顺序播放您的曲目。
将音乐传输到手机将音乐传输到手机将音乐传输到手机的 轻松的方法是通过蓝牙或数据线。
您也可以使用 LG PC 套件。 使用蓝牙传输音乐:
请确保双方设备都已打开蓝牙并且连接对方。
选择另一个设备上的音乐文件,选择通过蓝牙发送。
文件发出后,您必须通过点触是是在您的手机上接受它。
文件应显示在音乐音乐 > 所有曲目所有曲目中。
1 2 3 4
13
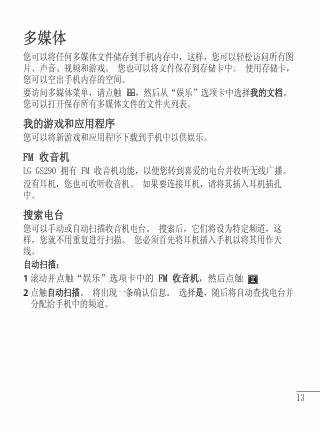
多媒体多媒体您可以将任何多媒体文件储存到手机内存中,这样,您可以轻松访问所有图片、声音、视频和游戏。 您也可以将文件保存到存储卡中。 使用存储卡,您可以空出手机内存的空间。
要访问多媒体菜单,请点触 ,然后从“娱乐”选项卡中选择我的文档我的文档。 您可以打开保存所有多媒体文件的文件夹列表。
我的游戏和应用程序 我的游戏和应用程序 您可以将新游戏和应用程序下载到手机中以供娱乐。
FM 收音机FM 收音机LG GS290 拥有 FM 收音机功能,以便您转到喜爱的电台并收听无线广播。
没有耳机,您也可收听收音机。 如果要连接耳机,请将其插入耳机插孔中。
搜索电台搜索电台您可以手动或自动扫描收音机电台。 搜索后,它们将设为特定频道,这样,您就不用重复进行扫描。 您必须首先将耳机插入手机以将其用作天线。
自动扫描:自动扫描:
滚动并点触“娱乐”选项卡中的 FM 收音机FM 收音机,然后点触
点触自动扫描自动扫描。 将出现一条确认信息。 选择是是,随后将自动查找电台并分配给手机中的频道。
1 2
14
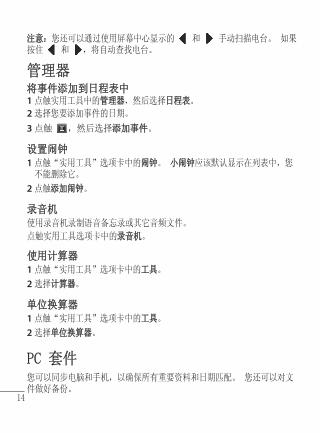
注意:注意:您还可以通过使用屏幕中心显示的 和 手动扫描电台。 如果按住 和 ,将自动查找电台。
管理器管理器将事件添加到日程表中将事件添加到日程表中点触实用工具中的管理器管理器,然后选择日程表日程表。
选择您要添加事件的日期。
点触 ,然后选择添加事件添加事件。
设置闹钟设置闹钟点触“实用工具”选项卡中的闹钟闹钟。 小闹钟小闹钟应该默认显示在列表中,您不能删除它。
点触添加闹钟添加闹钟。
录音机录音机使用录音机录制语音备忘录或其它音频文件。
点触实用工具选项卡中的录音机录音机。
使用计算器使用计算器点触“实用工具”选项卡中的工具工具。
选择计算器计算器。
单位换算器单位换算器点触“实用工具”选项卡中的工具工具。
选择单位换算器单位换算器。
PC 套件PC 套件您可以同步电脑和手机,以确保所有重要资料和日期匹配。 您还可以对文件做好备份。
1 2 3
1
2
1 2
1 2
15
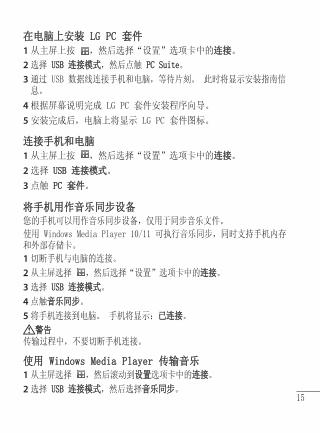
在电脑上安装 LG PC 套件在电脑上安装 LG PC 套件从主屏上按 ,然后选择“设置”选项卡中的连接连接。
选择 USB 连接模式USB 连接模式,然后点触 PC SuitePC Suite。
通过 USB 数据线连接手机和电脑,等待片刻。 此时将显示安装指南信息。
根据屏幕说明完成 LG PC 套件安装程序向导。
安装完成后,电脑上将显示 LG PC 套件图标。
连接手机和电脑连接手机和电脑从主屏上按 ,然后选择“设置”选项卡中的连接连接。
选择 USB 连接模式USB 连接模式。
点触 PC 套件 PC 套件。
将手机用作音乐同步设备将手机用作音乐同步设备您的手机可以用作音乐同步设备,仅用于同步音乐文件。
使用 Windows Media Player 10/11 可执行音乐同步,同时支持手机内存和外部存储卡。
切断手机与电脑的连接。
从主屏选择 ,然后选择“设置”选项卡中的连接连接。
选择 USB 连接模式USB 连接模式。
点触音乐同步音乐同步。
将手机连接到电脑。 手机将显示:已连接已连接。
警告警告传输过程中,不要切断手机连接。
使用 Windows Media Player 传输音乐使用 Windows Media Player 传输音乐从主屏选择 ,然后滚动到设置设置选项卡中的连接连接。
选择 USB 连接模式USB 连接模式,然后选择音乐同步音乐同步。
1 2 3
4 5
1 2 3
1 2 3 4 5
1 2
16
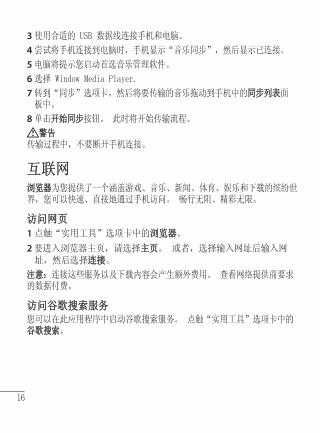
使用合适的 USB 数据线连接手机和电脑。
尝试将手机连接到电脑时,手机显示“音乐同步”,然后显示已连接。
电脑将提示您启动首选音乐管理软件。
选择 Window Media Player.
转到“同步”选项卡,然后将要传输的音乐拖动到手机中的同步列表同步列表面板中。
单击开始同步开始同步按钮。 此时将开始传输流程。
警告警告传输过程中,不要断开手机连接。
互联网互联网浏览器浏览器为您提供了一个涵盖游戏、音乐、新闻、体育、娱乐和下载的缤纷世界,您可以快速、直接地通过手机访问。 畅行无阻、精彩无限。
访问网页访问网页点触“实用工具”选项卡中的浏览器浏览器。
要进入浏览器主页,请选择主页主页。 或者,选择输入网址后输入网址,然后选择连接连接。
注意:注意:连接这些服务以及下载内容会产生额外费用。 查看网络提供商要求的数据付费。
访问谷歌搜索服务 访问谷歌搜索服务 您可以在此应用程序中启动谷歌搜索服务。 点触“实用工具”选项卡中的谷歌搜索谷歌搜索。
3 4 5 6 7
8
1 2
17
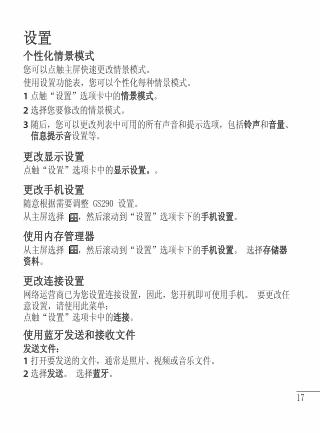
设置设置个性化情景模式个性化情景模式您可以点触主屏快速更改情景模式。
使用设置功能表,您可以个性化每种情景模式。
点触“设置”选项卡中的情景模式情景模式。
选择您要修改的情景模式。
随后,您可以更改列表中可用的所有声音和提示选项,包括铃声铃声和音量音量、信息提示音信息提示音设置等。
更改显示设置更改显示设置点触“设置”选项卡中的显示设置。显示设置。。
更改手机设置更改手机设置随意根据需要调整 GS290 设置。
从主屏选择 ,然后滚动到“设置”选项卡下的手机设置手机设置。
使用内存管理器使用内存管理器从主屏选择 ,然后滚动到“设置”选项卡下的手机设置手机设置。 选择存储器存储器资料资料。
更改连接设置更改连接设置网络运营商已为您设置连接设置,因此,您开机即可使用手机。 要更改任意设置,请使用此菜单:点触“设置”选项卡中的连接连接。
使用蓝牙发送和接收文件使用蓝牙发送和接收文件发送文件:发送文件:打开要发送的文件,通常是照片、视频或音乐文件。
选择发送发送。 选择蓝牙蓝牙。
1 2 3
1 2
18
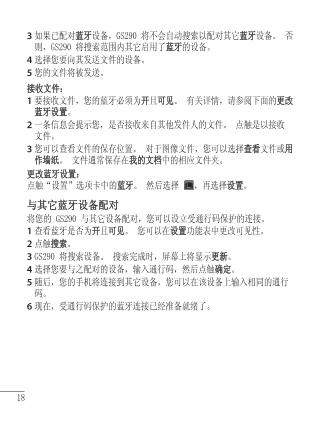
如果已配对蓝牙蓝牙设备,GS290 将不会自动搜索以配对其它蓝牙蓝牙设备。 否则,GS290 将搜索范围内其它启用了蓝牙蓝牙的设备。
选择您要向其发送文件的设备。
您的文件将被发送。
接收文件:接收文件:要接收文件,您的蓝牙必须为开开且可见可见。 有关详情,请参阅下面的更改更改蓝牙设置蓝牙设置。
一条信息会提示您,是否接收来自其他发件人的文件。 点触是以接收文件。
您可以查看文件的保存位置。 对于图像文件,您可以选择查看查看文件或用作墙纸作墙纸。 文件通常保存在我的文档我的文档中的相应文件夹。
更改蓝牙设置:更改蓝牙设置:点触“设置”选项卡中的蓝牙蓝牙。 然后选择 ,再选择设置设置。
与其它蓝牙设备配对与其它蓝牙设备配对将您的 GS290 与其它设备配对,您可以设立受通行码保护的连接。查看蓝牙是否为开开且可见可见。 您可以在设置设置功能表中更改可见性。
点触搜索搜索。
GS290 将搜索设备。 搜索完成时,屏幕上将显示更新更新。
选择您要与之配对的设备,输入通行码,然后点触确定确定。
随后,您的手机将连接到其它设备,您可以在该设备上输入相同的通行码。
现在,受通行码保护的蓝牙连接已经准备就绪了。
3
4 5
1
2
3
1 2 3 4 5
6
19
关于安全有效使用手机的准则关于安全有效使用手机的准则请阅读以下简单的准则。 违反这些准则可能造成危险或者触犯法律。
暴露在射频能量之下暴露在射频能量之下
无线电波暴露和特定吸收率(SAR) 信息。无线电波暴露和特定吸收率(SAR) 信息。
此款 GS290 型手机已设计为遵守有关适用的无线电波暴露安全要求。 此要求基于相关的科学准则,其中包括为确保所有用户(无论年龄和健康状况)安全而设计的安全裕量。
• 无线电波暴露准则采用一种称为“特定吸收率”或 SAR 的测量单位。 SAR 测试是在所有用到的频带中以手机的 高认可功率电平进行发射时使用标准化方法执行的。
• 不同的 LG 手机型号可能有不同的 SAR 能级,但它们均符合相关的无线电波暴露准则。
• 国际非游离辐射防护委员会 (ICNIRP) 建议的 SAR 上限值为:每 10g 重的人体组织吸收的能量平均值不超过 2W/kg。
• 由 DASY4 对该型号手机进行的测试,人耳能够承受的 SAR 大值为 0.993 W/kg(10克),戴在身体上时,其值为 0.543 W/kg(10 克)。
• 电气电子工程师协会 (IEEE) 建议的 SAR 上限值为 1.6 W/kg,平均值超过 1 克薄纸,此 SAR 数据适用于各个国家/地区的居民。
产品保养和维护产品保养和维护
警告警告
仅使用经核准为用于此特定手机型号的电池、充电器和配件。 使用任何其它类型可能导致适用于此手机的许可或保修失效,并可能造成危险。
• 不要拆解本机。 当需要维修时,请将手机送往合格的服务技术人员处。
• 远离诸如电视、收音机或个人计算机之类的电器。• 远离诸如暖气片或厨灶之类的热源。
20
• 小心不要让手机摔落。• 不要让手机受到机械振动或撞击。• 在任何有特殊条例要求的区域关闭手机。 例如,请勿在医院使用手
机,因为它可能影响敏感的医疗装置。• 手机充电时,请勿用湿手操作手机。 这可能会导致电击或手机严重
受损。• 请勿在靠近易燃物体的位置充电,因为手机可能因加热而引发火灾。• 用包装材料或乙烯基包装纸包裹手机可能会损坏手机涂层。• 如果手机置于柔软物体之上,请不要充电。• 应将手机放在完全通风的位置充电。• 不要在烟雾或灰尘过多的环境中使用或存放手机。• 不要将手机放在信用卡或卡式车票旁边,它可能会影响磁条上的信
息。• 不要用尖锐物体敲击屏幕,这可能会损坏手机。• 不要将手机暴露在液体或潮气中。• 谨慎使用诸如耳机之类的配件。 在不必要的情况下,不要触摸天
线。
有效的手机操作 有效的手机操作
电子设备电子设备• 在未经允许的情况下,不得在医疗装置附近使用手机。 不要将手机
放在心脏起搏点上,即胸前的口袋内。• 手机可能会对某些助听器造成干扰。• 微弱的干扰可能会影响电视、收音机、电脑等。
公路安全公路安全查阅有关在驾驶时使用手机的本地法律法规。• 不要在驾驶时使用手持式手机。• 将备注力完全集中在驾驶上。• 如果有免提装置,请使用免提装置。• 如果行驶条件需要,请在拨打或接听电话之前将车辆驶离道路并停
车。
21
• 射频能量可能影响车辆内的电子系统,例如立体声音响、安全设备等。
• 如果车辆配备气囊,不要让安装的或便携式的无线设备阻挡气囊。 由于不适当的个人行为,可能造成严重伤害。
• 如果您在外出时使用耳机收听音乐,请确保将音量设置为合理的音量级别,以便注意周围的情况。 在过马路时,尤其要注意这一点。
防止损伤您的听力防止损伤您的听力如果您长时间置于高音环境中,那么您的听力可能会遭到伤害。 因此,我们建议您在开机或关机时不要将手机置于耳边。 同时,我们还建议您将音乐和通话音量设置为合理的音量级别。
爆炸区爆炸区不要在正进行爆炸的地区使用手机。 请依照有关限制,并遵守任何规定或规章。
易爆环境易爆环境• 不要在加油站内使用手机。• 不要在靠近燃料或化学制品处使用手机。• 不要在放有手机和配件的车厢内运输或存放可燃气体、液体或爆炸
品。
在飞机上在飞机上无线设备可能对飞机造成干扰。• 登机前,请关机。• 未经机务人员允许,不得在地面上使用手机。
儿童儿童将手机放在儿童接触不到的安全地方。 手机中包含细小零件,如果脱落可能导致窒息危险。
紧急电话紧急电话并非在所有手机网络中均可使用紧急电话。 因此,您不应仅依赖于手机的紧急呼叫功能。 请向本地的服务提供商核准。
22
电池信息及保养 电池信息及保养 • 您无需在再次充电前对电池进行完全放电。 与其它电池系统不同,
本机电池不具有可能影响电池性能的记忆效应。• 只能使用 LG 电池和充电器。 LG 充电器设计为 大程度地延长电
池使用寿命。• 不要拆解电池组或将其短路。• 保持电池组的金属触点清洁。• 当电池不再提供合乎要求的性能时,请更换电池。 在需要更换之
前,电池组可以反复充电数百次。• 如果电池已经使用很长一段时间,请对电池再次进行充电以保持
佳使用状态。• 不要将电池充电器暴露在直射阳光下,也不要在诸如浴室之类的高
湿环境中使用。• 不要将电池存放在过热或过冷的地方,这可能损害电池的性能。• 替换电池类型不当时可能会有爆炸危险。• 请按制造商的说明处置用过的电池。 如果可能,请循环使用电池。
不要象处理家用废物一样处理电池。• 如果要更换电池,请将其携带至 LG Electronics 授权服务点或经销
商处以寻求帮助。• 手机充好电后,请务必将充电器从墙上插座拔下,以避免不必要的
耗电。• 实际的电池寿命将取决于网络配置、产品设置、使用方式、电池和
环境条件。
23
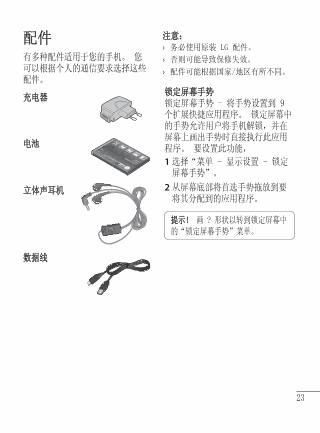
配件配件有多种配件适用于您的手机。 您可以根据个人的通信要求选择这些配件。
充电器充电器
电池电池
立体声耳机立体声耳机
数据线数据线
注意: 注意: 务必使用原装 LG 配件。
否则可能导致保修失效。
配件可能根据国家/地区有所不同。
›››
锁定屏幕手势锁定屏幕手势锁定屏幕手势 - 将手势设置到 9 个扩展快捷应用程序。 锁定屏幕中的手势允许用户将手机解锁,并在屏幕上画出手势时直接执行此应用程序。 要设置此功能,
选择“菜单 - 显示设置 - 锁定屏幕手势”。
从屏幕底部将首选手势拖放到要将其分配到的应用程序。
提示!提示! 画 ? 形状以转到锁定屏幕中的“锁定屏幕手势”菜单。
1
2
24
技术参数技术参数
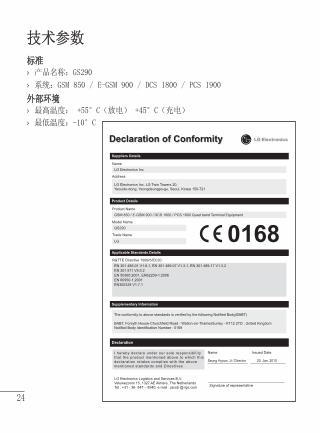
标准标准产品名称:GS290
系统:GSM 850 / E-GSM 900 / DCS 1800 / PCS 1900
外部环境外部环境高温度: +55°C(放电) +45°C(充电)
低温度:-10°C
››
››
25
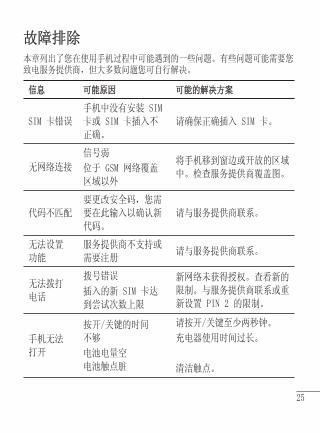
故障排除故障排除本章列出了您在使用手机过程中可能遇到的一些问题。有些问题可能需要您致电服务提供商,但大多数问题您可自行解决。
信息信息 可能原因可能原因 可能的解决方案可能的解决方案
SIM 卡错误
手机中没有安装 SIM
卡或 SIM 卡插入不
正确。
请确保正确插入 SIM 卡。
无网络连接
信号弱
位于 GSM 网络覆盖
区域以外
将手机移到窗边或开放的区域
中。检查服务提供商覆盖图。
代码不匹配
要更改安全码,您需
要在此输入以确认新
代码。
请与服务提供商联系。
无法设置
功能
服务提供商不支持或
需要注册请与服务提供商联系。
无法拨打
电话
拨号错误
插入的新 SIM 卡达
到尝试次数上限
新网络未获得授权。查看新的
限制。与服务提供商联系或重
新设置 PIN 2 的限制。
手机无法
打开
按开/关键的时间
不够
电池电量空
电池触点脏
请按开/关键至少两秒钟。
充电器使用时间过长。
清洁触点。
26
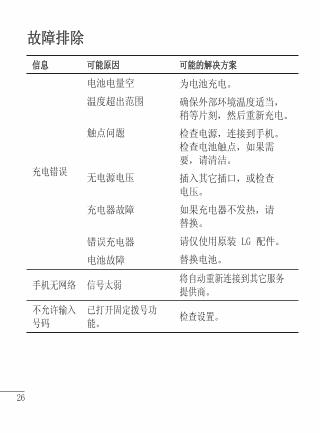
信息信息 可能原因可能原因 可能的解决方案可能的解决方案
充电错误
电池电量空
温度超出范围
触点问题
无电源电压
充电器故障
错误充电器
电池故障
为电池充电。
确保外部环境温度适当,
稍等片刻,然后重新充电。
检查电源,连接到手机。
检查电池触点,如果需
要,请清洁。
插入其它插口,或检查
电压。
如果充电器不发热,请
替换。
请仅使用原装 LG 配件。
替换电池。
手机无网络 信号太弱将自动重新连接到其它服务
提供商。
不允许输入
号码
已打开固定拨号功
能。 检查设置。
故障排除故障排除
GS290 USER GUIDESome of the contents in this manual may differ from your phone depending on the software of the phone or your service provider.

2
MicroSD Card Slot
Volume keys• When the screen is at the
Home screen: Ring tone and Touch tone volume.
• During a call: Earpiece volume.
Handsfree or Stereo earphone connector
Component
Lock key• Short press to turn on/off
the screen.
Camera key• Go to the camera menu
directly by pressing and holding the key.
Charger, cable
EarpieceCall keyDials a phone number and answers incoming calls.
Multi-tasking key
End/ Power keyLong press for power on/off.
3
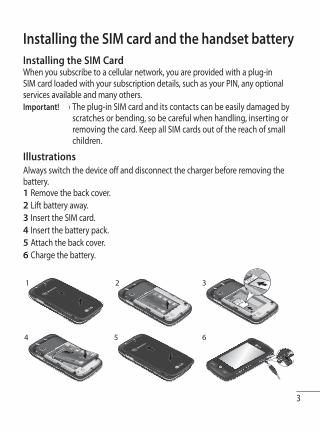
Installing the SIM card and the handset batteryInstalling the SIM CardWhen you subscribe to a cellular network, you are provided with a plug-in SIM card loaded with your subscription details, such as your PIN, any optional services available and many others.Important! › The plug-in SIM card and its contacts can be easily damaged by
scratches or bending, so be careful when handling, inserting or removing the card. Keep all SIM cards out of the reach of small children.
IllustrationsAlways switch the device off and disconnect the charger before removing the battery.
Remove the back cover.Lift battery away.Insert the SIM card.Insert the battery pack.Attach the back cover.Charge the battery.
1 2 3 4 5 6
1 2 3
64 5
4
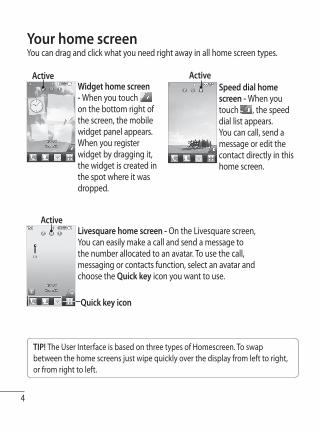
You can drag and click what you need right away in all home screen types.Your home screen
Widget home screen - When you touch on the bottom right of the screen, the mobile widget panel appears. When you register widget by dragging it, the widget is created in the spot where it was dropped.
Active
Livesquare home screen - On the Livesquare screen, You can easily make a call and send a message to the number allocated to an avatar. To use the call, messaging or contacts function, select an avatar and choose the Quick key icon you want to use.
Active
Quick key icon
Speed dial home screen - When you touch , the speed dial list appears. You can call, send a message or edit the contact directly in this home screen.
Active
TIP! The User Interface is based on three types of Homescreen. To swap between the home screens just wipe quickly over the display from left to right, or from right to left.
5
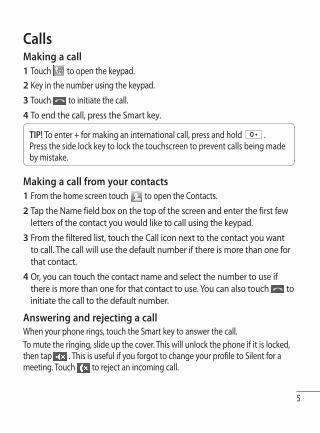
CallsMaking a call
Touch to open the keypad.Key in the number using the keypad. Touch to initiate the call.To end the call, press the Smart key.
TIP! To enter + for making an international call, press and hold . Press the side lock key to lock the touchscreen to prevent calls being made by mistake.
Making a call from your contactsFrom the home screen touch to open the Contacts.Tap the Name field box on the top of the screen and enter the first few letters of the contact you would like to call using the keypad. From the filtered list, touch the Call icon next to the contact you want to call. The call will use the default number if there is more than one for that contact.Or, you can touch the contact name and select the number to use if there is more than one for that contact to use. You can also touch to initiate the call to the default number.
Answering and rejecting a callWhen your phone rings, touch the Smart key to answer the call.To mute the ringing, slide up the cover. This will unlock the phone if it is locked, then tap . This is useful if you forgot to change your profile to Silent for a meeting. Touch to reject an incoming call.
1 2 3 4
1 2
3
4
6
Changing the common call settingTouch Call settings in the SETTINGS tab.Scroll and touch Common settings.
ContactsSearching for a contactThere are two ways to search for a contact:
Touch Contacts in the COMMUNICATION tab. Touch Search.You see a list of contacts. Typing in the first letter of a contact’s name in the Name field will jump the menu to that alphabetical area of the list.
Adding a new contactTouch Contacts in the COMMUNICATION tab and touch Add contact.Choose whether to save the contact to your Handset or SIM.Enter your first and last name.You can enter up to five different numbers per contact. Add an email addresses. You can enter up to two different email addresses per contact.Assign the contact to one or more groups. Touch Save to save the contact.
Changing your contact settingsYou can adapt your contact settings so that your Contacts suits your own preferences.Touch Contacts in the COMMUNICATION tab and touch Settings.
1 2
1 2 3
1 2 3 4 5
6 7
7
MessagingYour GS290 combines SMS and MMS into one intuitive and easy-to-use menu.
Sending a messageTouch Messaging in the COMMUNICATION tab. And touch New message to begin composing a new message.Touch Insert to add an image, video, sound, template and so on.Touch Recipient at the bottom of the screen to enter the recipients. Then enter the number or touch to select a contact. You can even add multiple contacts.Touch Send when ready
WARNING: If an image, video or sound is added to an SMS it will be automatically converted to an MMS and you will be charged accordingly.
Entering textThere are five ways to enter text: Keypad, Keyboard, Handwriting-Screen, Handwriting-Box, Handwriting-Double Box.You can choose your input method by tapping and Input method.Touch to turn on T9 mode. This icon is only shown when you choose Keypad as the input method.Touch to choose the writing language.Touch to change between numbers, symbols and text input. Use Shift key to change between capital or lowercase input.
Handwriting recognitionIn Handwriting mode you simply write on the screen and your GS290 will convert your handwriting into your message. Select Handwriting-Screen or Handwriting-Box or Handwriting- Double Box according to your preferred view.
1
2 3
4
8
Setting up your emailTouch E-mail in the COMMUNICATION tab. If the email account is not set up, start the email set up wizard and finish it.You can check and edit settings by selecting . You can also check the additional settings that were filled in automatically when you created the account.
Changing your email settingsTouch E-mail in the COMMUNICATION tab. Touch and select E-mail settings
Changing your text message settingsTouch Messaging in the COMMUNICATION tab and touch Settings. Select Text message.Text message centre - Enter the details of your message centre.Delivery report - Slide the switch left to receive confirmation that your messages have been delivered.Validity period - Choose how long your messages are stored at the message centre.Message types - Convert your text into Text, Voice, Fax, X.400 or E-mail.Character encoding - Choose how your characters are encoded. This impacts the size of your messages and therefore data charges.Send long text as - Choose to send long messages as Multiple SMS or as an MMS.
For incoming Push email Check Push email:Touch Games & Applications in the Entertainment and then touch Applications.*Attention: Depending on the region or SIM operator, user may not be able to use push e-mail and access WAP (or MMS) simultaneously.
1 2
9
Changing your multimedia message settingsTouch Messaging in the COMMUNICATION tab. Scroll and choose Settings and Multimedia message. Retrieval mode - Choose between Home network or Roaming network. If you then choose Manual you will receive only notifications of MMS and you can then decide whether to download them in full.Delivery report - Choose to request and/or allow a delivery report.Read reply - Choose to request and/or allow a reply.Priority - Choose the priority level of your MMS.Validity period - Choose how long your message is stored at the message centre.Slide duration - Choose how long your slides appear on the screen.Creation mode - Choose your message mode.Delivery time - Choose how long to wait before a message is delivered.Multi msg centre - Choose one from the list or add a new message centre.
Social network services (SNS)Your GS290 has SNS that lets you enjoy and manage your social network. NOTE: An additional costs may be incurred when connecting and using online services. Check your data charges with your network provider.Touch Social network menu and select a site.
TIP! Facebook is a native application preloaded onto your phone, and easy to access. Twitter is a java application based on Java technology. Other applications access to the WAP(Wireless Application Protocol) services.
NOTE: SNS feature is a data intensive application. An additional costs may be incurred when connecting and using online services. Check your data charges with your network provider.
10
Facebook (Continued SNS)Home: Log in and you will see your friend’s updated status. Input your comment about new status or check others. Profile: You can select the Wall > Status updates and write the current status. See your info detail and upload the photo by touching Album > Upload Photo. Friends: Search your friends in facebook by selecting Search tap.Message: You can see the Inbox/Sent folder, and write a SN message.
TIP! Using Facebook Feed WidgetDrag the facebook feed widget from widget tray and touch OK.
If the facebook widget registered on home screen, it will show latest 3 feeds from your SN site. You can also access the facebook application directly by touching up the feed widget.
CameraTaking a quick photo
Press the key on the right side of the phone.When the camera has focused on your subject, touch the on the right-center of the screen to take a photo. You can also press the key on the side of the phone firmly.
TIP! To switch to the camera mode or video mode, slide up/down the camera or video icon on the centre-right of the viewfi nder.
After taking a photoYour captured photo will appear on the screen. The image name is shown with four icons on the right-hand side.
Touch to send the photo as a message, email or via Bluetooth. Touch to set a Home screen, Contacts, Startup or shutdown imagea. Touch to edit the photo.
1 2
11
Touch to rename the photo. Touch to return to the previous menu. Touch to delete the image. Touch to take another photo immediately. Your current photo will be saved. Touch to view a gallery of your saved photos.
Using the advanced settingsFrom the viewfinder, touch to open all advanced settings options.You can change the camera setting by using and displayed in the buttom of the screen and select the option.
Video cameraMaking a quick video
Press the camera key on the right side of the phone for a few seconds.
TIP! To switch to the camera mode or video mode, slide up/down the camera or video icon on the right centre of the viewfinder.
Holding the phone horizontally, point the lens towards the subject of the video.Press the camera key on the phone once to start recording. Or touch the red dot .
Rec will appear at the bottom of the viewfinder with a timer at the bottom showing the length of the video.To pause the video, touch and resume by selecting .Touch on screen or press the a second time to stop recording.
After making a videoA still image representing your captured video will appear on the screen. The name of the video runs along the bottom of the screen together with eight icons down the left and right sides .
1
2
3
4
5 6
12
Touch to play the video. Touch to send the video as a Message or Email or by Bluetooth. Touch to rename the video. Touch to return to the previous menu. Touch to delete the video you have just made and confirm by touching Yes.
The viewfinder will reappear. Touch to shoot another video immediately. Your current video will be saved. Touch to view a gallery of saved videos and images.
Your photos and videosViewing your photos and videos
Touch on the camera preview screen.Your gallery will appear on the screen.Touch the video or photo to open it fully.
Editing your photosOpen the photo you’d like to edit and touch to bring up the options.Touch the icons to alter your photo:
Move your finger across the screen to select the area. Draw something on your photo freehand. Select the line thickness from the four options, then the colour you want to use.
Add writing to the picture. Decorate your photo with stamps. Choose from the different stamps and
colours and touch your photo where you want to place them. Erase whatever you draw. You can also select the eraser size.
Touch to return to the gallery.
1 2 3
1 2
13
Save the changes you have made to the photos. Select to save the changes over the Original file, or as a New file. If you select New file, enter a file name.
Undo the last effect or edit you made to the photo. Touch to open the Filter options.
You can adjust the selected photo.
MusicTo access the music player, touch Music in the ENTERTAINMENT tab. From here, you can access a number of folders:Recently played - Plays the songs you have played recently.All tracks - Contains all the songs you have on your phone except the pre-loaded default music.Artists - Browse through your music collection by artist.Albums - Browse through your music collection by album.Genres - Browse through your music collection by genre.Playlists - Contains all the playlists you have created.Shuffle tracks - Play your tracks in a random order.
Transferring music onto your phoneThe easiest way to transfer music onto your phone is via Bluetooth or the data cable.You can also use LG PC Suite. To transfer music using Bluetooth:
Make sure both devices have Bluetooth switched on and are connected to each other.Select the music file on the other device and select send via Bluetooth.When the file is sent, you will have to accept it on your phone by touching Yes.The file should appear in Music > All tracks.
1
2 3
4

14
MultimediaYou can store multimedia files in your phone’s memory so you have easy access to all your pictures, sounds, videos and games. You can also save your files to a memory card. Using a memory card allows you to free up space in your phone’s memory.To access the Multimedia menu, touch select My stuff from ENTERTAINMENT tab. You can open a list of the folders that store all your multimedia files.
Games and Applications You can download new games and applications to your phone to keep you enjoy.
FM RadioYour LG GS290 has an FM radio feature so you can tune into your favourite stations to listen on the move.You can listen to the radio without headphones. It you want to attach headphones, insert them into the headphone socket.
Searching for stationsYou can tune your phone to radio stations by searching for them either manually or automatically. They will then be saved to specific channel numbers, so you don‘t have to keep re-tuning. To auto tune:
Scroll and touch FM radio in the ENTERTAINMENT tab, then Touch Auto scan. A confirmation message appears. Select Yes, then the stations will be automatically found and allocated to a channel in your phone.
NOTE: You can also manually tune into a station by using and displayed in the centre of the screen. If you press and hold and , the stations will be automatically found.GS290 supports wireless FM. User does not require to insert ear-mic to listen FM in normal condition. In weak FM radio signal area the sensitivity can degrade
1 2
15
with wireless and antenna mode. So it is advisable to insert the ear-mic for better and enhanced FM quality.
UTILITIESAdding an event to your calendar
Touch UTILITIES in the UTILITIES tab and select Calendar.Select the date you would like to add an event to.Touch then Add event.
Setting your alarmTouch Alarms in the UTILITIES tab. Widget alarm should appear in the list as default and you can not delete it.Touch Add alarm.
Voice recorderUse your voice recorder to record voice memos or other audio files.Touch Voice recorder in the UTILITIES tab.
Using your calculatorTouch Tools in the UTILITIES tab.Select Calculator.
Converting a unitTouch Tools in the UTILITIES tab.Select Unit converter.
PC SuiteYou can synchronise your PC with your phone to make sure all your important details and dates match. You can also backup your files to put your mind at ease.
1 2 3
1
2
1 2
1 2
16
Installing the LG PC Suite on your computerFrom the Home screen press and select Connectivity on the SETTINGS tab.Select USB connection mode and click PC Suite.Connect handset and PC via USB cable and wait for a while. Installation guide message will be displayed.Follow the instructions on the screen to complete the LG PC Suite Installer wizard.Once installation is complete, the LG PC Suite icon will appear on your desktop.
Connecting your phone and PCFrom the Home screen press and select Connectivity on the SETTINGS tab.Select USB connection mode. Touch PC Suite.
Using your phone as a Music Sync deviceYour Phone can be used as a Music Sync device for Sync Music Files only.Music Sync can be carried out using Windows Media Player 10/11 and supports both Handset Memory and an External Memory Card.1 Disconnect your phone from your PC. 2 From the Home screen select , then select Connectivity on the SETTINGS
tab. 3 Select USB connection mode. 4 Touch Music sync. 5 Connect the phone to your PC. Your phone will read: Connected.
WARNINGDo not disconnect your phone during the transfer.
1
2 3
4
5
1
2 3
17
Transferring music using Windows Media PlayerFrom the home screen select , then scroll through Connectivity in the SETTINGS tab.Select USB connection mode and choose Music sync.Connect your handset and PC using a compatible USB cable.When you try to connect the handset to your PC, your handset will read: “Music Sync“ followed by Connected.The PC will prompt you to launch your preferred music management software.Select Window Media Player.Go to the Sync Tab, then drag and drop the music you wish to transfer to your handset into the Sync List panel.Click on the Start Sync button. This starts the transfer process.
WARNINGDo not disconnect your phone during the transfer.
The webBrowser gives you a fast, full-colour world of games, music, news, sport, entertainment and loads more, straight to your mobile phone. Wherever you are and whatever you’re into.
Accessing the webTouch the Browser in UTILITIES tab.To go straight to the browser home page, select Home. Alternately, select Enter address and type in the URL, followed by Connect.
NOTE: You will incur extra cost by connecting to these services and downloading content. Check data charges with your network provider.
1
2 3 4
5
6 7
8
1 2
18
Access to Google Service You can launch google services in this application. Touch Google Search in the UTILITIES tab.
SettingsPersonalising your profilesYou can quickly change your profile by touching the Home screen. You can personalise each profile setting using the settings menu.
Touch Profiles in the SETTINGS tab.Choose the profile you want to edit. You can then change all the sounds and alert options available in the list, including your Ringtone and Volume, Message tone settings and more.
Changing your screen settingsTouch Screen settings in SETTINGS tab.
Changing your phone settingsUse the freedom of adapting the GS290 to your own preferences.From the home screen, select then scroll to Phone settings on the SETTINGS tab.
Using memory managerFrom the home screen select then scroll to Phone settings on the SETTINGS tab. Select Memory info.
Changing your connectivity settingsYour connectivity settings have already been set up by your network operator, so you can enjoy your new phone immediately. To change any settings, use this menu:Touch Connectivity in the SETTINGS tab.
1 2 3
19
Anti Theft Mobile TrackerWhen the handset is stolen, handset sends the SMS to the numbers configured by real owner. To activate the ATMT feature, you will need to set ATMT on, and configure the ATMT settings with Owner name and Alternate numbers. Default ATMT code is “000000.”
Sending and receiving your files using BluetoothTo send a file:
Open the file you want to send, typically this will be a photo, video or music file.Choose Send. Choose Bluetooth.If you have already paired the Bluetooth device, your GS290 will not automatically search for other Bluetooth devices. If not, your GS290 will search for other Bluetooth enabled devices within range.Choose the device you want to send the file to.Your file will be sent.
To receive a file:To receive files, your Bluetooth must be both ON and Visible. See Changing your Bluetooth settings below for more information.A message will prompt you to accept the file from the sender. Touch Yes to receive the file.You will see where the file has been saved. For image files, you can choose to View the file or Use as wallpaper. Files will usually be saved to the appropriate folder in My stuff.
Changing your Bluetooth settings:Touch Bluetooth in the SETTINGS tab. And select and choose Settings.
1
2 3
4 5
1
2
3
20
Pairing with another Bluetooth deviceBy pairing your GS290 and another device, you can set up a passcode protected connection.
Check that your Bluetooth is ON and Visible. You can change your visibility in the Settings menu.Touch Search.Your GS290 will search for devices. When the search is completed, Refresh will appear on screen.Choose the device you want to pair with and enter the passcode, then touch OK.Your phone will then connect to the other device, on which you will need to enter the same passcode.Your passcode protected Bluetooth connection is now ready.
Lock screen gestureLock screen gesture - set a gesture to the 9 extended shortcut applications. Gesture in Lock screen allows users to unlock the phone and execute the applications directly as they draw a gesture on the screen. To set up this feature,1 Select Menu - Screen settings - Lock screen gesture2 Drag & drop the prefered gesture from the bottom of the screen to the
applications you want to assign them to.
1
2 3
4
5
6
TIP! Draw ? shape to go to Lock screen gesture menu in the lock screen.

21
Guidelines for safe and effi cient usePlease read these simple guidelines. Not following these guidelines may be dangerous or illegal.
Exposure to radio frequency energyRadio wave exposure and Specific Absorption Rate (SAR) informationThis mobile phone model GS290 has been designed to comply with applicable safety requirements for exposure to radio waves. These requirements are based on scientific guidelines that include safety margins designed to assure the safety of all users, regardless of age and health.
• The radio wave exposure guidelines employ a unit of measurement known as the Specific Absorption Rate, or SAR. Tests for SAR are conducted using standardised methods with the phone transmitting at its highest certified power level in all used frequency bands.
• While there may be differences between the SAR levels of various LG phone models, they are all designed to meet the relevant guidelines for exposure to radio waves.
• The SAR limit recommended by the International Commission on Non-Ionising Radiation Protection (ICNIRP) is 2W/kg averaged over 10g of tissue.
• The highest SAR value for this model phone tested by DASY4 for use close to the ear is 0.993 W/kg (10g) and when worn on the body is 0.543 W/kg (10g).
• SAR data information for residents in countries/regions that have adopted the SAR limit recommended by the Institute of Electrical and Electronics Engineers (IEEE), which is 1.6 W/kg averaged over 1g of tissue.
22
Product care and maintenance
WARNINGOnly use batteries, chargers and accessories approved for use with this particular phone model. The use of any other types may invalidate any approval or warranty applying to the phone, and may be dangerous.
• Do not disassemble this unit. Take it to a qualified service technician when repair work is required.
• Keep away from electrical appliances such as TVs, radios, and personal computers.
• The unit should be kept away from heat sources such as radiators or cookers.• Do not drop.• Do not subject this unit to mechanical vibration or shock.• Switch off the phone in any area where you are required by special
regulations. For example, do not use your phone in hospitals as it may affect sensitive medical equipment.
• Do not handle the phone with wet hands while it is being charged. It may cause an electric shock and can seriously damage your phone.
• Do not charge a handset near flammable material as the handset can become hot and create a fire hazard.
• Use a dry cloth to clean the exterior of the unit (do not use solvents such as benzene, thinner or alcohol).
• Do not charge the phone when it is on soft furnishings.• The phone should be charged in a well ventilated area.• Do not subject this unit to excessive smoke or dust.• Do not keep the phone next to credit cards or transport tickets; it can affect
the information on the magnetic strips.• Do not tap the screen with a sharp object as it may damage the phone.• Do not expose the phone to liquid or moisture.• Use the accessories, like earphones, cautiously. Do not touch the antenna
unnecessarily.
23
Efficient phone operation Electronic devices• Do not use your mobile phone near medical equipment without requesting
permission. Avoid placing the phone over pacemakers, i.e. in your breast pocket.
• Some hearing aids might be disturbed by mobile phones.• Minor interference may affect TVs, radios, PCs, etc.
Road safetyCheck the laws and regulations on the use of mobile phones in the area when you drive.• Do not use a hand-held phone while driving.• Give full attention to driving.• Use a hands-free kit, if available.• Pull off the road and park before making or answering a call if driving
conditions so require.• RF energy may affect some electronic systems in your vehicle such as car
stereos and safety equipment.• When your vehicle is equipped with an air bag, do not obstruct it with
installed or portable wireless equipment. It can cause the air bag to fail or cause serious injury due to improper performance.
• If you are listening to music whilst out and about, please ensure that the volume is at a reasonable level so that you are aware of your surroundings. This is particularly important when near roads.
Avoid damage to your hearingDamage to your hearing can occur if you are exposed to loud sound for long periods of time. We therefore recommend that you do not turn the handset on or off close to your ear. We also recommend that music and call volumes are set to a reasonable level.
24
Blasting areaDo not use the phone where blasting is in progress. Observe restrictions, and follow the rules and regulations.
Potentially explosive atmospheres• Do not use the phone at a refuelling point.• Do not use near fuel or chemicals.• Do not transport or store flammable gas, liquid, or explosives in the same
compartment of your vehicle as your mobile phone and accessories.
In aircraftWireless devices can cause interference in aircraft.• Turn your mobile phone off before boarding any aircraft.• Do not use it on the ground without permission from the crew.
ChildrenKeep the phone in a safe place out of the reach of small children. It includes small parts which may cause a choking hazard if detached.
Emergency callsEmergency calls may not be available with all mobile networks. Therefore, you should never depend solely on the phone for emergency calls. Check with your local service provider.
Battery information and care • You do not need to completely discharge the battery before recharging.
Unlike other battery systems, there is no memory effect that could compromise the battery’s performance.
• Use only LG batteries and chargers. LG chargers are designed to maximise the battery life.
• Do not disassemble or short-circuit the battery pack.• Keep the metal contacts of the battery pack clean.
25
• Replace the battery when it no longer provides acceptable performance. The battery pack may be recharged hundreds of times until it needs replacing.
• Recharge the battery if it has not been used for a long time to maximise usability.
• Do not expose the battery charger to direct sunlight or use it in high humidity, such as in the bathroom.
• Do not leave the battery in hot or cold places, this may deteriorate the battery performance.
• There is a risk of explosion if the battery is replaced by an incorrect type.• Dispose off used batteries according to the manufacturer’s instructions.
Please recycle when possible. Do not dispose as household waste.• If you need to replace the battery, take it to the nearest authorised LG
Electronics service point or dealer for assistance.• Always unplug the charger from the wall socket after the phone is fully
charged to save unnecessary power consumption of the charger.• Actual battery life will depend on network configuration, product settings,
usage patterns, battery and environmental conditions.
26
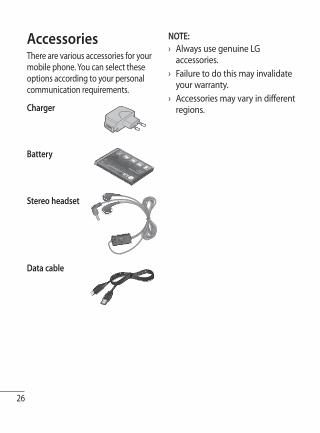
AccessoriesThere are various accessories for your mobile phone. You can select these options according to your personal communication requirements.
Charger
Battery
Stereo headset
Data cable
NOTE: Always use genuine LG accessories.Failure to do this may invalidate your warranty.Accessories may vary in different regions.
›
›
›
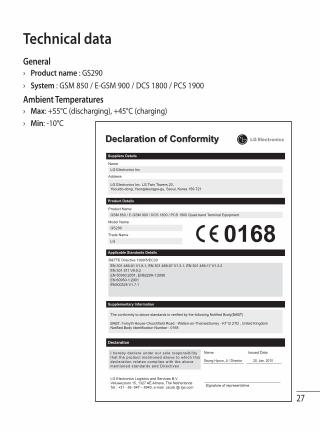
27
Technical dataGeneral
Product name : GS290System : GSM 850 / E-GSM 900 / DCS 1800 / PCS 1900
Ambient TemperaturesMax: +55°C (discharging), +45°C (charging)Min: -10°C
››
››
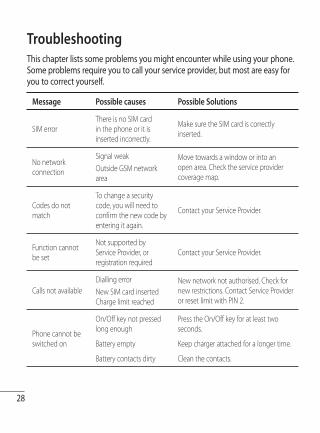
28
Troubleshooting This chapter lists some problems you might encounter while using your phone. Some problems require you to call your service provider, but most are easy for you to correct yourself.
Message Possible causes Possible Solutions
SIM error There is no SIM card in the phone or it is inserted incorrectly.
Make sure the SIM card is correctly inserted.
No network connection
Signal weakOutside GSM network area
Move towards a window or into an open area. Check the service provider coverage map.
Codes do not match
To change a security code, you will need to confirm the new code by entering it again.
Contact your Service Provider.
Function cannot be set
Not supported by Service Provider, or registration required
Contact your Service Provider.
Calls not available Dialling errorNew SIM card inserted Charge limit reached
New network not authorised. Check for new restrictions. Contact Service Provider or reset limit with PIN 2.
Phone cannot be switched on
On/Off key not pressed long enough
Battery empty
Battery contacts dirty
Press the On/Off key for at least two seconds.
Keep charger attached for a longer time.
Clean the contacts.
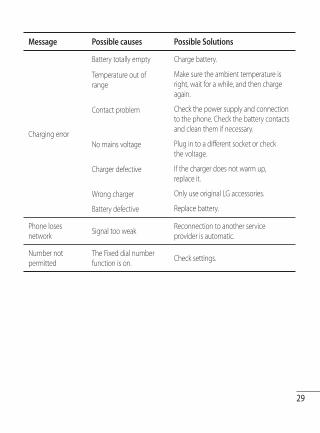
29
Message Possible causes Possible Solutions
Charging error
Battery totally empty
Temperature out of range
Contact problem
No mains voltage
Charger defective
Wrong charger
Battery defective
Charge battery.
Make sure the ambient temperature is right, wait for a while, and then charge again.
Check the power supply and connection to the phone. Check the battery contacts and clean them if necessary.
Plug in to a different socket or check the voltage.
If the charger does not warm up, replace it.
Only use original LG accessories.
Replace battery.
Phone loses network Signal too weak Reconnection to another service
provider is automatic.
Number not permitted
The Fixed dial number function is on. Check settings.

Memo

Memo

Memo